Lab: Discover Getting Started With Kibana — Elastic
Navigating The Discover App
Lab: Discover Getting Started With Kibana — Elastic
Navigating The Discover App
- Navigate to Discover.
1–1. Select the Discover button under Analytics in Kibana.

Analytics Tab in Homepage of Kibana

Discover Tab in Analytics Section
Alternatively we can navigate to the hamburger menu and select Discover under Analytics.

Hamburger Menu, Analytics Section and Discover Tab
- Adjust the Time Picker.
2–1. Adjust the time picker by selecting the Calendar, then Day 0 under Commonly Used. Kibana will automatically refresh and update the page when picking a commonly used time range.

Time Picker
- Observe the available Data view.
3–1. Select the Data view dropdown to observe which data views are available and select ecs-zeek-* .

ecs-zeek- Dataview Selected*
- Review document results via built-in histogram.
4–1. Observe the number of total hits on the documents tab. Hover our cursor over the largest green bar to see the document count for the first time bucket in the histogram. Click on the largest green bar.

Histogram with Count of Records of Largest Green Bar
4–2. Observe how our time range has changed to focus on the specific time range we choose from the histogram.

After Clicking the Largest Green Bar
Select Day 0 again to set our time picker to our original range

For Setting Time Picker to Original Range
Getting Started With Filters
- Apply filters to gain additional insight about the data.
1–1. Select the Data View dropdown to observe which data views are available and select ecs-zeek-*.
ecs-zeek- Dataview Selected*
1–2. To create a filter from the Available Fields list, select the name of any field to get a preview of the top 10 results. These results are calculated based on 5,000 sample records from the data view. In this example, we will use source.address. Select the plus sign (+) next to one of the values to filter for it.

Filtering by Value of Source Address
Our filter will now appear under the query bar. To remove this filter, select the X.

For Removing Filter
1–3. Let’s create this filter in a different way. Select (+). Then select a field in the field drop-down menu. Next, select the is operator, and an available value. Finally, select Add Filter. This new filter will produce the same results as the one created in step 1–1.

Another Method for Applying Filter
- Inspect individual documents from the filtered results.
2–1. Expand one of the documents in the document table by selecting the arrow at the left of its row.

Arrow from which document Expand
2–2. Observe the fields and value data associated with this document and hover over the Value column to view the options available.

Available Options by Hover Over the Value Column
2–3. Choose an interesting field, and select the minus sign (-) while hovering over the value to filter the value out. This will exclude all results that match the filter.

Filter for Excluding
- Leverage the query menu to apply different filter options.
3–1. We should now have two filters applied. Select the query menu button above the filters.

Query Menu
3–2. Select Apply to all to view changes that can be applied to every filter simultaneously.

Applying Filter to All
The options available are:
- Enable all: Enable any disabled filters.
- Disable all: Disable any enabled filters.
- Invert inclusion: Invert the inclusion/exclusion of all filters.
- Pin all: All filters will stay in your filter bar and be applied to any Dashboards, Visualizations, etc., that you navigate to until unpinned.
- Unpin all: All filters will be unpinned from the filter bar.
The example below would Pin all filters across apps in Kibana.

Pin all Filters
- Observe the options available for individual filters.
4–1. Select one of the filters to observe the options available.
- Pin across all apps: Filters will stay in your filter bar and be applied to any Dashboards, Visualizations, etc., that you navigate to until unpinned.
- Edit filter: Change filter, operators, value, add additional filters, and custom labels.
- Exclude results/Include results: Exclude or invert the filter from search results.
- Temporarily disable/Re-enable: Disable or re-enable filters.
- Delete: Remove the filter.

Options by Selecting Any Applied Filter
- Inspect a new document with the new filters applied.
5–1. Expand a new document from the updated results.

Expanding a Document from the Updated Results.
5–2. Hover over the Value column menu and choose the Toggle column in table option for a different field to view it as a column in the table.

Toggle Column in Table Option
5–3. We will see that the new column has been added to the results table. Adjust the size of your columns, if needed, by dragging the edges of each column.

Table After Toggling Column
5–4. Click on the three dots next to the field name. A popup menu will give you options for sorting by the field, moving the field, and removing the field, as well as some column-specific options such as copying the field name or value to the clipboard. Select the X to remove this column.

For Removing Column
We can also add columns to the view by hovering over a field in the Available Fields list and selecting the plus sign (+).

Alternate Method to Add Column in Table
Exploring Data In Discover
*Question 1: Navigate to the Discover module. How many documents are displayed when you set the following options? Data View: ecs- Date/Time: Sep 1, 2018 (Day 1) Answer: **104117
First we navigate to Discover Section.

Navigating to Discover
Select Data View and Time as given, we can see the number of documents.

No. of Documents as per given Criteria
*Question 2: How many documents are displayed when you set the following options? Data View: ecs- Date/Time: Aug 1, 2018 (Day 0) Answer:** 185595
Select Data View and Time as given, we can see the number of documents.

No. of Documents as per given Criteria
*Question 3: How many documents are displayed when you set the following options? Data View: ecs-zeek- Date/Time: Aug 1, 2018 (Day 0) Answer:** 106299
Select Data View and Time as given, we can see the number of documents.

No. of Documents as per given Criteria
Question 4: Sort the timestamp Old to New and expand the first document, what is the value for the _id field?
Answer: iN0YZooB4Qc_-UiFNdcR
First we sort the timestamp from old to new.

Sorting Documents according to Time from Old to New
By expanding the the first document we can see its _id.

_id of First Document
Question 5: While keeping the date/data view from the last question, what time did the first document/record get logged at? Answer: 11:01:48
By keeping date/data view from above question, we can see the time of the first document.

Time of First Document
Question 6: What data view would you select to limit the results to only Suricata logs? Answer: ecs-suricata-*
By Selecting mentioned data view we can select to limit the results to only Suricata logs.

Data View for Suricata Logs
Question 7: What data view would you select to limit the results to only Zeek logs? Answer: ecs-zeek-*
By Selecting mentioned data view we can select to limit the results to only Zeek logs.

Data View for Zeek Logs
Question 8: What data view would you select to limit the results to all ECS formatted logs? Answer: ecs-*
By Selecting mentioned data view we can select to limit the results to all ECS formatted logs.
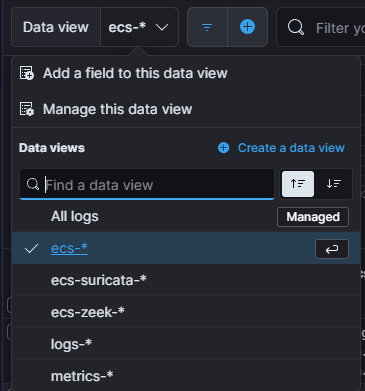
Data View for all ECS Formatted Logs
메타데이터
- post_id
- b02a5f75e7d9
- slug
- lab-discover-getting-started-with-kibana-elastic-b02a5f75e7d9
- url
- https://medium.com/@malikmuhammadusman97/lab-discover-getting-started-with-kibana-elastic-b02a5f75e7d9
- canonical_url
- https://medium.com/@malikmuhammadusman97/lab-discover-getting-started-with-kibana-elastic-b02a5f75e7d9
- author_url
- https://medium.com/@malikmuhammadusman97
- status
- ok
- fetched_at
- 2026-07-13 14:23:43