Day-20: Kubernetes Error : FailedScheduling
Error: Pod stuck in Pending state with FailedScheduling
Day-20: Kubernetes Error : FailedScheduling
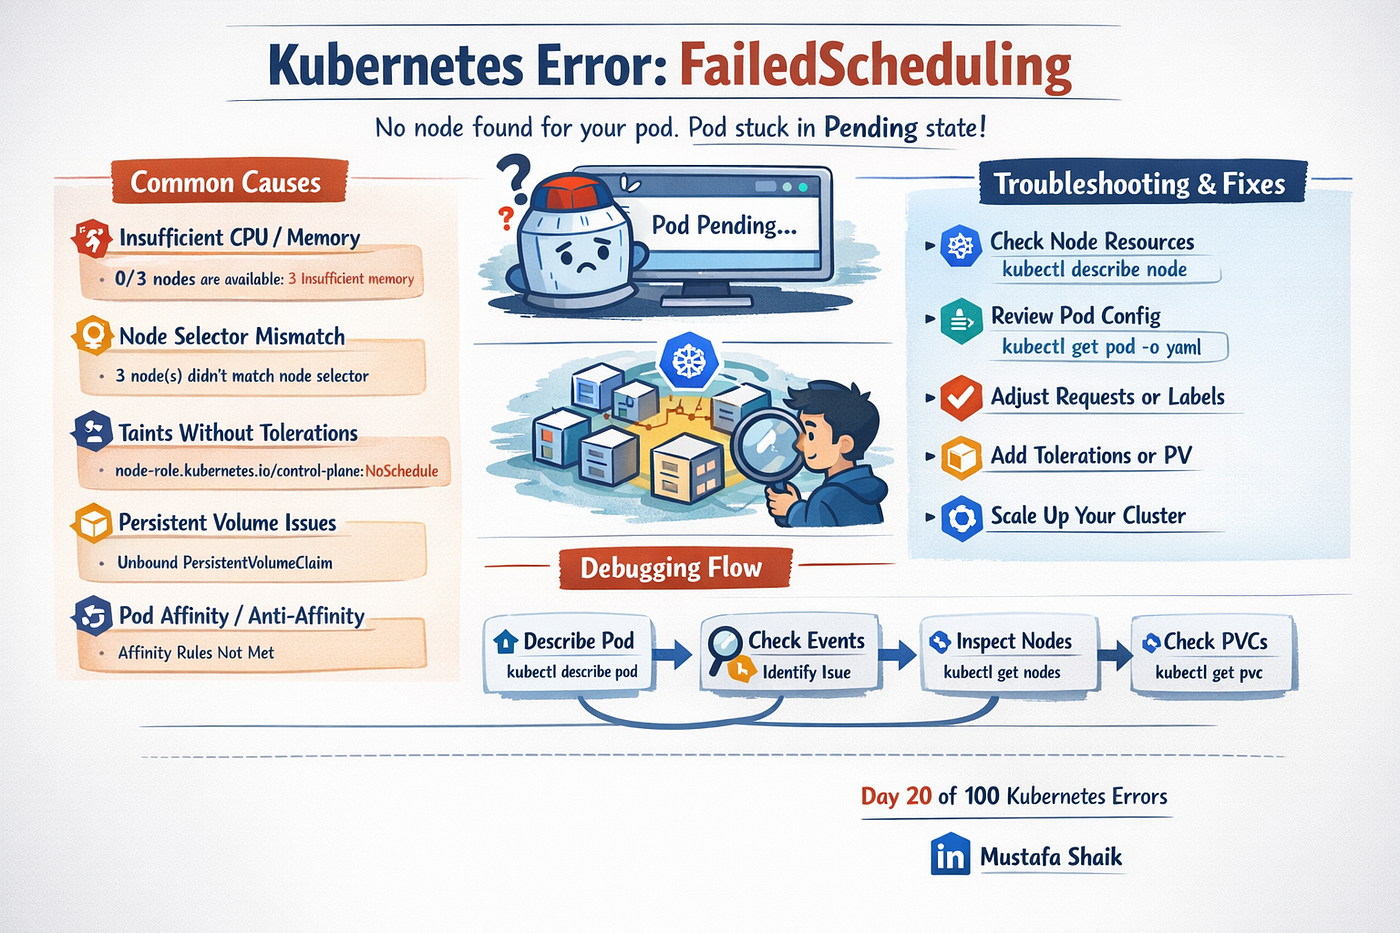
Error: Pod stuck in
Pendingstate withFailedScheduling
🚨 Scenario
You deploy a new application:
kubectl apply -f deployment.yamlEverything looks fine… until you run:
kubectl get podsAnd you see:
my-app-7f6d9c7b8d-xyz 0/1 Pending 0 2mHmm.
You describe the pod:
kubectl describe pod my-app-7f6d9c7b8d-xyzAnd at the bottom you see:
Warning  FailedScheduling  default-scheduler
0/3 nodes are available:
3 Insufficient memory.
Or maybe:
0/3 nodes are available:
3 node(s) had taint {node-role.kubernetes.io/control-plane: NoSchedule}
Or:
0/3 nodes are available:
3 node(s) didn't match node selector.
This is where today’s topic begins 👇
What is FailedScheduling?
FailedScheduling means:
Kubernetes could not find a suitable node to run your pod.
The scheduler evaluated all nodes and said: “Nope. This pod doesn’t fit anywhere.”
Your pod stays in Pending state until the issue is resolved.
🔍 Common Real-Time Causes & Fixes
Let’s break down real-world scenarios you’ll actually face.
1️⃣ Insufficient CPU or Memory
🔎 Error
0/3 nodes are available: 3 Insufficient memory.💡 Why This Happens
Your pod requests more resources than any node can provide.
Example:
resources:
  requests:
    memory: "4Gi"
    cpu: "2"
But your nodes only have:
- 2Gi free memory
- 1 CPU available
Scheduler says ❌
🛠 Troubleshooting Steps
Check node capacity:
kubectl describe node <node-name>Or:
kubectl top nodesCheck pod requests:
kubectl get pod <pod-name> -o yamlLook under:
resources:
  requests:
✅ Solutions
- Reduce resource requests
- Scale your cluster (add nodes)
- Enable Cluster Autoscaler (recommended in production)
2️⃣ Node Selector Mismatch
🔎 Error
0/3 nodes are available:
3 node(s) didn't match node selector.
💡 Why This Happens
Your pod specifies:
nodeSelector:
  environment: production
But your nodes are labeled:
environment=devScheduler cannot match label → pod stays Pending.
🛠 Troubleshooting
Check pod nodeSelector:
kubectl get pod <pod-name> -o yamlCheck node labels:
kubectl get nodes --show-labels✅ Fix
Either:
- Correct the label in deployment
- Or label the node properly:
kubectl label nodes <node-name> environment=production3️⃣ Taints Without Tolerations
This one confuses many beginners.
🔎 Error
node(s) had taint {key=value: NoSchedul💡 Why This Happens
Your node is tainted:
kubectl describe node <node-name>You see:
Taints: node-role.kubernetes.io/control-plane:NoScheduleKubernetes protects that node from regular workloads.
Your pod does not tolerate this taint.
🛠 Fix Option 1: Add Toleration
tolerations:
- key: "node-role.kubernetes.io/control-plane"
  operator: "Exists"
  effect: "NoSchedule"
🛠 Fix Option 2: Remove Taint (Not recommended in prod)
kubectl taint nodes <node-name> node-role.kubernetes.io/control-plane:NoSchedule-4️⃣ Persistent Volume Issues
🔎 Error
pod has unbound immediate PersistentVolumeClaims💡 Why This Happens
Your pod needs storage, but:
- PVC is not bound
- StorageClass missing
- No PV available
🛠 Troubleshooting
Check PVC:
kubectl get pvcDescribe it:
kubectl describe pvc <pvc-name>If status is:
PendingThat’s your root cause.
✅ Fix
- Create matching PV
- Check StorageClass
- Verify dynamic provisioning works
5️⃣ Pod Anti-Affinity / Affinity Rules
Advanced but very common in production.
🔎 Error
node(s) didn't match pod affinity/anti-affinity rules💡 Why This Happens
You configured something like:
affinity:
  podAntiAffinity:
But cluster doesn’t have enough nodes to satisfy the rule.
For example:
- You want pods on separate nodes
- But you only have 1 node
Scheduler cannot comply.
✅ Fix
- Add more nodes
- Relax affinity rules
- Change
requiredDuringSchedulingtopreferredDuringScheduling
🧠 How the Scheduler Actually Thinks
When you create a pod:
- Scheduler checks all nodes
- Filters out invalid ones (taints, resources, selectors)
- Scores remaining nodes
- Picks best candidate
If no nodes survive filtering, you get:
FailedScheduling🔥 Production-Level Debugging Flow
When you see Pending + FailedScheduling, follow this exact flow:
kubectl describe pod <pod-name>⬇ Check Events section ⬇ Identify specific reason ⬇
Then check:
kubectl get nodeskubectl describe nodekubectl get pvckubectl top nodes
📌 What’s Next
This is Day 19 of 100 Kubernetes Errors
Next up: 👉 Liveness probe failed
If you found this article helpful, connect me on Linkedin : Mustafa Shaik
메타데이터
- post_id
- b2448aef6e6b
- slug
- day-20-kubernetes-error-failedscheduling-b2448aef6e6b
- url
- https://medium.com/@shaikmustafa8991/day-20-kubernetes-error-failedscheduling-b2448aef6e6b
- canonical_url
- https://medium.com/@shaikmustafa8991/day-20-kubernetes-error-failedscheduling-b2448aef6e6b
- author_url
- https://medium.com/@shaikmustafa8991
- status
- ok
- fetched_at
- 2026-08-17 09:41:18