Introduction to VSperf:
In this shift from PNFs to VNFs in the new NFV world it was really important to achieve high performance from VNFs. Moreover, the NFVI was…
Introduction to VSperf:
In this shift from PNFs to VNFs in the new NFV world it was really important to achieve high performance from VNFs. Moreover, the NFVI was supposed to meet the demand of these VNFs for the high-performance data plane. This lead to the housing of many performance benchmarking projects in OPNFV(Open Platform for NFV). One such project is VSperf.
What is VSperf?
VSperf (Virtual Switch Performance) is an open-source project in OPNFV for benchmarking data-plane performance. The core idea is to benchmark the network infrastructure build using vSwitches on high-performance servers with repeatable tests.
VSperf is a completely automated test framework written in python. User can specify VNF to benchmark, vSwitch network to use(dpdk, vpp, OvS,..), a scenario for deploying VNF and type of benchmarks/tests to perform with a config-file as the argument. Everything is automated and no other installer is required.
VSperf and the Standards
RFC 8204
RFC 8204: Benchmarking Virtual Switches in Open Platform for NFV (OPNFV) was developed with VSperf for benchmarking vSwitches for data-plane performance.
LTD Test Spec
VSperf has LTD(Level Test Design) Test Specification which describes some of the relevant benchmarks for vSwitches. VSperf has developed these specs by adopting previous standards for physical switches and applying them to vSwitches.
ETSI NFV TST 009
VSperf has played significant contributions in giving feedback to ETSI NFV TST 009.
VSperf Test Setup
In OPNFV VSperf has access to POD12. The VSperf test setup on POD12 looks like:
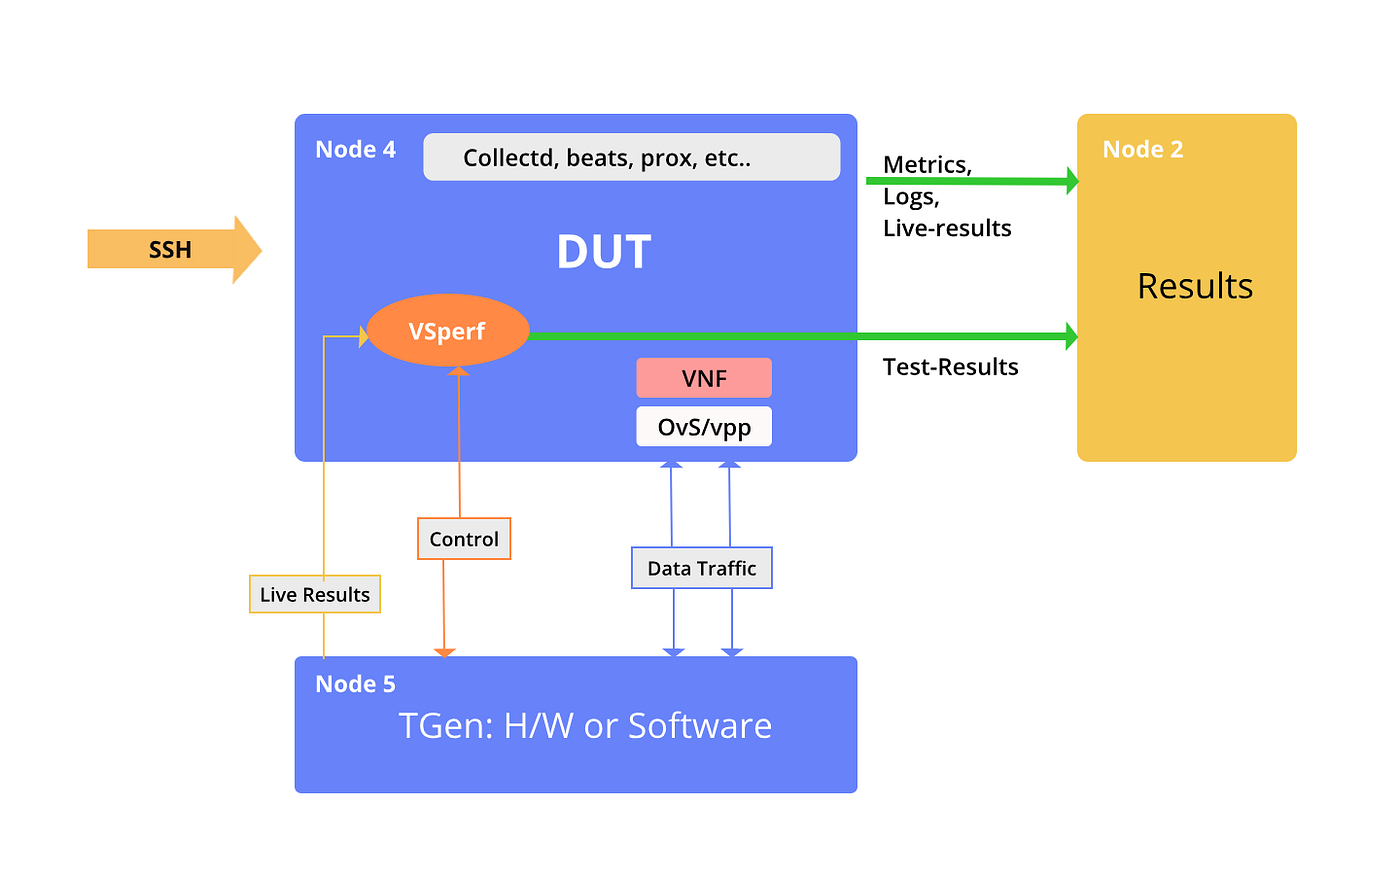
VSperf Test Setup
VSperf runs on DUT(Device Under Test) with some collectors. VSperf then setups required VNFs with OvS and establishes a connection with TrafficGen. When tests are run, results from TrafficGen, Collectors are sent to Result Machine.
Working of VSperf:
We can run tests for phy2phy_tput(Physical to Physical Throughput) by using the command:

This calls VSperf python script which looks for default settings in /conf directory(in VSperf codebase) and automatically sets up the test environment. Settings related to traffic and scenario are specified by us in conf-file passed as argument which we will discuss later.
VSperf uses these configurations and runs tests. We can divide the whole workflow into 5 parts:
- Setting up a Test environment on DUT
- Connecting to Traffic-gen
- Starting Tests and performing Binary Search
- Running Tests and Generating Results
- Cleaning up
Setting up a Test environment on DUT
Vsperf validates all config files and then starts setting up various components for the tests. It starts vswitches, VNFs, dpdk, vpp, collectors, etc.. using its controllers.
Connecting to Traffic-gen
Once DUT is ready, VSperf establishes a connection with Traffic-generator. Traffic-generator may be physical or virtual(running inside VM). VSperf supports various Traffic-generators like IXIA, Monogen, T-rex, Xena, etc.
Starting Tests and performing Binary Search
Once, VSperf establishes a connection with Traffic-gen it sends the traffic information for the test to Traffic generator. Then, Binary Search is run with Traffic generator to find the required Throughput.
Running Tests and Generating Results
Throughput obtained by running a binary search is used to run all required test specified in conf-file and benchmarking results are generated.
These benchmarking results are then stored by VSperf in result directory(defaults to /tmp). VSperf creates a csv file, a markdown file and a restructured test file(rst) with the final results. VSperf also stores all the metrics collected and logs collected. VSperf project also has a docker-compose file for result containers where VSperf test results can be pushed and analysed.
Cleaning Up
Once all test jobs are completed VSperf cleans everything automatically.
Conf-file Example:
[embed]VSperf config file example
The above conf-file is self-explanatory. It tells VSperf that vSwitch Bridge’s name is ‘vsperf-br0’s. Traffic-gen to use is T-rex and it’s IP address is 10.10.120.25. Bandwidth is 10Gbps. Each traffic will be sent for a 30-sec duration. The tests will be performed for 64 bytes packets and 1024 bytes packets. VNF configurations has an image of VNF to use, CPU Core to which this VNF will be pinned are 8 and 9.
You can make your config file manually or generate one using vsperf wizard.
메타데이터
- post_id
- b2a6ec1838f6
- slug
- introduction-to-vsperf-b2a6ec1838f6
- url
- https://medium.com/@parthyadav3105/introduction-to-vsperf-b2a6ec1838f6
- canonical_url
- https://medium.com/@parthyadav3105/introduction-to-vsperf-b2a6ec1838f6
- author_url
- https://medium.com/@parthyadav3105
- status
- ok
- fetched_at
- 2026-08-06 23:09:27