NTTData second interview: Why can Spring Boot JARs run directly?
Why Can Spring Boot JARs Run Directly? The Question That Ended a NTT Data Interview
NTTData second interview: Why can Spring Boot JARs run directly? I said it’s because it has an embedded Tomcat container, and he told me to turn left and leave.
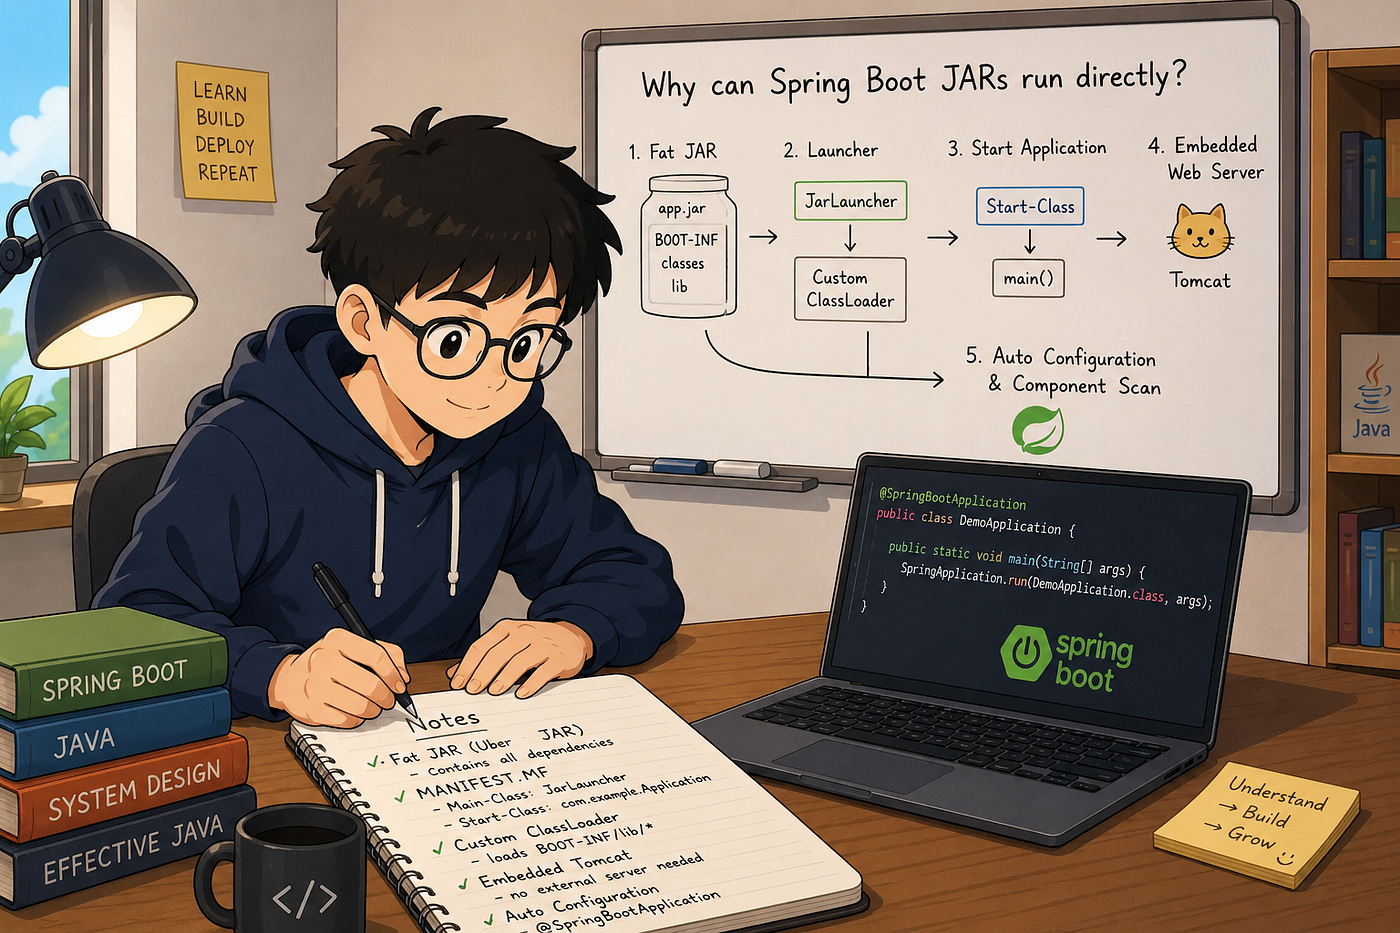
AI image
Why Can Spring Boot JARs Run Directly? The Question That Ended a NTT Data Interview
“Why can Spring Boot JARs run directly?”
During a Ntt Data interview, I confidently replied:
“Because Spring Boot has an embedded Tomcat container.”
The interviewer smiled and said:
“Turn left and leave.”
While the answer wasn’t completely wrong, it barely scratched the surface.
The embedded Tomcat is only one piece of a much larger architecture. The real magic lies in how Spring Boot packages applications, bootstraps the JVM, loads dependencies, and configures itself at runtime.
In this article, we’ll dive deep into what actually happens when you execute:
java -jar my-application.jarBy the end, you’ll understand exactly why Spring Boot applications can run as standalone executables without installing Tomcat or configuring complex classpaths.
The Traditional Java Deployment Model
Before Spring Boot, deploying a Java web application involved several manual steps.
A typical workflow looked like this:
Compile Code
      │
      ▼
Package as WAR
      │
      ▼
Install Apache Tomcat
      │
      ▼
Copy WAR into webapps/
      │
      ▼
Configure Server
      │
      ▼
Start Tomcat
Developers had to worry about:
- Installing the correct server version
- Managing dependency conflicts
- Setting classpaths
- Server configuration
- Environment consistency
A missing JAR could easily result in:
java.lang.ClassNotFoundExceptionor
NoClassDefFoundErrorDeployment was often more difficult than development itself.
Spring Boot Changed Everything
Spring Boot introduced a radically simpler deployment model.
Instead of deploying a WAR into Tomcat, you simply package your application as an executable JAR.
mvn clean package

java -jar application.jar
That’s it.
No external server.
No manual classpath.
No deployment directory.
Just a single executable file.
But how?
The Secret Begins with the Fat JAR
Spring Boot creates what’s called a Fat JAR (also known as an Uber JAR).
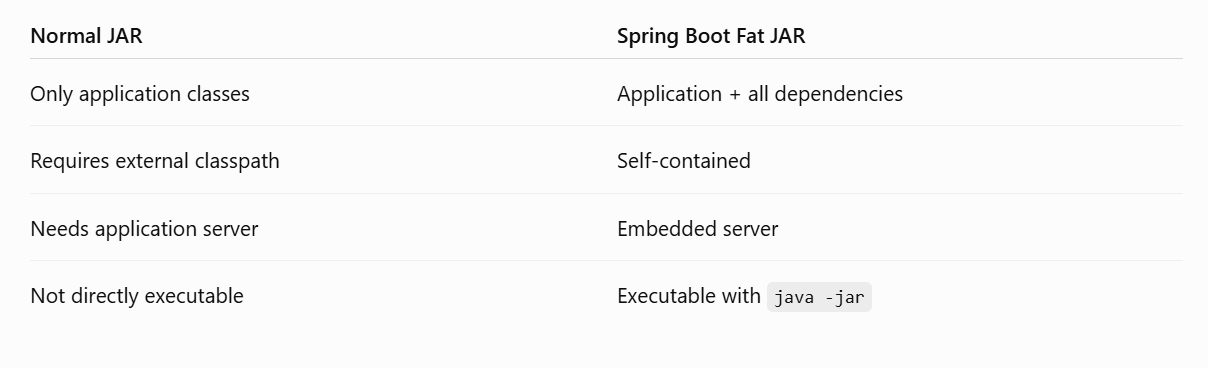
Unlike a normal JAR, it contains:
- Your application classes
- Spring Framework
- Spring Boot
- Tomcat/Jetty/Undertow
- Third-party libraries
- Resources
- Metadata
Everything needed to run the application exists inside one file.
Think of it like shipping an entire apartment instead of asking someone to assemble furniture after delivery.
Normal JAR vs Fat JAR
Packaging Process
Spring Boot relies on the Spring Boot Maven Plugin (or Gradle plugin).
<plugin>
    <groupId>org.springframework.boot</groupId>
    <artifactId>spring-boot-maven-plugin</artifactId>
</plugin>
During packaging:
mvn packagethe plugin performs an additional step:
repackageInstead of generating a normal JAR, it reorganizes the archive into a Spring Boot executable JAR.
What’s Inside a Spring Boot JAR?
If you unzip a Spring Boot application, you’ll see something like this:
application.jar
│
├── META-INF
│      └── MANIFEST.MF
│
├── BOOT-INF
│      ├── classes
│      └── lib
│
└── org
       └── springframework
             └── boot
                  └── loader
Let’s understand each part.
META-INF/
Contains metadata.
Most importantly:
MANIFEST.MFBOOT-INF/classes
Contains:
- Your compiled classes
- application.properties
- static files
- templates
- resources
Essentially everything belonging to your project.
BOOT-INF/lib
Contains every dependency.
Example:
spring-context.jar

spring-web.jar

spring-core.jar

tomcat-embed-core.jar

jackson-databind.jar

hibernate-core.jar
No external Maven repository is required at runtime.
org/springframework/boot/loader
This folder contains Spring Boot’s custom launcher classes.
These classes make executable JARs possible.
The MANIFEST.MF File
A normal executable JAR contains something like:
Main-Class: com.example.ApplicationSpring Boot is different.
Example:
Main-Class:
org.springframework.boot.loader.launch.JarLauncher

Start-Class:
com.example.Application
Notice something interesting?
Your application is not the Main-Class.
Instead,
JarLauncherstarts first.
Why?
Because Java cannot load nested JAR files by default.
Spring Boot solves this problem with a custom launcher.
What Happens When You Execute java -jar?
When you run
java -jar application.jarthe JVM performs these steps.
JVM
 │
 ▼
Read MANIFEST.MF
 │
 ▼
Load JarLauncher
 │
 ▼
Create custom ClassLoader
 │
 ▼
Load BOOT-INF/lib/*
 │
 ▼
Load BOOT-INF/classes
 │
 ▼
Find Start-Class
 │
 ▼
Invoke main()
Everything starts from JarLauncher.
Why Doesn’t the JVM Load Nested JARs?
Imagine this structure:
application.jar

├── lib
        ├── spring.jar
        ├── jackson.jar
        └── mysql.jar
The standard JVM class loader cannot directly read JAR files inside another JAR.
It only understands:
Directory

or
Standalone JAR
Spring Boot therefore provides its own class loader.
Spring Boot’s Custom ClassLoader
Spring Boot creates a specialized class loader that:
- Reads nested JARs
- Builds the classpath dynamically
- Loads application classes
- Loads dependencies
- Starts the real application
This is one of the biggest reasons executable Spring Boot JARs work.
Without this loader, nested dependencies would be invisible to the JVM.
The Startup Flow
The startup process looks like this:
java -jar
      │
      ▼
JarLauncher
      │
      ▼
Create LaunchedURLClassLoader
      │
      ▼
Read BOOT-INF/lib
      │
      ▼
Load Dependencies
      │
      ▼
Read Start-Class
      │
      ▼
Invoke SpringApplication.run()
Only after this process does your main() method execute.
Embedded Web Server
Now comes the part most developers already know.
When you include:
<dependency>
    <groupId>org.springframework.boot</groupId>
    <artifactId>spring-boot-starter-web</artifactId>
</dependency>
Spring Boot automatically adds:
- Embedded Tomcat (default)
- or Jetty
- or Undertow
During startup:
Spring Boot
      │
      ▼
Create Tomcat Instance
      │
      ▼
Configure Connectors
      │
      ▼
Register DispatcherServlet
      │
      ▼
Listen on Port 8080
No separate Tomcat installation is necessary.
Your application already contains one.
Is Embedded Tomcat the Real Reason?
No.
This is where many interview answers go wrong.
Embedded Tomcat explains how HTTP requests are served, but it doesn’t explain how the executable JAR starts.
The complete answer includes:
- Fat JAR packaging
- Custom launcher
- Custom class loader
- MANIFEST.MF
- Nested dependency loading
- Auto-configuration
- Embedded servlet container
Mentioning only Tomcat misses most of the architecture.
Auto Configuration
Once the launcher hands control to your application, Spring Boot initializes the framework.
Your application starts with:
@SpringBootApplication
public class DemoApplication {

public static void main(String[] args) {
        SpringApplication.run(DemoApplication.class, args);
    }
}
@SpringBootApplication is actually a combination of three annotations:
@SpringBootConfiguration

@EnableAutoConfiguration

@ComponentScan
Each serves a different purpose.
1. @SpringBootConfiguration
Marks the class as a Spring configuration class.
Equivalent to:
@Configuration2. @ComponentScan
Automatically discovers:
- Controllers
- Services
- Repositories
- Components
Example:
@Service
public class UserService {

}
No XML configuration required.
3. @EnableAutoConfiguration
This is the real magic.
Spring Boot examines:
- Available libraries
- Existing beans
- Environment
- Properties
Then configures everything automatically.
Examples:
If Spring MVC exists →
Configure DispatcherServlet.
If Tomcat exists →
Configure embedded server.
If HikariCP exists →
Configure DataSource.
If Jackson exists →
Configure ObjectMapper.
All without writing configuration code.
Auto-Configuration in Spring Boot 3
Older Spring Boot versions loaded auto-configurations from:
META-INF/spring.factoriesSpring Boot 3 introduced a new mechanism:
META-INF/spring/org.springframework.boot.autoconfigure.AutoConfiguration.importsThis improves startup performance and simplifies auto-configuration registration.
Why Doesn’t Spring Configure Everything?
Spring Boot uses conditional annotations such as:
@ConditionalOnClass

@ConditionalOnMissingBean

@ConditionalOnProperty

@ConditionalOnWebApplication
Example:
@Configuration
@ConditionalOnClass(DataSource.class)
public class DataSourceAutoConfiguration {

}
If DataSource isn't present, this configuration is skipped.
This keeps startup lightweight and avoids unnecessary bean creation.
Complete Startup Sequence
Putting everything together, the full process looks like this:
mvn package
        │
        ▼
Spring Boot Maven Plugin
        │
        ▼
Generate Fat JAR
        │
        ▼
java -jar
        │
        ▼
JVM reads MANIFEST.MF
        │
        ▼
JarLauncher
        │
        ▼
Custom ClassLoader
        │
        ▼
Load BOOT-INF/lib
        │
        ▼
Load BOOT-INF/classes
        │
        ▼
Find Start-Class
        │
        ▼
SpringApplication.run()
        │
        ▼
Component Scan
        │
        ▼
Auto Configuration
        │
        ▼
Start Embedded Tomcat
        │
        ▼
Application Ready
Interview Answer (2-Minute Version)
If an interviewer asks:
Why can Spring Boot JARs run directly?
A strong answer would be:
Spring Boot packages the application as a self-contained Fat JAR using the Spring Boot Maven or Gradle plugin.
During packaging, it modifies the
MANIFEST.MFfile so the JVM startsJarLauncherinstead of the application's main class.
*JarLaunchercreates a custom class loader that can load nested JARs fromBOOT-INF/liband application classes fromBOOT-INF/classes, something the default JVM class loader cannot do.*
It then invokes the actual
Start-Class, whereSpringApplication.run()initializes the Spring context, performs component scanning, applies auto-configuration, and starts the embedded servlet container such as Tomcat.
This architecture allows a Spring Boot application to run with a simple
java -jarcommand without requiring an external application server.
Key Takeaways
- Spring Boot packages applications as a Fat (Uber) JAR containing both application code and dependencies.
- The Spring Boot Maven/Gradle plugin repackages the archive into an executable format.
- The
MANIFEST.MFfile points to JarLauncher, not your application class. - JarLauncher creates a custom class loader capable of loading nested JARs from
BOOT-INF/lib. - Application classes are loaded from
BOOT-INF/classes, and the realStart-Classis invoked afterward. - Embedded Tomcat, Jetty, or Undertow eliminates the need for an external servlet container.
@SpringBootApplicationcombines configuration, component scanning, and auto-configuration to bootstrap the application.- Since Spring Boot 3, auto-configurations are discovered through
AutoConfiguration.importsinstead ofspring.factories.
Final Thoughts
The embedded Tomcat is only the visible part of the iceberg. The real innovation behind Spring Boot’s executable JARs is the combination of custom packaging, a specialized launcher, a custom class-loading mechanism, nested dependency management, and intelligent auto-configuration.
Understanding these internals not only helps you answer interview questions with confidence but also gives you a much deeper appreciation of how Spring Boot simplifies Java application deployment while hiding a remarkable amount of engineering beneath a single command:
java -jar application.jarThat’s far more than “because it has embedded Tomcat.” It’s an elegant startup architecture that transformed Java deployment.
Thank you for reading!
If you found this article useful, feel free to give it a clap 👏, share it with your friends, and follow for more deep dives into distributed systems, Spring Boot architecture, Kafka, Redis, and high-scale backend engineering.
😊 Your support is the biggest motivation to continue sharing technical insights.
Before you go
- Please take a moment to like the post and follow the writer!
- Did you know that over 400,000 developers share what they’re building, learning, and discovering across our platforms every month? Learn how you can contribute here
메타데이터
- post_id
- b3e09492a162
- slug
- nttdata-second-interview-why-can-spring-boot-jars-run-directly-b3e09492a162
- url
- https://blog.stackademic.com/nttdata-second-interview-why-can-spring-boot-jars-run-directly-b3e09492a162
- canonical_url
- https://blog.stackademic.com/nttdata-second-interview-why-can-spring-boot-jars-run-directly-b3e09492a162
- author_url
- https://medium.com/@umeshcapg
- status
- ok
- fetched_at
- 2026-07-11 00:45:12