Configuring Multiple Databases in Spring Boot: A Complete Guide by Sam :)
When building enterprise applications, you might encounter scenarios where you need to work with multiple databases. For example, you…
Configuring Multiple Databases in Spring Boot: A Complete Guide by Sam :)
When building enterprise applications, you might encounter scenarios where you need to work with multiple databases. For example, you might want to store your main application data in one database while keeping application logs in another. Hello world! I’m Samarth, In this tutorial, I’ll show you how to configure and use multiple databases in a Spring Boot application.
Note: At the end I have Attached My Github repo Link where you can find Complete source code
Prerequisites
- Java 21
- Spring Boot 3.4.0
- MySQL Server
- Basic knowledge of Spring Boot and JPA
Project Setup
First, create a new Spring Boot project using Spring Initializer or your preferred IDE. Add the following dependencies to your pom.xml
<dependencies>
    <dependency>
        <groupId>org.springframework.boot</groupId>
        <artifactId>spring-boot-starter</artifactId>
    </dependency>
    <dependency>
        <groupId>org.springframework.boot</groupId>
        <artifactId>spring-boot-starter-web</artifactId>
    </dependency>
    <dependency>
        <groupId>org.springframework.boot</groupId>
        <artifactId>spring-boot-starter-data-jpa</artifactId>
    </dependency>
    <dependency>
        <groupId>com.mysql</groupId>
        <artifactId>mysql-connector-j</artifactId>
        <scope>runtime</scope>
    </dependency>
    <dependency>
        <groupId>org.projectlombok</groupId>
        <artifactId>lombok</artifactId>
        <optional>true</optional>
    </dependency>
</dependencies>
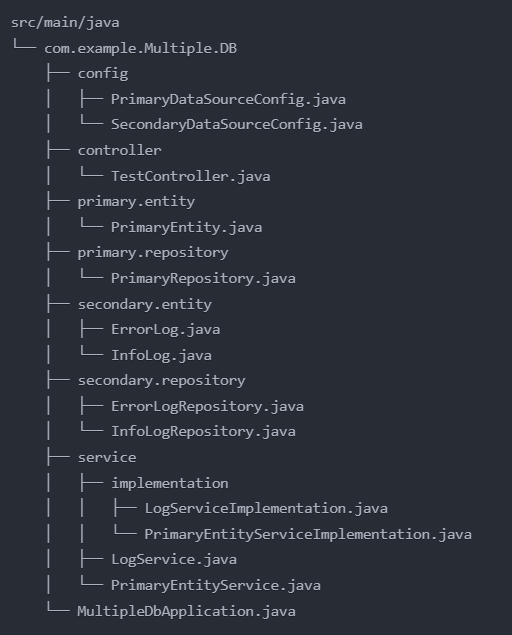
Project Structure
Our project follows a clean package structure to separate concerns for different databases:
Database Configuration
The most crucial part of setting up multiple databases is configuring them properly. We need to create separate configuration classes for each database to handle their respective entity managers and transaction managers.
1. Application Properties
Configure both databases in your application.properties:
spring.application.name=Multiple-DB

# Primary datasource configuration
spring.datasource.primary.url=jdbc:mysql://localhost:3306/primary
spring.datasource.primary.driver-class-name=com.mysql.cj.jdbc.Driver
spring.datasource.primary.username=root
spring.datasource.primary.password=1234

# Secondary datasource configuration
spring.datasource.secondary.url=jdbc:mysql://localhost:3306/secondary
spring.datasource.secondary.driver-class-name=com.mysql.cj.jdbc.Driver
spring.datasource.secondary.username=root
spring.datasource.secondary.password=1234

# JPA configuration for databases
spring.datasource.primary.jpa.properties.hibernate.dialect=org.hibernate.dialect.MySQLDialect
spring.datasource.primary.jpa.hibernate.ddl-auto=update

spring.datasource.secondary.jpa.properties.hibernate.dialect=org.hibernate.dialect.MySQLDialect
spring.datasource.secondary.jpa.hibernate.ddl-auto=update
1. Primary Database Configuration
Create PrimaryDataSourceConfig.java:
@Configuration
@EnableJpaRepositories(
    basePackages = "com.example.Multiple.DB.primary.repository",
    entityManagerFactoryRef = "primaryEntityManagerFactory",
    transactionManagerRef = "primaryTransactionManager"
)
public class PrimaryDataSourceConfig {
    @Value("${spring.datasource.primary.url}")
    private String url;
    @Value("${spring.datasource.primary.driver-class-name}")
    private String driverClassName;
    @Value("${spring.datasource.primary.username}")
    private String username;
    @Value("${spring.datasource.primary.password}")
    private String password;
    @Value("${spring.datasource.primary.jpa.properties.hibernate.dialect}")
    private String dialect;
    @Value("${spring.datasource.primary.jpa.hibernate.ddl-auto}")
    private String ddlAuto;

    @Bean(name = "primaryDataSource")
    public DataSource primaryDataSource() {
        return DataSourceBuilder.create()
                .url(url)
                .driverClassName(driverClassName)
                .username(username)
                .password(password)
                .build();
    }

    @Bean(name = "primaryEntityManagerFactory")
    public LocalContainerEntityManagerFactoryBean primaryEntityManagerFactory(
            @Qualifier("primaryDataSource") DataSource dataSource) {
        LocalContainerEntityManagerFactoryBean em = new LocalContainerEntityManagerFactoryBean();
        em.setDataSource(dataSource);
        em.setPackagesToScan("com.example.Multiple.DB.primary.entity");

        HibernateJpaVendorAdapter vendorAdapter = new HibernateJpaVendorAdapter();
        em.setJpaVendorAdapter(vendorAdapter);

        Properties jpaProperties = new Properties();
        jpaProperties.put("hibernate.dialect", dialect);
        jpaProperties.put("hibernate.hbm2ddl.auto", ddlAuto);
        em.setJpaProperties(jpaProperties);

        return em;
    }

    @Bean(name = "primaryTransactionManager")
    public PlatformTransactionManager primaryTransactionManager(
            @Qualifier("primaryEntityManagerFactory") EntityManagerFactory entityManagerFactory) {
        return new JpaTransactionManager(entityManagerFactory);
    }
}
2. Secondary Database Configuration
Create SecondaryDataSourceConfig.java:
@Configuration
@EnableJpaRepositories(
    basePackages = "com.example.Multiple.DB.secondary.repository",
    entityManagerFactoryRef = "secondaryEntityManagerFactory",
    transactionManagerRef = "secondaryTransactionManager"
)
public class SecondaryDataSourceConfig {
    @Value("${spring.datasource.secondary.url}")
    private String url;
    @Value("${spring.datasource.secondary.driver-class-name}")
    private String driverClassName;
    @Value("${spring.datasource.secondary.username}")
    private String username;
    @Value("${spring.datasource.secondary.password}")
    private String password;
    @Value("${spring.datasource.secondary.jpa.properties.hibernate.dialect}")
    private String dialect;
    @Value("${spring.datasource.secondary.jpa.hibernate.ddl-auto}")
    private String ddlAuto;

    @Bean(name = "secondaryDataSource")
    public DataSource secondaryDataSource() {
        return DataSourceBuilder.create()
                .url(url)
                .driverClassName(driverClassName)
                .username(username)
                .password(password)
                .build();
    }

    @Bean(name = "secondaryEntityManagerFactory")
    public LocalContainerEntityManagerFactoryBean secondaryEntityManagerFactory(
            @Qualifier("secondaryDataSource") DataSource dataSource) {
        LocalContainerEntityManagerFactoryBean em = new LocalContainerEntityManagerFactoryBean();
        em.setDataSource(dataSource);
        em.setPackagesToScan("com.example.Multiple.DB.secondary.entity");

        HibernateJpaVendorAdapter vendorAdapter = new HibernateJpaVendorAdapter();
        em.setJpaVendorAdapter(vendorAdapter);

        Properties jpaProperties = new Properties();
        jpaProperties.put("hibernate.dialect", dialect);
        jpaProperties.put("hibernate.hbm2ddl.auto", ddlAuto);
        em.setJpaProperties(jpaProperties);

        return em;
    }

    @Bean(name = "secondaryTransactionManager")
    public PlatformTransactionManager secondaryTransactionManager(
            @Qualifier("secondaryEntityManagerFactory") EntityManagerFactory entityManagerFactory) {
        return new JpaTransactionManager(entityManagerFactory);
    }
}
Let’s break down the key components of these configuration classes:
- @EnableJpaRepositories: This annotation configures JPA repositories for each database with:
basePackages: Specifies where to find the repositoriesentityManagerFactoryRef: References the entity manager factory beantransactionManagerRef: References the transaction manager bean
- @ Value annotations: Used to inject properties from application.properties file
- DataSource Bean: Creates and configures the database connection
- EntityManagerFactory Bean: Configures JPA/Hibernate properties including:
- Package scanning for entities
- Hibernate dialect
- DDL auto configuration
- Transaction management
- TransactionManager Bean: Manages database transactions for each data source
These configuration classes ensure that:
- Each database has its own connection pool
- Entities are properly mapped to their respective databases
- Transactions are managed independently
- JPA repositories are correctly associated with their corresponding database
2. Entity Classes
Primary Database Entity:
@Entity
@Data
public class PrimaryEntity {
    @Id
    @GeneratedValue(strategy = GenerationType.IDENTITY)
    private Long id;
    private String name;
}
Secondary Database Entities (Logging):
@Entity
@Data
public class InfoLog {
    @Id
    @GeneratedValue(strategy = GenerationType.IDENTITY)
    private Long id;
    private String infoMessage;
    private LocalDateTime timestamp;
}

@Entity
@Data
public class ErrorLog {
    @Id
    @GeneratedValue(strategy = GenerationType.IDENTITY)
    private Long id;
    private String errorMessage;
    private String stackTrace;
    private LocalDateTime timestamp;
}
3. Repository Interfaces
Create repository interfaces for each entity:
public interface PrimaryRepository extends JpaRepository<PrimaryEntity, Long> {
}

public interface InfoLogRepository extends JpaRepository<InfoLog, Long> {
}

public interface ErrorLogRepository extends JpaRepository<ErrorLog, Long> {
}
4. Service Layer
Create service interfaces and implementations to handle business logic:
public interface LogService {
    void logInfo(String message);
    void logError(String errorMessage, String stackTrace);
}

@Service
public class LogServiceImplementation implements LogService {
    @Autowired
    private InfoLogRepository infoLogRepository;

    @Autowired
    private ErrorLogRepository errorLogRepository;

    @Override
    public void logInfo(String message) {
        InfoLog infoLog = new InfoLog();
        infoLog.setInfoMessage(message);
        infoLog.setTimestamp(LocalDateTime.now());
        infoLogRepository.save(infoLog);
    }

    @Override
    public void logError(String errorMessage, String stackTrace) {
        ErrorLog errorLog = new ErrorLog();
        errorLog.setErrorMessage(errorMessage);
        errorLog.setStackTrace(stackTrace);
        errorLog.setTimestamp(LocalDateTime.now());
        errorLogRepository.save(errorLog);
    }
}
Testing the Implementation
You can create a simple controller to test both databases:
@RestController
@RequestMapping("/api")
public class TestController {
    @Autowired
    private PrimaryEntityService primaryEntityService;

    @Autowired
    private LogService logService;

    @GetMapping("/test")
    public ResponseEntity<String> test() {
        try {
            // Save to primary database
            PrimaryEntity entity = new PrimaryEntity();
            entity.setName("Test Entity");
            primaryEntityService.saveRecord(entity);

            // Log info in secondary database
            logService.logInfo("Successfully saved primary entity");

            return ResponseEntity.ok("Test successful");
        } catch (Exception e) {
            // Log error in secondary database
            logService.logError("Error occurred", e.getStackTrace().toString());
            return ResponseEntity.status(HttpStatus.INTERNAL_SERVER_ERROR).body("Test failed");
        }
    }
}
Running the Application
Before running the application:
- Create two databases named ‘primary’ and ‘secondary’ in your MySQL server
- Update the database credentials in application.properties if needed
- Run the Spring Boot application
- Test the endpoints using Postman or any API testing tool or you can just hit api on your Browser
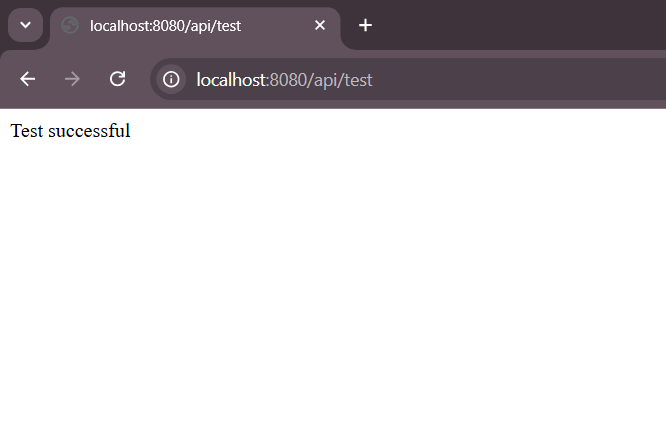
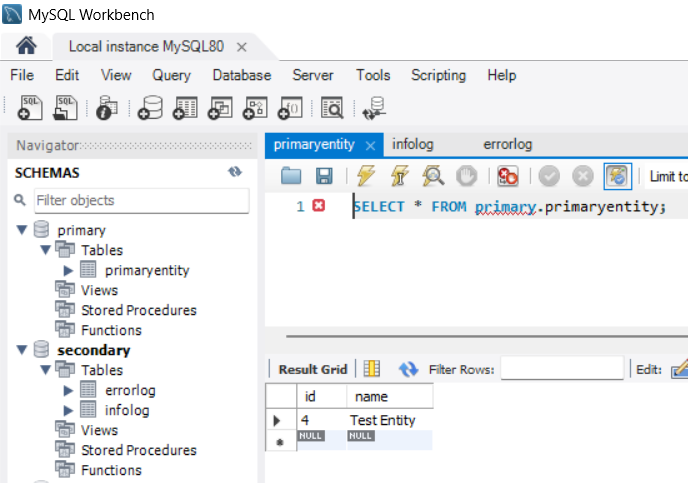
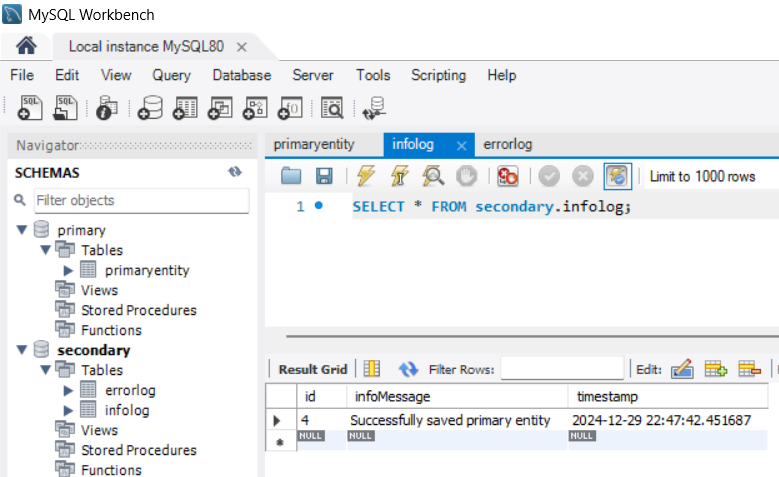
Conclusion
This implementation demonstrates how to effectively configure and use multiple databases in a Spring Boot application. The separation of concerns between primary application data and logging data provides better maintainability and scalability.
You can find the complete source code for this project on my **GitHub repository.**
Socials:
**Github**
Follow me for more such helpful content!
SpringBoot #Java #Programming #Database #Tutorial
메타데이터
- post_id
- b4b528d367cb
- slug
- configuring-multiple-databases-in-spring-boot-a-complete-guide-by-sam-b4b528d367cb
- url
- https://medium.com/@samarth.dev.in/configuring-multiple-databases-in-spring-boot-a-complete-guide-by-sam-b4b528d367cb
- canonical_url
- https://medium.com/@samarth.dev.in/configuring-multiple-databases-in-spring-boot-a-complete-guide-by-sam-b4b528d367cb
- author_url
- https://medium.com/@samarth.dev.in
- status
- ok
- fetched_at
- 2026-07-13 06:23:13