Complete Guide to MAMP on macOS 15 Sequoia: Installation and Advanced Configurations
In this article, you’ll find the translated and adapted English version of “Guida completa a MAMP su macOS 15 Sequoia: Installazione e…
Complete Guide to MAMP on macOS 15 Sequoia: Installation and Advanced Configurations
Photo by Daniele D’Andreti on Unsplash
In this article, you’ll find the translated and adapted English version of “Guida completa a MAMP su macOS 15 Sequoia: Installazione e configurazioni avanzate”.
I hope you find it useful and enjoyable to read!
If you notice any mistakes or unclear sentences, feel free to point them out in the comments — I’ll be happy to fix and improve the translation.
Thank you, and happy reading!
Introduction to MAMP on macOS 15
MAMP (Macintosh, Apache, MySQL, PHP) is a free software suite that allows you to create a complete and functional web development environment in just a few minutes on your Mac. In this guide, we’ll explore how to install and configure MAMP on macOS 15 Sequoia, including advanced features to optimize your workflow.
Installing MAMP
To download MAMP, visit the official website. During standard installation, MAMP sets the htdocs folder located in /Applications/MAMP/ as the “Document Root” (the main folder for your websites) and uses localhost as the web address, associating it with non-standard ports: port 8888 for the Apache web server and port 8889 for the MySQL database server. These ports are chosen to avoid conflicts with any existing versions of Apache or MySQL already present or used by the operating system.
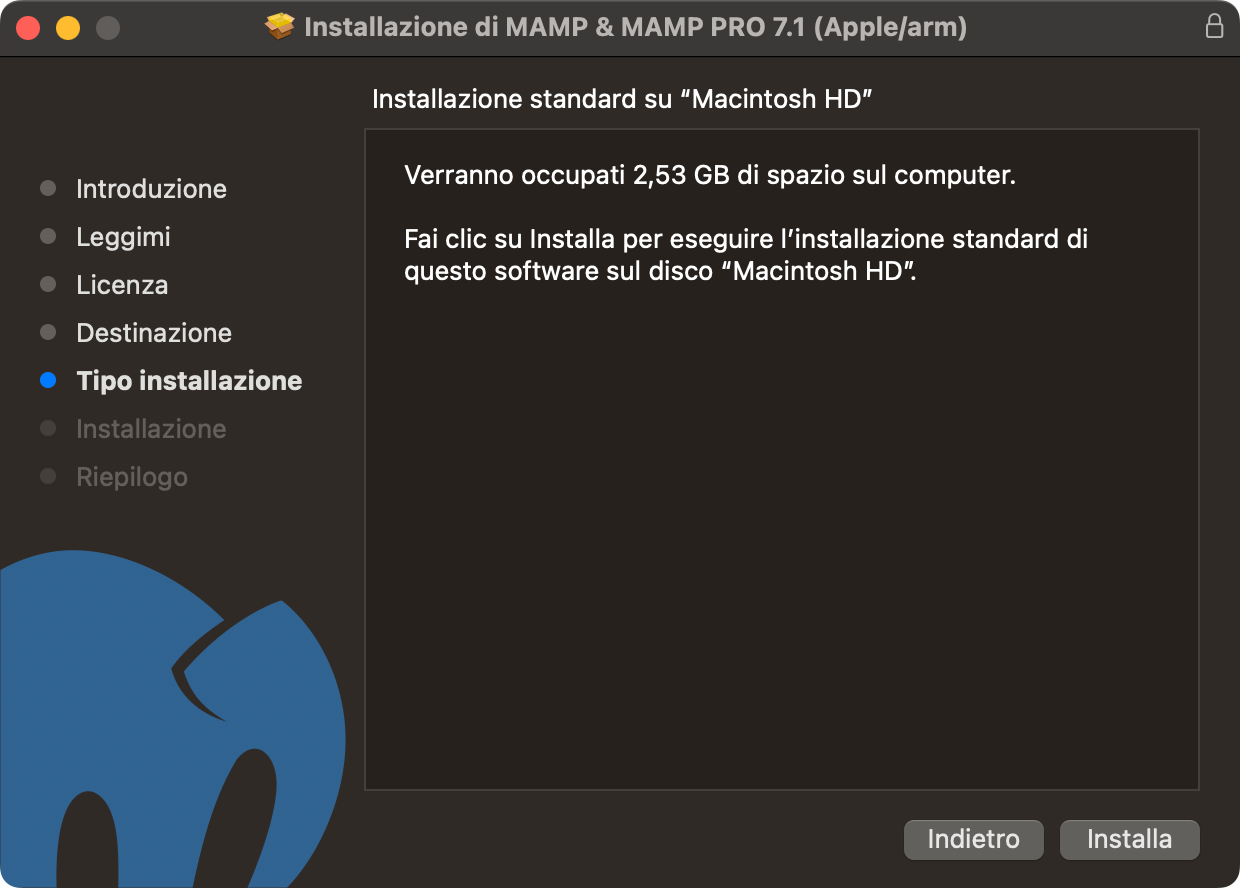
MAMP Installation
For a more production-like experience, you can configure MAMP to use standard ports: port 80 for Apache and port 3306 for MySQL. This way, your development address will simply become http://localhost/ (or http://127.0.0.1/) instead of [http://localhost:8888/.](http://localhost:8888/.)
Note: When using standard ports (below 1024), macOS will require your administrator password every time you start the MAMP servers, as these ports are considered privileged.
Starting and Verifying MAMP
To start MAMP, simply double-click the MAMP application icon in the Applications folder.
MAMP Installation
The main MAMP window will open, from which you can: — Start and stop Apache and MySQL servers — Access Preferences — Open the “WebStart” page
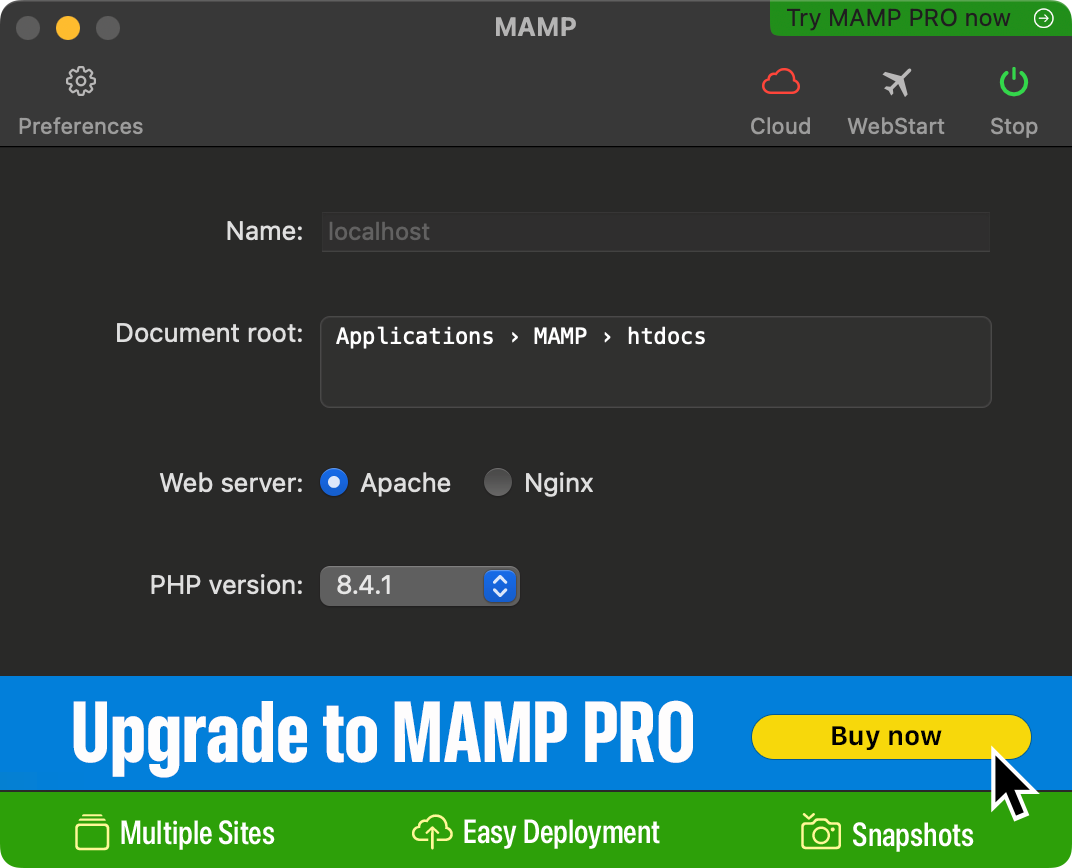
MAMP Preferences
Clicking the “WebStart” button opens a page in your default browser providing access to useful information and quick links, including access to phpMyAdmin or Adminer (web tools for managing MySQL databases) through the “Tools” section.
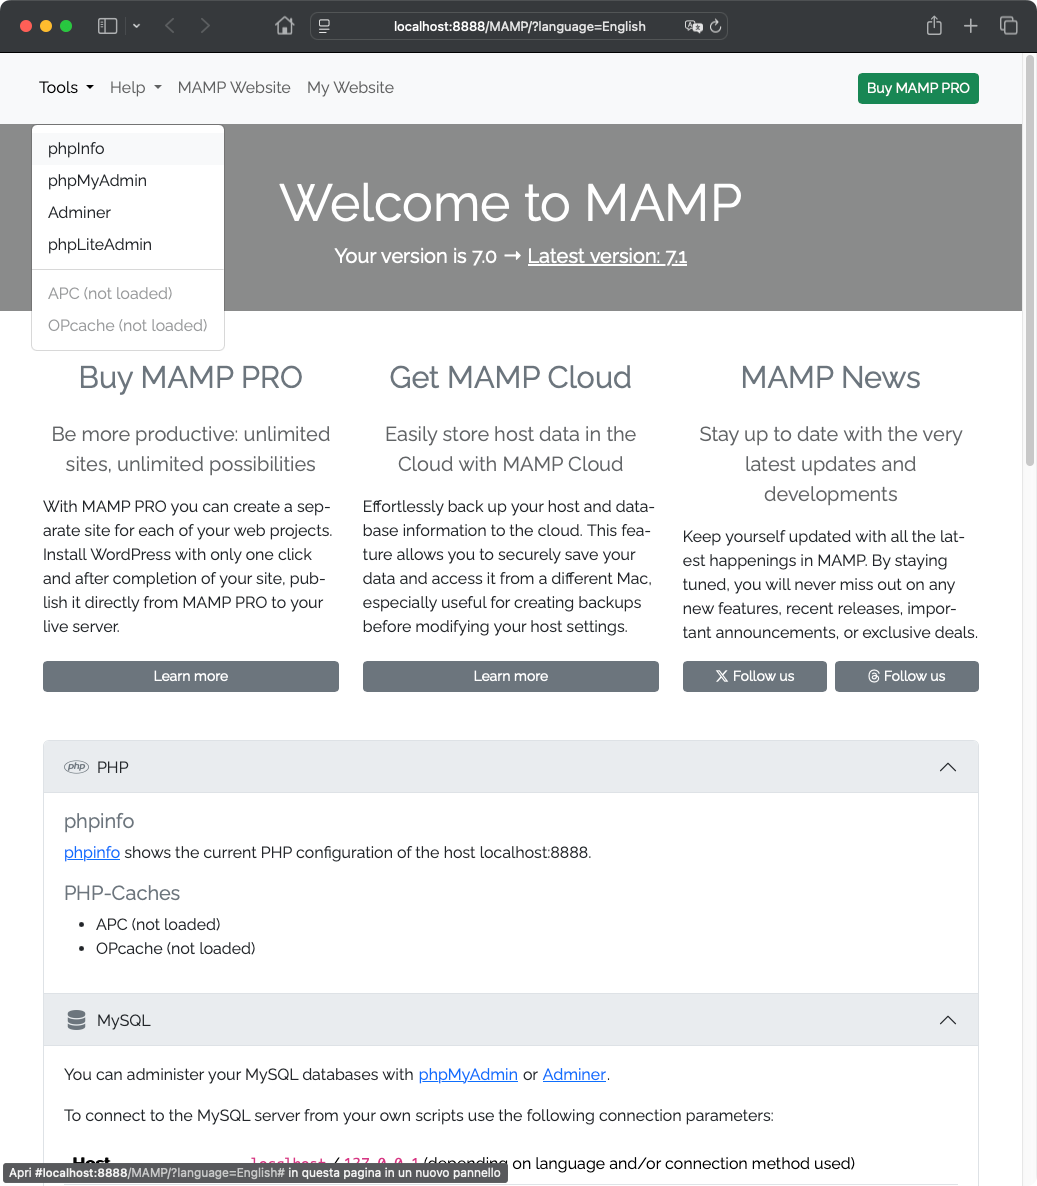
MAMP WebStart Page
If you haven’t modified the default settings (thus using ports 8888/8889), you can quickly test the installation:
- Create a new file called
test.phpinside MAMP’s Document Root folder (/Applications/MAMP/htdocs). - Paste the following code into the
test.phpfile:
<!DOCTYPE html>
<html lang="en">
<head>
    <meta charset="UTF-8">
    <meta name="viewport" content="width=device-width, initial-scale=1.0">
    <meta http-equiv="X-UA-Compatible" content="ie=edge">
    <title>Test</title>
</head>
<body>
    <hr>
    <?php echo date('F, Y') ?>
    <hr>
    <?php echo "PHP ver.: " . phpversion(); ?>
    <hr>
    <?php
    // MySQL version in use
    $ver_mysql = mysqli_connect("localhost", "root", "root")
        or die("Failed to connect: " . mysqli_connect_error());
    echo "MySQL ver.: " . mysqli_get_server_info($ver_mysql);
    mysqli_close($ver_mysql);
    ?>
    <hr>
</body>
</html>
Save it in the htdocs folder and access the file through your browser at [http://localhost:8888/test.php.](http://localhost:8888/test.php.)
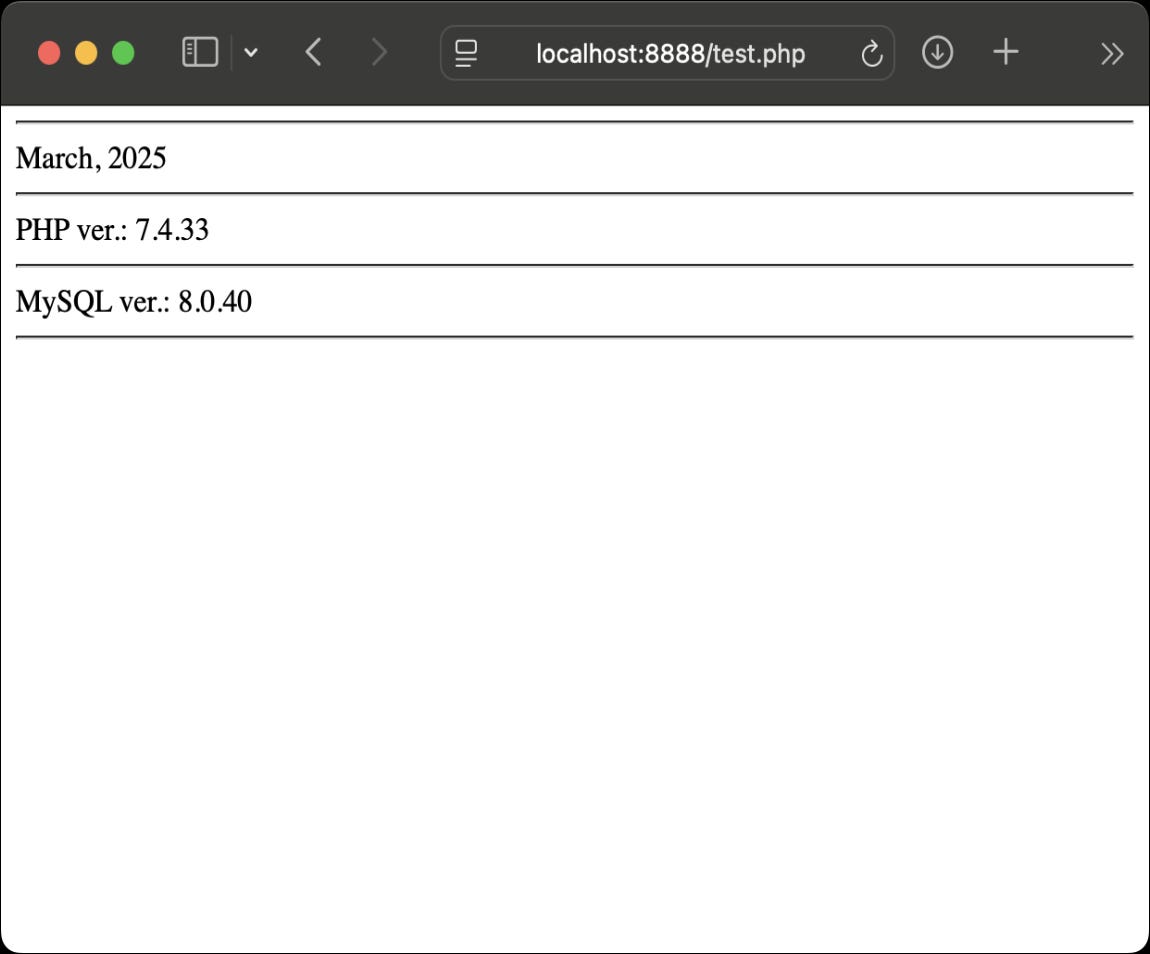
PHP test file
If you see the page displaying PHP and MySQL version information, MAMP is installed correctly!
Note: If you need advanced features right from the start, such as managing multiple virtual hosts, easily selectable multiple PHP versions, local SSL certificates, DynDNS integration, email server, etc., and want to avoid manual configurations, you might consider **MAMP PRO**. It’s a paid solution (approximately 89 euros) that offers a more complete and ready-to-use development environment.
Details in the comparison table: https://www.mamp.info/en/comparison-matrix/
Custom Configuration
Once MAMP is installed, you can customize various settings to optimize your development environment. For example, you can use your user’s Sites folder instead of htdocs as the Document Root for your projects.
Since macOS (starting from version 10.8 Mountain Lion) no longer automatically creates this Sites folder, you’ll need to create it manually. Here’s how:
- Open Finder
- Navigate to your Home (User) folder
- Create a new folder called
Sites
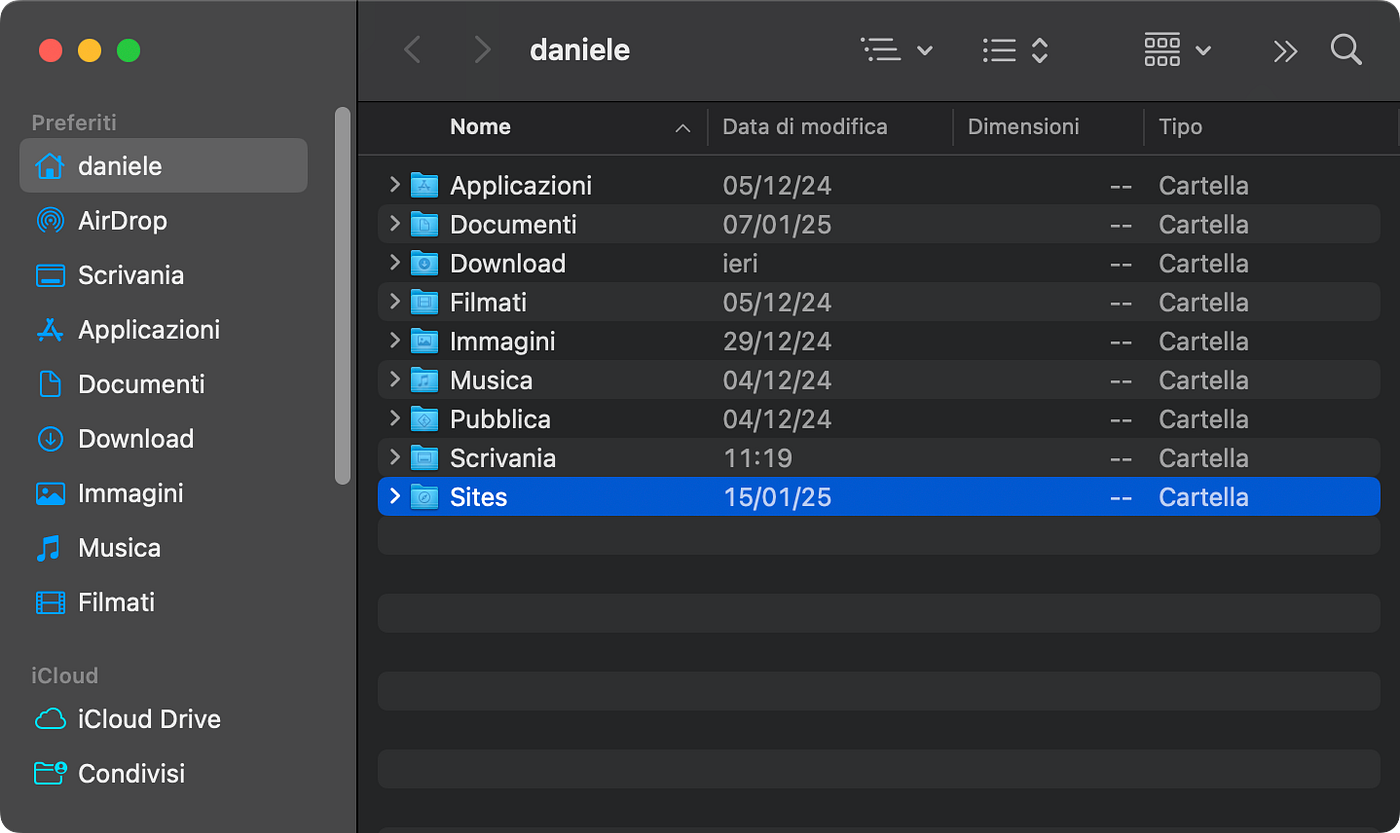
Sites Folder
To make accessing your projects even faster, you can drag the Sites folder to the Dock to create an alias.
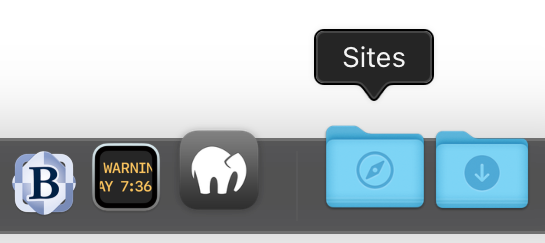
Dock Alias
MAMP Preferences
Clicking the “Preferences” button in the main MAMP window allows you to customize various settings.
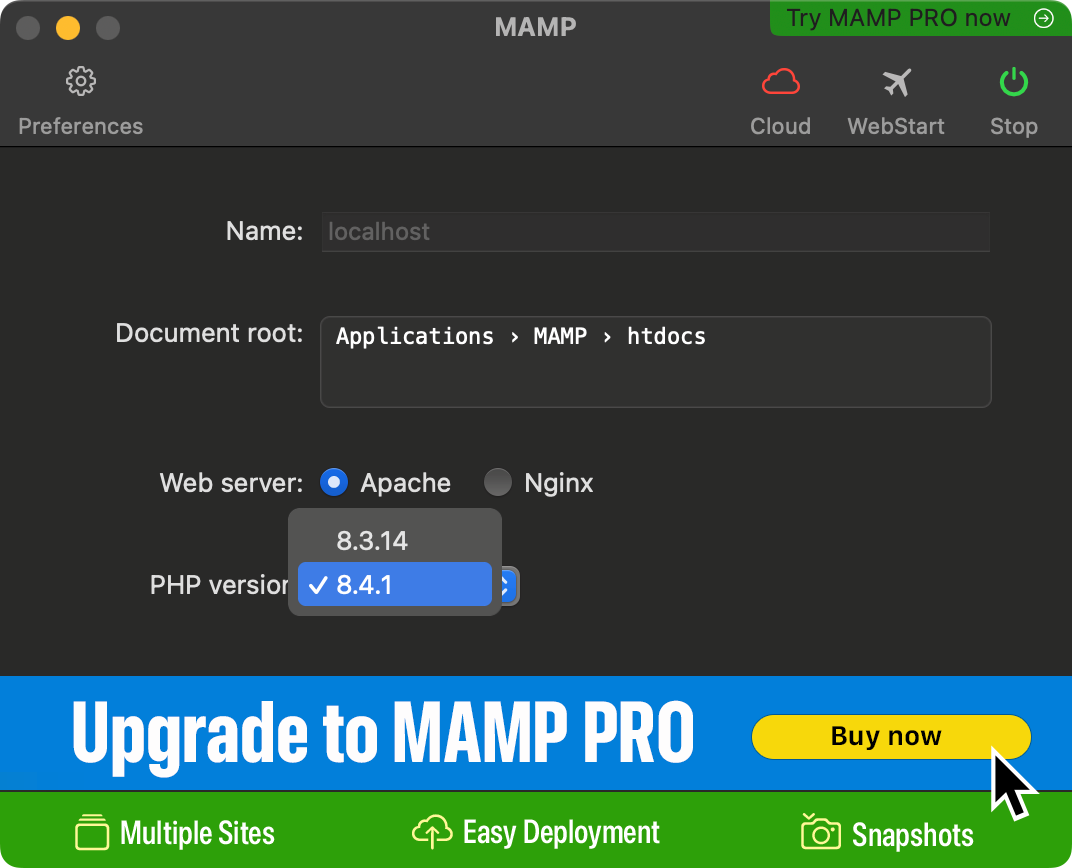
MAMP Main Window
General Tab
- Start servers / Stop servers: Decide whether MAMP should automatically start servers when opening the app and stop them when closing.
- Check for updates: Enable/disable automatic checking for new MAMP versions.
- Open WebStart page: Choose whether to automatically open the WebStart page when servers start.
- PHP-Cache: Select the caching system for PHP (e.g., OPcache).
- My favorite link: Set a custom URL for the WebStart button.
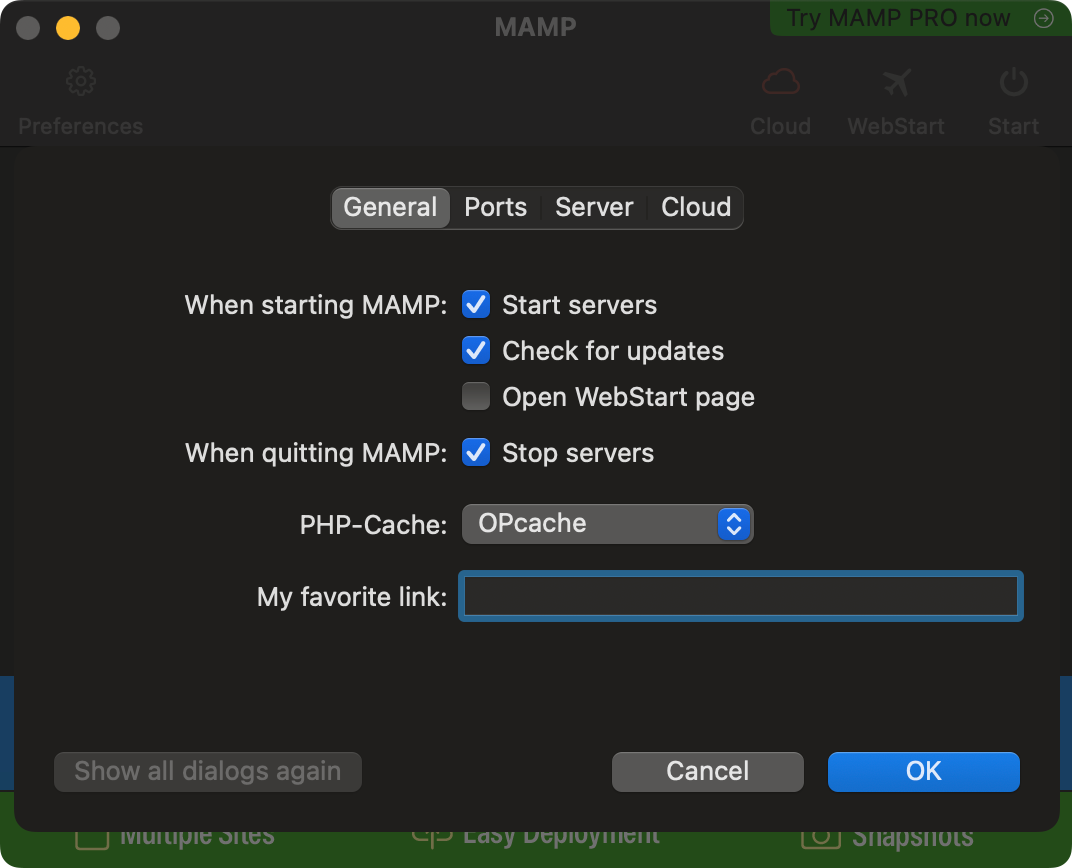
Tab General
Ports Tab
- Keep MAMP’s default ports (8888 for Apache and 8889 for MySQL).
- Set standard web ports (80 for Apache and 3306 for MySQL) by clicking the “Set Web & MySQL ports to 80 & 3306” button.
- Set custom ports, ensuring they’re not already in use.
Note: Remember that using standard ports will require the administrator password at startup.
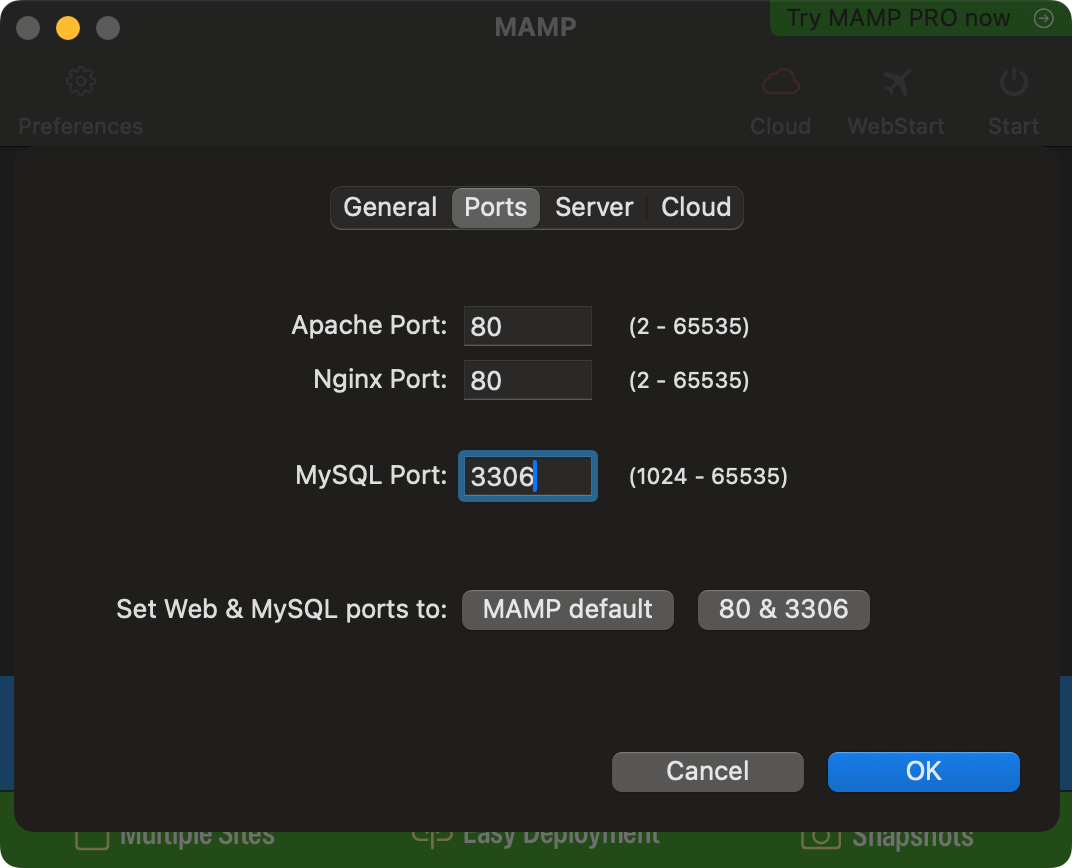
Tab Ports
Server Tab
- Web Server: Here you can choose which web server to use.
- MySQL Server Version: MAMP includes multiple MySQL versions. Here you can select which database server version to use (e.g., MySQL 5.7.x or 8.0.x).
- Document Root: As mentioned earlier, here you can click “Choose…” to select the main folder that will contain your websites (for example, the Sites folder in your home directory instead of the default htdocs).
MySQL Server Version Note: Before changing versions with existing databases, always perform a complete backup, as there may be compatibility issues that prevent old databases from working with the new version.
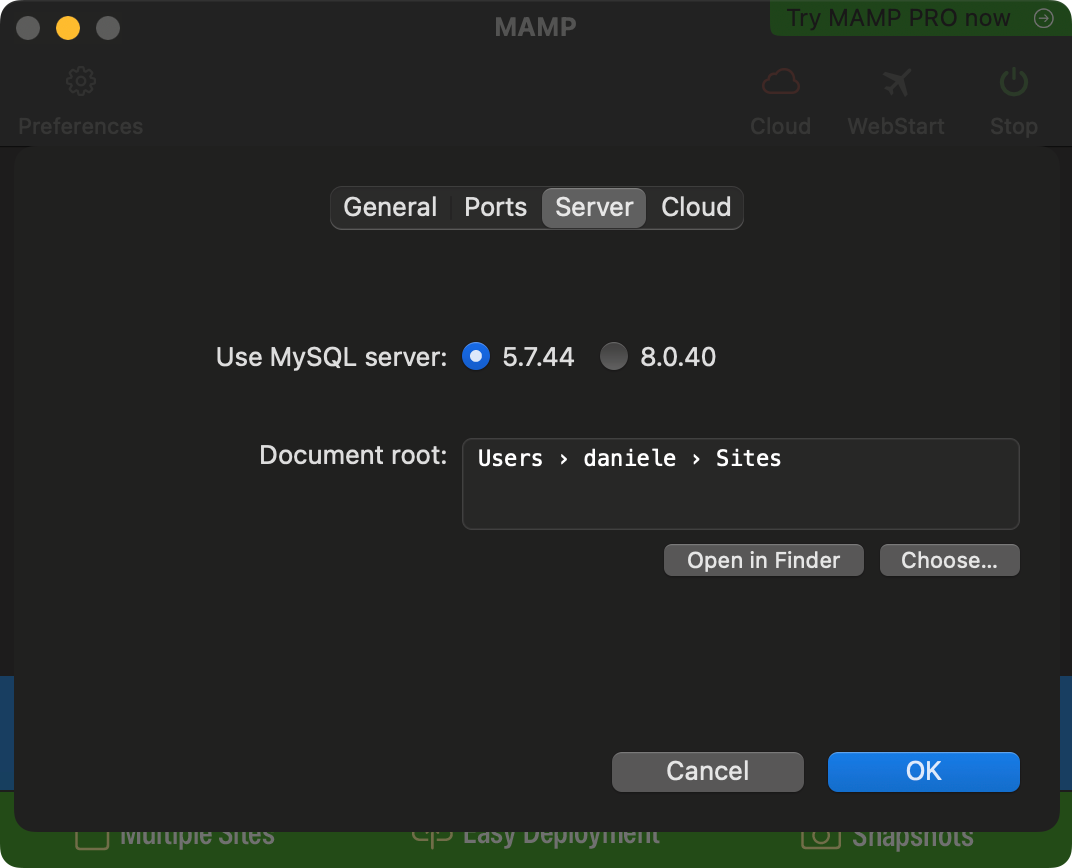
Sites as Document Root
phpMyAdmin
MAMP includes phpMyAdmin, a popular web application that provides a graphical interface to create, view, modify, and delete your MySQL databases, tables, and data without having to use terminal commands. You can access it at [http://localhost/phpMyAdmin5/](http://localhost/phpMyAdmin5/) or [http://127.0.0.1/phpMyAdmin5/](http://127.0.0.1/phpMyAdmin5/)
The access parameters are:
Host = localhost
User = root
Password = root
You can also access it from the WebStart page (Tools section).
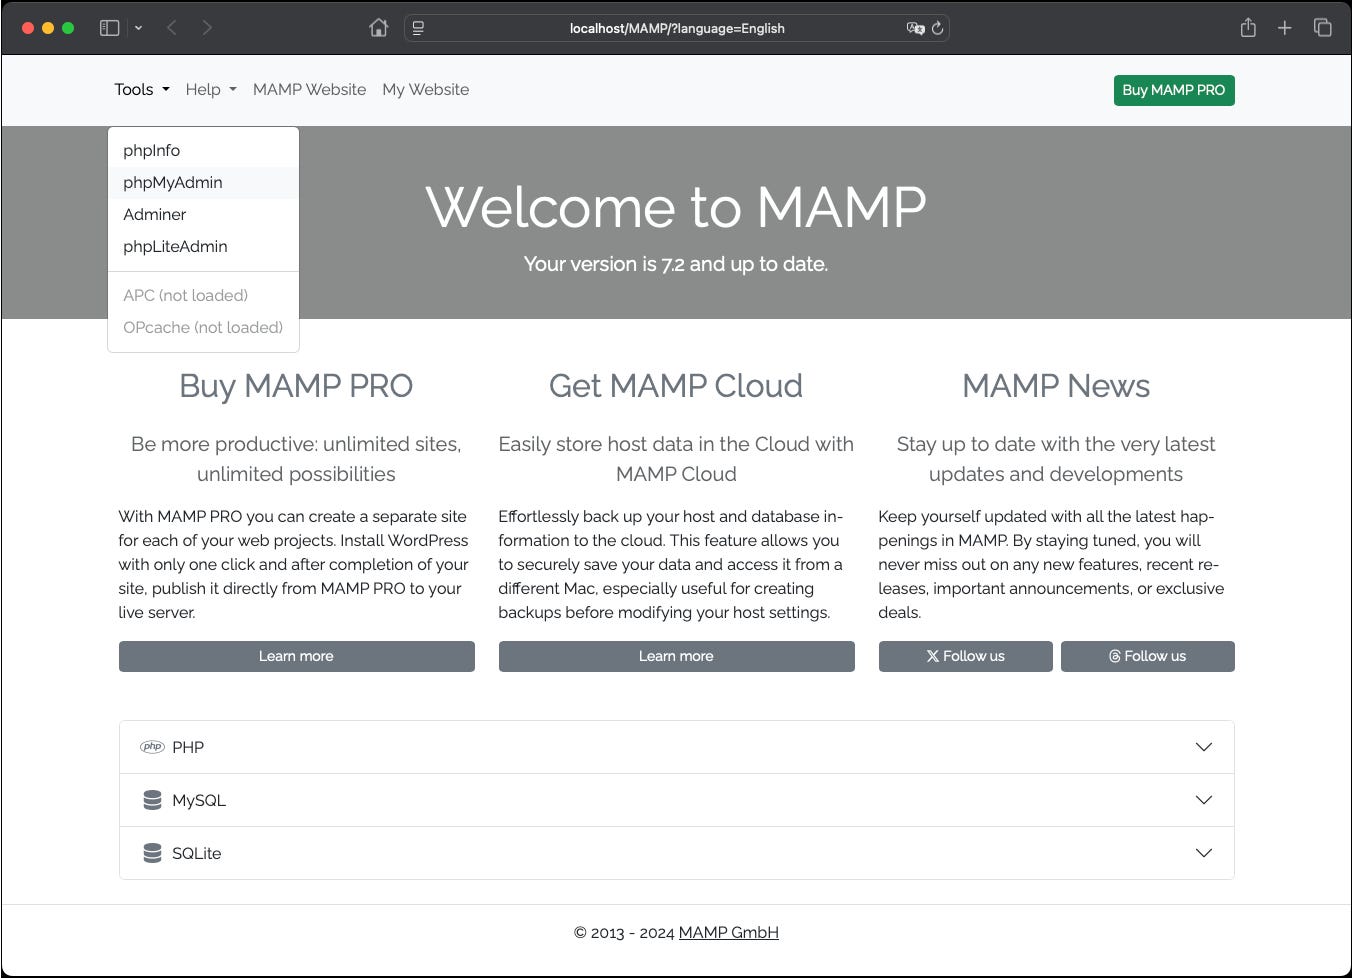
phpMyAdmin via WebStart
Directly via the correct URL, which depends on the configured ports:
If using MAMP’s DEFAULT ports (Apache on port 8888): http://localhost:8888/phpMyAdmin/ or http://127.0.0.1:8888/phpMyAdmin/
If using STANDARD ports (Apache on port 80): http://localhost/phpMyAdmin/ or [http://127.0.0.1/phpMyAdmin/](http://127.0.0.1/phpMyAdmin/)
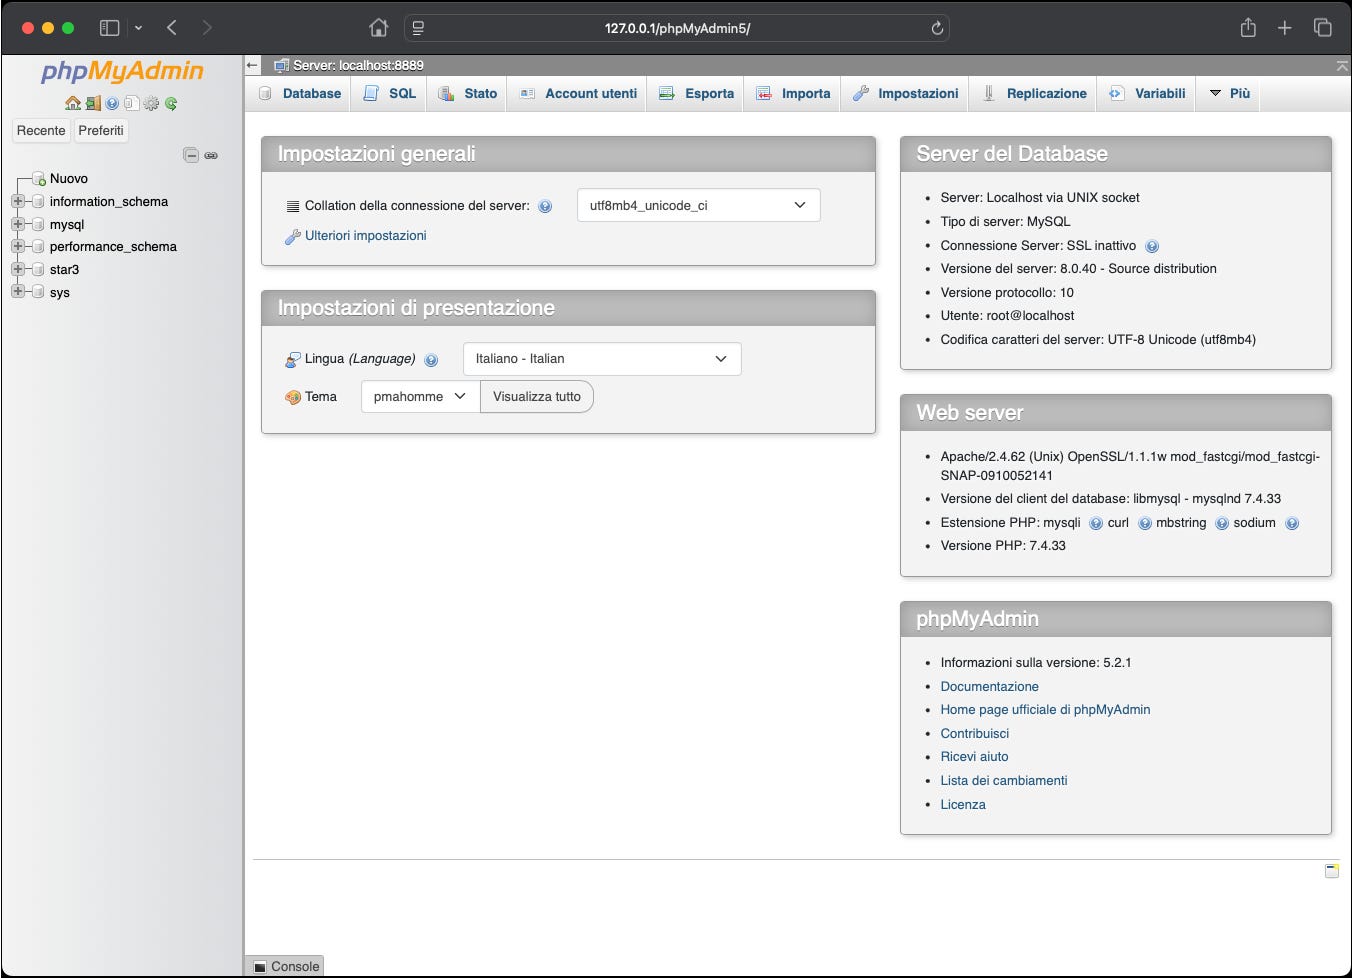
phpMyAdmin via URL
Note: Depending on the specific version of MAMP you have installed, the final path might be slightly different, for example
/phpMyAdmin5/instead of/phpMyAdmin/.
Adminer
Recent versions of MAMP may include different MySQL versions (e.g., 5.7 and 8.0). If you decide to use MySQL 8 or later versions, I recommend using Adminer included in MAMP, accessible from the WebStart page > Tools > Adminer or through the URL similar to phpMyAdmin.
phpMyAdmin via URL
Note: To learn more about the project, visit the official Adminer website.
Transferring Databases from a Previous Installation
If you’re migrating from an old MAMP installation, you can easily transfer your databases. Until a few years ago, I used to copy the contents of the db/mysqlXX folder (e.g., db/mysql57) from the old installation to the new one. This method is risky, especially for databases using the InnoDB engine (default for many years), because it might not correctly copy shared tablespaces or log files, leading to data corruption. It works better with very simple databases or those using dated engines like MyISAM.
Recommended Method (Safe): SQL Export/Import
Export databases from the old installation: Use a tool like phpMyAdmin or Adminer (from the old installation) or the mysqldump command from Terminal to export each database to a .sql file.
Note: ALWAYS make a complete backup before any migration or major database modification operation! Compatibility issues can arise between very different MySQL versions.
PHP Version and Advanced Modifications
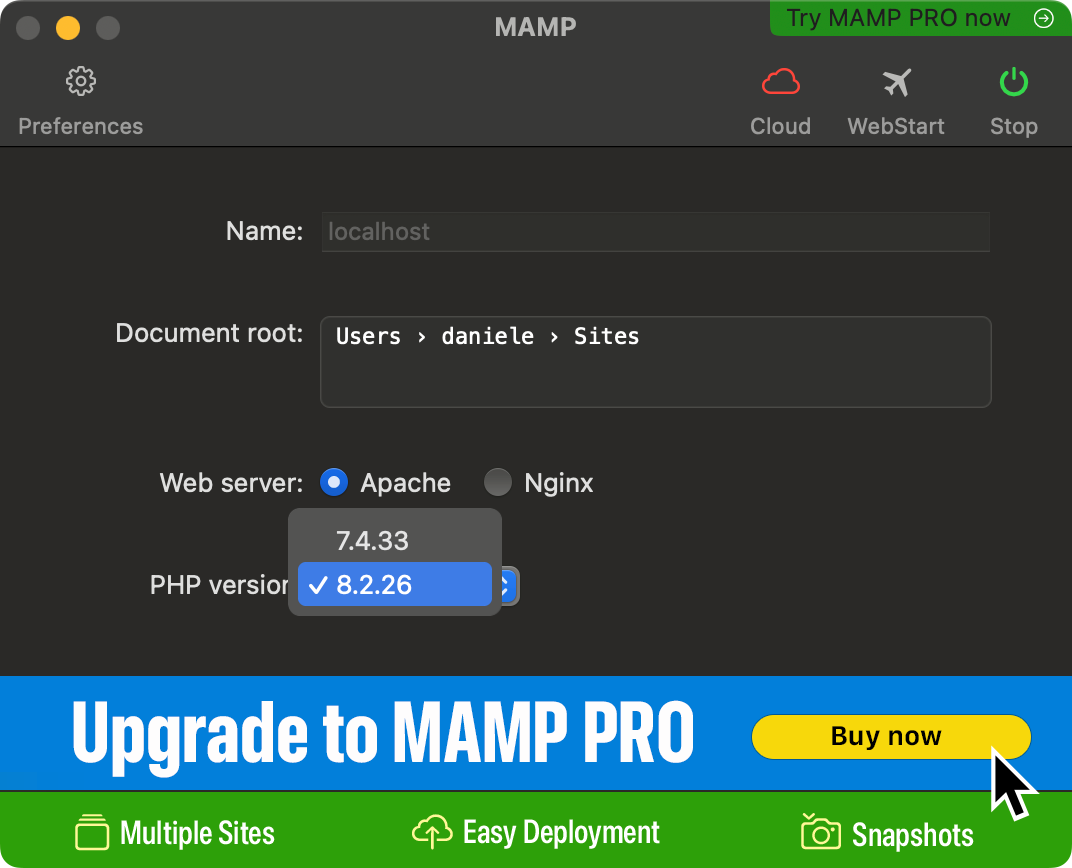
The free version of MAMP usually allows you to choose between two PHP versions directly from the interface (e.g., 8.4.1 and 8.3.14). If you need to use a different version included in MAMP but not selectable from the interface, you can use this “trick”:
- Access the
/Applications/MAMP/bin/php/folder - Find the desired PHP versions and create a ZIP archive for the others.
Note: If needed, you can easily restore other PHP versions. If you prefer, you can also delete unnecessary ones.
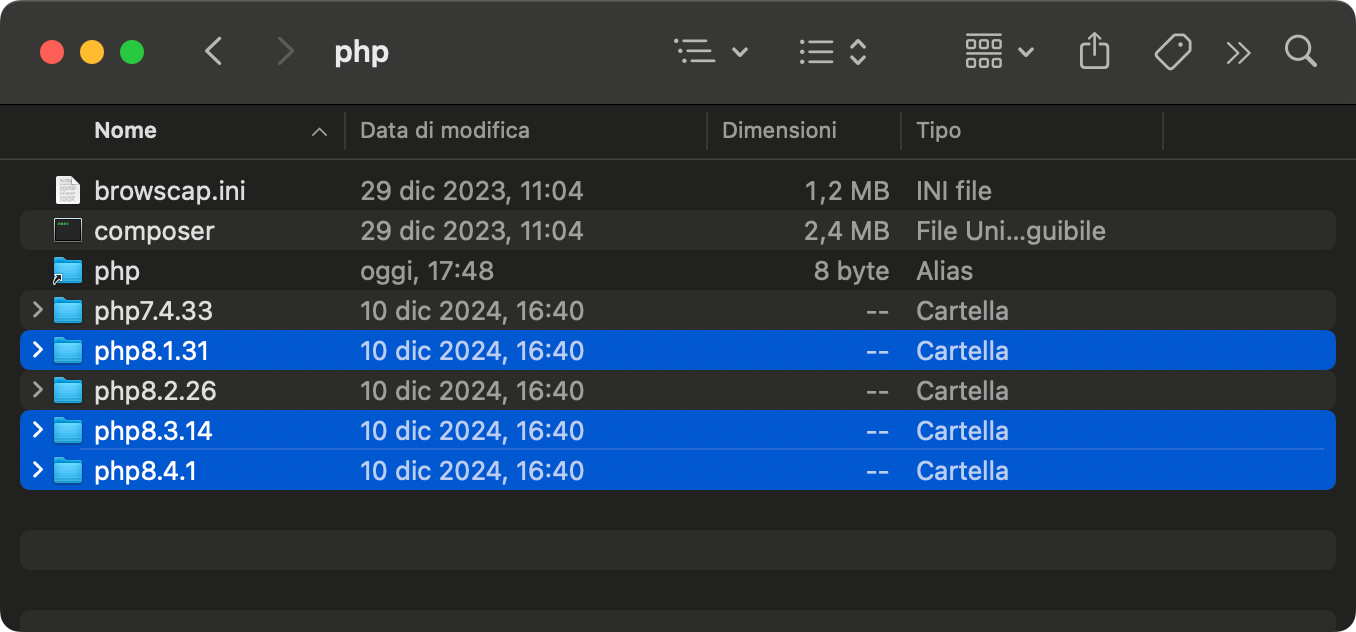
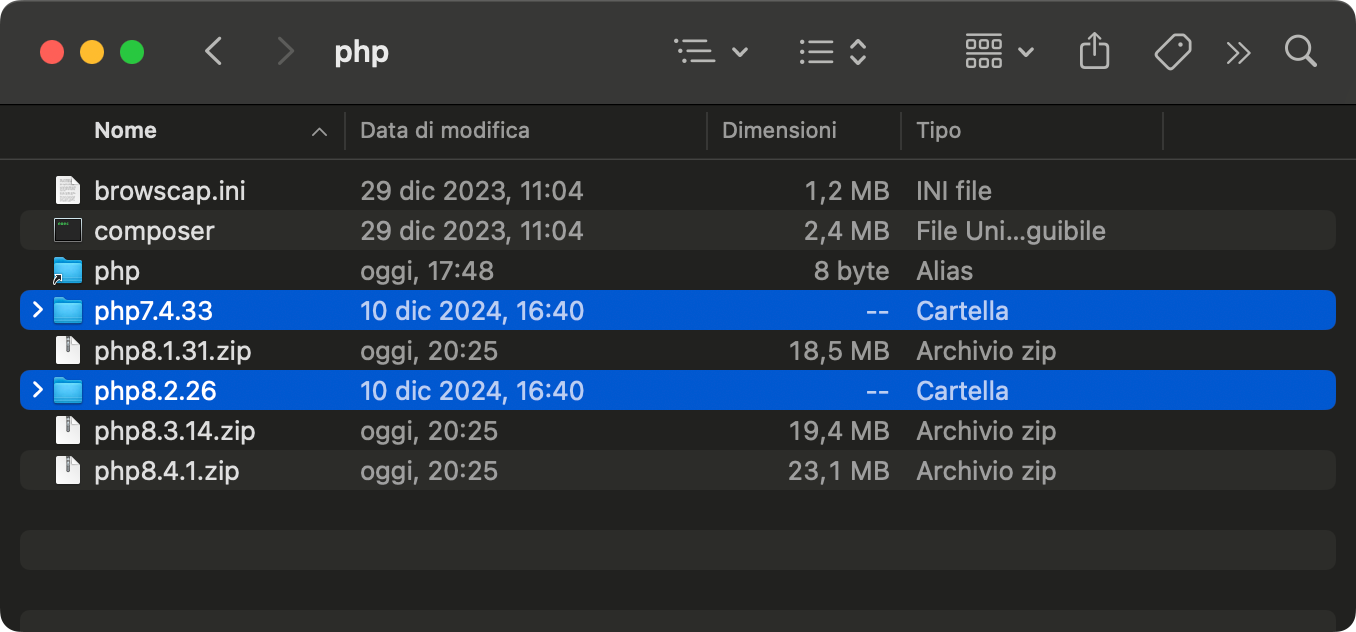
This way, you can use PHP 8.2 or PHP 7.4 and easily switch between the two versions via the preferences dropdown menu.
Modifications for PHP Error Display
During development, it’s essential to clearly see PHP error messages to debug your code. Make sure the following directives are configured correctly in the php.ini file of the PHP version you’re using (e.g., /Applications/MAMP/bin/php/php7.4.33/conf/php.ini):
[...]
error_reporting = E_ALL
[...]
display_errors = On
These settings will help you diagnose any code issues during development. Normally in MAMP, you only change the display_errors directive from Off to On for PHP versions below 8.1
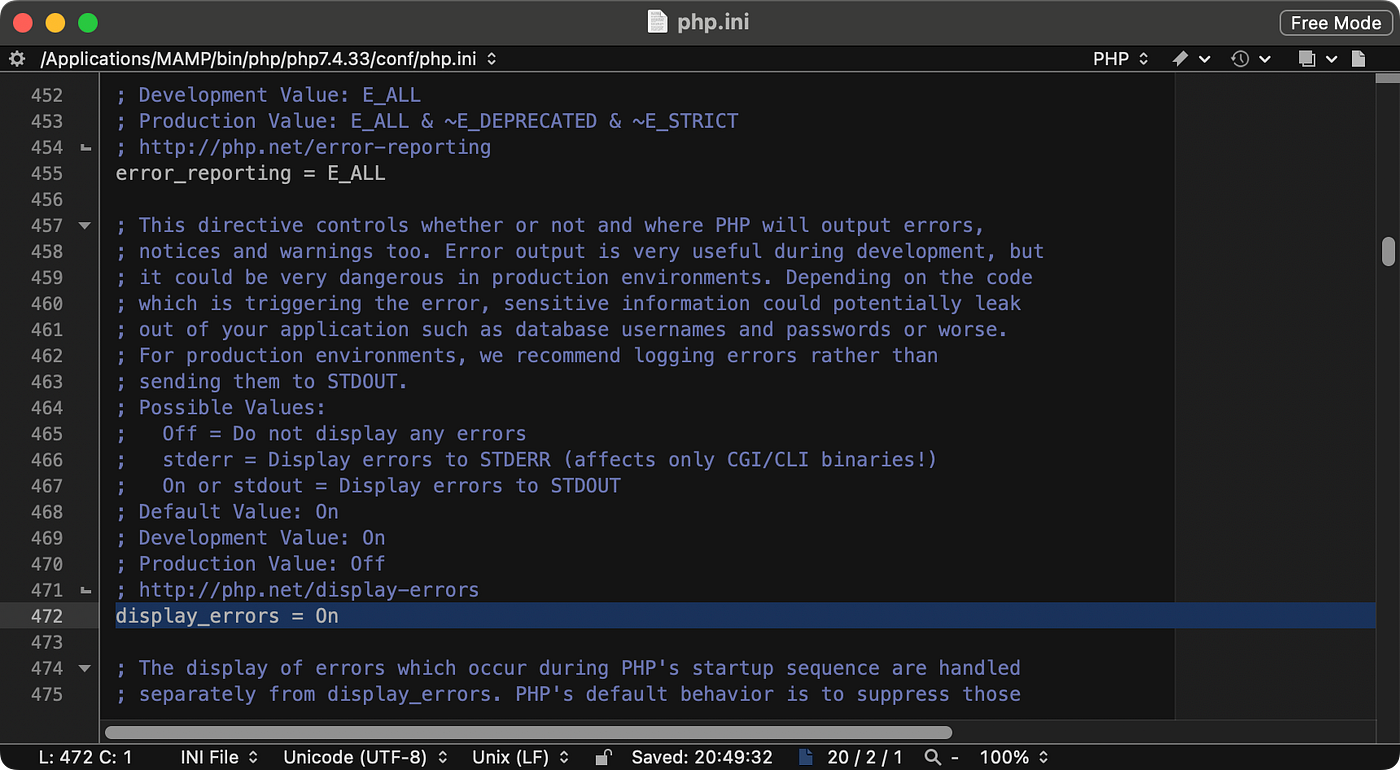
display_errors from Off to On
How to modify the php.ini file:
- Make a backup copy of the
php.inifile before modifying it. - Open the
php.inifile with a text editor. - Search for the directives (
error_reporting,display_errors). - Modify their values as indicated above (e.g., change
display_errors = Offtodisplay_errors = On). You can also comment out the original line with a semicolon (;) and add the new line below. - Save the file and restart MAMP servers for the changes to take effect.
Note: Always make a backup copy of files you’re going to modify; you can restore the initial state at any time.
Modifications to httpd.conf
To enable detailed directory listing, modify the httpd.conf file (located in MAMP/conf/apache/httpd.conf) by removing the # symbol from the line starting with “Include […]”
# Fancy directory listings
Include /Applications/MAMP/conf/apache/extra/httpd-autoindex.con
By default, if you access a folder that doesn’t contain an index file (like index.php or index.html), Apache might show an access denied message. To see a list of files and subfolders instead (useful in development), you can enable the autoindex module:
- Open Apache’s configuration file:
/Applications/MAMP/conf/apache/httpd.conf. - Make a backup copy of the file.
- Look for a line similar to this (it might be commented with #):
# Fancy directory listings
#Include /Applications/MAMP/conf/apache/extra/httpd-autoindex.conf- Remove the # symbol at the beginning of the include line:
# Fancy directory listings
Include /Applications/MAMP/conf/apache/extra/httpd-autoindex.conf- Save the httpd.conf file and restart MAMP servers.
This allows you to see a detailed directory listing instead of the default display.
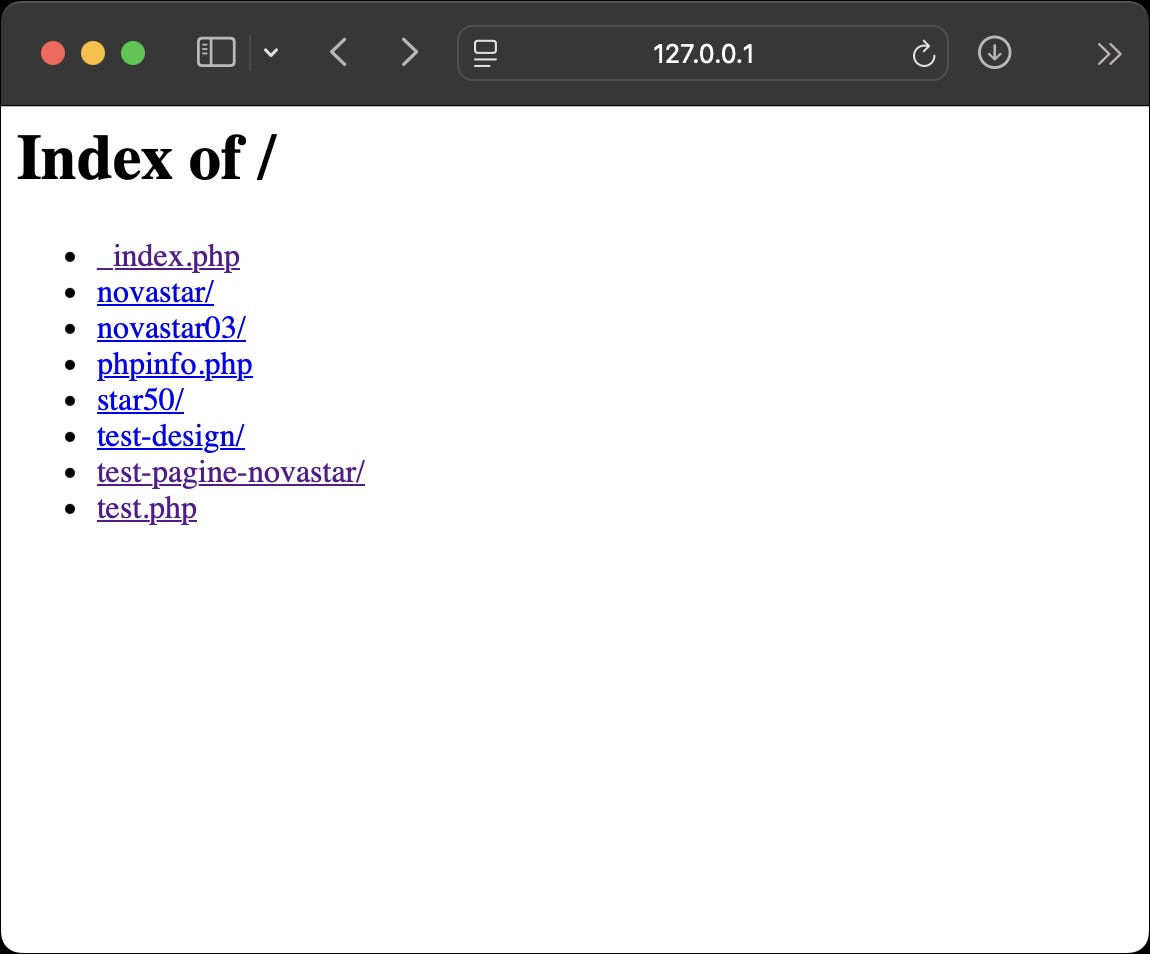
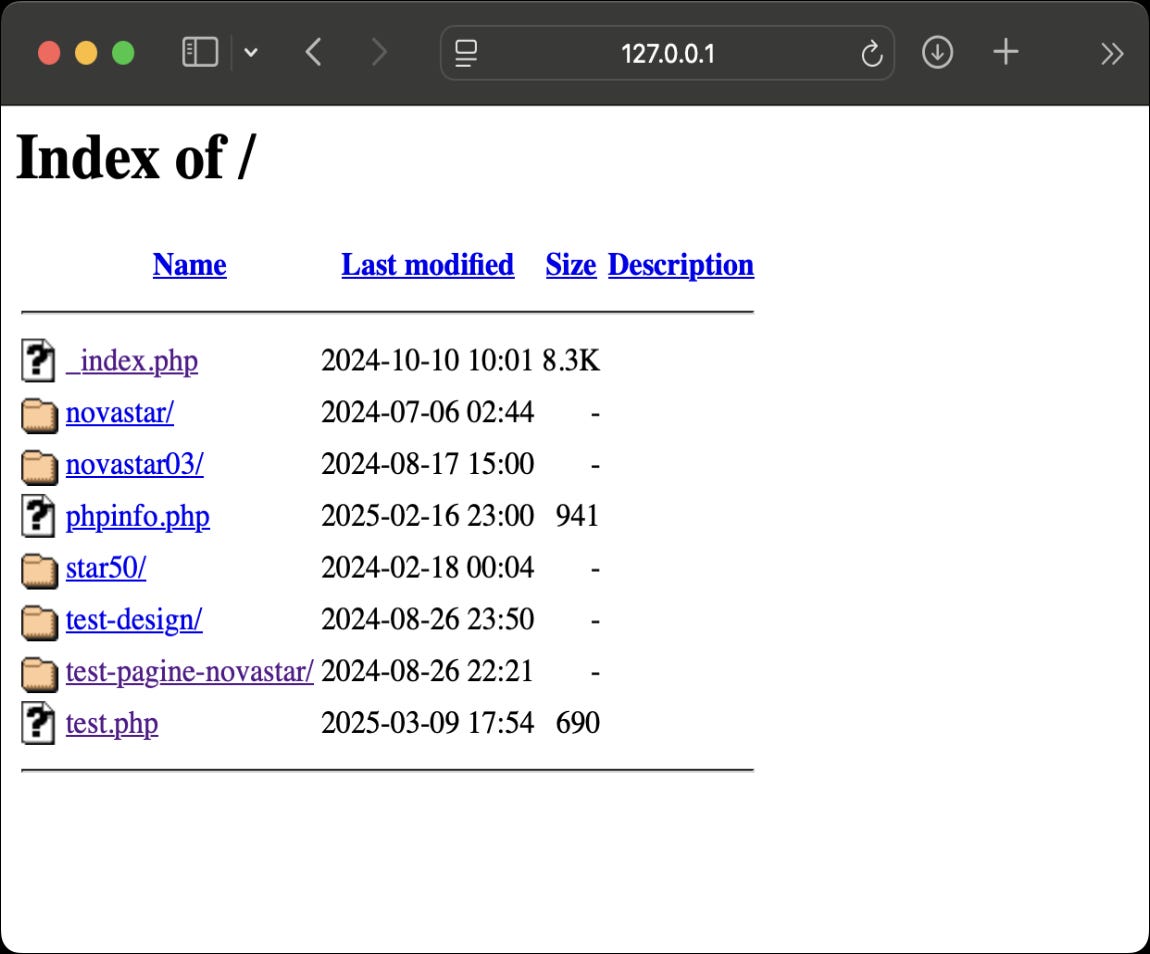
Default view on left, detailed view on right
Enabling Xdebug
Xdebug is an essential tool for PHP developers. It replaces the traditional method of finding errors (inserting echo or var_dump in the code) with an organized system that allows you to examine code step by step. It enables you to:
- Display errors and warnings in a much more detailed and readable way
- Follow your code execution step by step directly from your editor (like VS Code or PhpStorm)
- Inspect variable values at any point during execution
- Analyze code performance (profiling)
Note: For more details, you can consult the Official Xdebug Documentation. If you find Xdebug useful, consider supporting the project.
Example without Xdebug
All examples shown were created using PHP version 7.4.33. The same modifications are also applicable to PHP version 8.2.26.
Example of error display without Xdebug and with active directives:
error_reporting = E_ALL
display_errors = On
In the test.php file, between the <hr> and </body> tags, I inserted two random variables that generate errors:
<?php
  $variabile_vuota;
  echo $variabile_a_caso;
  echo $variabile_vuota;
?>
Without Xdebug active, an error like using an undefined variable generates a simple “Notice” in the browser.
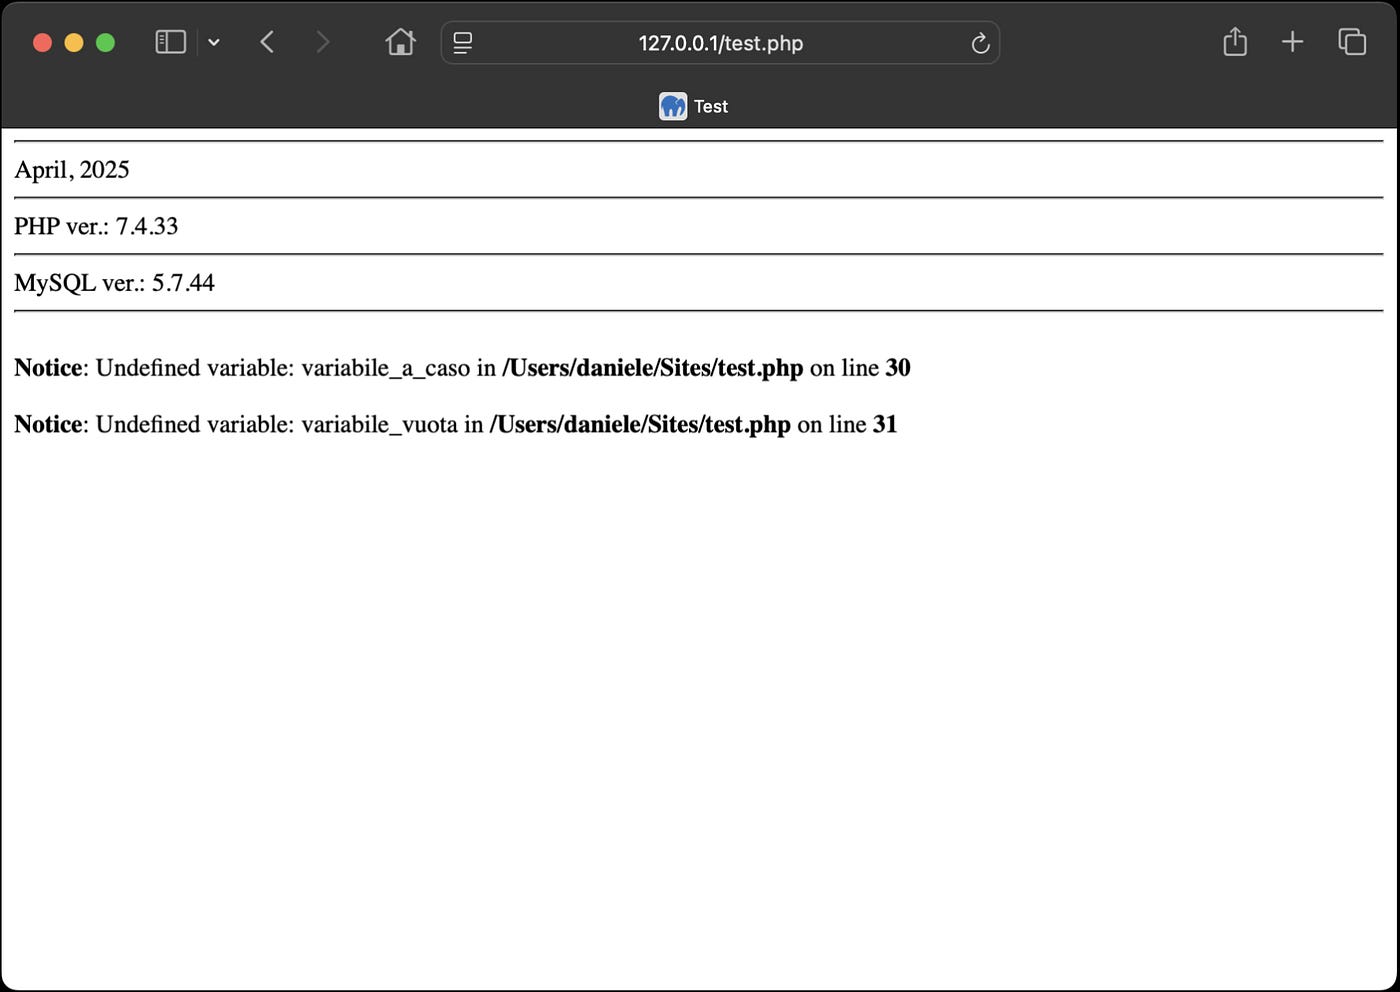
Without XDebug Active
With MAMP turned off, open /Applications/MAMP/bin/php/php7.4.33/conf/php.ini (remember to make a backup of the file).
Find the [xdebug] section, usually near the end of php.ini, and remove the semicolon (;) at the beginning of the line ;zend_extension="..." to activate the directive.
[xdebug]
zend_extension="/Applications/MAMP/bin/php/php7.4.33/lib/php/extensions/no-debug-non-zts-20190902/xdebug.so"
xdebug.mode=develop,coverage,debug,gcstats,profile,trace
xdebug.start_with_request=yes
Save the php.ini file and start MAMP.
Reload the test.php page in your browser. The error will now be clearer and formatted thanks to Xdebug.
Without XDebug Active
Brief explanation of Xdebug modes:

| Mode         | Purpose                                               |
|--------------|-------------------------------------------------------|
| `develop`    | Clearer and more detailed error messages              |
| `debug`      | Remote debugging with an IDE (e.g., VSCode, PhpStorm) |
| `coverage`   | Test coverage verification (code coverage)            |
| `gcstats`    | Memory management statistics (GC)                     |
| `profile`    | Performance analysis (code profiling)                 |
| `trace`      | Complete trace of executed functions                  |
Advanced Xdebug Configuration
I added parameters to the [xdebug] section. To enable Xdebug in MAMP with an advanced configuration, follow these steps.
Open the php.ini file: /Applications/MAMP/bin/php/php7.4.33/conf/php.ini
Update Xdebug settings: Replace the content of the [xdebug] section with this custom configuration.
I’ve included brief comments for each parameter added to the custom configuration.
[xdebug]
zend_extension="/Applications/MAMP/bin/php/php7.4.33/lib/php/extensions/no-debug-non-zts-20190902/xdebug.so"

; Xdebug modes
xdebug.mode=develop,debug,profile ; Enable advanced development, debugging, and profiling

; Remote debugging
xdebug.start_with_request=yes ; Automatically start debugger
xdebug.client_host=127.0.0.1 ; Connect to local debugger
xdebug.client_port=9003 ; Use standard port

; Error behavior
xdebug.start_upon_error=yes ; Activate debugger when errors occur
xdebug.show_exception_trace=1 ; Display stack trace for exceptions

; Optimizations
xdebug.max_nesting_level=256 ; Limit call depth
xdebug.collect_params=2 ; Show only simple values
xdebug.show_local_vars=1 ; Display local variables

; File link configuration (VS Code)
xdebug.file_link_format="vscode://file/%f:%l" ; Create clickable links to open files in VS Code

; Logging
xdebug.log=/Applications/MAMP/logs/xdebug.log ; Define log location
xdebug.log_level=3 ; Log only important messages (3 = errors)

; Global variable dump (minimized to reduce noise)
xdebug.dump_globals=1 ; Enable global variable dump
xdebug.dump.SERVER=REMOTE_ADDR,REQUEST_METHOD,HTTP_USER_AGENT ; Shows only essential server info
xdebug.dump.GET= ; Disable automatic GET parameter dump
xdebug.dump.POST= ; Disable automatic POST parameter dump
Save and restart MAMP. Now Xdebug is active and ready for debugging!
On the left, one of my old projects where I disconnected the database; on the right, VS Code opened at the line in the file where the error is detected.
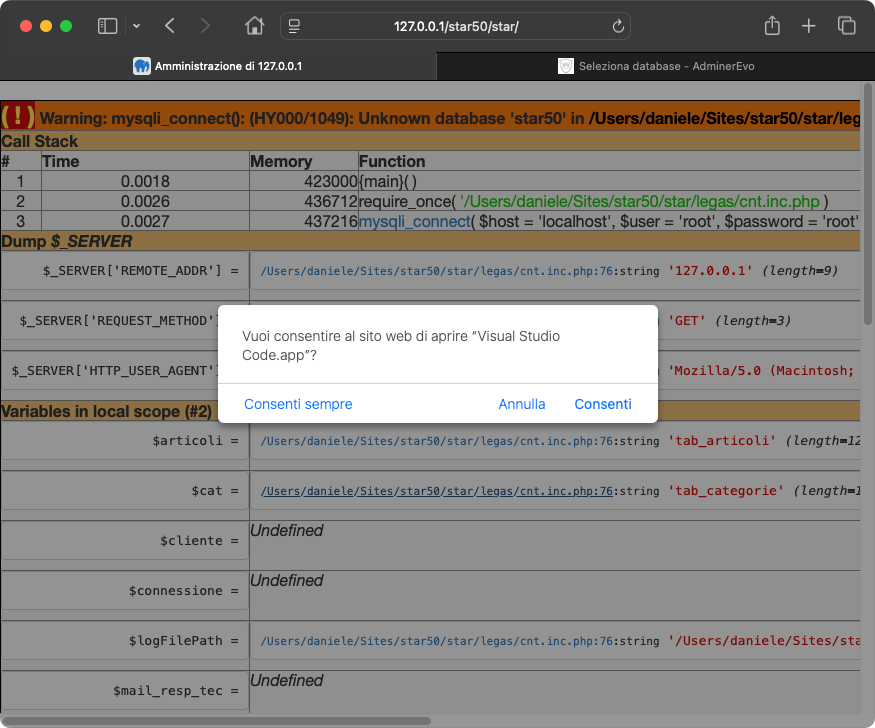
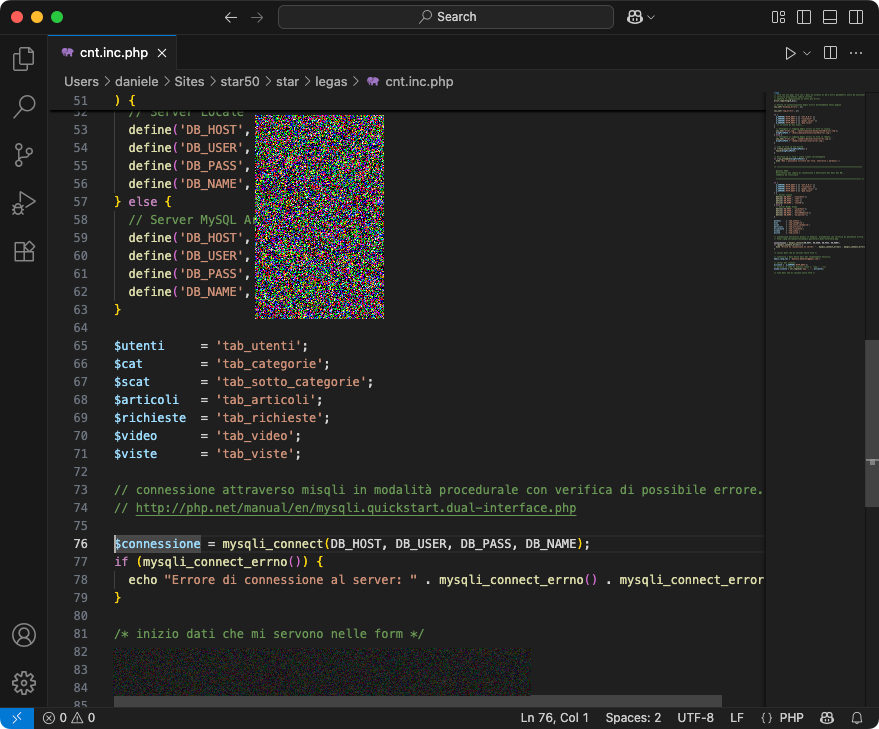
Error Detection
Note: Tools like phpMyAdmin can become slow and/or generate errors. I recommend using Adminer for MySQL management or temporarily disabling Xdebug if necessary.
Configuring VS Code for Xdebug
Click on the “Extensions” icon in the left sidebar. A search box will open: type “PHP Debug” and proceed with installing the extension.
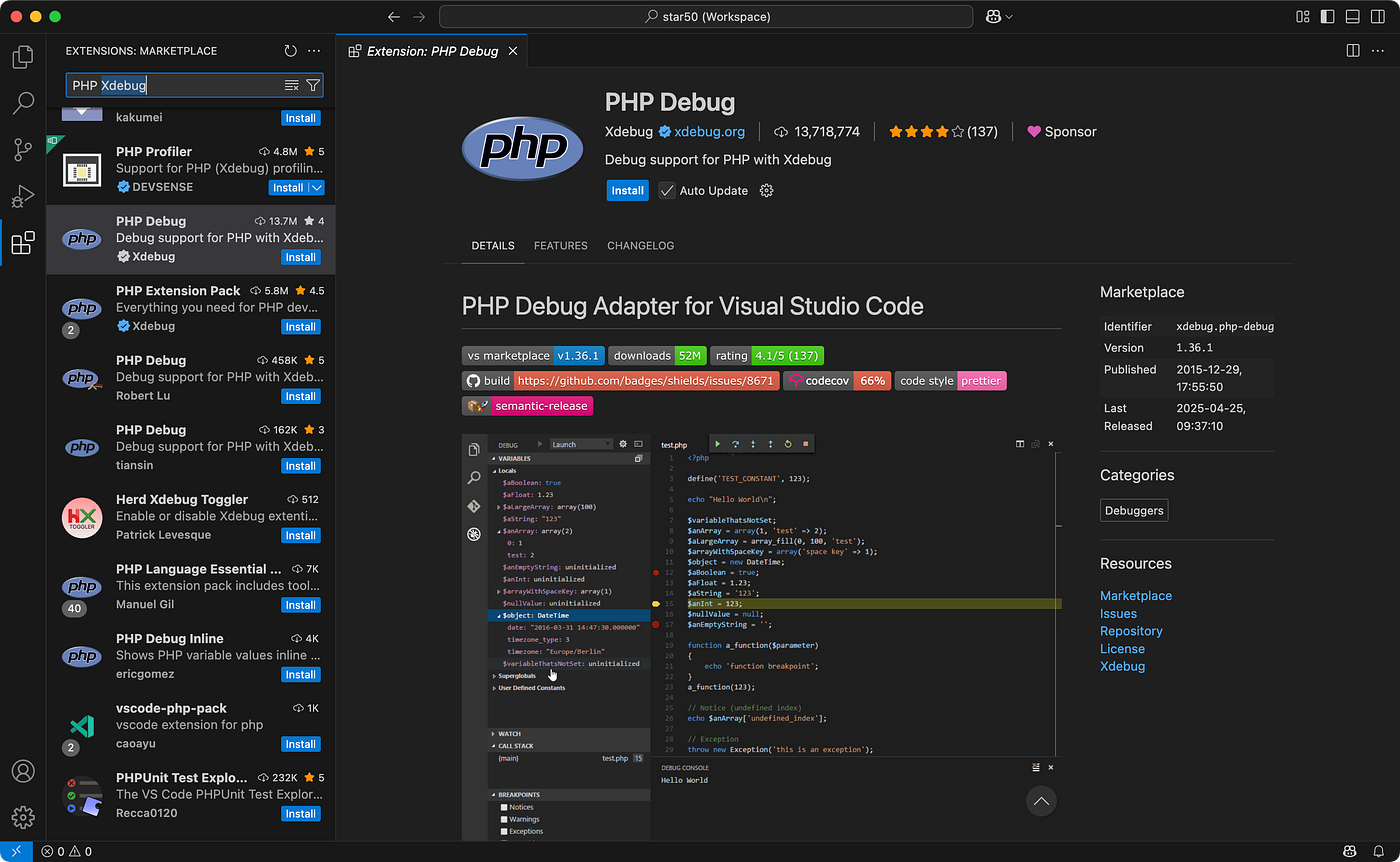
VS Code + PHP Debug
Configuring the launch.json file
In the example, the project folder is star50. Inside, look for a folder named .vscode, If it doesn’t exist, create the folder from VS Code like this: open your project folder, click on the folder icon, name it .vscode, and save.
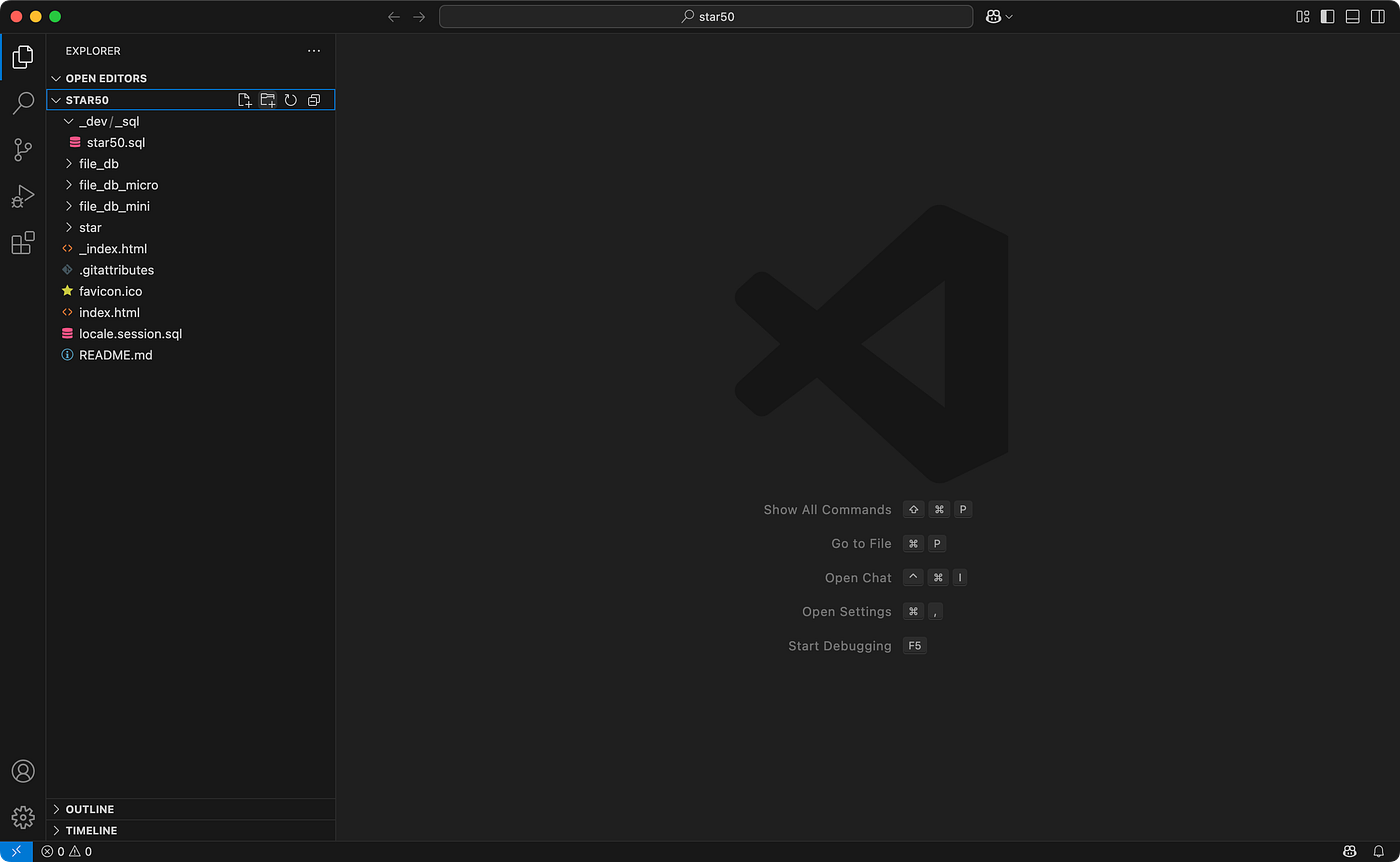
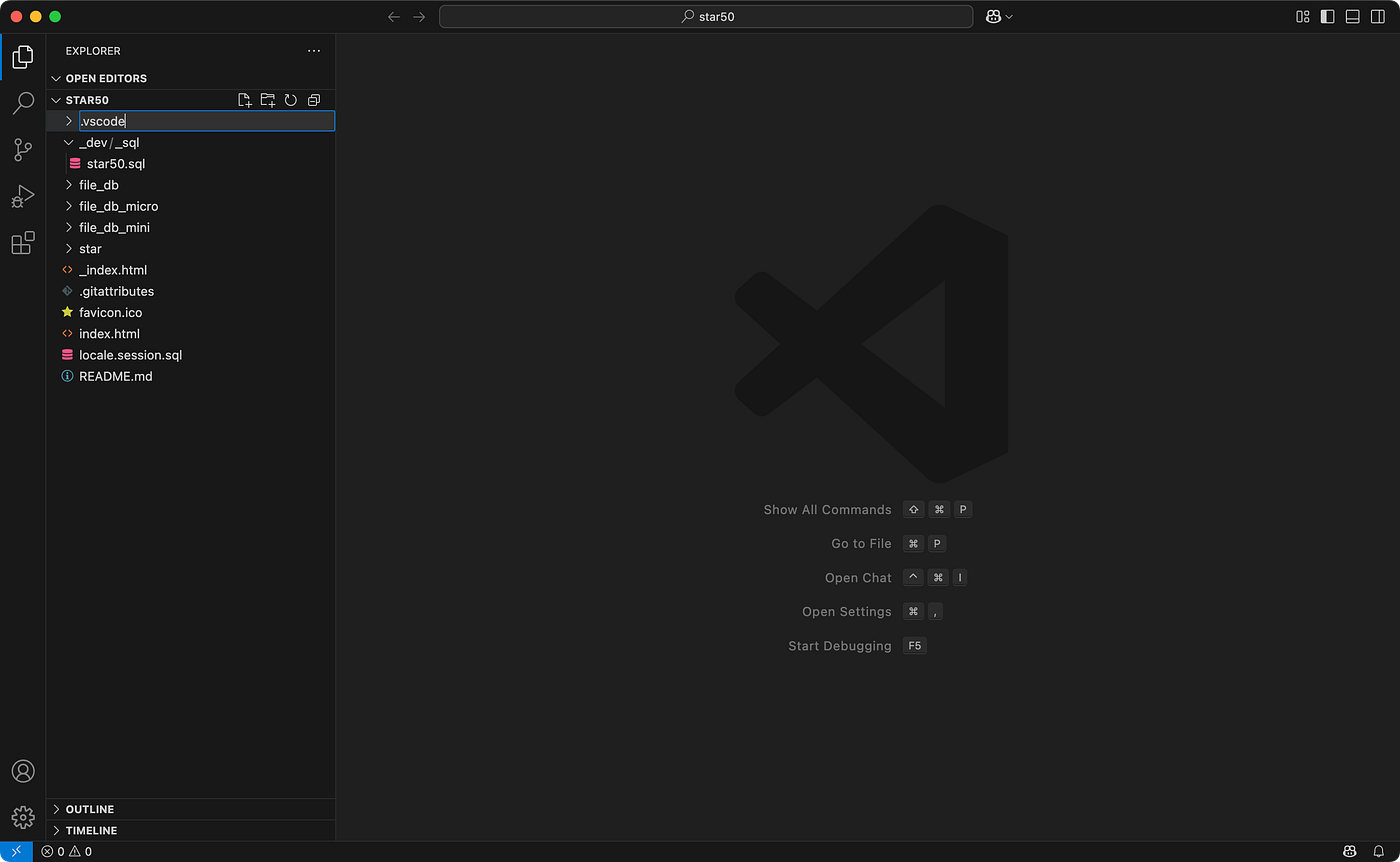
Inside the .vscode folder, create a file named launch.json. For simplicity, you can paste the following code:
{
    "version": "0.2.0",
    "configurations": [
        {
            "name": "Listen for Xdebug PHP",
            "type": "php",
            "request": "launch",
            "port": 9003,
            "pathMappings": {
                "/Users/daniele/Sites/star50": "${workspaceFolder}"
            },
            "log": true
        },
        {
            "name": "Launch currently open script",
            "type": "php",
            "request": "launch",
            "program": "${file}",
            "cwd": "${fileDirname}",
            "port": 0,
            "runtimeArgs": [
                "-dxdebug.start_with_request=yes"
            ],
            "env": {
                "XDEBUG_MODE": "debug,develop,profile",
                "XDEBUG_CONFIG": "client_port=${port}"
            }
        }
    ]
}
Important: Remember to enter the correct pathMapping to use the Sites or htdocs folder from MAMP and replace “star50” with your project folder name.
pathMapping for Sites:
"pathMappings": {
    "/Users/tuonome/Sites/nome-progetto": "${workspaceFolder}"
},
pathMapping for htdocs:
"pathMappings": {
     "/Applications/MAMP/htdocs/none-progetto": "${workspaceFolder}"
},
How to Use Xdebug with VS Code
Starting the Debug:
- Start MAMP and make sure Xdebug is active (as configured previously)
- Open your project in VS Code
- Set breakpoints: Click on the left margin of the code (next to line numbers) to add breakpoints (red dots)
- Start the debugger:
- Go to the “Run and Debug” section (play icon with bug in the sidebar)
- Select “Listen for Xdebug” from the dropdown menu
- Click the play button
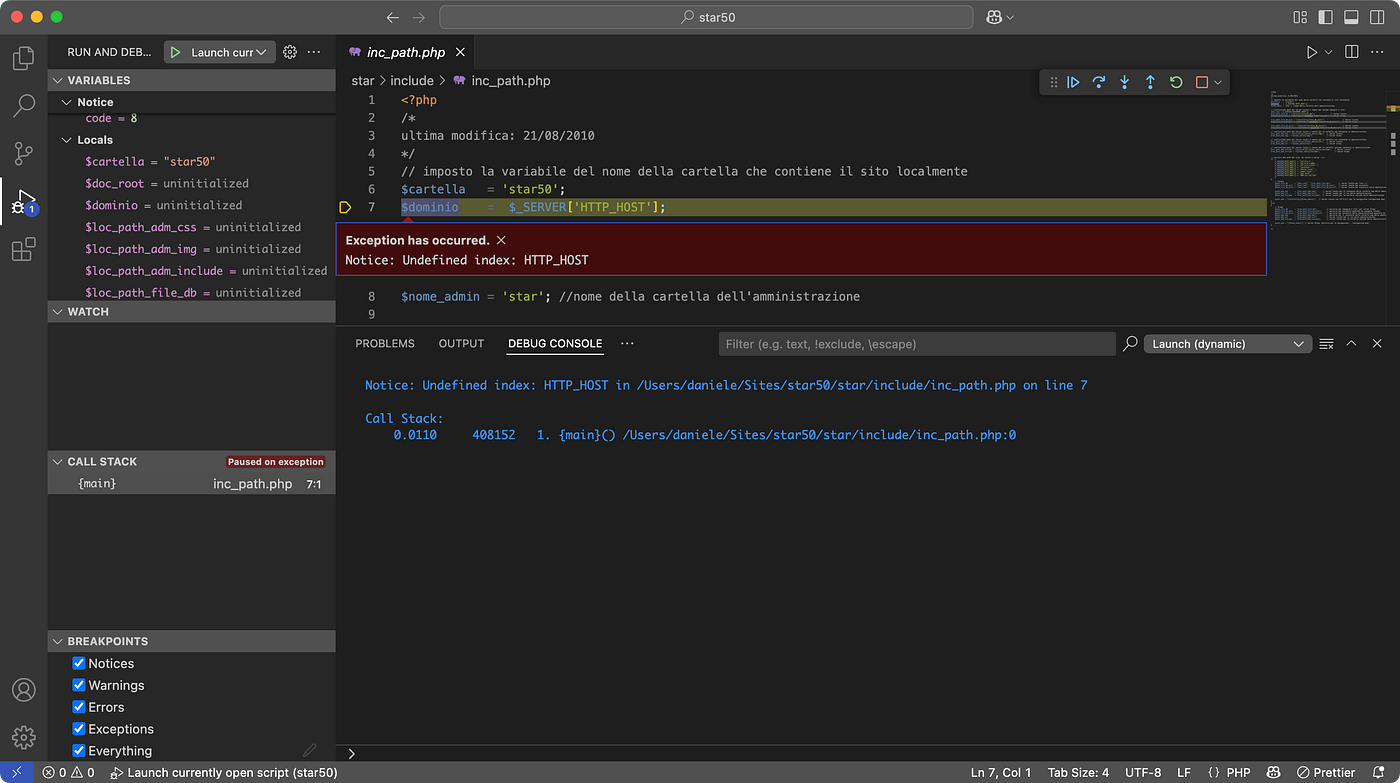
Debugger Active
Note: Always remember to disable Xdebug in production environments, as it can significantly affect website performance.
Final Considerations
This guide stems from my direct teaching experience and the most frequent questions from my students. MAMP may seem complex at first, but with these configurations, you’ll achieve a professional and flexible development environment.
If you found this article helpful, share it and leave a Clap!
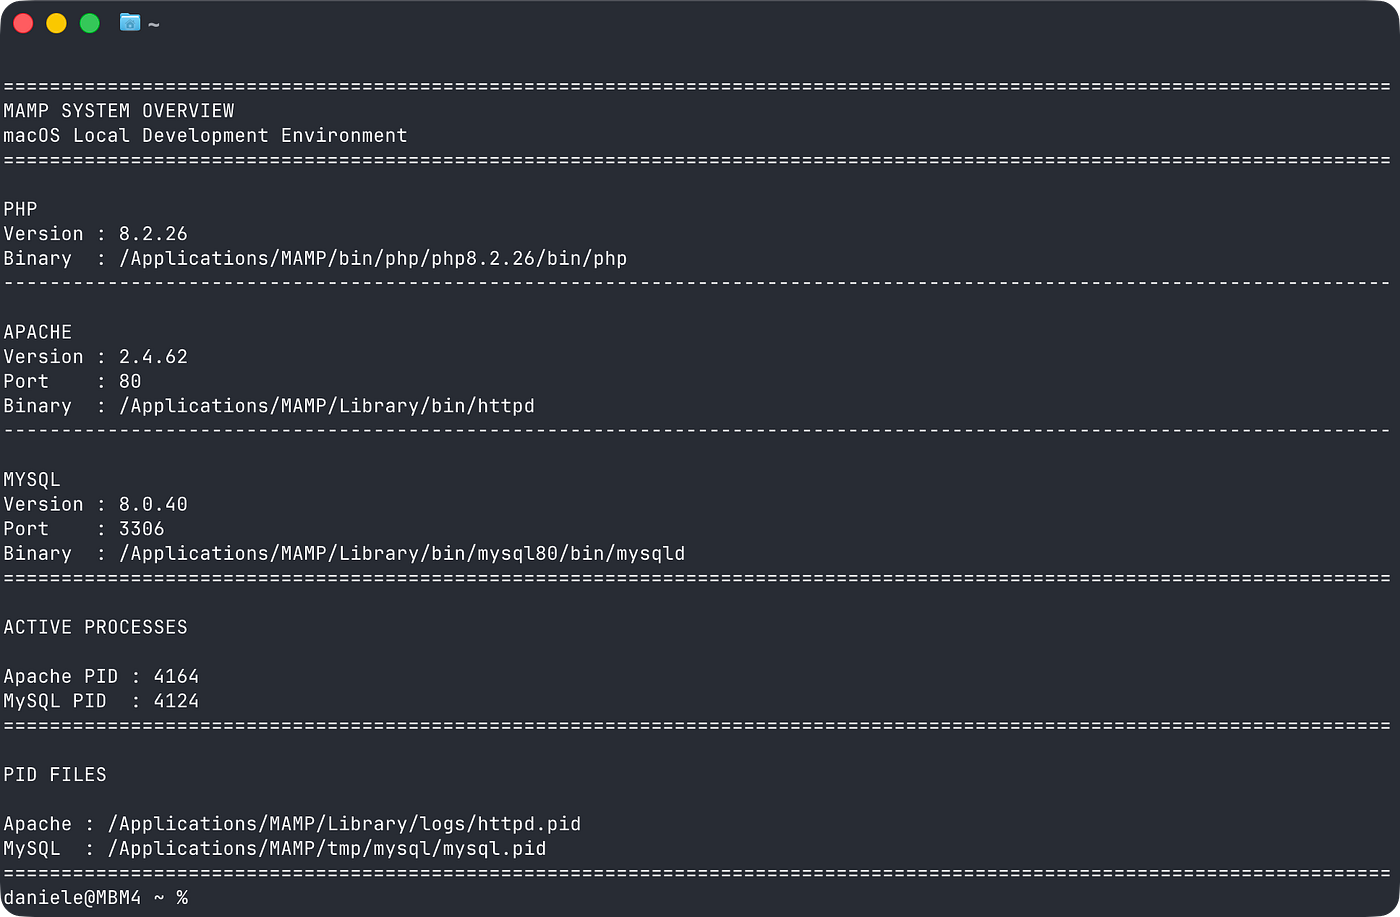
Having trouble starting Apache or MySQL in MAMP?
Even after a successful installation, MAMP may occasionally fail to start due to stale PID files left behind after an unexpected shutdown.
Learn how to identify and remove them to restore your local development environment in minutes.
메타데이터
- post_id
- b4e22db0be6e
- slug
- complete-guide-to-mamp-on-macos-15-sequoia-installation-and-advanced-configurations-b4e22db0be6e
- url
- https://medium.com/@daniele.dandreti/complete-guide-to-mamp-on-macos-15-sequoia-installation-and-advanced-configurations-b4e22db0be6e
- canonical_url
- https://medium.com/@daniele.dandreti/complete-guide-to-mamp-on-macos-15-sequoia-installation-and-advanced-configurations-b4e22db0be6e
- author_url
- https://medium.com/@daniele.dandreti
- status
- ok
- fetched_at
- 2026-06-27 07:40:21