From Terminal to Full Game: How We Built a Car Dodge Game in Python
The idea started with a while True: loop and a few Unicode box characters
From Terminal to Full Game: How We Built a Car Dodge Game in Python
The idea started with a while True: loop and a few Unicode box characters
Part 1 — It Started in the Terminal
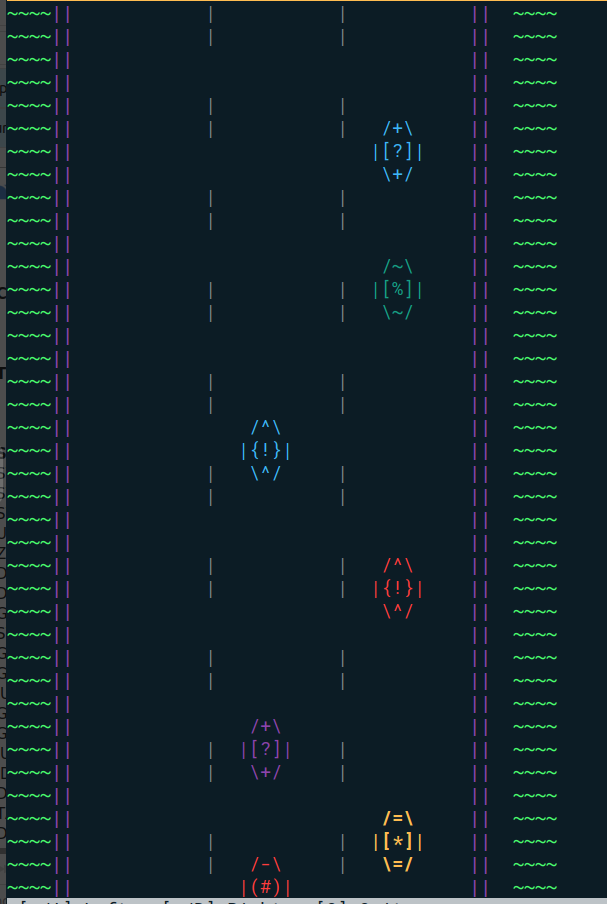
Every game project has a humble beginning. Ours was a Python script using the curses library — the low-level terminal control toolkit that lets you draw text at specific screen positions.
The “car” looked like this:
      //=\\
      |[*]|
      \\=//
Enemy vehicles? More Unicode box-drawing characters, scrolling down the screen at 20 frames per second. Collision detection was just “are we in the same row and column?” It worked. It was fun. And it was clearly a prototype screaming to become something more.
The curses version taught us the fundamentals: game state, frame timing, lane-based movement, difficulty scaling. But it had a ceiling. You can’t easily add images, particles, or sound effects to a terminal. So we decided to port it to Pygame.
Part 2 — The Migration Plan
Porting is deceptively hard. You’re not just replacing drawing calls — you’re rethinking your entire coordinate system, asset pipeline, and event model.
Here’s what changed: Characters on a grid became pixels on a surface. curses.color_pair() became RGB tuples. getch() became pygame.event.get(). 20 FPS became 60 FPS. Subprocess sound calls became pygame.mixer.
We restructured the codebase into clean modules:
cargame/
├── constants.py    # dimensions, colors, layout math
├── renderer.py     # all drawing — road, trees, sky, particles
├── hud.py          # speedometer, score panels, confetti, booster
├── cars.py         # player car image loading
├── enemy.py        # enemy vehicle loading and movement
├── screens.py      # splash screen, car selection, game over
├── game.py         # main loop: input → logic → render
├── sound.py        # music + SFX with theme switching
└── scores.py       # SQLite leaderboard
The rule we followed: renderer.py draws, game.py thinks. No game logic in the renderer, no drawing in the game loop. This separation saved us from spaghetti dozens of times.
Part 3 — Building the Road
The visual core of any racing game is the road. In Pygame, this means drawing rectangles and lines onto a surface every frame. We started with a flat gray rectangle. Then added shoulder strips, dashed lane markings that scroll downward, grass with alternating shades to create a “mowing stripe” effect, and procedurally placed trees.
The road scroll is just an offset variable that increments each frame:
self.road_offset = (self.road_offset + speed) % DASH_HEIGHT
Later we added scene moods that change based on your level:
def _scene_for_level(level: int) -> int:
    if level <= 4:   return SCENE_DAY
    elif level <= 8: return SCENE_SUNSET
    return SCENE_NIGHT
Levels 1–4 are bright daytime. Levels 5–8 are a dramatic orange sunset. Level 9+ is full night with a near-black sky. This gives a natural sense of escalating tension without changing any gameplay parameters.
We also added animated birds in the background — small V-shapes that flap their wings using a sine wave and drift across the sky. Tiny detail, huge atmosphere.
Part 4 — Real Car Images (and the Extraction Problem)
For player cars we sourced a PNG sprite sheet — a vertical strip of four rear-view illustrations. For enemies, a 4×3 grid of front-view vehicles. Extracting sprites from a grid image sounds easy. It isn’t.
Problem 1: Large vehicles span multiple rows. Our grid had a school bus and semi truck twice as tall as a sedan. Equal-height slicing cut them in half. Solution: define bounding boxes manually for multi-row vehicles.
Problem 2: White background. The illustrations sat on white. We needed transparency. The fix was a per-pixel pass:
for x in range(img.width):
    for y in range(img.height):
        r, g, b, a = img.getpixel((x, y))
        if r > 230 and g > 230 and b > 230:
            img.putpixel((x, y), (r, g, b, 0))
Problem 3: ICC profile spam. Loading these PNGs printed hundreds of libpng warning: iCCP lines. Fixed by re-saving all assets with Pillow after stripping the profile with del img.info['icc_profile'].
Part 5 — Sizing Everything Right
Getting sizes right took iteration. Our first pass had the player car at 60×110 pixels. On a 1200×800 window, it looked like a toy. We went through three rounds:
v1: Car 60×110, Road 360px, Window 900×650
v2: Car 90×130, Road 420px, Window 900×650
v3 (final): Car 110×150, Road 480px, Window 1200×800
The key insight: road width must be derived from car width, not the other way around. 3 lanes × 160px = 480px road. The car at 110px fits comfortably in a 160px lane with visual breathing room.
Part 6 — The HUD
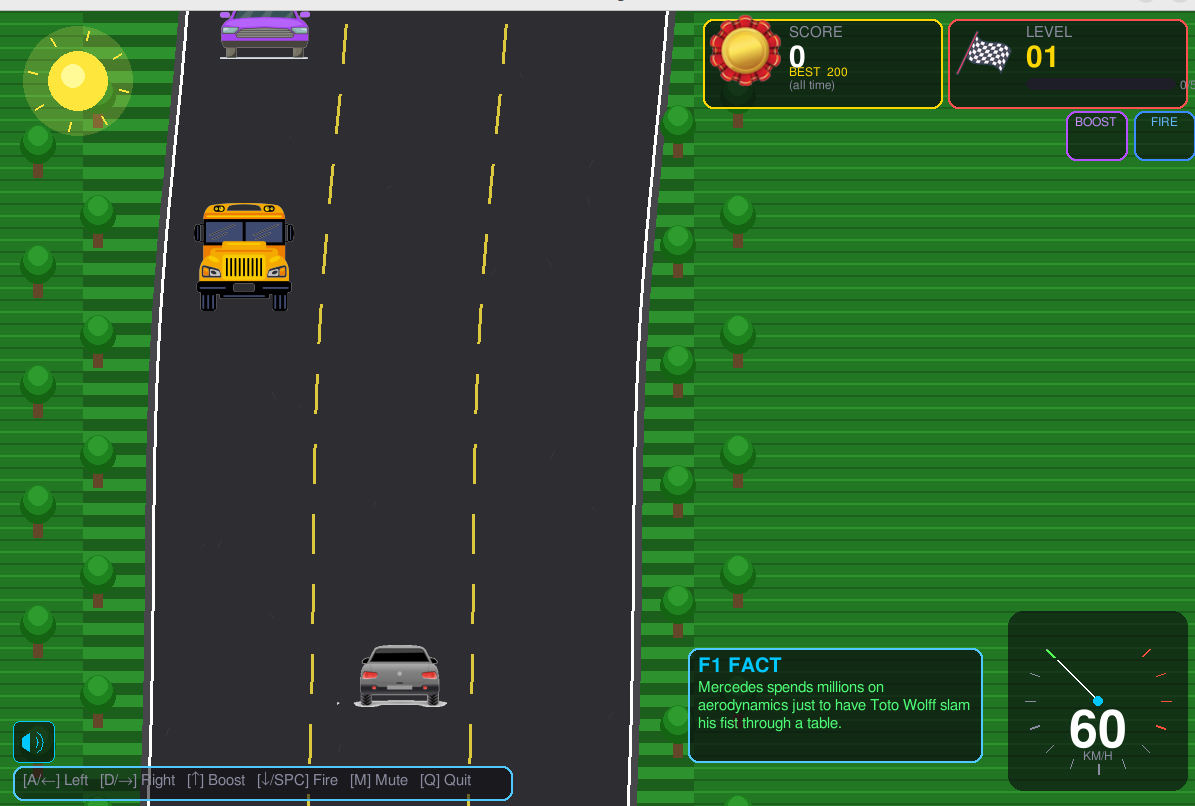
A good racing game HUD tells you everything at a glance. We built a circular speedometer, a level progress bar, a score panel with SQLite persistence, and a booster display with countdown bar.
The speedometer needle is pure trigonometry:
angle = math.radians(225 - (speed_pct * 270))
needle_x = cx + math.cos(angle) * radius
needle_y = cy - math.sin(angle) * radius
pygame.draw.line(surface, WHITE, (cx, cy), (needle_x, needle_y), 3)
For milestones, we replaced a boring text banner with a confetti burst. We pre-allocate 60 ConfettiParticle objects using __slots__ for memory efficiency. Each particle has gravity, rotation, and a fade-out — auto-cleaned when off screen.
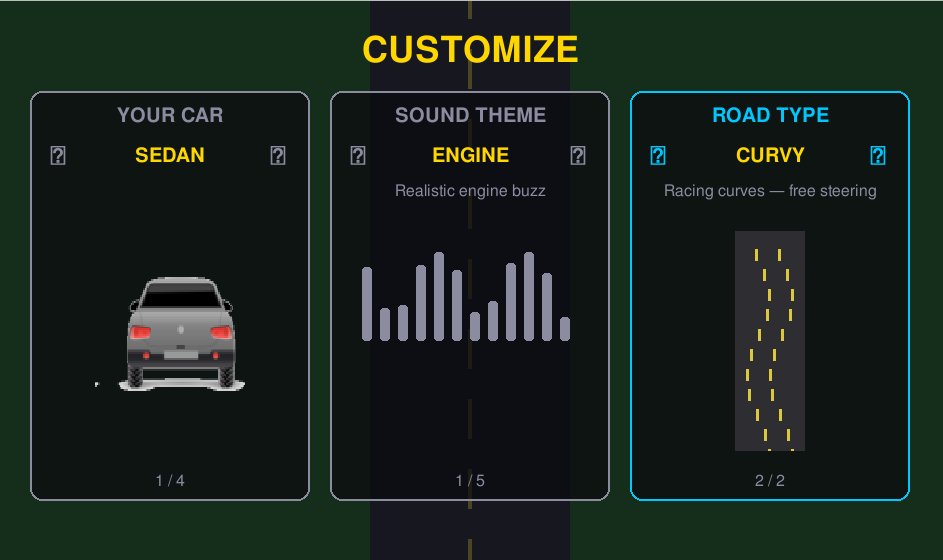
Customize Option looked like this
Part 7 — The Speed Lines Bug
Speed lines are streaks behind the player car when going fast. Our first implementation drew them above the car — in front of it. Cars don’t trail streaks in front of themselves.
The fix was a single sign change:
# Wrong: streak appears in front of car
streak_y = player_y - offset
# Correct: streak appears behind car
streak_y = player_y + offset
One of those bugs that’s obvious in retrospect but takes a while to notice mid-implementation.
Part 8 — The Invincible Boost
Every good arcade game needs a power-up. We added an Invincible Boost: earned every 50 points, activated with the UP arrow key, 3 seconds of full crash immunity. Visual: a purple pulsing glow around the player car.
pulse = abs(math.sin(self.invincible_timer * 4))
glow_radius = int(40 + pulse * 15)
pygame.draw.circle(screen, PURPLE_GLOW, car_center, glow_radius, 4)
Part 9 — A Bug That Crashed the Game
At level 2, we hit a ValueError: empty range for randrange(). The crash trace led here:
spawn_delay = random.randint(40, intensity)
At level 2, intensity = min(2 * 15, 180) = 30. And randint(40, 30) is illegal — lower bound exceeds upper bound. The fix:
lo = min(40, intensity)
hi = max(40, intensity)
spawn_delay = random.randint(lo, hi)
Simple, but it only triggered at exactly level 2, and only sometimes — making it hard to catch.
Part 10 — Polish and Feel
The last 20% of development was pure polish:
Curvy road mode — player drifts freely side to side instead of lane-snapping.
Sound themes — engine, retro 8-bit, or silent, selectable from customization screen.
F1 facts — random racing trivia on the pause screen, loaded from JSON.
Car selection screen — animated background with all four cars previewed.
SQLite leaderboard — top 5 scores persisted between sessions.
Scene transitions — day to sunset to night as you climb levels.
Fully developed game screen
What We Learned
1. Separate concerns early. Splitting rendering from logic from HUD saved enormous refactoring time.
2. Source asset quality matters. A 226px sprite sheet will blur when scaled up. Get high-res sources.
3. Size things relative to each other. Road width derived from car width. Window sized around road + HUD. Everything flows.
4. Particle effects are cheap and powerful. Confetti, speed lines, and glow effects cost almost nothing in performance but dramatically change how the game feels.
5. Bugs hide at edge cases. The randint crash only appeared at a specific level because difficulty scaling has non-linear behavior near its minimum.
6. Pygame is a great learning tool. It gives you just enough structure to build something real, without hiding how rendering, events, and timing actually work.
Happy driving.
Source code: https://github.com/gvgbalaji/cargame
메타데이터
- post_id
- b67e3ca2b2cd
- slug
- from-terminal-to-full-game-how-we-built-a-car-dodge-game-in-python-b67e3ca2b2cd
- url
- https://medium.com/@gvgbalaji/from-terminal-to-full-game-how-we-built-a-car-dodge-game-in-python-b67e3ca2b2cd
- canonical_url
- https://medium.com/@gvgbalaji/from-terminal-to-full-game-how-we-built-a-car-dodge-game-in-python-b67e3ca2b2cd
- author_url
- https://medium.com/@gvgbalaji
- status
- ok
- fetched_at
- 2026-07-13 06:23:13