Running GPUs in Kubernetes: From Setup to Scheduling and Sharing
1. How to Enable GPUs in Kubernetes and Run a GPU Workload ?
Running GPUs in Kubernetes: From Setup to Scheduling and Sharing
1. How to Enable GPUs in Kubernetes and Run a GPU Workload ?
In Kubernetes, GPUs are not available by default. A few components work together so that Kubernetes can discover GPUs and attach them to pods.
High-level GPU enablement flow
The following flow shows how Kubernetes detects and assigns GPUs:
GPU-enabled Pod
 ↓ (requests nvidia.com/gpu)

Kubelet (Kubernetes Cluster)
 ↓ (checks allocatable GPUs)

NVIDIA Device Plugin
 ↓ (discovers GPUs via driver)

NVIDIA Driver
 ↓
Physical GPU
─────────── Pod Startup (runtime attachment path) ──────────
Kubelet
 ↓ (invokes GPU-enabled runtime)

NVIDIA Container Runtime (Container Toolkit)
 ↓ (injects GPU devices & CUDA libs)

GPU-enabled Pod
By diagram we can understand, to enable GPUs in a cluster, three components must be configured on GPU nodes:
i. NVIDIA Driver : This allows the operating system to communicate with the physical GPU hardware.
ii. NVIDIA Container Runtime (Container Toolkit) : This injects GPU devices and CUDA libraries into containers at runtime.
iii. NVIDIA Device Plugin : This discovers GPUs using the NVIDIA driver and advertises them to Kubernetes so pods can request them.
Step 1: Verify NVIDIA Driver on the GPU node
First, check whether the NVIDIA driver is installed on the GPU node:
nvidia-smiIf the driver is installed correctly, this command will show GPU details.
If not, install the driver according to your operating system using the official documentation:
👉 https://docs.nvidia.com/datacenter/tesla/driver-installation-guide/index.html
After installation, we can verify it again using nvidia-smi.

Step 2: Install NVIDIA Container Runtime (Container Toolkit)
Next, we will install the NVIDIA Container Toolkit on the GPU node.
Follow the official documentation based on the operating system:
👉 https://docs.nvidia.com/datacenter/cloud-native/container-toolkit/latest/install-guide.html
After installation, we will run the following commands to attach the NVIDIA Container Runtime to the container runtime.
If using containerd (most Kubernetes clusters) :
sudo nvidia-ctk runtime configure --runtime=containerd
sudo systemctl restart containerd
If using Docker :
sudo nvidia-ctk runtime configure --runtime=docker
sudo systemctl restart docker
After this step, containers can access GPUs when GPU resources are requested.
We can verify this in the following way if the NVIDIA Container Toolkit is configured with Docker :

Step 3: Install NVIDIA Device Plugin in the cluster
Finally, on the cluster, we can install the NVIDIA Device Plugin using the following command:
kubectl create -f https://raw.githubusercontent.com/NVIDIA/k8s-device-plugin/v0.17.1/deployments/static/nvidia-device-plugin.ymlAfter this step, the cluster is ready with GPU nodes.
We can verify this, and the GPU resources will now be visible on the nodes.

Running a GPU workload in Kubernetes
To run a GPU-enabled pod, GPU resources must be explicitly requested:
resources:
  limits:
    nvidia.com/gpu: 1
Example: Simple GPU test pod
cat <<EOF | kubectl apply -f -
apiVersion: v1
kind: Pod
metadata:
  name: gpu-pod-1
  labels:
    app: gpu-test
spec:
  restartPolicy: Never
  containers:
  - name: cuda-container
    image: nvidia/cuda:11.8.0-base-ubuntu22.04
    command:
    - /bin/bash
    - -c
    - |
      echo "GPU Pod 1 started"
      nvidia-smi
      echo "Running infinite loop to keep pod alive..."
      while true; do
        echo "GPU Pod 1 - $(date) - Running GPU workload simulation"
        nvidia-smi --query-gpu=utilization.gpu,memory.used --format=csv
        sleep 10
      done
    resources:
      limits:
        nvidia.com/gpu: 1
EOF
And now we can verify it.

2. What happens when multiple pods request more GPUs than available ?
Since we already deployed one GPU pod and verified via resources that we have only one GPU node, now we want to check what happens if we deploy another pod that also requires a GPU.
cat <<EOF | kubectl apply -f -
apiVersion: v1
kind: Pod
metadata:
  name: gpu-pod-2
  labels:
    app: gpu-test
spec:
  restartPolicy: Never
  containers:
  - name: cuda-container
    image: nvidia/cuda:11.8.0-base-ubuntu22.04
    command:
    - /bin/bash
    - -c
    - |
      echo "GPU Pod 2 started"
      nvidia-smi
      echo "Running infinite loop to keep pod alive..."
      while true; do
        echo "GPU Pod 2 - $(date) - Running GPU workload simulation"
        nvidia-smi --query-gpu=utilization.gpu,memory.used --format=csv
        sleep 10
      done
    resources:
      limits:
        nvidia.com/gpu: 1
EOF
Now, if we check the pod status, the second pod will remain in the Pending state because there are no available GPU resources. We can verify this by describing the pod.


3. What is GPU time slicing, and how can we configure it ?
GPU Time Slicing is a way to share a single GPU among multiple processes without physically partitioning or splitting the GPU. Instead, each process gets access to the GPU for a short time slice, one after another.
When we enable time slicing, Kubernetes exposes virtual (fake) GPU resources, allowing multiple pods to request GPUs even though there is only one physical GPU. These virtual GPUs are available to processes as long as the GPU is not fully saturated by another workload.
### Before Time-Slicing
┌─────────────────────┐
│  Physical GPU 0     │  → Can run 1 pod
└─────────────────────┘

### After Time-Slicing (replicas: 4)
┌─────────────────────┐
│  Physical GPU 0     │
├─────────────────────┤
│  Virtual GPU 0      │  → Pod 1
│  Virtual GPU 1      │  → Pod 2
│  Virtual GPU 2      │  → Pod 3
│  Virtual GPU 3      │  → Pod 4
└─────────────────────┘
Steps to configure GPU time slicing
1. Create a ConfigMap for time slicing
cat <<EOF | kubectl apply -f -
apiVersion: v1
kind: ConfigMap
metadata:
  name: time-slicing-config
  namespace: kube-system
data:
  any: |-
    version: v1
    flags:
      migStrategy: none
    sharing:
      timeSlicing:
        resources:
        - name: nvidia.com/gpu
          replicas: 4
EOF
This configuration creates 4 virtual GPUs from a single physical GPU using time slicing.
2. Patch the NVIDIA Device Plugin DaemonSet to use this ConfigMap
kubectl patch daemonset nvidia-device-plugin-daemonset -n kube-system --type='json' -p='[
  {
    "op": "replace",
    "path": "/spec/template/spec/volumes",
    "value": [
      {
        "name": "device-plugin",
        "hostPath": {
          "path": "/var/lib/kubelet/device-plugins"
        }
      },
      {
        "name": "time-slicing-config",
        "configMap": {
          "name": "time-slicing-config-all"
        }
      }
    ]
  }
]'
Now, after the NVIDIA Device Plugin pod restarts, we can verify the GPU resources in the following way.
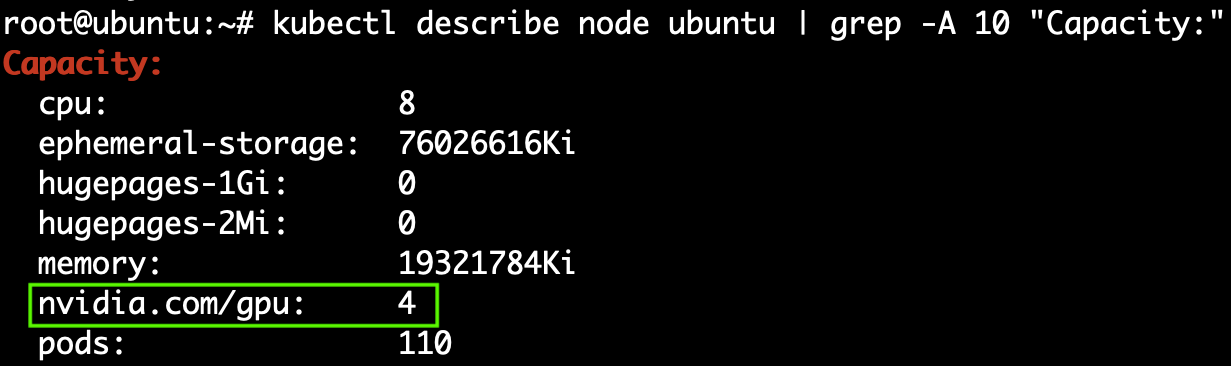
Now we can also verify those pods.

As expected, both GPU pods will now be in the Running state, and both will be utilizing the same physical GPU through time slicing.
4. What is the NVIDIA GPU Operator, and how does it simplify GPU setup and management ?
Instead of manually managing all the steps we covered earlier, GPU setup and management can be handled much more easily using the NVIDIA GPU Operator. The GPU Operator automates the entire GPU lifecycle in Kubernetes. It not only handles the steps mentioned above but also provides additional functionality. In short, it manages everything in a much cleaner and more scalable way.
What the NVIDIA GPU Operator provides by default
- GPU Driver Management Automatically installs and manages NVIDIA GPU drivers across all GPU nodes (especially useful when the cluster has multiple GPU nodes).
- NVIDIA Container Runtime Enables containers to access GPUs using the NVIDIA container runtime.
- NVIDIA Device Plugin Exposes GPU resources to Kubernetes so pods can request GPUs.
- GPU Feature Discovery Labels nodes with GPU details such as model, memory, and compute capabilities.
- DCGM Monitoring Collects GPU metrics like utilization, memory usage, temperature, and power.
- DCGM Exporter Exports GPU metrics to Prometheus for monitoring and alerting.
- CUDA Toolkit (Optional) Provides CUDA libraries inside containers when required by workloads.
- MIG Management (If Supported) Automatically configures and manages MIG instances on supported GPUs.
- Node Validation Runs health checks to ensure GPU nodes are correctly configured.
- Upgrade & Lifecycle Management Handles driver and component upgrades without manual intervention.
For a deeper explanation, refer to the official documentation:
👉 https://docs.nvidia.com/datacenter/cloud-native/gpu-operator/latest/overview.html
Steps to install the NVIDIA GPU Operator
1. Add the NVIDIA Helm repository
helm repo add nvidia https://helm.ngc.nvidia.com/nvidia && helm repo update2. Install the GPU Operator Install the operator with the default configuration:
helm install --wait --generate-name \
  -n gpu-operator --create-namespace \
  nvidia/gpu-operator \
  --version=v25.10.1
3. Enable Time Slicing To enable GPU time slicing, there is only need to create the time-slicing configuration file and pass it during the Helm install or upgrade command. The GPU Operator will handle the rest.
If GPU Operator is already installed:
helm upgrade gpu-operator nvidia/gpu-operator \
  -n gpu-operator \
  --set-file devicePlugin.config=time-slicing-config.yaml
After installation, it can be verified in the same way as done in the previous steps.
Big idea: Before the NVIDIA GPU Operator, setting up GPUs in Kubernetes was chaotic. Drivers, container runtimes, device plugins, and monitoring had to be installed and managed manually.
GPU Operator = one Helm install, and NVIDIA handles everything.
5. What are other concurrency mechanisms in NVIDIA GPUs ?
Multi-Instance GPU (MIG)
On newer NVIDIA GPU models, it is possible to achieve complete isolation at the physical level using Multi-Instance GPU (MIG).
Unlike GPU time slicing, where multiple processes share the same GPU memory and compute resources without actual partitioning, MIG physically partitions a single GPU into multiple isolated instances. Each instance has its own dedicated memory, compute, and cache resources.
MIG is available only on newer NVIDIA GPU models and is useful when strong isolation and predictable performance are required.
메타데이터
- post_id
- b6b7ebd10d4e
- slug
- running-gpus-in-kubernetes-from-setup-to-scheduling-and-sharing-b6b7ebd10d4e
- url
- https://medium.com/@pabhi18/running-gpus-in-kubernetes-from-setup-to-scheduling-and-sharing-b6b7ebd10d4e
- canonical_url
- https://medium.com/@pabhi18/running-gpus-in-kubernetes-from-setup-to-scheduling-and-sharing-b6b7ebd10d4e
- author_url
- https://medium.com/@pabhi18
- status
- ok
- fetched_at
- 2026-06-15 20:49:13