Exploring Mapbox in React Native
A simple guide to adding maps, markers, routes, and location features
Exploring Mapbox in React Native
A simple guide to adding maps, markers, routes, and location features
After setting up Mapbox in React Native for Android and iOS in the previous articles, it’s time to explore how to actually use it in your app.
In this post, we’ll walk through several essential Mapbox features you can implement with just a few lines of code:
- Adding a Marker
- Customizing the Default Marker
- Replacing a Marker with an Image
- Changing the Map Style (e.g., Dark Mode)
- Getting the Current Location
- Displaying Multiple Markers
- Creating a Custom Callout
- Drawing a Polyline (Route)
Let’s dive in
Adding a Marker
This is the simplest way to display a map and place a single marker at a specific coordinate.
import React from 'react';
import { StyleSheet, View } from 'react-native';
import Mapbox, { MapView, Camera, PointAnnotation } from '@rnmapbox/maps';

export default function AddMarker() {
  return (
    <View style={styles.container}>
      <MapView style={styles.map}>
        <Camera
          zoomLevel={14}
          centerCoordinate={[106.8272, -6.1754]}
        />
        <PointAnnotation id="marker1" coordinate={[106.8272, -6.1754]} />
      </MapView>
    </View>
  );
}

const styles = StyleSheet.create({
  container: { flex: 1 },
  map: { flex: 1 },
});
Customizing the map marker
By default, Mapbox shows a red pin as your marker. But you can easily customize it — change its color, turn it into a circle, or even replace it with your own image to better match your app’s design.
Changing the color
import React from 'react';
import { StyleSheet, View } from 'react-native';
import Mapbox, { MapView, Camera, PointAnnotation } from '@rnmapbox/maps';

Mapbox.setAccessToken('YOUR_MAPBOX_ACCESS_TOKEN_HERE');

export default function CustomColorMarker() {
  return (
    <View style={styles.container}>
      <MapView style={styles.map}>
        <Camera zoomLevel={14} centerCoordinate={[106.8272, -6.1754]} />
        <PointAnnotation id="marker2" coordinate={[106.8272, -6.1754]}>
          <View style={styles.marker} />
        </PointAnnotation>
      </MapView>
    </View>
  );
}

const styles = StyleSheet.create({
  container: { flex: 1 },
  map: { flex: 1 },
  marker: {
    width: 20,
    height: 20,
    borderRadius: 10,
    backgroundColor: '#E63946', // merah
    borderWidth: 2,
    borderColor: '#fff',
  },
});
Using an Image as Marker
If you want something more visual — like a custom pin icon — simply replace the marker view with an image.
import React from 'react';
import { StyleSheet, View, Image } from 'react-native';
import Mapbox, { MapView, Camera, PointAnnotation } from '@rnmapbox/maps';

Mapbox.setAccessToken('YOUR_MAPBOX_ACCESS_TOKEN_HERE');

export default function ImageMarker() {
  return (
    <View style={styles.container}>
      <MapView style={styles.map}>
        <Camera zoomLevel={14} centerCoordinate={[106.8272, -6.1754]} />
        <PointAnnotation id="marker3" coordinate={[106.8272, -6.1754]}>
          <Image
            source={require('./assets/pin.png')} // pastikan ada di folder assets
            style={styles.markerImage}
          />
        </PointAnnotation>
      </MapView>
    </View>
  );
}

const styles = StyleSheet.create({
  container: { flex: 1 },
  map: { flex: 1 },
  markerImage: { width: 32, height: 32 },
});
Changing the Map Style
Mapbox offers multiple prebuilt styles. You can switch between light, dark, satellite, and more using styleURL.
import React from 'react';
import { View, StyleSheet } from 'react-native';
import Mapbox, { MapView, Camera, PointAnnotation } from '@rnmapbox/maps';

Mapbox.setAccessToken('YOUR_MAPBOX_ACCESS_TOKEN_HERE');

export default function DarkMap() {
  return (
    <View style={styles.container}>
      <MapView
        styleURL={Mapbox.StyleURL.Dark} // 👉 Ganti peta menjadi dark mode
        style={styles.map}
      >
        <Camera
          zoomLevel={12}
          centerCoordinate={[106.8272, -6.1751]}
        />
        <PointAnnotation id="marker1" coordinate={[106.8272, -6.1754]} />
      </MapView>
    </View>
  );
}

const styles = StyleSheet.create({
  container: {
    flex: 1,
  },
  map: {
    flex: 1,
  },
});
You can also experiment with different built-in map styles provided by Mapbox.
Here are some of the options you can try:
- Mapbox.StyleURL.Street
- Mapbox.StyleURL.Outdoors
- Mapbox.StyleURL.Light
- Mapbox.StyleURL.Dark
- Mapbox.StyleURL.Satellite
- Mapbox.StyleURL.SatelliteStreet
- Mapbox.StyleURL.TrafficDay
- Mapbox.StyleURL.TrafficNight
Each style gives your map a different look and feel — from minimalist light themes to high-contrast dark modes, or even real satellite imagery with road overlays.
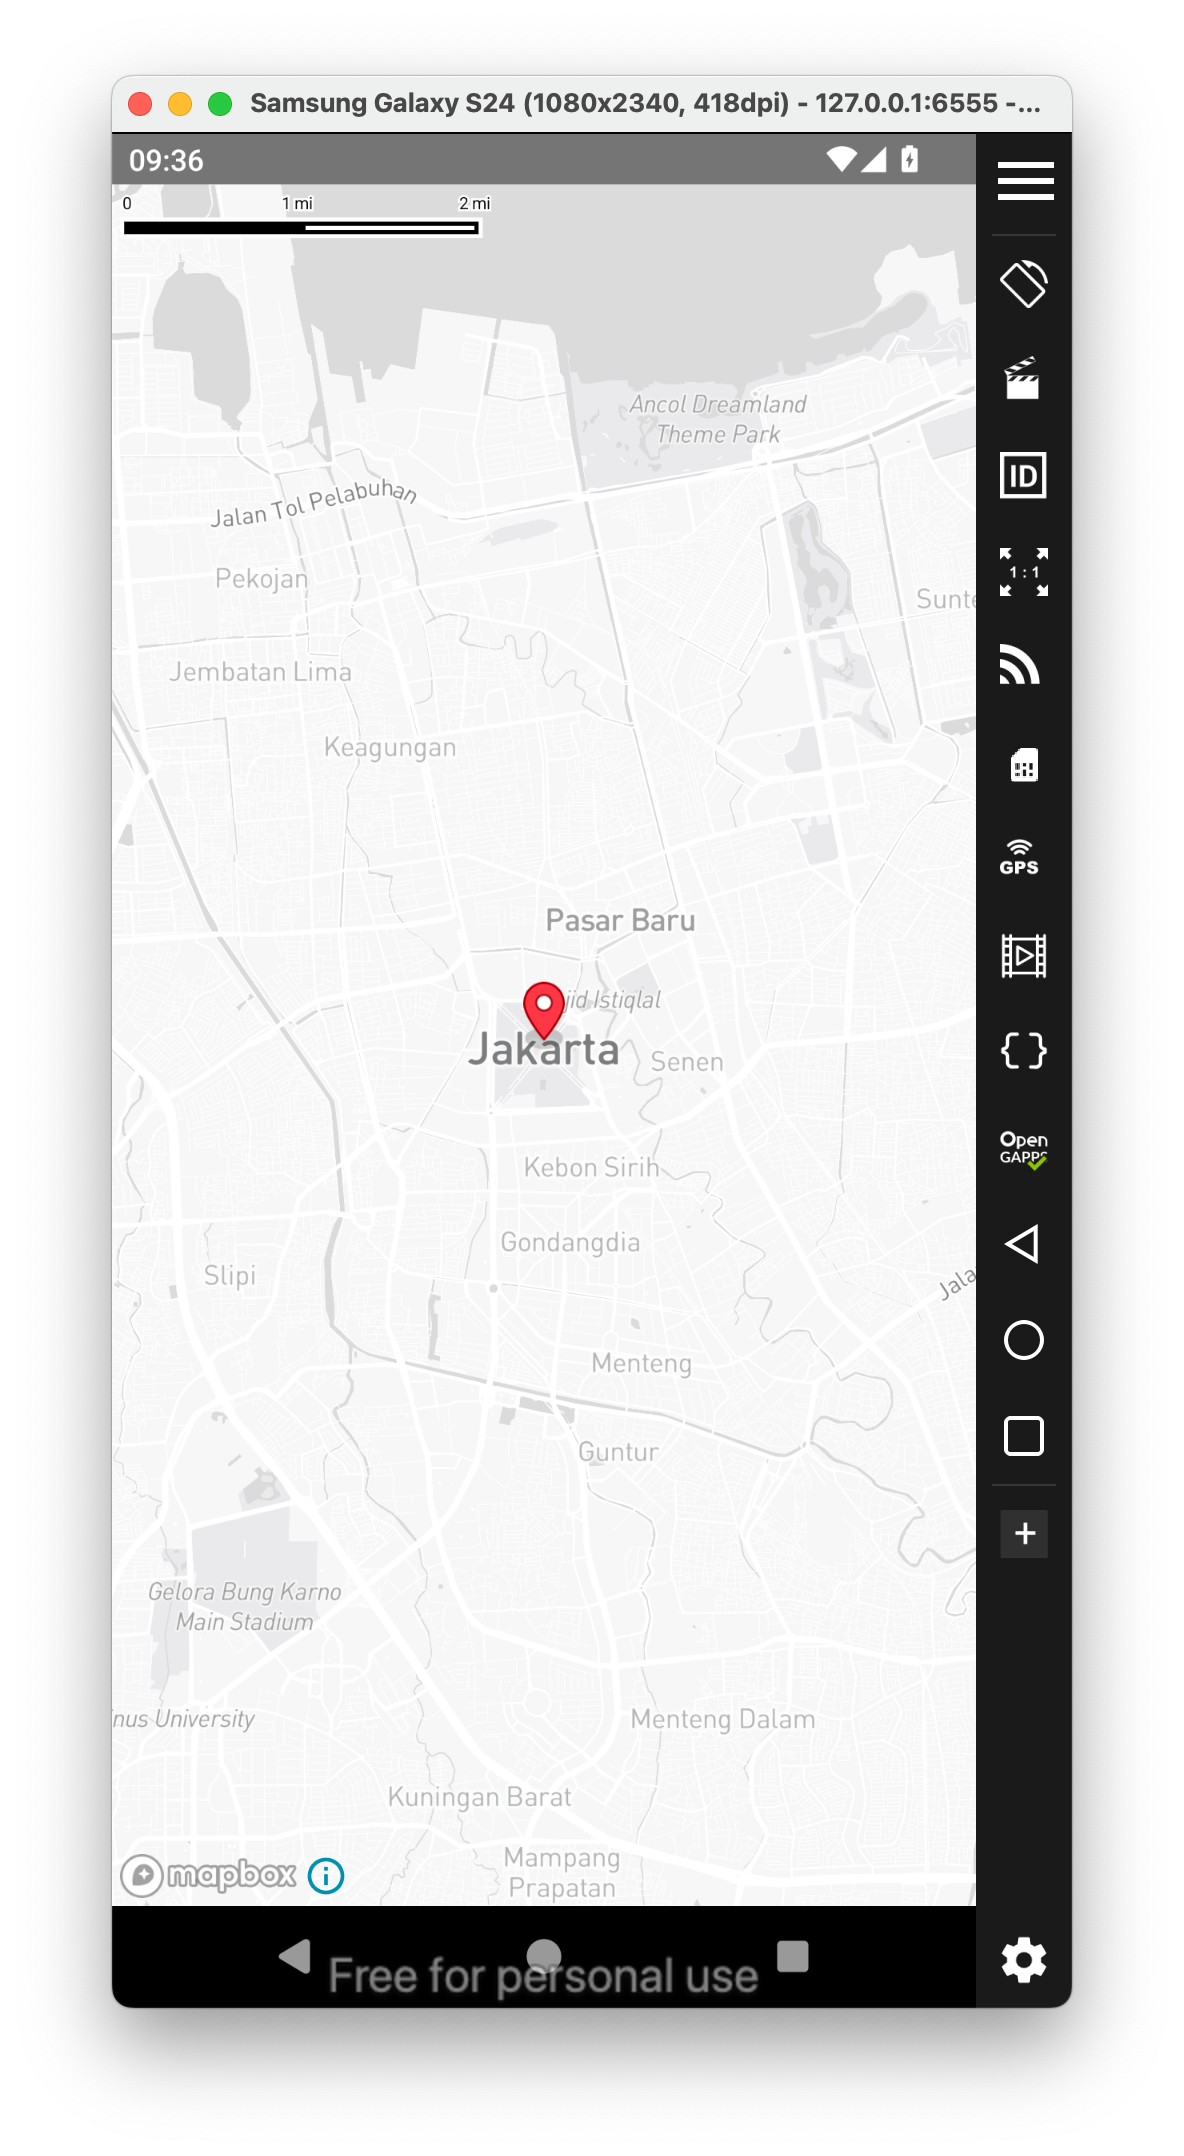
Alternatively, you can also specify the full style URL directly using the mapbox:// syntax. Here’s an example:
import React from 'react';
import { View, StyleSheet } from 'react-native';
import Mapbox, { MapView, Camera, PointAnnotation } from '@rnmapbox/maps';

Mapbox.setAccessToken('YOUR_MAPBOX_ACCESS_TOKEN_HERE');

export default function DarkMap() {
  return (
    <View style={styles.container}>
      <MapView
        styleURL={'mapbox://styles/mapbox/light-v11'} // 👉 Ganti style peta
        style={styles.map}
      >
        <Camera
          zoomLevel={12}
          centerCoordinate={[106.8272, -6.1751]}
        />
        <PointAnnotation id="marker1" coordinate={[106.8272, -6.1754]} />
      </MapView>
    </View>
  );
}

const styles = StyleSheet.create({
  container: {
    flex: 1,
  },
  map: {
    flex: 1,
  },
});
You can replace the style URL with any of the following Mapbox presets:
- mapbox://styles/mapbox/streets-v12
- mapbox://styles/mapbox/outdoors-v12
- mapbox://styles/mapbox/light-v11
- mapbox://styles/mapbox/dark-v11
- mapbox://styles/mapbox/satellite-v9
- mapbox://styles/mapbox/satellite-streets-v12
- mapbox://styles/mapbox/navigation-day-v1
- mapbox://styles/mapbox/navigation-night-v1
- mapbox://styles/mapbox/standard
- mapbox://styles/mapbox/standard-satellite
Getting the current location
To display the user’s current location and move the camera automatically, use UserLocation and Camera with a reference.
import React, { useEffect, useRef } from 'react';
import { View, StyleSheet, PermissionsAndroid, Platform } from 'react-native';
import Mapbox, { MapView, Camera, UserLocation } from '@rnmapbox/maps';

// Ganti dengan token kamu
Mapbox.setAccessToken('YOUR_MAPBOX_ACCESS_TOKEN_HERE');

export default function CurrentLocationMap() {
      const cameraRef = useRef(null);

  // ✅ Minta izin lokasi (khusus Android)
  useEffect(() => {
    const requestLocationPermission = async () => {
      if (Platform.OS === 'android') {
        const granted = await PermissionsAndroid.request(
          PermissionsAndroid.PERMISSIONS.ACCESS_FINE_LOCATION,
          {
            title: 'Izin Lokasi',
            message: 'Aplikasi memerlukan akses lokasi untuk menampilkan posisi Anda.',
            buttonNeutral: 'Tanya Nanti',
            buttonNegative: 'Batal',
            buttonPositive: 'OK',
          }
        );
        if (granted !== PermissionsAndroid.RESULTS.GRANTED) {
          console.warn('Izin lokasi tidak diberikan');
        }
      }
    };

    requestLocationPermission();
  }, []);

  return (
    <View style={styles.page}>
      <MapView
        style={styles.map}
        styleURL={Mapbox.StyleURL.Light} // peta gelap elegan
        logoEnabled={true}
      >
        {/* 🔵 Lokasi pengguna */}
        <UserLocation
          visible={true}
          onUpdate={(location) => {
            if (location?.coords) {
              const { longitude, latitude } = location.coords;
              // 🎯 Pindahkan kamera ke lokasi user
              cameraRef.current?.setCamera({
                centerCoordinate: [longitude, latitude],
                zoomLevel: 15,
                animationDuration: 1000,
              });
            }
          }}
        />

        {/* 🎥 Kamera dengan referensi */}
        <Camera ref={cameraRef} />
      </MapView>
    </View>
  );
}

const styles = StyleSheet.create({
  page: {
    flex: 1,
  },
  map: {
    flex: 1,
  },
});
Remember to request location permission on Android using PermissionsAndroid.

Displaying Multiple Markers
To render multiple points dynamically, map through an array of coordinates:
// src/screens/DynamicMarkers.js
import React from 'react';
import { View } from 'react-native';
import Mapbox, { MapView, Camera, PointAnnotation } from '@rnmapbox/maps';

Mapbox.setAccessToken('YOUR_MAPBOX_ACCESS_TOKEN_HERE');

const markers = [
  { id: '1', coords: [106.8456, -6.2088] }, // Jakarta
  { id: '2', coords: [107.6191, -6.9175] }, // Bandung
  { id: '3', coords: [112.7508, -7.2575] }, // Surabaya
];

export default function DynamicMarkers() {
  return (
    <View style={{ flex: 1 }}>
      <MapView
        style={{ flex: 1 }}
        styleURL={Mapbox.StyleURL.Light}
      >
        <Camera zoomLevel={4} centerCoordinate={[110, -6.5]} />
        {markers.map((marker) => (
          <PointAnnotation
            key={marker.id}
            id={marker.id}
            coordinate={marker.coords}
          />

        ))}
      </MapView>
    </View>
  );
}
Custom Callout
You can show an information bubble (callout) when a user taps a marker. Here’s a simple approach that displays the callout outside the map, so it’s fully interactive.
// src/screens/CustomCallout.js
import React, { useState } from 'react';
import { View, Text, TouchableOpacity, StyleSheet, Dimensions } from 'react-native';
import Mapbox, { MapView, Camera, PointAnnotation } from '@rnmapbox/maps';

Mapbox.setAccessToken('YOUR_MAPBOX_ACCESS_TOKEN_HERE');

export default function CustomCallout() {
  const [selected, setSelected] = useState(false);

  const marker = {
    id: '1',
    title: 'BMKG Jakarta',
    description: 'Stasiun Meteorologi Kemayoran',
    coords: [106.8394085, -6.1560067],
  };

  return (
    <View style={{ flex: 1 }}>
      <MapView style={{ flex: 1 }}>
        <Camera zoomLevel={12} centerCoordinate={marker.coords} />

        <PointAnnotation
          id={marker.id}
          coordinate={marker.coords}
          onSelected={() => setSelected(true)}
        />
      </MapView>

      {/* ✅ Callout di luar peta agar bisa diklik */}
      {selected && (
        <View style={styles.calloutContainer}>
          <View style={styles.callout}>
            <Text style={{ fontWeight: 'bold' }}>{marker.title}</Text>
            <Text style={{ fontSize: 12 }}>{marker.description}</Text>
            <TouchableOpacity onPress={() => setSelected(false)} style={{ marginTop: 6 }}>
              <Text style={{ color: 'blue', fontSize: 12 }}>Tutup</Text>
            </TouchableOpacity>
          </View>
        </View>
      )}
    </View>
  );
}

const styles = StyleSheet.create({
  calloutContainer: {
    position: 'absolute',
    bottom: 100, // posisi relatif dari bawah layar
    left: Dimensions.get('window').width / 2 - 100,
  },
  callout: {
    width: 200,
    backgroundColor: 'white',
    padding: 10,
    borderRadius: 8,
    shadowColor: '#000',
    shadowOpacity: 0.3,
    shadowRadius: 4,
  },
});
Drawing a Polyline (Route)
You can visualize paths or routes between points using a LineLayer inside a ShapeSource.
// src/screens/PolylineRoute.js
import React from 'react';
import { View } from 'react-native';
import Mapbox, { MapView, Camera, ShapeSource, LineLayer } from '@rnmapbox/maps';

Mapbox.setAccessToken('YOUR_MAPBOX_ACCESS_TOKEN_HERE');

const routeGeoJSON = {
  type: 'FeatureCollection',
  features: [
    {
      type: 'Feature',
      geometry: {
        type: 'LineString',
        coordinates: [
          [106.8456, -6.2088], // Jakarta
          [107.6191, -6.9175], // Bandung
          [110.3671, -7.8014], // Yogyakarta
          [112.7508, -7.2575], // Surabaya
        ],
      },
    },
  ],
};

export default function PolylineRoute() {
  return (
    <View style={{ flex: 1 }}>
      <MapView style={{ flex: 1 }}>
        <Camera zoomLevel={5} centerCoordinate={[110, -7]} />
        <ShapeSource id="routeSource" shape={routeGeoJSON}>
          <LineLayer
            id="routeLine"
            style={{
              lineColor: '#1E90FF',
              lineWidth: 4,
              lineCap: 'round',
              lineJoin: 'round',
            }}
          />
        </ShapeSource>
      </MapView>
    </View>
  );
}
Conclusion
Mapbox brings a powerful, flexible, and beautifully designed mapping experience to React Native. With just a few components — MapView, Camera, PointAnnotation, and ShapeSource — you can build rich interactive maps that go far beyond what the default React Native MapView offers.
From dynamic markers to real-time user tracking and route visualization, Mapbox opens up a world of possibilities for location-based mobile apps.
메타데이터
- post_id
- b827a148c2dd
- slug
- exploring-mapbox-in-react-native-b827a148c2dd
- url
- https://medium.com/@mahisaajy/exploring-mapbox-in-react-native-b827a148c2dd
- canonical_url
- https://medium.com/@mahisaajy/exploring-mapbox-in-react-native-b827a148c2dd
- author_url
- https://medium.com/@mahisaajy
- status
- ok
- fetched_at
- 2026-06-09 15:37:30






