Automating Data Deduplication in Snowflake with Tilores
Detecting Free Trial Abuse using Identity Resolution with your Snowflake Customer Data
Automating Data Deduplication in Snowflake with Tilores
Detecting Free Trial Abuse using Identity Resolution with your Snowflake Customer Data
The problem
Ending up with duplicate customer data is almost unavoidable, whether it is due to acquiring data from different sources, customers registering multiple times or mistakes made during manual data entry. Another possible cause of duplicate customer data is when customers sign up online multiple times, each time slightly changing their details, to take advantage of free trials or first-use discounts.
This leads to multiple rows in a table that represent the same customer, company or any other kind of entity. A classic identity resolution problem. So how can one solve this in Snowflake?
What to expect?
In this guide we will start with a Snowflake table that contains duplicated customer data and we will end up with another table introducing a new field (entity_id) which is a unique identifier for each customer.
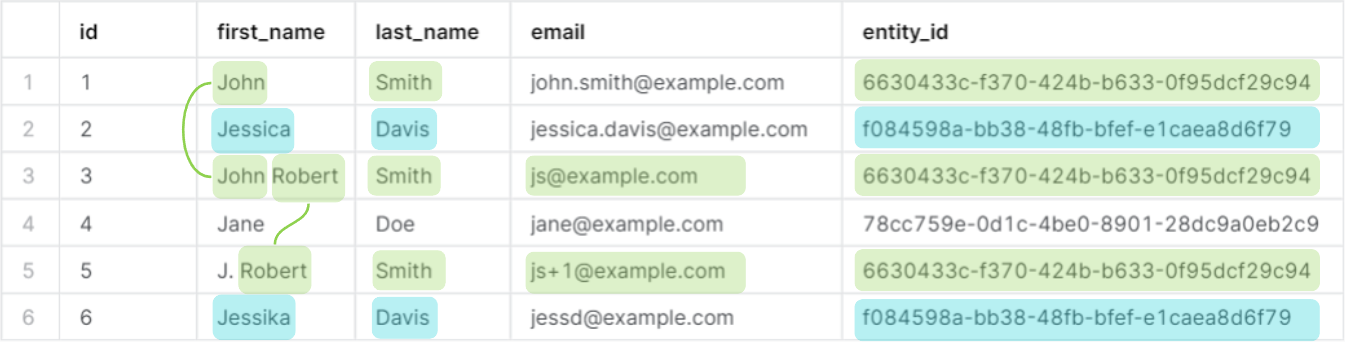
An entity_id will be automatically calculated for any new data added to the table.
Create test table in Snowflake
Create a new worksheet and run the following:
CREATE DATABASE DEMO;

USE DATABASE DEMO;

CREATE or REPLACE TABLE customers(
 "id" VARCHAR,
 "first_name" VARCHAR,
 "last_name" VARCHAR,
 "email" VARCHAR
);

ALTER TABLE customers SET CHANGE_TRACKING = TRUE;

INSERT INTO customers VALUES
    ('1', 'John', 'Smith', 'john.smith@example.com'),
    ('2', 'Jessica', 'Davis', 'jessica.davis@example.com'),
    ('3', 'John Robert', 'Smith', 'js@example.com'),
    ('4', 'Jane', 'Doe', 'jane@example.com'),
    ('5', 'J. Robert', 'Smith', 'js+1@example.com'),
    ('6', 'Jessika', 'Davis', 'jessd@example.com');

SELECT * from customers;
Download the result as CSV. We will use this in the next step to automatically generate the matching rules.
Connecting Snowflake to Tilores
Sign up for a free Tilores account at app.tilores.io. After signing in choose “ Upload Data File”. And then upload the CSV file from the previous step, Then click “ Yes, use rules “ and complete the wizard. It will take around 3 minutes to finish setting up.
Now we will create an API integration which will allow Snowflake to make calls to Tilores.
Snowflake will always be the one initiating the connection, sending and requesting data from Tilores, not the other way around.
In the Tilores UI go to Integration — Snowflake and under the section “Where to get these values?” copy all the code sections and run them in a new worksheet in your Snowflake workspace.
The result of the last query should have API_AWS_IAM_USER_ARN, copy the value and use it in User ARN field in Tilores UI. Also copy the value of API_AWS_EXTERNAL_ID and use it in External ID in Tilores UI then click UPDATE to activate the connection.
The following banner should show:
Now Snowflake and Tilores are connected.
Setup automatic entity identification in Snowflake
Next we will create a task which will process any new data added to the customers table we created at the beginning and create a row with an entity_id in a new table customers_entities. Run the following in Snowflake:
USE DATABASE DEMO;

ALTER TABLE customers SET CHANGE_TRACKING = TRUE;

CREATE or REPLACE TABLE customers_entities(
    "entity_id" VARCHAR,
    "customer_id" VARCHAR
);

CREATE OR REPLACE TABLE TILORES_CONFIG (
    name varchar(255) NOT NULL,
    value varchar(255) default NULL
);

INSERT INTO TILORES_CONFIG VALUES
    ('last_sync', CURRENT_TIMESTAMP()::string),
    ('fetch_on_next_run', 'true');

SELECT * FROM TILORES_CONFIG;

CREATE OR REPLACE TASK tilores_sync
    SCHEDULE = '1 MINUTE'
    AS
    DECLARE
        now STRING;
        last_sync STRING;
        fetch_on_next_run STRING;
    BEGIN
        now := (SELECT CURRENT_TIMESTAMP());
        last_sync := (SELECT value FROM TILORES_CONFIG WHERE name='last_sync');
        fetch_on_next_run := (SELECT value FROM TILORES_CONFIG WHERE name='fetch_on_next_run');

        SELECT tilores_ingest(OBJECT_CONSTRUCT(*)) AS ingested
        FROM (
            SELECT * EXCLUDE(METADATA$ACTION, METADATA$ISUPDATE, METADATA$ROW_ID)
            FROM customers
            CHANGES(INFORMATION => DEFAULT)
                AT(TIMESTAMP => to_timestamp_tz(:last_sync))
            WHERE METADATA$ACTION='INSERT');

        IF (fetch_on_next_run = 'true') THEN
            MERGE INTO customers_entities TARGET USING (SELECT tilores_entity_by_record_id("id"):id AS "entity_id", "id" FROM customers) SOURCE
            ON TARGET."customer_id" = SOURCE."id"
            WHEN MATCHED THEN
              UPDATE SET
                  TARGET."entity_id" = SOURCE."entity_id"
            WHEN NOT MATCHED THEN
              INSERT ("entity_id", "customer_id")
                  VALUES (SOURCE."entity_id", SOURCE."id");
        END IF;

        UPDATE TILORES_CONFIG
            SET value = :now
            WHERE name = 'last_sync';
        UPDATE TILORES_CONFIG
            SET value = (SELECT
                            CASE
                                WHEN count(*) > 0 THEN 'true'
                                ELSE 'false'
                            END AS fetch_on_next_run
                        FROM customers
                        CHANGES(INFORMATION => DEFAULT)
                            AT(TIMESTAMP => to_timestamp_tz(:last_sync))
                        WHERE METADATA$ACTION='INSERT')
            WHERE name = 'fetch_on_next_run';
    END;

ALTER TASK tilores_sync RESUME;

SELECT *
FROM TABLE(information_schema.task_history())
ORDER BY scheduled_time;
Testing the automation
After two minutes, a row is created in customers_entities for each customer. So if we perform a join we should be able to tell which customer rows belong to which actual customer.
SELECT * EXCLUDE("customer_id")
FROM customers
LEFT JOIN customers_entities ON "id"="customer_id"
ORDER BY "id";
Should result in:
Based on the entity ids, it shows that these rows represent only three actual customers.
And if we now add another customer with a similar name and a few spelling mistakes, and a different email domain. It should end up with the same entity_id as the first row.
INSERT INTO customers VALUES
  ('7', 'Johnn', 'Smeth', 'john.smith@otherDomain.com');
Wait two minutes, then run the following again:
SELECT * EXCLUDE("customer_id")
FROM customers
LEFT JOIN customers_entities ON "id"="customer_id"
ORDER BY "id";
The result should now be:

In this case entity_id is the actual customer identifier.
Conclusion - Identity Resolution in Snowflake
By introducing unique entity IDs for customers, this identity resolution approach ensures an accurate customer 360 view in Snowflake and allows for easy customer segmentation for marketing. Further use cases include detecting duplicate account creation associated with free trial abuse.
Originally published at https://tilores.io.
메타데이터
- post_id
- b9dbd5bc37b7
- slug
- automating-data-deduplication-in-snowflake-with-tilores-b9dbd5bc37b7
- url
- https://medium.com/tilo-tech/automating-data-deduplication-in-snowflake-with-tilores-b9dbd5bc37b7
- canonical_url
- https://medium.com/tilo-tech/automating-data-deduplication-in-snowflake-with-tilores-b9dbd5bc37b7
- author_url
- https://medium.com/@samibnyyasen
- status
- ok
- fetched_at
- 2026-06-10 18:44:10