Merkle Trees in Solidity and TypeScript
A hands-on guide to understanding, building, and verifying Merkle trees in Web3 without losing your mind.
Merkle Trees in Solidity and TypeScript
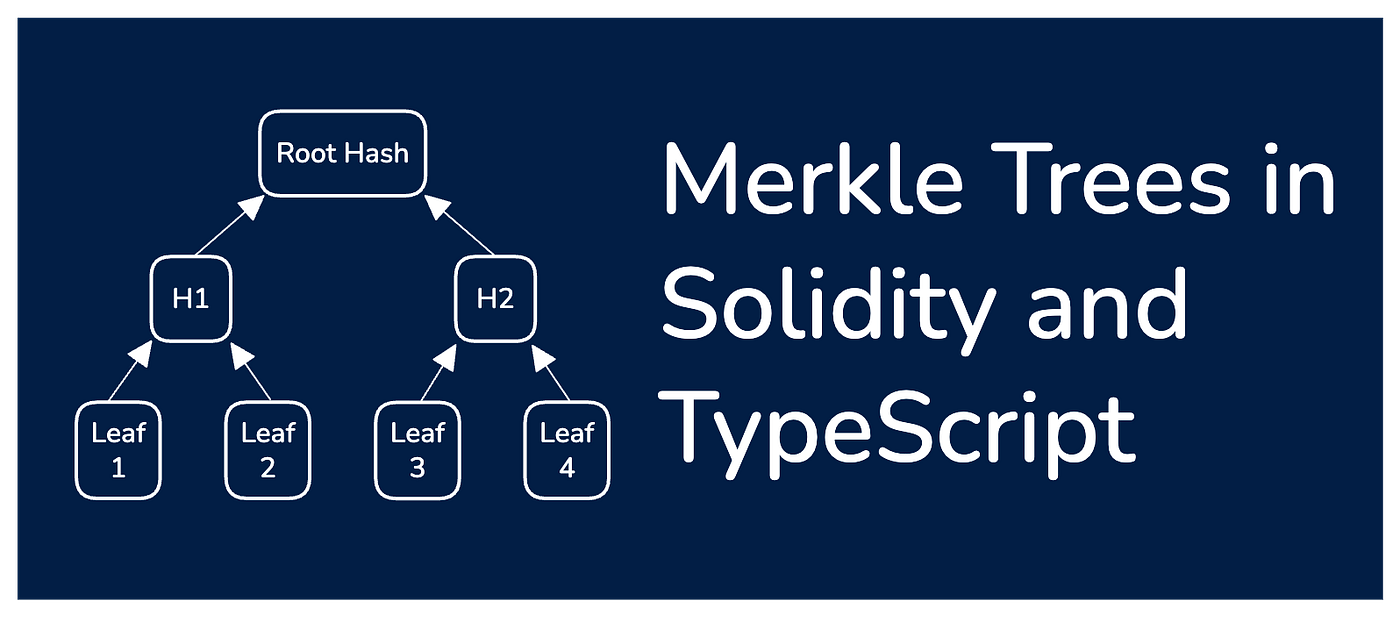
You’re working at a Web3 company — maybe you’re a smart contract engineer, maybe you’re building front-ends — and suddenly you hear the term “Merkle tree” or “Merkle proof” tossed around in meetings. Your eyes glaze over. Your soul leaves your body. What the hell are they talking about?
How can you compress a list of 10,000 addresses into a few lines of data? Why is everyone pretending this is normal?
Let me stop you right there. Merkle trees are not rocket science. They’re just a clever, efficient way to prove that a specific item belongs to a much larger list without uploading the entire list on-chain and spending a fortune on gas.
In this article, I’ll walk you through:
- Where Merkle trees are useful, and where they’re absolutely not.
- The technical details of Merkle trees.
- How to generate, build proofs, and verify Merkle trees using third-party libraries in both TypeScript (front-end/backend) and Solidity (on-chain).
- Common attack vectors, like the second pre-image attack, and how to defend against them with proper hashing choices.
I’ve seen way too many devs struggle to wrap their heads around this (including senior engineers), and it’s honestly a shame, because once you get it, you’ll start seeing where it fits in your toolbox.
The Usefulness and the Evil of Merkle Trees
Merkle trees are one of the most elegant gas-optimization techniques, but the misuse can be devastating!
On one hand, you can take a massive dataset, like a list of 100,000 wallet addresses eligible for an airdrop, and compress it into a single 32-byte hash to be stored on-chain. Then, when someone wants to claim their share, they show up with a Merkle proof: a small list of sibling hashes that lets the contract verify they’re really in the tree, without ever seeing the whole tree.
Congratulations, you just saved $50,000 in gas fees!
But I can’t deny the evil side! Updating the tree, even for a single item, requires regenerating the entire thing from scratch! That’s computationally expensive, and worse, it invalidates the previously stored Merkle root on-chain!
Another quirk is exploring the content. If the dataset is not publicly available (e.g. on IPFS or a CDN), no one can regenerate or validate the tree by themselves and they should trust the admin for fairness and correctness!
🚨 And then, there’s misuse. You can’t and shouldn’t use Merkle trees for proving non-membership, like proving that someone is not in the tree. Also screwing up the hashing logic breaks everything, even if one byte is off in how you hash your leaves or build your proof, the contract will reject it, and it’ll make the debug day a haunted one!
So yeah, usefulness meets pain. But don’t worry, we’ll make it all crystal clear for you to understand and use correctly.
Calculate root hash, build proof and verify!
Before we dive into code, let me show you a quick and simple visual overview of what a Merkle tree looks like:
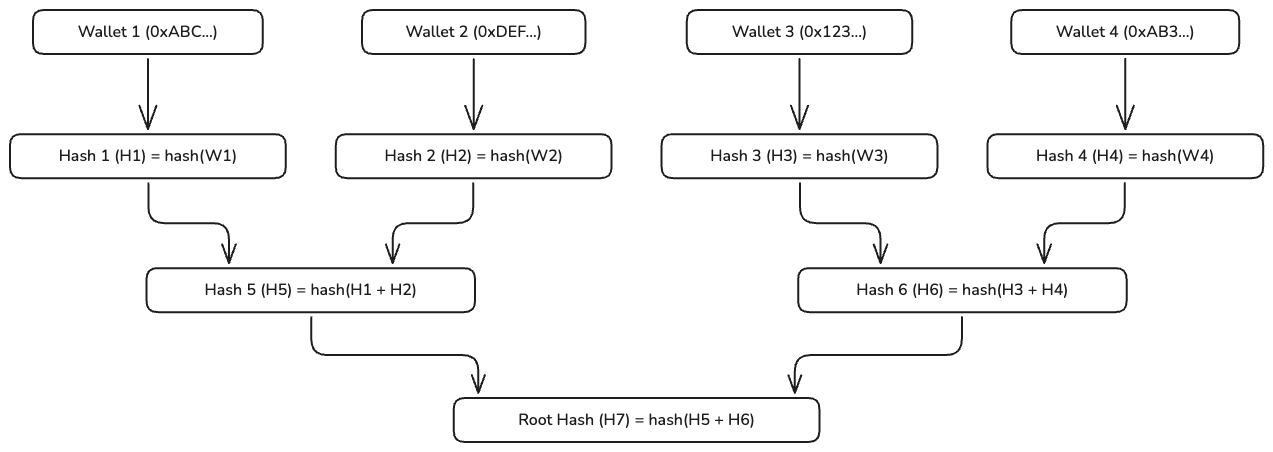
Figure 1. Overview of a small Merkle tree
In Figure 1, the Merkle tree is built from a list of wallet addresses. The first layer of the tree (the leaves) is created by hashing each address individually. Then, each pair of sibling hashes is concatenated (left + right) and hashed again to form the next layer, continuing until we arrive at the root hash — a single 32-byte value that represents the entire dataset.
You can use any cryptographically secure hash function like keccak256 (Ethereum's standard) or sha256, as long as you use the exact same hash function consistently when:
- Hashing the leaves.
- Generating the proof.
- Verifying the proof.
⚠️ Even a single mismatch in the hashing logic will result in broken proofs and rejected claims.
Now, to prove that Wallet 1 is part of the list, we extract a Merkle proof from the tree. This proof is just a minimal list of sibling hashes required to recompute the root:
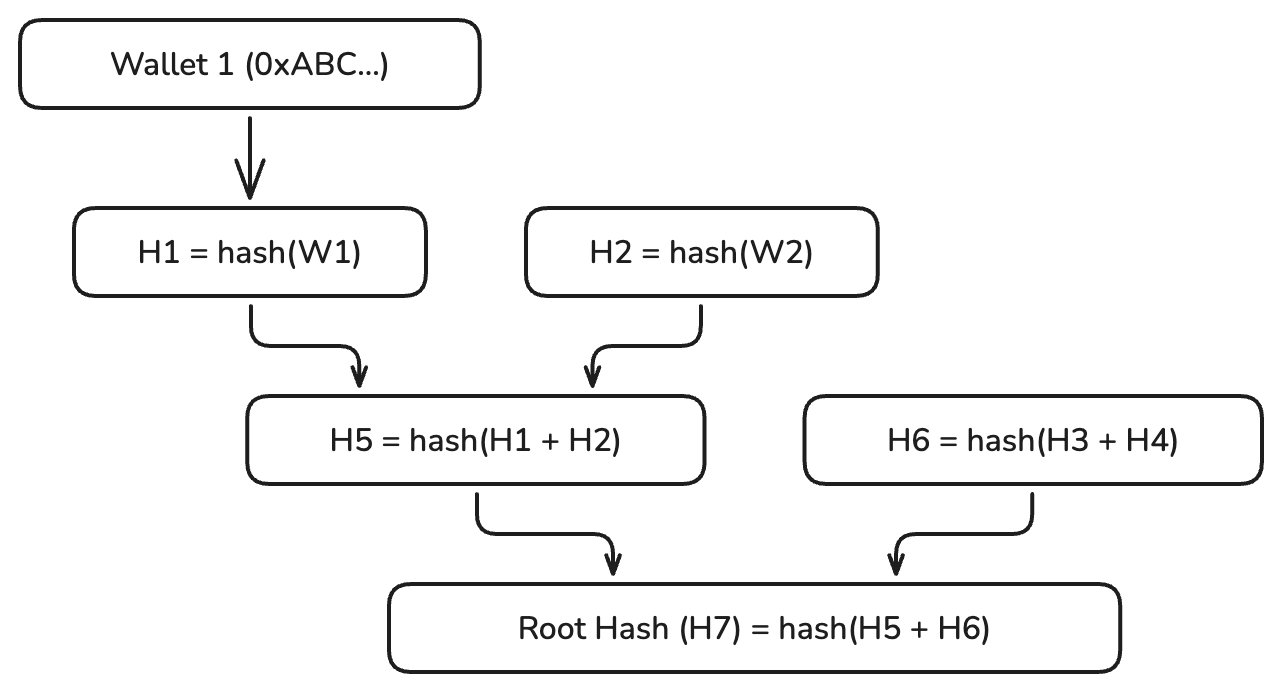
Figure 2. Proof of “wallet 1” membership
Figure 2 shows the path up the tree. To verify Wallet 1’s inclusion, we only need two sibling hashes from the tree: H2 and H6. The smart contract (or the verifier) will re-compute the tree path using H1, H2, and H6, and check if the resulting root hash matches the known root.
Let’s break it down step by step:
- You have a list of 4 whitelisted wallet addresses eligible for an airdrop.
- Each address is hashed with
keccak256, producing a 32-byte leaf. - Each pair of sibling leaves (e.g.
H1andH2) are concatenated in order (H1 + H2) into a 64-byte buffer, then hashed again to produce a parent node. - You repeat this process layer by layer until you’re left with a single hash: the Merkle root.
That’s how the Merkle tree is built! Once the tree is ready, the Merkle proof for any item is simply the list of sibling nodes at each level required to recompute the root.
Now we dig the code!
To get started, clone my example repository which we will be referencing throughout this article:
git clone https://github.com/difof/merkletree-solI’m using foundry and bun, because this is not 2017 anymore! Once you’ve got those installed, go ahead and install the project dependencies so we can move forward:
forge install
bun install
If you don’t feel like polluting your system, there’s also a Dockerfile you can build and explore.
TypeScript Example: Generating a Merkle Tree
Open [test/simpleMerkleTree.test.ts](https://github.com/difof/merkletree-sol/blob/master/test/simpleMerkle.test.ts):
// Dataset
const whitelist = [
    "0x742d35cc6b8B4C0532C15f9AD3E8b8c8bB8c9e3f", // Wallet 1
    "0x8ba1f109551bD432803012645Hac189451c4e155", // Wallet 2
    "0x1f9840a85d5aF5bf1D1762F925BDADdC4201F984", // Wallet 3
    "0x6B175474E89094C44Da98b954EedeAC495271d0F", // Wallet 4
]

// Building the tree
const leaves = whitelist.map(addr => hash(addr))
const tree = new MerkleTree(leaves, hash)

// This root should be stored on the verifier side
const root = tree.getRoot().toString("hex")

// Extracting proof for wallet 1
const leafWallet1 = hash(whitelist[0]!)
const proof = tree.getProof(leafWallet1)

expect(tree.verify(proof, leafWallet1, root)).to.be.true
What’s happening here?
- You take your dataset (whitelist addresses).
- Hash each address with
keccak256to produce the leaves. - Build the tree.
- Extract the proof for the wallet you want to verify (Wallet 1).
- Verify that proof against the known root.
Run the code by bun test test/simpleMerkle.test.ts and you will see the test pass! Now, tweak leafWallet1 (e.g. add a 1 to the hash string). Boom! Verification fails. That’s the beauty of cryptographic proofs.
📝 Key Note:
Whenever your dataset changes, you must rebuild the Merkle tree.
The merkletreejs library has helper functions to modify the tree, but those are error-prone and not worth the headache. Just rebuild, it’s safer and simpler.
For this example, we used merkletreejs because it’s lightweight and solid. There’s also an OpenZeppelin alternative, but it has slightly different encoding rules (which can bite you if you mix them).
I’ve also included a wrapper in [script/merkle.ts](https://github.com/difof/merkletree-sol/blob/master/script/merkle.ts) to handle annoying details like 0x prefixing, making it plug-and-play for most Web3 projects.
You can even peek into the tree structure with:
tree.getTree().getLayers()
tree.getTree().print()
See? Not scary at all!
Solidity Side: Verifying Proofs
Now let’s switch to Solidity. Open [test/foundry/MerkleVerify.fuzz.test.sol](https://github.com/difof/merkletree-sol/blob/master/test/foundry/MerkleVerify.fuzz.test.sol) and check out this test:
function testFuzz_VerifyProofHappyPath(
    bytes32[] memory data, // arbitrary input data
    uint256 leafIndex // random index within dataset
) public view {
    // Fuzz skip case conditions
    vm.assume(data.length > 1);
    vm.assume(leafIndex < data.length);

    bytes32 root = merkle.getRoot(data);
    bytes32[] memory proof = merkle.getProof(data, leafIndex);

    bytes32 valueToProve = data[leafIndex];
    assertTrue(merkle.verifyProof(root, proof, valueToProve));
}
This is similar to the TypeScript test, except the input is random. Again, flip a single bit in valueToProve and the proof fails.
Run the test: forge test --mt testFuzz_VerifyProofHappyPath -vvv and it should pass too!
This unit test is a very basic demonstration of murky library usage. If you change a single bit in the valueToProve variable, the verification will fail!
Real-World Example: Airdrop Contract
Now for something more useful: a native token airdrop contract.
Check [src/Airdrop.sol](https://github.com/difof/merkletree-sol/blob/master/src/Airdrop.sol). It transfers ETH to whitelisted members using a Merkle proof.
Unlike our previous examples with simple arrays, here we have a struct:
struct Membership {
    address userWallet;
    uint256 claimAmount;
}
We keep only the Merkle root on-chain:
function updateMerkleRoot(bytes32 _root) external onlyOwner {
    emit MerkleRootUpdated(merkleRoot, _root);
    merkleRoot = _root;
}
⚠️ Whenever the whitelist changes, the admin rebuilds the tree and updates the root.
Next, we build the leaves on-chain with explicit hashing logic:
function getLeaf(
    address _user,
    uint256 _amount
) public view returns (bytes32) {
    return keccak256(abi.encodePacked(_user, _amount, block.chainid));
}
The block.chainid is included to avoid cross-chain replay attacks as mentioned later in the article.
And at last, we have two functions for proof verification and claiming: verifyEligibility and airdrop:
function verifyEligibility(
    bytes32 _leaf,
    bytes32[] calldata _proof
) public view returns (bool) {
    return merkle.verifyProof(merkleRoot, _proof, _leaf);
}

function airdrop(
    Membership calldata _membership,
    bytes32[] calldata _proof
) external nonReentrant {
    address user = _membership.userWallet;
    uint256 amount = _membership.claimAmount;
    bytes32 leaf = getLeaf(user, amount);

    if (!verifyEligibility(leaf, _proof)) {
        revert NotEligible(user);
    }

    if (claimed[leaf]) {
        revert AlreadyClaimed(user);
    }

    claimed[leaf] = true;
    payable(user).sendValue(amount);
    emit AirdroppedEther(user, amount);
}
verifyEligibility checks the proof, and airdrop ensures eligibility, prevents double-claims, and finally transfers funds. Anyone can call it, as long as the proof is valid.
Now, let’s run the unit test for the airdrop contract. The test can be found in [test/foundry/Airdrop.fuzz.test.sol](https://github.com/difof/merkletree-sol/blob/master/test/foundry/Airdrop.fuzz.test.sol).
Run it: forge test --mt AirdropHappyPath and it should pass too!
💡 Pro Tip: Cache and Store Proofs for Static Trees
If your Merkle tree is static (the dataset doesn’t change frequently), you should precompute and store the proof for every leaf node. Why?
You wouldn’t need to regenerate proofs on-demand, and clients just fetch their proof from a static storage (IPFS, CDN, or backend API). This ends up with a better UX and lower server load because dealing with large trees can be expensive.
For example, you can export a simple JSON mapping like:
{
  "0x742d35cc6b8B4C0532C15f9AD3E8b8c8bB8c9e3f": {
    "amount": "1000000000000000000",
    "leaf": "0x7989770ec...",
    "proof": [
      "0xabc123...",
      "0xdef456..."
    ]
  },
  "0x8ba1f109551bD432803012645Hac189451c4e155": {
    "amount": "500000000000000000",
    "leaf": "0xb011762fa...",
    "proof": [
      "0xghi789...",
      "0xjkl012..."
    ]
  }
}
Clients can query this file (or API) to get their proof instantly!
🚨 Common Attack Vectors and How to Defend Against Them
Merkle trees are cryptographically strong only if you use them correctly. Two common pitfalls can lead to serious exploits:
Second Pre-image Attack
A second pre-image attack happens when an attacker finds a different input that produces the same hash as a legitimate leaf. If this is possible, they can forge a valid proof for a value that doesn’t actually exist in your dataset.
How does this happen in Merkle trees?
- If your hashing function is weak (think MD5 or SHA1), attackers can deliberately craft colliding inputs.
- If your dataset items are exactly the same size as the hash output (e.g. you store raw 32-byte data as leaves without salting), an attacker might brute-force another 32-byte value that results in the same parent hash after concatenation.
For example, if your leaf is simply keccak256(addr), and addr is a raw 32-byte value, an attacker could craft a fake value that collides at the leaf level or at a concatenation boundary higher up the tree.
To mitigate this issue:
- Use a collision-resistant hash (e.g.
keccak256orsha256). - Add domain separation to your leaves. Instead of hashing raw data, encode them explicitly with tags:
bytes32 leaf = keccak256(abi.encodePacked("leaf:", user, amount)); - This ensures no ambiguity in how inputs are combined.
- Never rely on un-hashed raw bytes as leaves.
Cross-chain Replay Attacks
Another subtle but dangerous issue is the cross-chain replay attack.
Imagine you build an airdrop on Ethereum mainnet and publish the Merkle root. Later, someone takes the exact same proof and replays it on a sidechain or testnet where your contract also exists with the same root. Boom — free double claim 🔥
This happens because Merkle proofs are chain-agnostic unless you bind them to a specific context.
How to defend? You should always include the chain ID (or some unique context) in your leaf hashing. Alternatively, include contract address, version, or other unique identifiers in the leaf.
Wrapping up
Merkle trees look intimidating on paper, but in practice, they’re just a neat trick: hash things layer by layer until you’re left with a single fingerprint for the whole dataset. With that, you can prove membership with only a few sibling hashes, instead of shipping the entire list on-chain.
You’ve seen how to:
- Build and verify proofs in TypeScript and Solidity.
- Avoid common mistakes that break proofs or open security holes.
- Use them in the real world (airdrop contracts, whitelists, etc.) without burning gas.
The catch? They’re not magic. They can’t prove non-membership, they’re annoying to update, and they rely on proper hashing to stay secure.
That’s all there is to it. Now you understand why everyone in Web3 keeps talking about Merkle proofs, and next time someone drops the term in a meeting, you won’t just nod, you’ll be the one explaining it!
If you found this helpful, share it with your team and save them a few headaches!
메타데이터
- post_id
- ba29d817eaa1
- slug
- merkle-trees-in-solidity-and-typescript-ba29d817eaa1
- url
- https://coinsbench.com/merkle-trees-in-solidity-and-typescript-ba29d817eaa1
- canonical_url
- https://coinsbench.com/merkle-trees-in-solidity-and-typescript-ba29d817eaa1
- author_url
- https://medium.com/@difof
- status
- ok
- fetched_at
- 2026-07-24 12:42:38