kube-trigger: A Kubevela add-on to monitor and react to events
Using kube-trigger to respond to Kubernetes events
kube-trigger: A Kubevela add-on to monitor and react to events
Using kube-trigger to respond to Kubernetes events
KubeVela + Kpack
kube-trigger is a workflow based trigger that combines listeners, filter events and action triggers in a programmable way with CUElang.
kube-trigger is not limited to Kubernetes and can run standalone as well. However, for this story, we will be sticking with the Kubernetes version that comes packaged with Kubevela as an addon.
kube-trigger monitors events on the cluster, filters them to zero in on the specific ones you want to act on, and then triggers a pre-configured action.
In this story, we’ll go over how to enable the kube-trigger addon, install custom definitions, and use one to monitor kpack Image rebasing and trigger creation of a Job as a response.
Setting up the environment
Since we will be using the Kubevela addon version of kube-trigger for this story, we need a Kubernetes cluster with Kubevela installed. Let’s go over the steps involved in getting that done.
- If you can access a Kubernetes cluster on cloud (EKS, GKE, etc.), authenticate to it otherwise you can install minikube and create one locally as follows:
mk start --memory 6144 --cpus 3 --kubernetes-version=v1.24.13We’re explicitly mentioning Kubernetes version here to avoid any compatibility issue with Kubevela.
- Next, install Kubevela CLI
curl -fsSl https://kubevela.net/script/install.sh | bash- Now, we can use the CLI to install Kubevela core on the cluster
vela install- Install
kubectlfollowing instructions here. - Use
kubectlto check if Kubevela core has been installed on your cluster. You should have a namespacevela-corecreated, with 2 healthy deployments.

Deployments in vela-system
- Enable the
kube-triggeraddon as follows:
vela addon enable kube-triggerThe addon will install the trigger-service ComponentDefinition on your cluster, however, to configure our own triggers we would need to install kube-trigger’s CRDs.
- Clone the kube-trigger repository linked below to get all the yaml config files we’ll be installing on the cluster.
- Once cloned, open the terminal in the repo directory and use
kubectl createto install all the CRDs.

CRDs installation
- Now we will install the
trigger-actionDefinition that would be used later to set up an action to be performed when an Image is rebased.
kubectl apply -f ./config/definition/task.yaml If you go over the trigger-action,
import (
  "vela/kube"
)

apply: kube.#Apply & {
  $params: {
    resource: {
      apiVersion: "batch/v1"
      kind: "Job"
      metadata: {
        name: parameter.name
        namespace: parameter.namespace
        if context.data.metadata.labels != _|_ {
          labels: context.data.metadata.labels
        }
        ownerReferences: [
          {
            apiVersion: context.data.apiVersion
            kind:       context.data.kind
            name:       context.data.metadata.name
            uid:        context.data.metadata.uid
            controller: true
          },
        ]
      }

      spec: {
        if parameter.ttlSecondsAfterFinished != _|_ {
          ttlSecondsAfterFinished: parameter.ttlSecondsAfterFinished
        }

        template: {
          spec: {
            restartPolicy: parameter.restart
            containers: [{
              name: parameter.name
              image: parameter.image
              command: parameter.cmd

              if parameter.env == _|_ {
                env: [{
                  name: "SOURCE_NAME"
                  value: context.data.metadata.name
                },{
                  name: "SOURCE_NAMESPACE"
                  value: context.data.metadata.namespace
                }]
              }

              if parameter.env != _|_ {
                env: [{
                  name: "SOURCE_NAME"
                  value: context.data.metadata.name
                },{
                  name: "SOURCE_NAMESPACE"
                  value: context.data.metadata.namespace
                }] + parameter.env
              }
            }]
          }
        }
      }
    }
  }
}

parameter: {
  // +usage=The image to run the job container on
  image: string

  // +usage=Name of the cron job
  name: *context.data.metadata.name | string

  // +usage=The namespace to create the Job in
  namespace: *context.data.metadata.namespace | string

  // +usage=Define the job restart policy, the value can only be Never or OnFailure. By default, it's Never.
  restart: *"Never" | string

  // +usage=Number of seconds to wait before a successfully completed job is cleaned up
  ttlSecondsAfterFinished?: uint

  // +usage=Commands to run in the container
  cmd: [...string]

  // +usage=Define evironment variables for the Job container
  env?: [...{
    // +usage=Name of the environment variable
    name: string
    // +usage=Value of the environment variable
    value: string
  }]
}
you’ll see that the output is a Job resource created with name and namespace same as that of the source that triggers the action.
...
metadata: {
        name: parameter.name
        namespace: parameter.namespace
...
// +usage=Name of the cron job
name: *context.data.metadata.name | string

// +usage=The namespace to create the Job in
namespace: *context.data.metadata.namespace | string
...
We are also setting environment variables in the container pointing to the source’s name and namespace.
...
if parameter.env == _|_ {
                env: [{
                  name: "SOURCE_NAME"
                  value: context.data.metadata.name
                },{
                  name: "SOURCE_NAMESPACE"
                  value: context.data.metadata.namespace
                }]
              }
...
This trigger-action is then referred to in a TriggerService but before diving into all that, let’s talk about the overall goal, and before going over that, let’s talk about Image rebasing.
Getting the Image to rebase
Image is a kpack resource that stores configurations regarding a build, build here refers to building your application and then pushing the OCI image to a registry. For our TriggerService we need to install kpack on our cluster and setup kpack resources like ClusterBuilder, ClusterStore, and Image.
For that you can refer to my previous blog (linked below) where I talk about kpack, setting it up, and building an image for your application.
Alright, assuming you went over the linked blog, you should have an Image in True state. Something like this,

The Image we will be rebasing
Rebasing
Now that we have an Image resource, let’s talk about rebasing.
Rebase allows app developers or operators to rapidly update an app image when its stack’s run image has changed. By using image layer rebasing, this command avoids the need to fully rebuild the app.
To oversimplify it in context of kpack, a ClusterStack contributes buildImage and runImage, and a runImage in turn contributes the OS layer on top which your app runs. When you update the runImage in your ClusterStack that would trigger a rebase (we’ll see how that happens soon don’t worry). Unlike Rebuilding, Rebasing would only swap the OS layer of your app image instead of rebuilding the whole image again. Not only is Rebasing much faster, it is also automatically triggered for every Image resource that refers to your ClusterStack as soon as you update the runImage field in it.
Ok now that we are done with the theoretical part, let’s get back to kube-trigger.
TriggerService
Having installed the trigger-action Definition and created an Image, let’s now create a TriggerService that would monitor this Image, specifically when it gets rebased and trigger a response.
A TriggerService is basically an array of triggers, and a trigger in turn is a group of:
- Source: A listener that would monitor events, typically associated with a Kubernetes resource, which is how it would be in our case.
- Filter: Used to zero in on only the specific type of events you want to respond to.
- Action: A response triggered by events that pass the filter.
With the above explanation in context, let’s take a look at our TriggerService
apiVersion: standard.oam.dev/v1alpha1
kind: TriggerService
metadata:
  name: image-rebase-trigger
  namespace: default
spec:
  triggers:
    - source:
        # source is all the kpack Image resources in all the namespaces
        type: resource-watcher
        properties:
          apiVersion: kpack.io/v1alpha2
          # kpack needs to be installed on the cluster to have this resource type
          kind: Image
          events:
            - update

      # only trigger action when an Image is successfully rebased
      filter: >
        context.data.status.latestBuildReason == "STACK" && context.data.status.conditions[0].status == "True"

      action:
        type: task
        properties:
          cmd: [/bin/sh, -c, "echo Image: ${SOURCE_NAME} in namespace: ${SOURCE_NAMESPACE} has been successfully rebased at $(date)"]
          image: busybox
          name: image-update-task
          ttlSecondsAfterFinished: 600
For source, we got a resource-watcher that monitors update events for all the Image resources in all the namespaces. We can narrow it down though by specifying a particular namespace inside the properties field.
With our filter, we are zeroing in only those events that are emitted when an Image resource is rebased.
To dive a bit deeper, when an Image is successfully rebased you can verify that by checking if the status of it is True and if the latestBuildReason was STACK.
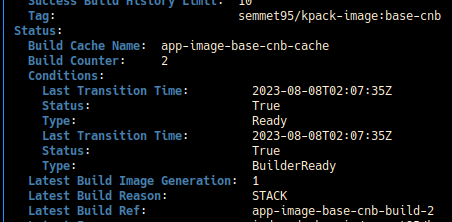
Check the status and the latestBuildReason fields
And in our action, we refer to the trigger-action we created above in task.yaml file.
We can sum up our TriggerService like this:
If any Image in any namespace gets Rebased, then it will create a Job in the same namespace that would print the name and the namespace of the rebased Image in its pod’s logs.
Alright, let's test the TriggerService now. Start with applying the triggerservice-image-update.yaml file.
kubectl apply -f ./examples/triggerservice-image-update.yamlThis should create a TriggerService in the default namespace, as well as a corresponding pod.
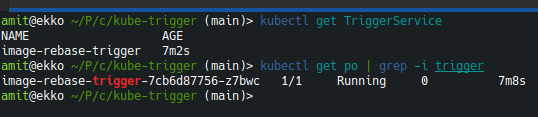
TriggerService and the Pod
If you check the logs of the TriggerService pod, you’ll see that it mentions resource-watcher as the source that is watching Image kind resources on the cluster.

TriggerService pod logs
Triggering the Action
Now that our trigger is set, let's pull it.
The action of our TriggerService can be activated by rebasing the Image resource we created earlier, app-image-base-cnb.
As mentioned earlier, an Image can be rebased by changing its runImage, which comes from the corresponding ClusterStack.
Let's go ahead and edit the ClusterStack.
kubectl edit ClusterStack base-cnbDepending on your default editor, you should see something like this:
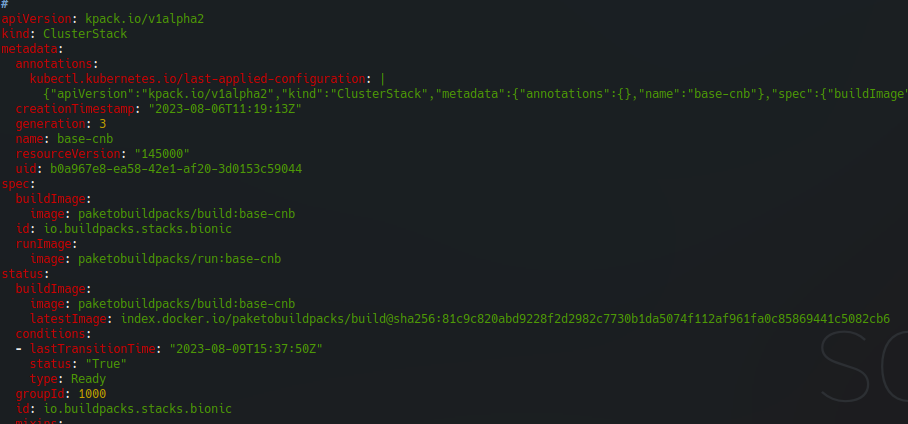
ClusterStack definition
To trigger a rebasing event, modify the spec.runImage.image field. You could set it to a specific version of base-cnb run image, take paketobuildpacks/run:1.2.70-base-cnb for example.
Once the runImagein the ClusterStack is updated, it should trigger rebasing.
Now check the logs of the pod again:
kubectl logs image-rebase-trigger-7cb6d87756-z7bwcAnd you should see logs related to the rebasing event and the trigger-action

TriggerService logs
update event local/default/app-image-base-cnb happened, calling event handlers” apiVersion=kpack.io/v1alpha2 cluster=local kind=Image source=resource-watcher
Here we can see that an update even for app-image-base-cnb was registered by the TriggerService,
calling event handler failed: event is filtered out” apiVersion=kpack.io/v1alpha2 cluster=local kind=Image source=resource-watcher
but since the even didn’t meet the filter conditions, it didn’t trigger any action. This means that even though the Image update operation, Rebasing in this case, has started, it hasn’t successfully finished yet.
event passed filters” eventhandler=applyfilters
When the Image has been successfully rebased, it emits another update event and this time it will pass the filters since the state of the Image, as shown below (describe the Image app-image-base-cnb):
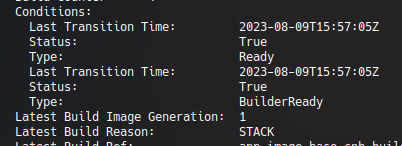
Check the latestBuildReason and status fields
pass the filter we created above:
context.data.status.latestBuildReason == "STACK" && context.data.status.conditions[0].status == "True"Now the trigger-action finally comes into the picture,
job task (eb002d4e5d3d2a25) started executing executor=action-job-executor job task (eb002d4e5d3d2a25) finished executor=action-job-executor
and creates a Job resource and corresponding Pod

Job created by the trigger-action
Now let's check the logs of this Job pod.
kubectl logs image-update-task-cdxm9The pod should log the source of the trigger and its namespace. Something like this:

logging the rebasing even and its source
And again, this behavior was also defined in our TriggerService.
cmd: [/bin/sh, -c, "echo Image: ${SOURCE_NAME} in namespace: ${SOURCE_NAMESPACE} has been successfully rebased at $(date)"]And with that you have your TriggerService set, monitoring Image rebasing events throughout the cluster and triggering actions if it's successful.
Since we are working with a lot of tools here: minikube, kpack, kubevela, and kube-trigger, you might run into some compatibility issues. Either way, please feel free to share your experience down in the comments.
And again, if you have any questions or suggestions, drop them in the comments section as well. See you on another post 🖖

Hey 👋 there. If I helped you in some way, and you’re feeling generous today, you can now buy me a coffee!
메타데이터
- post_id
- baa417fe9152
- slug
- kube-trigger-a-kubevela-add-on-to-monitor-and-react-to-events-baa417fe9152
- url
- https://medium.com/@singhamit/kube-trigger-a-kubevela-add-on-to-monitor-and-react-to-events-baa417fe9152
- canonical_url
- https://medium.com/@singhamit/kube-trigger-a-kubevela-add-on-to-monitor-and-react-to-events-baa417fe9152
- author_url
- https://medium.com/@singhamit
- status
- ok
- fetched_at
- 2026-06-12 22:02:08