#1 Setting Up WhatsApp in Salesforce Unified Messaging — From Scratch
unified document based on official help links
1 Setting Up WhatsApp in Salesforce Unified Messaging — From Scratch
Setting Up WhatsApp in Salesforce Unified Messaging — From Scratch
A practical admin guide with verified navigation, official documentation references, and every gotcha you won’t find in one place
Why This Article Exists
Salesforce documentation for WhatsApp Unified Messaging spans 30+ Help pages across Data Cloud, Marketing Cloud, Service Cloud, and Meta. This guide consolidates the correct setup flow into a single walkthrough — verified against official Salesforce Help docs and a live org.
What Is Unified Messaging for WhatsApp?
Unified Messaging lets you run marketing and service interactions through a single WhatsApp number. Instead of separate channels for Service Cloud and Marketing Cloud, one number handles both — with shared consent tracking and conversation continuity powered by Data Cloud (Data 360).
Product naming note: Three Salesforce products connect to Unified WhatsApp:
- Marketing Cloud Next (MCN) — the newer, native Salesforce platform app (Growth and Advanced editions). Uses Flows and Segments.
- Marketing Cloud Engagement (MCE/SFMC) — the legacy ExactTarget-based platform (Pro+, Corporate+, and Enterprise+ editions). Uses Journey Builder.
- Service Cloud Digital Engagement (DE) — handles bots, agents, and Omni-Channel routing.
Salesforce recommends upgrading from MCE to MCN. This guide covers both.
Where WhatsApp lives in Setup:
Setup → Unified Messaging → WhatsApp → Your Numbers
        → Click your number to open the detail page
              ├── Tab: Details
              │     ├── Channel Information
              │     ├── Capabilities
              │     │     ├── Agent and Bot Conversational Support
              │     │     ├── Customer Conversation Engagement
              │     │     └── Marketing Cloud Engagement Messages
              │     ├── Data Residency Region
              │     └── Process Incoming Messages
              └── Tab: Consent
                    ├── Opt-In Settings (Consent Type)
                    └── Consent Keyword Settings
Where does Messaging Settings fit? Clicking “Configure” on the Agent and Bot Conversational Support capability opens the classic Messaging Settings page. Unified Messaging is a wrapper that delegates Service Cloud configuration to Messaging Settings.
Number Migration — What Are Your Options?
You don’t have to start with a brand-new number. Official documentation confirms migration from all existing channel types:
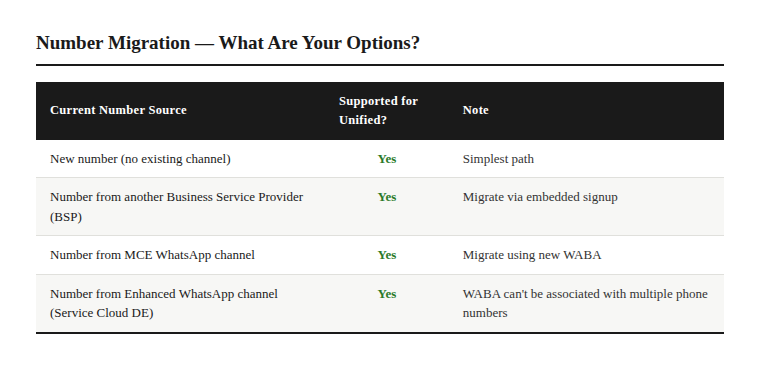
The key constraint: A new WABA is required when migrating from MCE or another BSP. Exception: numbers from Service Cloud Digital Engagement can use the existing WABA — but only if that WABA has consistently used the same phone number (no history of multiple numbers).
When migrating with a phone number at the same time as the WABA, template migration can take 1–2 days. If you migrate the WABA first and add the phone number later, template migration can begin within a few hours. Migrate during a low-traffic window. When migrating from Enhanced or WhatsApp-First channels, messaging history and channel settings from the previous channel are preserved — customers see all messages in the same chat.
Prerequisites
Salesforce Licensing
Product Required Edition Salesforce Platform Enterprise or Unlimited Marketing Cloud Next Growth or Advanced Marketing Cloud Engagement Pro+, Corporate+, or Enterprise+ Service Cloud Enterprise or Unlimited (for Digital Engagement) Data Cloud (Data 360) Required — included with above
Not supported in Government Cloud Plus. Contact your Salesforce AE before starting — Unified Messaging won’t appear in Setup without correct entitlements.
Meta Requirements
- A verified Meta Business Manager account
- A phone number (new or migrated — must support SMS or voice for OTP)
Required Package Versions
- Salesforce Standard Data Model package: version 1.69 or later
- UnifiedMessagingConsent package: version 1.3 or later
- Earlier versions can be upgraded without losing existing consent data
Key Considerations (from official docs)
- Sandbox support: only sandboxes created after May 9, 2025
- Meta doesn’t support business-to-business (B2B) messaging
- Don’t reuse a WABA across multiple Salesforce orgs (sandbox and production = two separate orgs)
- Unprocessable messages go to a Dead Letter Queue (DLQ) for manual intervention; messages exceeding a 24-hour processing window are auto-expired
- Some messages may not be delivered due to Meta rules (customer blocked your number, offline 30+ days, restricted country)
Step-by-Step Setup
Salesforce recommends this order:
- Data Cloud → 2. WABA + Number → 3. Consent → 4. Capabilities + Default Cloud → 5. Marketing Routing → 6. Service Routing
Step 1 — Configure Data Cloud for Unified WhatsApp
Phase A — Install Data Kits (one-click)
- In Setup, Quick Find → Your Numbers (under Unified Messaging → WhatsApp)
- Under Channel Setup, click Install
- This installs both required data kits for WhatsApp (takes 5–10 minutes):
- UnifiedMessagingConsent (consent tracking)
- UnifiedWhatsAppPackage (engagement data)
4.Click Done when complete
Phase B — Deploy Data Streams (manual, in Data Cloud app)
- Open Data Cloud from App Launcher → select Data Streams tab
- Click New → Installed Data Kits & Packages → Next
- Deploy four data streams in sequence:
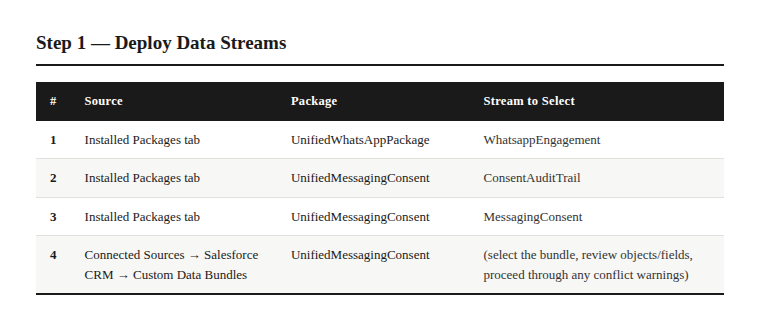
- Verify all four streams show Active status in the Data Streams tab
Required permissions: Data Cloud Architect Permission Set
If step 4 warns about conflicts, click Proceed — this is expected.
Step 2 — Set Up Branded Domain for URL Shortening (Optional)
- Navigate to Setup → Unified Messaging → Branded Domain → URL Shortening Domain
- Click New Domain
- Enter your domain name (Salesforce auto-adds
https://prefix — use a subdomain) - Select a CA-signed HTTPS certificate from the dropdown. If none exist, upload one via Certificate & Key Management
- Save the domain
- Click dropdown next to the domain → Details
- Configure the required DNS CNAME record with your domain registrar (work with IT)
- After DNS propagates, click Status to activate
Shortened links expire after 90 days. After expiry, subscribers see a “page not found” error.
Step 3 — Connect Your WABA and Add a Number
- In Setup, Quick Find → Your Numbers
- Click Add Number
- Select Create a WhatsApp Business Account, new account → Next
- Click Create Account → Next
- Enter Meta credentials → Next
- Click Continue as [your name]
- Click Get Started
- Select your Business Portfolio → Next
- Click Next
- Enter WhatsApp Business account name, display name, and Category → Next
- Enter your phone number, select Phone Call (for OTP) → Next
- Enter verification code → Next
- Click Finish
- Back in Salesforce, select your WABA and phone number → Finish
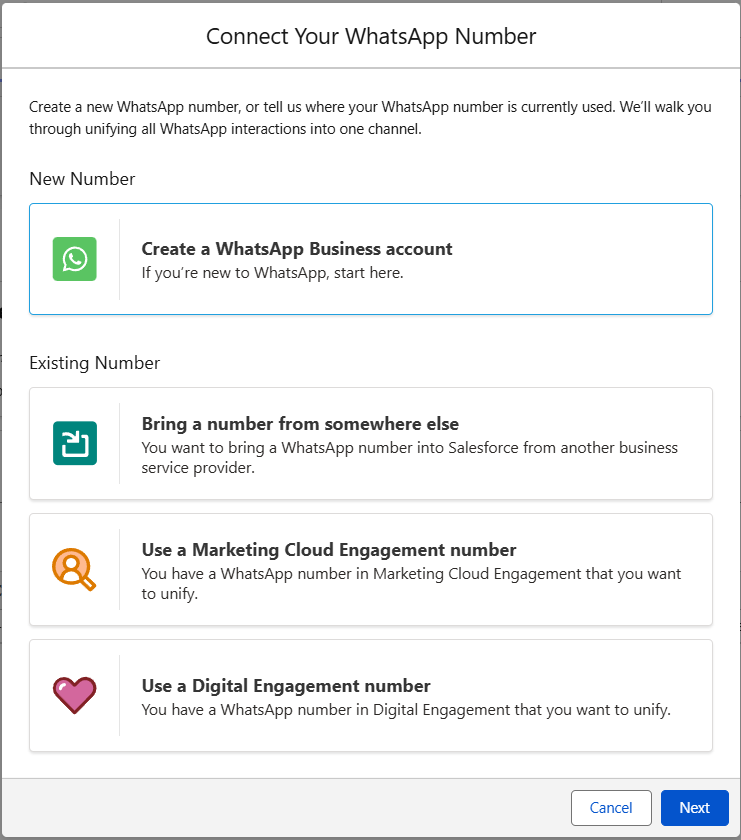
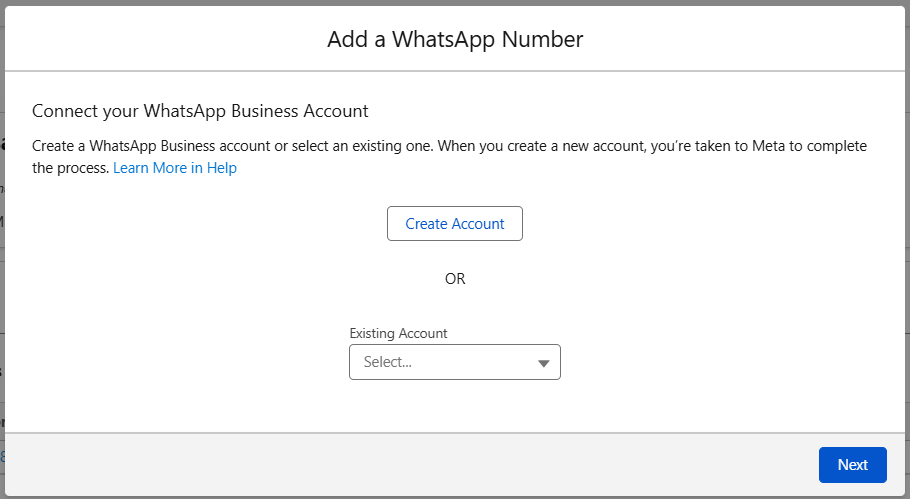
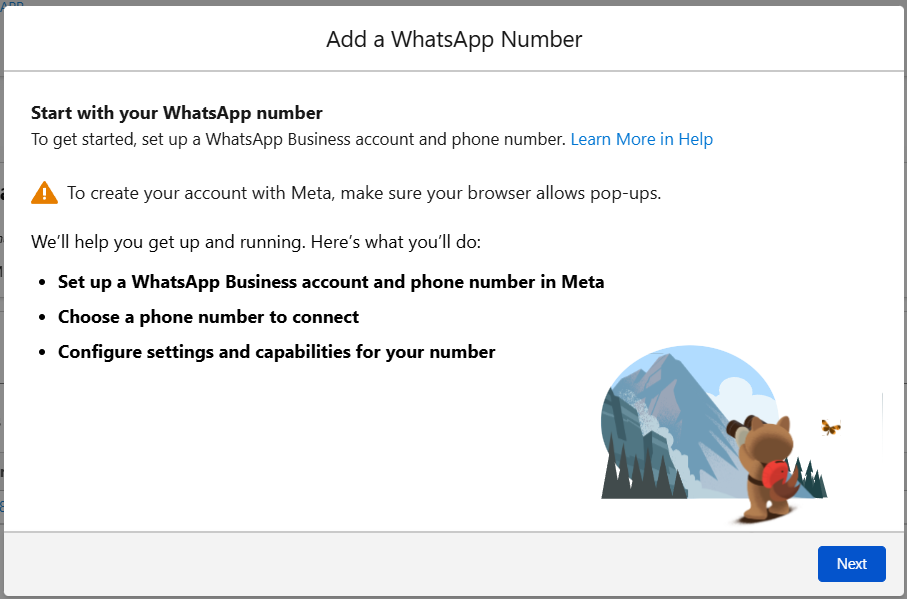
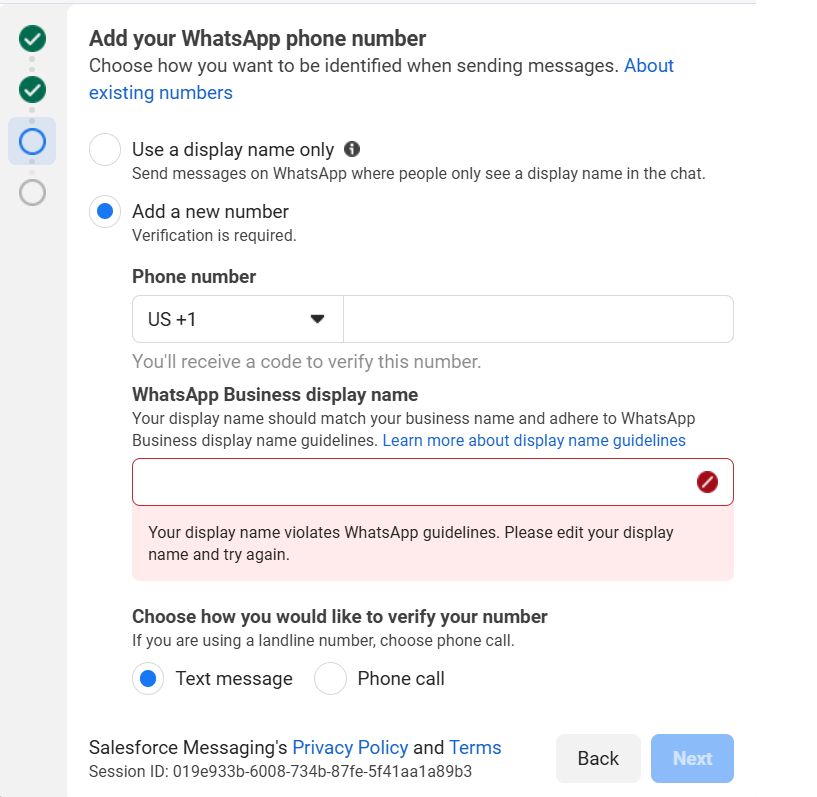
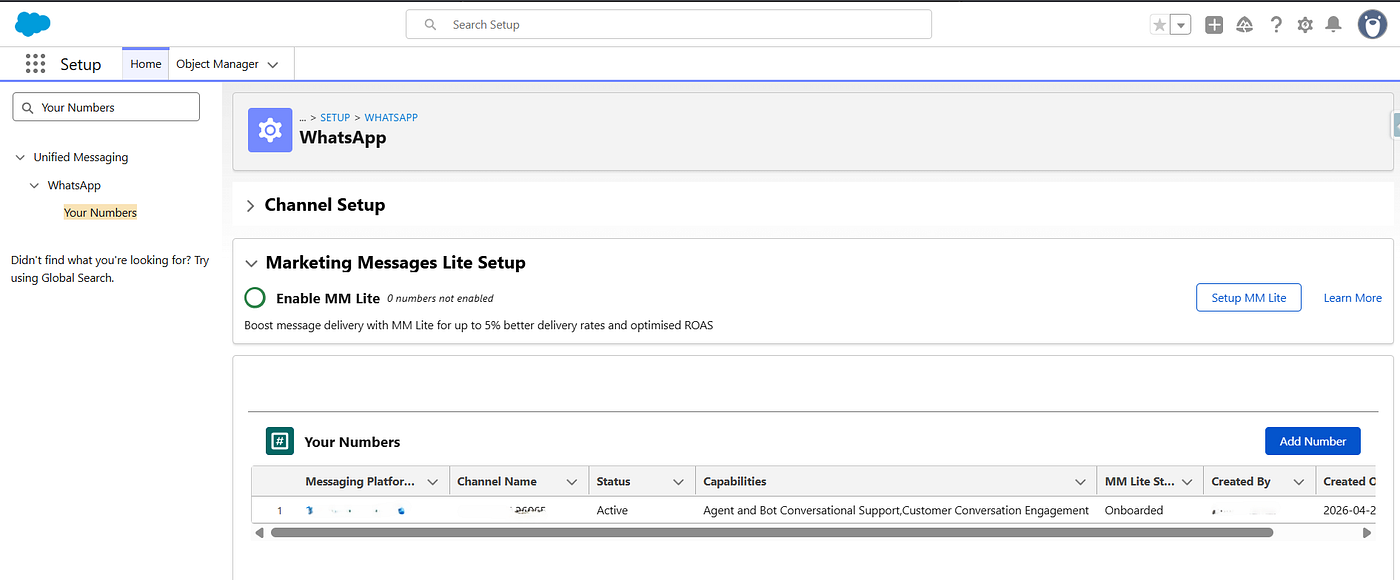
📸 Screenshot : Your Numbers page with number registered
Step 4 — Configure Consent (BEFORE Activating Capabilities)
This must happen before Step 5. Capabilities require opt-in consent to be configured first.
- On the number detail page, click the Consent tab
- Enter Opt-In Keywords and an Opt-In Confirmation Message
- Save
- Set Consent Type — Explicit Opt-In or Implicit Opt-In
The Consent tab note reads: “Changes to consent settings apply to sending and receiving messages through Flow and Marketing Cloud Engagement. Consent opt-in settings don’t apply to conversational messages.”
Consent Keyword Settings: Configure keywords and responses per language.
Multiple consent layers exist:
- Your Numbers → Consent tab — Flow and Marketing sends
- Messaging Settings (via Agent/Bot configure) — conversational messaging with opt-out keywords (
cancel,stopall,unsubscribe,quit) and help keywords (help)- Unified Messaging → Consent — cross-channel settings
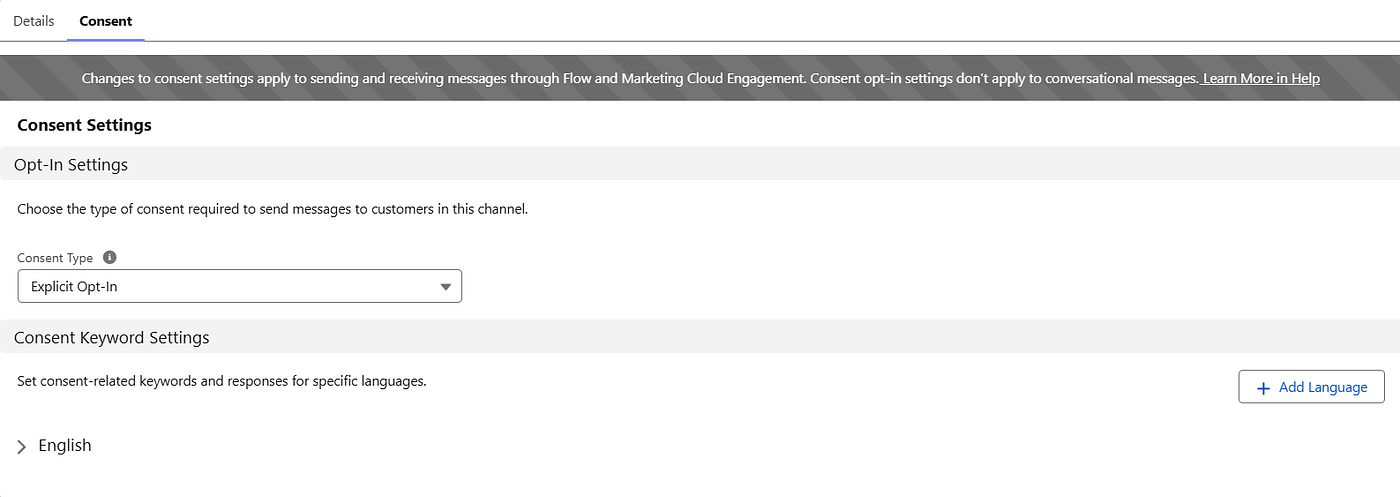
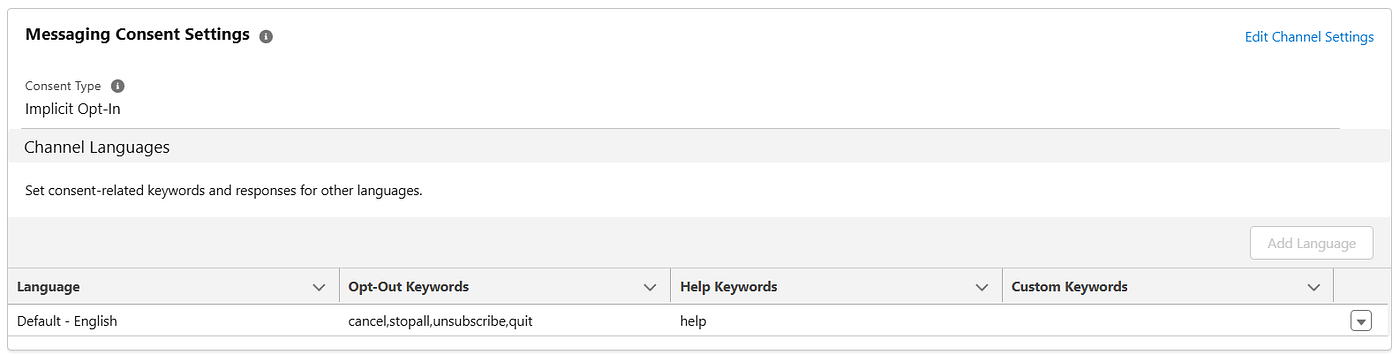
📸 Screenshot : Consent tab with opt-in settings and keyword configuration
Step 5 — Activate Capabilities (Cross-Cloud Relationship)
On the Details tab, the Capabilities section extends what you can do with your number. Each capability must be configured and then activated separately.
Agent and Bot Conversational Support (Digital Engagement)
Enables user-initiated inbound messages routed to agents, bots, or service reps.
Before activating: complete Service Cloud setup (Omni-Channel, routing, queues).
- Click Configure next to Agent and Bot Conversational Support
- You’re taken to the Messaging Channel page (Messaging Settings)
- Locate Omni-Channel Routing section
- Choose Routing Type: Omni-Queue, Omni-Flow, or User
- Select the corresponding queue, flow, or user
- Save
- Return to Capabilities section → click Activate
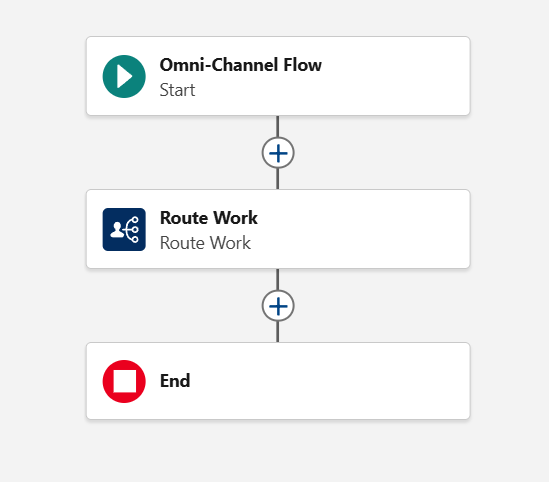
Omni Channel flow configuration in flows
Troubleshooting: If Activate doesn’t work, go to the Messaging Settings landing page, toggle Messaging off then on, then retry.
Customer Conversation Engagement (MCN/DE Outbound)
Enables business-initiated outbound conversations from MCN or DE.
- Ensure Consent tab opt-in keywords are configured (Step 4)
- Click Configure next to Customer Conversation Engagement
- Requires explicit opt-in consent from end users
- Click Activate
Marketing Cloud Engagement Messages (MCE)
Before activating: connect Data Cloud to MCE.
- Click Configure next to Marketing Cloud Engagement Messages
- Select an Enterprise ID and Business Unit
- Click Save
- Click Activate
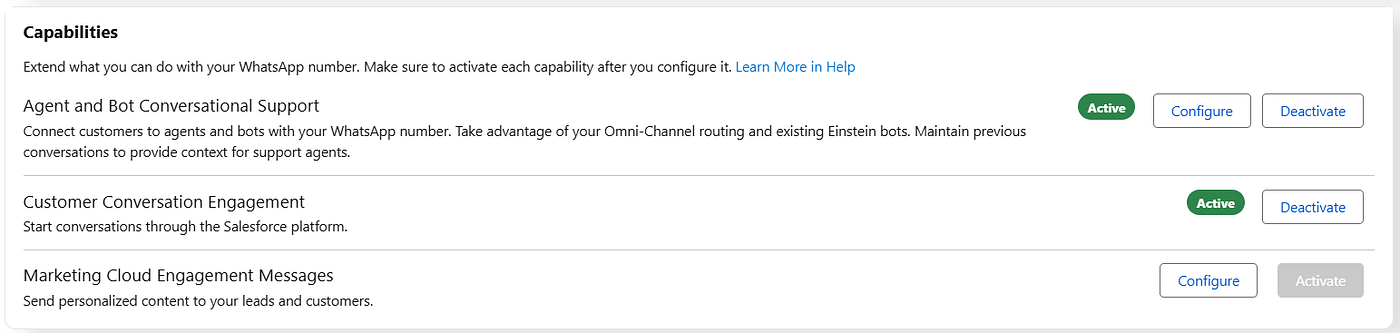
📸 Screenshot 4: All three capabilities with Active/Inactive toggles
Step 6 — Select Data Residency Region
On the Details tab, locate Data Residency Region.
- Select the country where WhatsApp data is stored at rest (managed by Meta)
- Required for GDPR compliance
Can this change later? Yes — deactivate all capabilities first, select new region, reactivate. This pauses all traffic.
Pre-check with Meta: ensure your phone number is verified in WhatsApp Manager → Profile → verify if “Phone number verification required” notification appears.
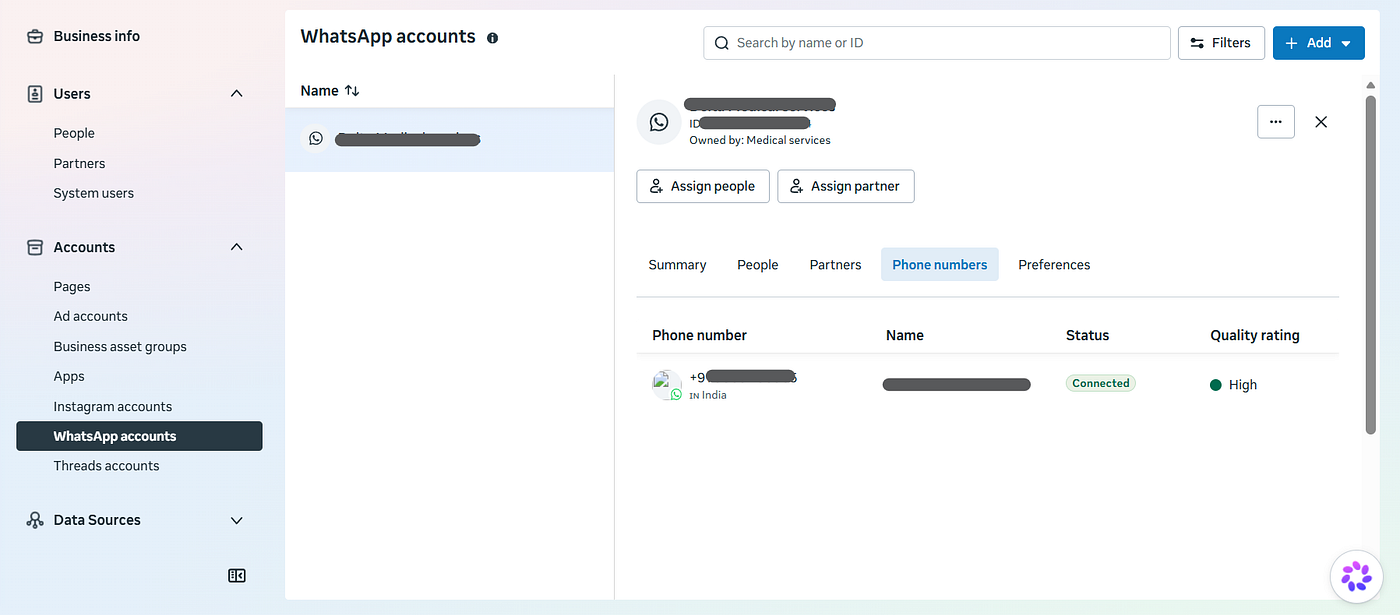
Step 7 — Set Default Cloud and Incoming Message Routing
On the Details tab, locate Process Incoming Messages.
This is critical — if not configured, incoming messages are dropped.
The inbound routing hierarchy (5 steps, from official docs):
- Compliance Check — opt-out keywords processed immediately. Opt-in/help keywords check for active DE conversation first.
- Active Service Conversations — if active DE conversation exists, message routes to agent/rep.
- Marketing Keywords — if no active service session AND setting is enabled, AND message matches a keyword in MCE with an active journey that applies to the user, routes to MCE via that journey
- Active Marketing Flows — checks if MCN has an applicable flow to resume.
- Default Application — final fallback. Routes to the app you configured.
Set Default App:
- Under Process Incoming Messages, select Digital Engagement (recommended) from the Default App dropdown
- Optionally: check Allow Marketing Cloud Engagement Reserved Keywords to auto-route marketing keywords to Journey Builder
Salesforce recommends Digital Engagement as default — inbound messages typically need agent/rep support.
Step 8 — Configure Marketing Routing
For MC Next (MCN) — Segment-Triggered Flow
- Pre-work: create a segment, communication subscription, WhatsApp template in Meta, WhatsApp Template Message content, and Data Graph
- Open Marketing app → Flows tab → New → Segment-Triggered Flow
- Add elements: Send WhatsApp Message → Wait Until Event (WhatsApp Response) → Forward Conversation to Bot or Agent
- Save, test, activate
For MCE (SFMC) — Journey Builder
- Pre-work: create a data extension
- Open Journey Builder → Create New Journey → Multi-Step Journey
- Entry Source: Data Extension
- Add: WhatsApp message activity → Wait Until Chat Response → WhatsApp Session Transfer (for service handoff)
- Save, validate, test, activate
Step 9 — Configure Service Cloud
Three sub-steps:
A. Prepare Service Reps:
- Assign Messaging User Permission Set License to reps
- Create custom permission set with App Permissions: Agent Initiated Outbound Messaging, Configure Messaging, Messaging Agent
- Create Presence Status for Unified WhatsApp → assign to permission set
- Assign Service Cloud User license + custom permission set + Marketing Cloud Manager permission set to reps
B. Set Up Messaging Console:
- Setup → App Manager → New Lightning App
- Select Console Navigation, Desktop and phone, Setup (full set)
- Add Omni-Channel utility item
- Add navigation items: Accounts, Contacts, Messaging Sessions, Messaging Users
- Assign user profiles → Save & Finish
C. Route Unified WhatsApp Sessions:
- Routing types: Omni-Queue, Omni-Flow, or User
- For Omni-Flow: create a Flow with Route work element → select Service Channel (Messaging Session) → route to Agent with Backup Queue
- Save and activate flow
Step 10 — Configure Messaging During Support Sessions (MCE)
Prevents promotional content during active agent/bot conversations. Configured in Journey Builder on the WhatsApp activity.
- In a running journey, click the WhatsApp activity → Edit
- On the Message Configuration tab, select from Message Timing dropdown:
- Not During Active Session (default) — message not sent if customer is actively engaged with agent/bot
- Not During Open Session — message not sent if customer has any open session
- Always Send — sends regardless of session status
Step 11 — Create WhatsApp Message Content (Templates)
Templates are created in Meta first, then referenced in Salesforce.
Two WhatsApp content types:
Content Type Purpose WhatsApp Template Message Start conversations (outbound, business-initiated) WhatsApp Session Message Reply to user-initiated conversation (within 24-hour window)
To create a WhatsApp Template Message (MC Next):
- Create and approve template in Meta Business Manager with
{{1}},{{2}}merge fields - Open Marketing app → Content tab → select Workspace → click Add → select WhatsApp Template Message
- Settings tab: select WABA, Language, Template (from Meta), Title
- Data Source tab (optional): select Event for event-triggered flows
- Map variables: each
{{N}}shows a Variable N field → click Add Merge Field to map Salesforce attributes - Save
Message body is read-only in Salesforce — it comes from Meta’s approved template.
Character limits: 1,024 chars for template messages, 4,096 chars for session messages.
Step 12 — Test End-to-End
- Inbound → Bot: test device sends message → bot responds
- Inbound → Agent: handoff or direct routing → conversation in Omni-Channel → agent replies
- Outbound → Template: Flow-based (MCN) or Journey Builder (MCE) template send → verify delivery
- Consent sync: opt out from test device → verify propagation across marketing and service
- Inactivity timeout: wait for configured timeout → verify automated responses
- Marketing-to-Service transition: send marketing template → customer replies with non-keyword → verify routing to Service Cloud
How Conversation Transitions Work
Marketing-to-Service transitions follow this pattern:
- Marketing campaign sends outbound template to customer
- Customer replies
- If reply matches a pre-defined marketing keyword → stays in marketing campaign/journey
- If reply doesn’t match any keyword (or MCN isn’t set up) → routes to Service Cloud for support or Agentforce Agent
Default context recommendation: use Service Cloud (Digital Engagement) as default. Inbound customer-initiated messages typically need agent support, not marketing routing.
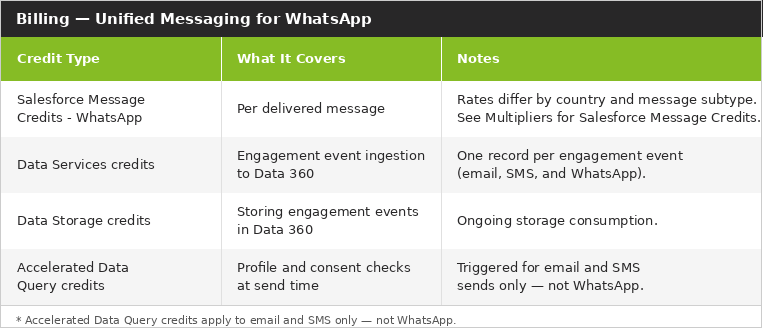
Billing
Post-Launch Checklist
- [ ] Data Kits installed + four data streams deployed and Active
- [ ] If migrating from MCE/BSP: old WABA deactivated, number moved to new WABA, templates migrated (up to 24h). If migrating from Service Cloud DE: confirm existing WABA eligibility (single-number history) or create new WABA
- [ ] All needed capabilities configured and activated
- [ ] Consent configured at both layers: Number → Consent tab (opt-in keywords, BEFORE capability activation) AND Messaging Settings (opt-out/help keywords)
- [ ] Default App for Incoming Messages set to Digital Engagement
- [ ] Omni-Channel routing configured in Messaging Settings (via Agent/Bot Configure)
- [ ] Automated responses set (acknowledgement, start, end, inactive)
- [ ] Customer inactivity timeout and warning set
- [ ] Service reps have Messaging User PSL + custom permission set + Service Cloud User license
- [ ] Messaging Console created with Omni-Channel utility item
- [ ] Marketing routing configured (Segment-Triggered Flow for MCN or Journey for MCE)
- [ ] Messaging During Support Session configured (MCE Journey Builder)
- [ ] Templates approved in Meta and created as content in Marketing → Content → Workspace
- [ ] Data residency region confirmed
- [ ] Blockout Windows configured if needed (Across Channel Settings)

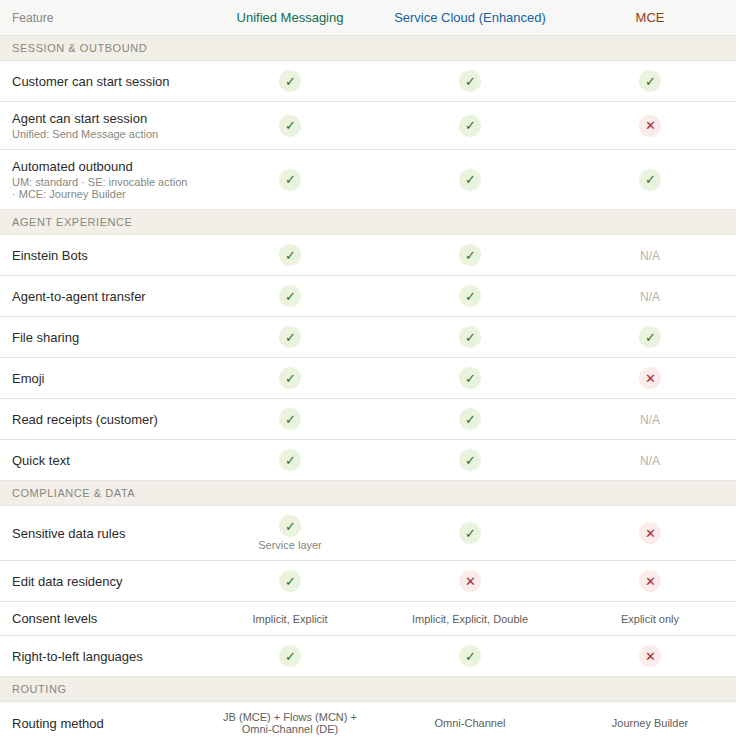
*MCE “customer can start session” works via reserved keyword matching — customer sends a keyword that triggers an MCE journey, not a traditional chat session. Requires “Allow Marketing Cloud Engagement Reserved Keywords” enabled in Process Incoming Messages.
Key Decisions Before You Start
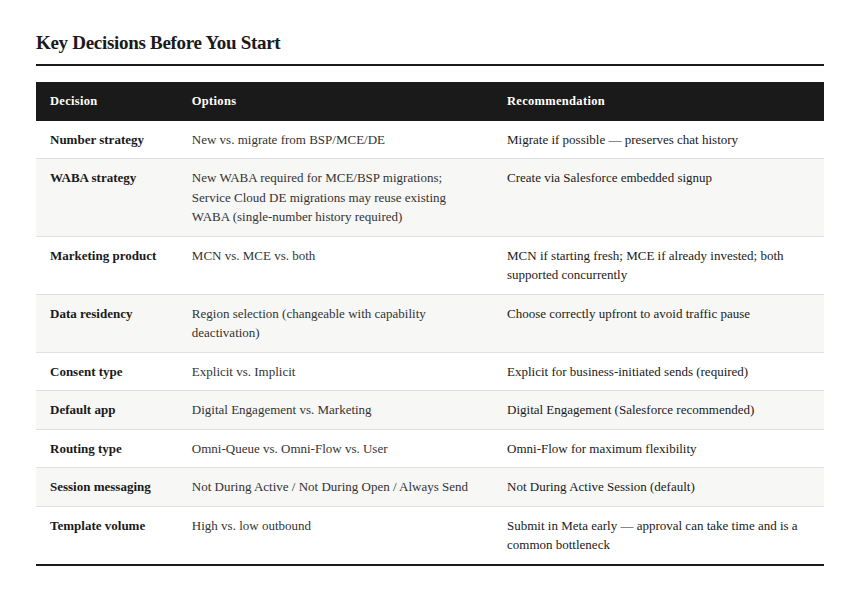
Refer below articles for detailed implementation —
Omni-Channel for Administrators — https://resources.docs.salesforce.com/latest/latest/en-us/sfdc/pdf/service_presence_administrators.pdf
Omni-Channel Routing in Service Cloud — https://medium.com/globant/omni-channel-routing-in-service-cloud-8b145ea9cfc9
Transfer Conversations from an Agent with an Omni-Channel Flow- https://help.salesforce.com/s/articleView?id=ai.service_agent_escalation.htm&type=5
Transfer Conversation From AI Agent To Live Human Agent — https://www.youtube.com/watch?v=O7GaLBOiH-c
Marketing Cloud Next: How to Set Up Conversational Email — https://medium.com/@marketingcloudtips/marketing-cloud-next-how-to-set-up-conversational-email-0ef29d7fd113
Implement Conversational Email — https://help.salesforce.com/s/articleView?id=mktg.um_channel_email_conversation.htm&type=5
Chat for Support Agents — https://resources.docs.salesforce.com/latest/latest/en-us/sfdc/pdf/chat_support_agents.pdf
Official Documentation Reference
Prepare
- What’s Unified Messaging?
- Unified WhatsApp Functionality Comparison
- Number Migration
- Conversation Transitions
- Considerations
Setup
- Unified Messaging Setup
- Connect to Data 360
- Configure Data Cloud
- Connect WABA
- Create WhatsApp Channel
- Cross-Cloud Relationship
- Default Cloud & Routing
- Data Residency
Configure by Cloud
- Configure MCN
- Configure MCE
- Configure Service Cloud
- Prepare Service Reps
- Messaging Console
- Route WhatsApp Sessions
Operations
- Handle Incoming Messages
- Messaging During Support Sessions
- Engagement Data & Queries
- Pause Traffic
- Re-Register Number
- Consent
- Billing
Migration
- Migrate to Unified WhatsApp
- Migration Guidelines
- Add Number After WABA Migration
- Channel Deprovisioning
Final Notes
Unified Messaging for WhatsApp is powerful once running — a single number, unified consent, and full conversation thread visible across marketing and service. But it is not a simple toggle.
The dependency chain: Licensing → Deploy Data Kits → WABA via embedded signup → Number registration → Data residency → Activate capabilities → Configure Agent/Bot via Messaging Settings → Set Default App for Incoming Messages → Configure consent (both layers) → Create templates in Meta → Create content in Marketing Cloud → Go live.
Four things surprise most admins:
- Clicking “Configure” on a capability drops you into Messaging Settings — Unified Messaging is a wrapper, not a replacement.
- Consent exists at multiple layers — the number-level Consent tab governs Flow and marketing sends; Messaging Settings governs conversational messaging. Both must be configured.
- Templates are not created in Salesforce — they must be approved in Meta first, then referenced as content in Marketing → Content → Workspace → Add → WhatsApp Template Message.
- The Marketing Cloud product matters — MCN (native Salesforce, Flows) and MCE (ExactTarget, Journey Builder) have completely different setup paths.
Last verified against official Salesforce Help documentation (38 pages) and a live Salesforce org (Spring ‘26).
Note: This is an honest effort to gather all available information in one article. If any discrepancies are found, kindly inform and refer to the official Salesforce documentation.
메타데이터
- post_id
- bacebb074cc2
- slug
- 1-setting-up-whatsapp-in-salesforce-unified-messaging-from-scratch-bacebb074cc2
- url
- https://medium.com/@adeshpatil/1-setting-up-whatsapp-in-salesforce-unified-messaging-from-scratch-bacebb074cc2
- canonical_url
- https://medium.com/@adeshpatil/1-setting-up-whatsapp-in-salesforce-unified-messaging-from-scratch-bacebb074cc2
- author_url
- https://medium.com/@adeshpatil
- status
- ok
- fetched_at
- 2026-06-09 15:37:30