Fine Tuning your Small Model in Education Domain to Make it Local Model as Standalone Assistant…
Imagine that you want to create a personal assistant like Gemini, however, you are in the middle of nowhere that does not have an internet…
Fine Tuning your Small Model in Education Domain to Make it Local Model as Standalone Assistant Model in Mobile Computing Device
Imagine that you want to create a personal assistant like Gemini, however, you are in the middle of nowhere that does not have an internet. Imagine the potential of deploying high-reasoning agents to environments completely cut off from the internet — like remote communities, field operations, or rural schools. Cloud-dependent AI is powerful, but it completely breaks down the moment the connection drops. The true frontier isn’t just making models bigger; it’s making them accessible everywhere, completely offline.
The myth between LLM vs SLM
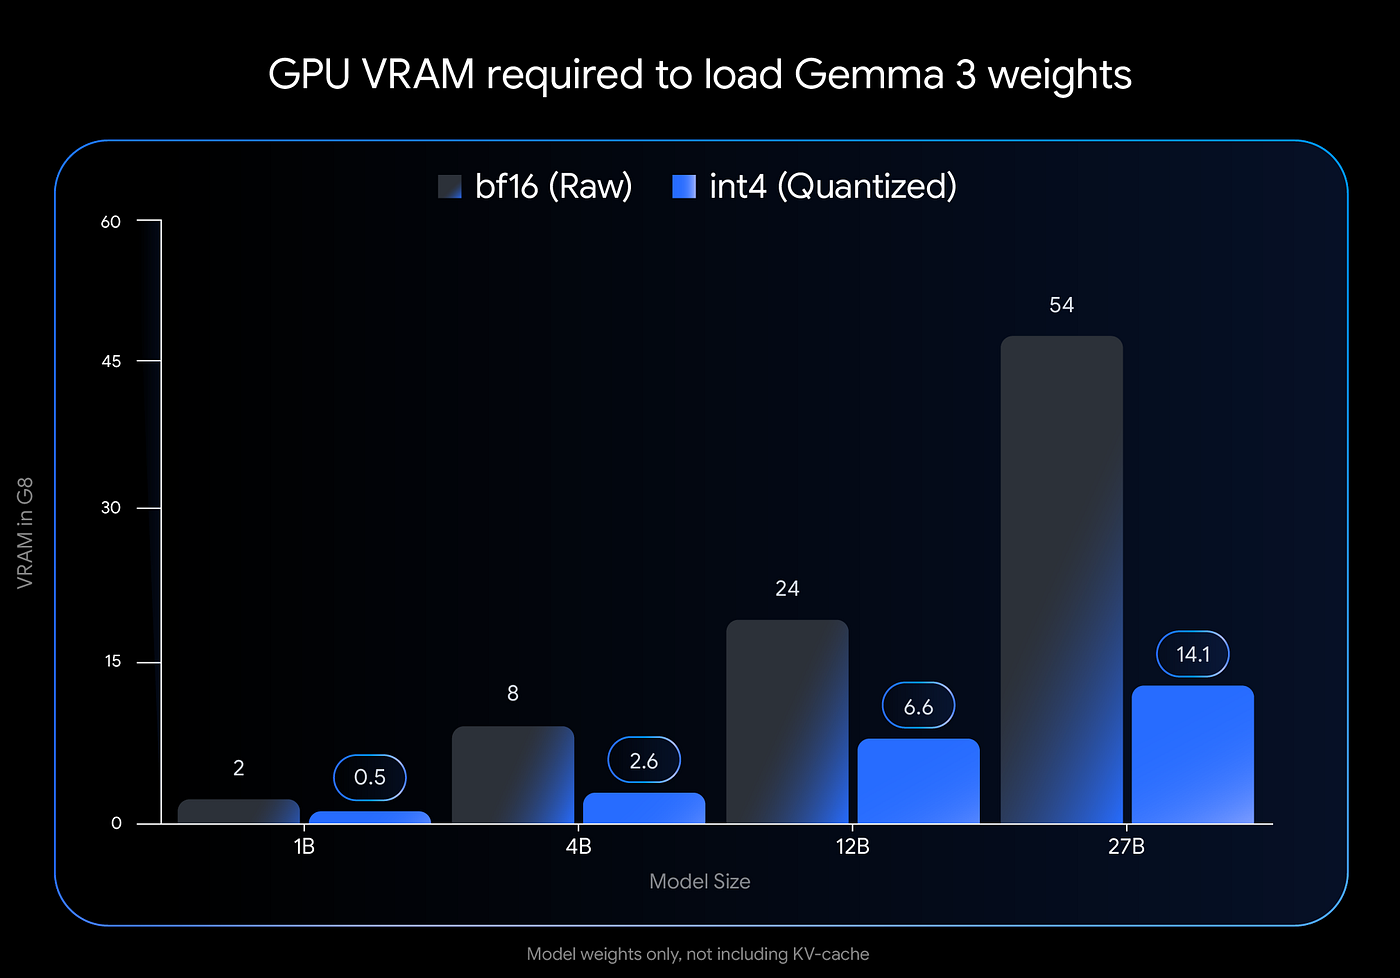
For the past few years, the AI industry has been driven by a single, overriding philosophy: bigger is better. This led to the creation of massive Large Language Models (LLMs) packed with hundreds of billions — sometimes trillions — of parameters. They were trained on practically the entire public internet. However, the industry is currently undergoing a massive shift toward Small Language Models (SLMs). The popularity of Small Language Models (SLMs) marks a significant maturation in how the industry approaches artificial intelligence. While massive LLMs proved what AI could do, SLMs are proving how AI will be used in everyday, practical scenarios. Google has been release Open Model Gemma that provides a SLM version to run in Edge Devices.
“Offline-First” AI
This is perhaps the most transformative way. Cloud-dependent AI is useless the moment connectivity drops. SLMs are small enough to be quantized and deployed directly onto mobile devices, laptops, and localized hardware.
- Democratizing Access: This capability unlocks advanced AI for environments with zero or intermittent internet connectivity. It allows for the deployment of high-reasoning agents in critical but disconnected scenarios, such as bringing intelligent, interactive educational tools to remote or rural areas where cloud infrastructure simply doesn’t exist.
- Zero Latency: Because the processing happens locally on the device’s NPU or CPU, the response time is instantaneous. There is no round-trip delay to a server, which is crucial for real-time standalone assistants.
As AI becomes integrated into personal devices and enterprise workflows, sending sensitive data to the cloud is increasingly viewed as a security risk. SLMs process data locally on the device. Because the data never leaves the user’s hardware, it inherently solves massive privacy concerns and makes it far easier to comply with strict AI governance and security frameworks.
This tutorial will cover how we prepare the data and how to use a finetuning process by utilizing JAX and Tunix to train a Gemma 3 1b models. The technical roadmap of this article will cover:
- Dataset Preparation: Since this tutorial is on the education domain, we try to utilize a Indonesian Book and create our own dataset to finetune the model.
- Targeted Fine-Tuning: Taking a foundational model and training it using JAX and Tunix frameworks to specialize in assistant-like workflows.
Now let’s discuss the first step in this tutorial, which is creating a dataset for our training process. The dataset is constructed from Indonesian E-Book about education from Ministry of Primary and Secondary Education website.
The book will extracted and formatted into a specified JSON format like this.
{
"Topic": "fisika",
"Class": "12",
"Chapter": "2",
"Question": "Seorang mekanik sedang merancang sistem kelistrikan untuk sebuah
mobil modifikasi. Ia memutuskan untuk menghubungkan kutub negatif dari semua
komponen elektronik langsung ke kerangka logam bodi mobil, alih-alih menarik
kabel panjang kembali ke kutub negatif baterai. Mengapa kerangka logam bodi
mobil digunakan sebagai bagian dari rangkaian kelistrikan (pentanahan), dan
apa keuntungan teoretis utamanya?\na. Untuk meningkatkan tegangan total baterai
dengan memanfaatkan muatan statis yang tersimpan pada logam bodi mobil.
\nb. Untuk menghemat penggunaan material kawat penghantar dan mempermudah
pelacakan kerusakan pada komponen kelistrikan.\nc. Untuk mencegah baterai
mengalami kelebihan daya dengan membuang kelebihan arus listrik langsung ke
tanah.\nd. Untuk meningkatkan hambatan total rangkaian sehingga komponen
elektronik tidak mudah terbakar akibat arus berlebih.\ne. Untuk mengubah
arus searah dari baterai menjadi arus bolak-balik yang dibutuhkan oleh
lampu utama mobil.",
"Reasoning": "Soal Skenario Interaktif C4 untuk menganalisis fungsi pentanahan
(grounding) pada sistem kelistrikan mobil. Distraktor mencakup miskonsepsi
umum seperti peningkatan tegangan (overgeneralisasi) atau pengubahan jenis
arus (sinonim palsu).",
"Hint": "Perhatikan sifat logam pada kerangka mobil sebagai konduktor dan
bayangkan dampaknya terhadap jumlah kabel yang dibutuhkan jika setiap lampu
harus ditarik dua kabel langsung ke aki.",
"Correct Answer": "b. Untuk menghemat penggunaan material kawat penghantar dan
mempermudah pelacakan kerusakan pada komponen kelistrikan."}
This dataset is a highly structured blueprint for an educational assessment item. It represents more than just a standard multiple-choice question; it is designed to act as a framework for an intelligent tutoring system or an educator to guide a student through a specific physics concept. Here is a breakdown of what each component of this dataset represents:
- Topic: Physics (
fisika). - Class & Chapter: Grade 12, Chapter 2 (which typically covers electricity and magnetism in standard curricula).
- Question: A scenario-based problem asking why a car’s metal chassis is used as the negative return path (grounding) in an automotive electrical system. The options include the correct practical reason mixed with common scientific misconceptions (like “dumping electricity into the earth” or “increasing voltage”).
- Correct Answer: Option b, which correctly identifies that using the metal frame as a conductor saves wire material and simplifies troubleshooting.
- Reasoning: Explains the intent of the question. It notes that the distractors (wrong answers) are deliberately designed to catch common student misconceptions, such as confusing automotive grounding with household earth-grounding (Option C).
- Hint: A direct clue pointing the student toward the physical properties of the car’s frame (it’s a metal conductor) and asking them to visualize the wiring.
This dataset is built for an interactive learning environment. It provides the question, the answer, the logic to prove the answer using reasoning, and the hint to a student.
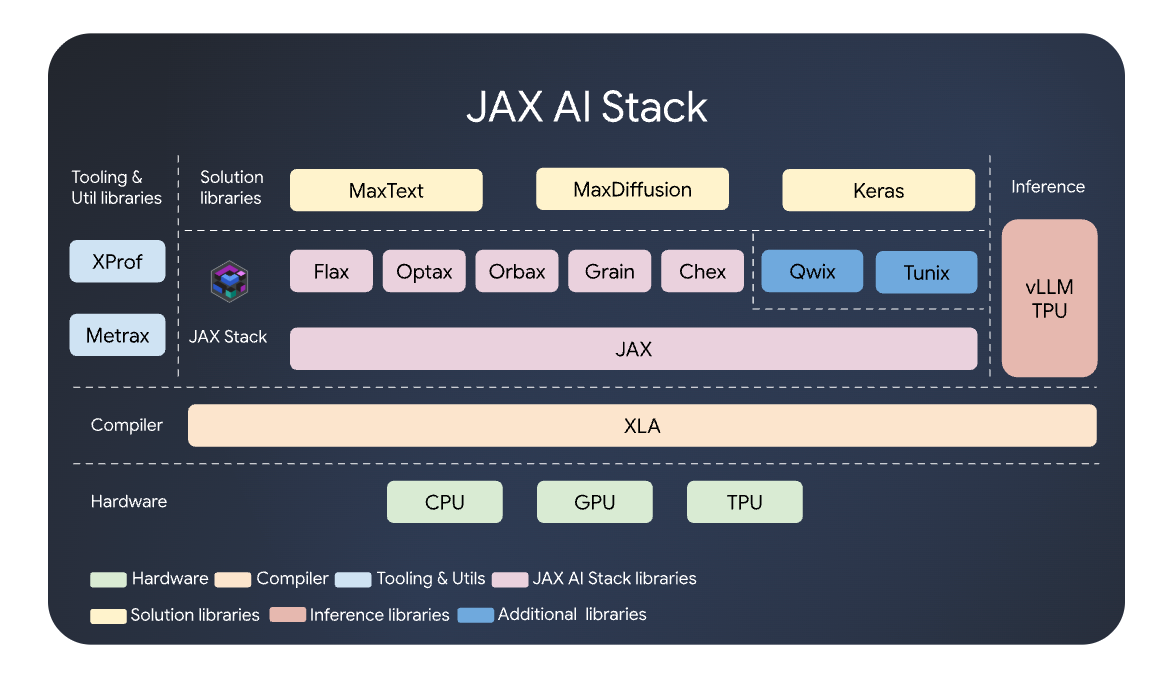
After creating the dataset, we will do the finetune training process. The finetuning process will use JAX and Tunix Framework from JAX AI Stack.
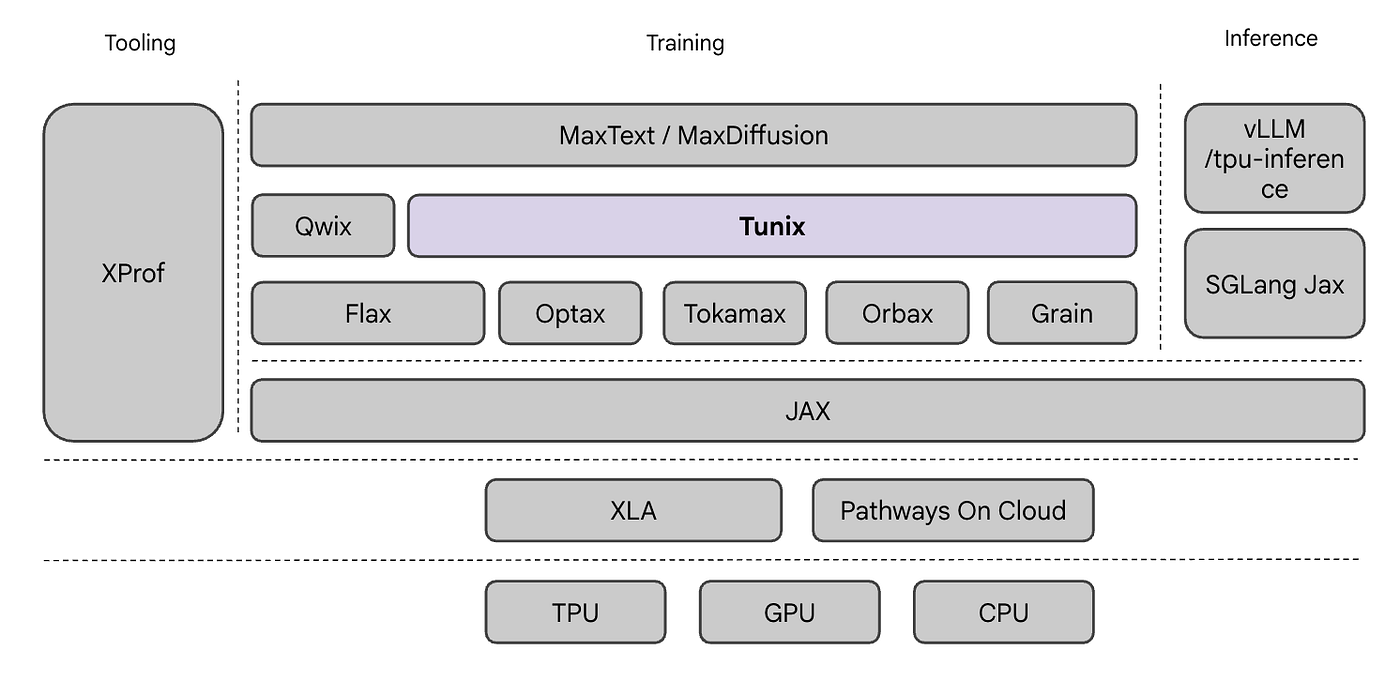
JAX and Tunix represent two deeply connected layers within the modern AI development stack, particularly when building, fine-tuning, and deploying language models on high-performance hardware. JAX is a numerical computing library developed by Google. You can think of it as NumPy backed by automatic differentiation and accelerated compilation. Tunix (Tune-in-JAX) is a recently released, lightweight library built directly on top of JAX. While JAX provides the raw computational power, Tunix provides the specific architectural pipelines required for post-training and aligning language models.
JAX handles the low-level execution — managing the sharding strategies and maximizing TPU acceleration during the training phase. Tunix sits on top of this, providing the reproducible recipes to apply LoRA adapters or preference tuning to the SLM. Once Tunix finishes refining the model’s behavior, the highly optimized weights can be merged, quantized, and exported out of the JAX ecosystem for native integration onto mobile device or other environment.
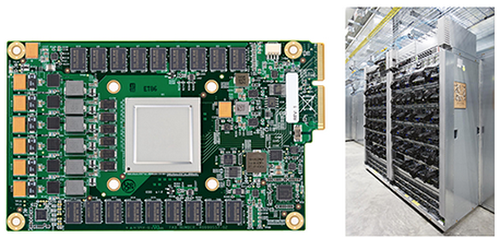
For our training process, we will try to utilize a Cloud TPU for our tutorial. There are several step-by-steps that need to be done for utilizing the Cloud TPU.
- Create a project in Google Cloud Console.
- Createn a new VM in our Google Cloud project by utilizing this code.
gcloud alpha compute tpus tpu-vm create tpu-tunix \
  --project=<your project id> \
  --zone=europe-west4-a \
  --accelerator-type=v6e-1 \
  --version=v2-alpha-tpuv6e \
  --provisioning-model=SPOT
gcloud alpha compute tpus tpu-vm create tpu-tunix
**gcloud alpha**: This invokes the "alpha" release track of the CLI, meaning you are accessing early-release, experimental, or preview features that aren't yet in general availability.**compute tpus tpu-vm create**: This instructs Google Cloud to create a new TPU architecture where the VM is physically attached to the TPU host (unlike older Node architectures where the VM and TPU communicated over the network). This bare-metal access is what allows JAX to compile and execute with zero network bottleneck.**tpu-tunix**: This is simply the custom name assigned to the instance.**--project=<google project ID>** Directs the billing and resource allocation to this specific Google Cloud Project ID.**--zone=europe-west4-a** Specifies the data center that used and this the place where the hardware will be provisioned.**--accelerator-type=v6e-1This defines the exact hardware slice. `v6e** designates the 6th generation TPU (Trillium), which is highly optimized for LLM/SLM inference and fine-tuning. The-1` indicates a single-chip topology (one TPU core). It is the ideal entry point for building and debugging a training script before executing a complex sharding strategy across a largerv6e-4orv6e-8pod.**--version=v2-alpha-tpuv6e** This selects the foundational software image loaded onto the VM. It ensures the operating system has the correct drivers and XLA compiler versions specifically built to support the alpha v6e hardware.
- After creating the TPU VM, we can login to the TPU VM by using the CLI.
gcloud compute tpus tpu-vm ssh tpu-tunix --zone=europe-west4-a - After creating the TPU VM, we will setup the env files for our model training. We use Kaggle and HF Token to download our model which is Gemma 3 1b parameters.
cat > ~/.env << 'EOF'
HF_TOKEN=<token>
EOF
Now, we will prepare the python environment for finetune the model. We will use Python 3.12 for our tutorial.
sudo apt update
sudo apt install -y software-properties-common
sudo add-apt-repository -y ppa:deadsnakes/ppa
sudo apt update
sudo apt install -y python3.12 python3.12-venv python3.12-dev
After installing python, we create a virtualenv for our Python Development.
python3.12 -m venv train
source train/bin/activate
We install all required library for our finetuning process.
pip install dotenv
pip install kagglehub
pip install safetensors
pip install transformers
pip install grain
pip install datasets
pip install "jax[tpu]" -f https://storage.googleapis.com/jax-releases/libtpu_releases.html
pip install "google-tunix[prod]"
pip install qwix
pip uninstall flax -y
pip install "flax"
pip install 'numpy>2'
pip install nest-asyncio
pip install google-cloud-storage
Now we will prepare our code for training the model and finetune it to the education domain dataset that we created before. We will divided the full code into several parts. Before any training happens, the script needs to set up its environment.
import os
import sys
import subprocess
from dotenv import load_dotenv
load_dotenv()
if "HF_TOKEN" in os.environ and os.environ["HF_TOKEN"]:
    hf_token = os.environ["HF_TOKEN"]
    os.system(f'huggingface-cli login --token {hf_token}')
else:
    print("HF_TOKEN not found. Skipping Hugging Face login.")
This code uses dotenv to securely load a Hugging Face token (HF_TOKEN) and logs in via the CLI. This is crucial for downloading the base Gemma 3 model. And then we continue to import all the import that is needed for training the model.
import re
import gc
import json
import logging
import shutil
from collections.abc import Iterable
from typing import Any

import dotenv
import datasets
from grain import python as grain
from flax import nnx
from huggingface_hub import snapshot_download
import jax
import jax.numpy as jnp
import numpy as np
import optax
from orbax import checkpoint as ocp
import qwix
from tunix.generate import sampler as sampler_lib
from tunix.generate import tokenizer_adapter as tokenizer_lib
from tunix.models.gemma3 import model as gemma3_model_lib
from tunix.models.gemma3 import params_safetensors as params_safetensors_lib
from tunix.models.gemma3 import params as gemma_params
from tunix.sft import metrics_logger
from tunix.sft import peft_trainer
from tunix.sft import utils
from tunix.sft.peft_trainer import TrainingInput
from google.cloud import storage
We continue to dwonload the dataset from bucket in Google Cloud Storage by using this following code.
DATASET_MODULE_GCS = "dataset-lora" # Bucket name
client = storage.Client()
bucket = client.bucket(DATASET_MODULE_GCS)
This initializes the Google Cloud Storage client. Instead of relying purely on command-line tools, this allows the Python script to directly interact with your cloud bucket (dataset-lora) to read or write files programmatically if needed.
print(f"JAX version: {jax.__version__}")
print(f"JAX devices: {jax.devices()}")
print(f"Device type: {jax.devices()[0].device_kind}")
Before doing any heavy lifting, the script asks JAX to report on the available hardware. If you are paying for an expensive TPU virtual machine, these three lines are your safety net to confirm that JAX actually “sees” the TPU chips. If it prints cpu instead of tpu, you immediately know your environment is misconfigured.
GCS_BUCKET        = "gs://dataset-lora"
BASE_CKPT_FOLDER  = "lora_gemma_qna_only"
MODEL_NAME        = f"{model_id.split('/')[1]}-trial"
MODEL_BASE_DIR    = f"{GCS_BUCKET}/models/{model_id.split('/')[1]}/"
LORA_CKPT_DIR     = f"{GCS_BUCKET}/{BASE_CKPT_FOLDER}/{MODEL_NAME}/lora_ckpts/"
QLORA_CKPT_DIR    = f"{GCS_BUCKET}/{BASE_CKPT_FOLDER}/{MODEL_NAME}/qlora_ckpts/"
MODEL_DIR         = f"{GCS_BUCKET}/model"
LOCAL_MODEL_CACHE = f"/tmp/hf_cache/{MODEL_NAME}"
DATASET_GCS_PATH = f"{GCS_BUCKET}/dataset/master_qnae_dataset.jsonl"
DATASET_LOCAL_PATH = "/tmp/master_qnae_dataset.jsonl"
local_output_dir = f"/tmp/merged_model/{MODEL_NAME}-qnae-lora"
gcs_output_dir   = f"{MODEL_DIR}/models--{model_id.split('/')[0]}--{MODEL_NAME}-qnae-lora"
Variables that include gs:// or GCS_BUCKET point to your permanent storage in the cloud. Think of this as your project's main hard drive that never gets erased.
**GCS_BUCKET**: The main folder/bucket where everything for this project is kept (gs://dataset-lora).**MODEL_BASE_DIR,MODEL_DIR**: Where the original model and the final, fully-trained model will be safely stored.**LORA_CKPT_DIR,QLORA_CKPT_DIR**: Where "checkpoints" (save states) are stored during training. If your server crashes at hour 5, you can reload from these folders instead of starting over.**DATASET_GCS_PATH**: The permanent home of your raw training data.
Variables that point to /tmp/ represent the temporary hard drive on the TPU VM.
**LOCAL_MODEL_CACHE**: Where the script downloads the base model from Hugging Face so it can read it quickly.**DATASET_LOCAL_PATH**: Where the script downloads a copy of the dataset from the cloud.
Variable local_output_dir defines a temporary, high-speed staging folder on the TPU Cloud server's local disk (/tmp/) where the heavy computational work of fusing the base Gemma model with your newly trained LoRA weights happens quickly, avoiding any slow internet bottlenecks during the save. Once that local merge is completely finished, gcs_output_dir dictates the permanent, secure destination in your Google Cloud Storage vault, cleverly using string manipulation to format the final folder name to look exactly like a standard Hugging Face repository (e.g., models--google--gemma-3-1b-it...) so your AI is safely backed up and ready for deployment.
After we define some specific path for our dataset and path for saving the models, we now define the config for model training and building.
NUM_TPUS = len(jax.devices())
print(f"Number of TPUs detected: {NUM_TPUS}")

if NUM_TPUS == 8:
    MESH_COUNTS = (1, 4)
elif NUM_TPUS == 4:
    MESH_COUNTS = (1, 4)
elif NUM_TPUS == 1:
    MESH_COUNTS = (1, 1)
else:
    raise ValueError(f"Unsupported number of TPUs: {NUM_TPUS}")

MESH = [
    MESH_COUNTS,
    ("fsdp", "tp"),
]

USE_QUANTIZATION = False
RANK = 16
ALPHA = float(2 * RANK)

MAX_STEPS = None
EVAL_EVERY_N_STEPS = 26
NUM_EPOCHS = 3
LEARNING_RATE = 1e-4
SAVE_PER_STEPS = 50
This code block is the hyperparameter for your AI’s training run. When dealing with massive models, you can’t just throw all the data onto a single chip. You have to slice the model and the data across multiple TPUs. This is called “sharding.”
**NUM_TPUS = len(jax.devices())**: This simply counts how many TPU cores your virtual machine has access to.**MESH_COUNTS(e.g.,(1, 4))**: This defines the "shape" of your hardware grid. In a(1, 4)setup, you are telling JAX to arrange the TPUs into 1 row and 4 columns for processing.**MESH = [MESH_COUNTS, ("fsdp", "tp")]**: This is the magic formula for how JAX distributes the workload:**fsdp(Fully Sharded Data Parallel)**: This splits the training data and the optimizer states across the TPUs so no single chip runs out of memory.**tp(Tensor Parallelism)**: This splits the actual math operations (the model's layers) across the TPUs. It forces the chips to work together to calculate a single layer of the neural network.**USE_QUANTIZATION = False: If set toTrue, this would enable QLoRA**. QLoRA squashes the giant base model down into 4-bit precision, saving massive amounts of RAM, but making training slightly slower. Leaving itFalsemeans you are running standard LoRA in higher precision.**RANK = 16**: Also known asr. This determines the size of the new LoRA matrices being injected into the model. A rank of 8 or 16 is standard. A higher rank (like 64) allows the model to learn more complex nuances but uses more memory and takes longer to train.**ALPHA = float(2 * RANK)(which equals 32)*: Alpha is the scaling factor. It dictates how "loudly" your new LoRA weights speak compared to the original model weights. Setting Alpha to exactly `2 Rank` is a widely accepted industry standard to keep training mathematically stable.
After creating the config or setting up the hyperparameter for finetune the models. We create the code for finetune the models.
TUTOR_SYSTEM_PROMPT = (
"Anda adalah AI Tutor Pendamping. Misi utama Anda BUKAN sekadar memberikan jawaban langsung, " "melainkan MEMBIMBING siswa untuk menemukan jawaban tersebut. Gunakan HANYA format XML berikut secara berurutan " "dan dilarang menulis teks apa pun di luar tag ini. PASTIKAN setiap tag yang dibuka WAJIB ditutup dengan benar (contoh: </Hint>):\n" "<Hint>: Berikan petunjuk, arahan, atau klu yang spesifik dan memancing nalar siswa tanpa membocorkan jawaban akhir.\n" "<Correct Answer>: Kunci jawaban akhir yang tepat, singkat, dan mutlak."
)

INPUT_TEMPLATE_IT = {
"prefix": f"<start_of_turn>user\n{TUTOR_SYSTEM_PROMPT}\n\n<Question>\n",     "suffix": "\n</Question>\n<end_of_turn>\n<start_of_turn>model\n",
}

def format_prompt_for_inference(question_text, system_prompt=TUTOR_SYSTEM_PROMPT):
    return (
        f"<start_of_turn>user\n"
        f"{system_prompt}\n\n"
        f"<Question>\n{question_text}\n</Question>\n"
        f"<end_of_turn>\n"
        f"<start_of_turn>model\n"
    )

def create_datasets(
    dataset_name: str,
    global_batch_size: int,
    max_target_length: int,
    num_train_epochs: int | None,
    tokenizer: tokenizer_lib.Tokenizer,
) -> tuple[Iterable[TrainingInput], Iterable[TrainingInput]]:
    if dataset_name.endswith(".csv"):
        dataset = datasets.load_dataset("csv", data_files=dataset_name)
    elif dataset_name.endswith(".jsonl"):
        dataset = datasets.load_dataset("json", data_files=dataset_name)
    else:
        raise ValueError(f"Unsupported dataset format. Expected CSV or JSONL: {dataset_name}")

    split = dataset["train"].train_test_split(test_size=0.05, seed=42)
    train_ds, eval_ds = split["train"], split["test"]

    prefix = INPUT_TEMPLATE_IT["prefix"]
    suffix = INPUT_TEMPLATE_IT["suffix"]

    class _Tokenize(grain.MapTransform):
        def map(self, element: dict[str, Any]) -> tuple[np.ndarray, np.ndarray]:
            src_tokens = tokenizer.tokenize(element["Question"], prefix=prefix, suffix=suffix, add_eos=False)
            dst_str = f"<Hint>\n{element['Hint']}\n</Hint>\n\n<Correct Answer>\n{element['Correct Answer']}\n</Correct Answer>\n"
            return src_tokens, tokenizer.tokenize(dst_str, add_eos=True)

    class _BuildTrainInput(grain.MapTransform):
        def map(self, tokens: tuple[np.ndarray, np.ndarray]) -> TrainingInput:
            src, dst = tokens
            seq  = np.concatenate([src, dst])
            mask = np.concatenate([np.zeros_like(src, dtype=np.bool_), np.ones_like(dst, dtype=np.bool_)])
            to_pad = max(max_target_length - len(seq), 0)
            seq  = np.pad(seq,  [(0, to_pad)], constant_values=tokenizer.pad_id())
            mask = np.pad(mask, [(0, to_pad)], constant_values=0)
            return TrainingInput(input_tokens=seq[:max_target_length], input_mask=mask[:max_target_length])

    class _FilterOverlength(grain.FilterTransform):
        def filter(self, element: TrainingInput) -> bool:
            return element.input_tokens.shape[0] <= max_target_length

    def _make_loader(data_source, epochs):
        return grain.DataLoader(
            data_source=data_source,
            sampler=grain.IndexSampler(num_records=len(data_source), num_epochs=epochs, shard_options=grain.NoSharding()),
            operations=[_Tokenize(), _BuildTrainInput(), _FilterOverlength(), grain.Batch(batch_size=global_batch_size, drop_remainder=True)],
        )

    return _make_loader(train_ds, num_train_epochs), _make_loader(eval_ds, 1)
This section defines how the AI should behave and how the raw text is wrapped into a format the model understands.
**TUTOR_SYSTEM_PROMPT**: Sets the persona of an "AI Tutor" that uses specific XML tags (<Hint>,<Correct Answer>). It explicitly forbids direct answers and mandates a guiding approach.**INPUT_TEMPLATE_IT&format_prompt_for_inference**: These define the "Instruction Tuned" (IT) structure. They use special tokens like<start_of_turn>and<end_of_turn>to help the model distinguish between the user’s input and its own generated response.
The create_datasets function function prepares raw data (CSV/JSONL) for the TPU.
- Loads data using the
datasetslibrary. - Reserves some of the by splitting data for evaluation to track performance during training.
**_TokenizeClass **is used to Converts text into numerical IDs. It specifically formats the target output to include the XML tags defined in the system prompt.**_BuildTrainInputClass contains several process: a. Concatenation: Joins the question and the answer into one long sequence. b. Masking: Creates a boolean mask so the model only calculates “loss” (learns) on the answer, not the question. c. Padding: Ensures all sequences in a batch are the same length (max_target_length) by adding “pad” tokens. d. `_make_loader**: Uses thegrain` library to create a high-performance data pipeline that handles shuffling, batching, and sharding across TPU cores.
Before training, the code ensures the data and model are available locally on the VM.
- GCS Download: Uses a “Plan A/Plan B” approach (
gsutilthengcloud storage) to download the dataset from a Google Cloud Storage bucket. This redundancy ensures the script doesn't crash if one tool is misconfigured. - Hugging Face Download: Uses
snapshot_downloadto pull the base Gemma 3 model weights. It ignores.pthfiles to save space, likely favoring Safetensors.
if not os.path.exists(DATASET_LOCAL_PATH):
    print(f"Mencoba download dataset dari {DATASET_GCS_PATH}...")
    ret = os.system(f"gsutil cp {DATASET_GCS_PATH} {DATASET_LOCAL_PATH}")
    if ret != 0:
        print("PERINGATAN: gsutil gagal (kemungkinan karena konflik library). Mencoba Plan B: gcloud storage...")
        ret = os.system(f"gcloud storage cp {DATASET_GCS_PATH} {DATASET_LOCAL_PATH}")
    if ret != 0:
        raise RuntimeError(
            f"Gagal download dataset dari {DATASET_GCS_PATH} menggunakan gsutil maupun gcloud storage.\n"
            "Pastikan path bucket benar dan Service Account TPU memiliki izin storage.objects.get."
        )
    print(f"Berhasil! Dataset terunduh ke {DATASET_LOCAL_PATH}")
else:
    print(f"Dataset sudah ada di {DATASET_LOCAL_PATH}")

ignore_patterns = ["*.pth"]
print(f"Downloading {model_id} from Hugging Face...")
local_model_path = snapshot_download(
    repo_id=model_id,
    ignore_patterns=ignore_patterns,
    local_dir=LOCAL_MODEL_CACHE,
)
print(f"Model downloaded to: {local_model_path}")

EOS_TOKENS = []
generation_config_path = os.path.join(local_model_path, "generation_config.json")
if os.path.exists(generation_config_path):
    with open(generation_config_path, "r") as f:
        generation_configs = json.load(f)
    EOS_TOKENS = generation_configs.get("eos_token_id", [])
    print(f"EOS token IDs: {EOS_TOKENS}")

MODEL_CP_PATH = local_model_path
if "gemma-3-1b" in model_id:
    if "it" in model_id:
        model_config = gemma3_model_lib.ModelConfig.gemma3_1b_it()
    else:
        model_config = gemma3_model_lib.ModelConfig.gemma3_1b_pt()
else:
    raise ValueError(f"Unsupported model: {model_id}")

mesh = jax.make_mesh(*MESH, axis_types=(jax.sharding.AxisType.Auto,) * len(MESH[0]))
with mesh:
    base_model = params_safetensors_lib.create_model_from_safe_tensors(
        MODEL_CP_PATH, model_config, mesh
    )
print("Model loaded onto TPU successfully!")

tokenizer = tokenizer_lib.Tokenizer(tokenizer_path=local_model_path, tokenizer_type="huggingface")
if tokenizer.eos_id() not in EOS_TOKENS:
    EOS_TOKENS.append(tokenizer.eos_id())
    print(f"EOS token IDs: {EOS_TOKENS}")

def get_lora_model(base_model, mesh, quantize=False):
  target_modules = ".*q_einsum|.*kv_einsum|.*gate_proj|.*down_proj|.*up_proj"
  if quantize:
    lora_provider = qwix.LoraProvider(
        module_path=target_modules,
        rank=RANK,
        alpha=ALPHA,
        weight_qtype="nf4",
        tile_size=128,
    )
  else:
    lora_provider = qwix.LoraProvider(
        module_path=target_modules,
        rank=RANK,
        alpha=ALPHA,
    )
  model_input = base_model.get_model_input()
  lora_model = qwix.apply_lora_to_model(
      base_model, lora_provider, **model_input
  )

  with mesh:
    state = nnx.state(lora_model)
    pspecs = nnx.get_partition_spec(state)
    sharded_state = jax.lax.with_sharding_constraint(state, pspecs)
    nnx.update(lora_model, sharded_state)
  return lora_model

lora_model = get_lora_model(base_model, mesh=mesh, quantize=USE_QUANTIZATION)
print(f"Using {'QLoRA' if USE_QUANTIZATION else 'LoRA'} model")

train_ds, validation_ds = data_lib.create_datasets(
    dataset_name=DATASET_LOCAL_PATH,
    global_batch_size=BATCH_SIZE,
    max_target_length=MAX_TARGET_LENGTH,
    num_train_epochs=NUM_EPOCHS,
    tokenizer=tokenizer,
)

def gen_model_input_fn(x: peft_trainer.TrainingInput):
    pad_mask = x.input_tokens != tokenizer.pad_id()
    positions = utils.build_positions_from_mask(pad_mask)
    attention_mask = utils.make_causal_attn_mask(pad_mask)
    return {
        'input_tokens': x.input_tokens,
        'input_mask': x.input_mask,
        'positions': positions,
        'attention_mask': attention_mask,
    }
print("Datasets loaded successfully!")

# training with lora
checkpoint_opts = ocp.CheckpointManagerOptions(
    save_interval_steps=SAVE_PER_STEPS,
    max_to_keep=2,
)

training_config = peft_trainer.TrainingConfig(
    eval_every_n_steps=EVAL_EVERY_N_STEPS,
    max_steps=MAX_STEPS,
    checkpoint_root_directory=QLORA_CKPT_DIR if USE_QUANTIZATION else LORA_CKPT_DIR,
    gradient_accumulation_steps=ACCUMULATION_STEPS,
    checkpointing_options=checkpoint_opts,
)

trainer = peft_trainer.PeftTrainer(
    lora_model, optax.adamw(LEARNING_RATE), training_config
).with_gen_model_input_fn(gen_model_input_fn)

method_name = "QLoRA" if USE_QUANTIZATION else "LoRA"
print(f"Starting {method_name} training...")
print(f"Checkpoints will be saved to: {LORA_CKPT_DIR}")

with mesh:
    trainer.train(train_ds, validation_ds)
print("Training complete!")

print(f"Saving merged LoRA model to {local_output_dir}...")
gemma_params.save_lora_merged_model_as_safetensors(
    local_model_path=LOCAL_MODEL_CACHE,
    output_dir=local_output_dir,
    lora_model=lora_model,
    rank=RANK,
    alpha=ALPHA,
)

print(f"Sedang mengunggah merged model ke GCS: {gcs_output_dir}")
ret = os.system(f"gsutil -m cp -r {local_output_dir}/* {gcs_output_dir}/")

if ret != 0:
    print("PERINGATAN: gsutil gagal saat upload. Mencoba Plan B: gcloud storage...")
    ret = os.system(f"gcloud storage cp -r {local_output_dir}/* {gcs_output_dir}/")

if ret != 0:
    raise RuntimeError(
        f"Gagal mengunggah model ke {gcs_output_dir} menggunakan gsutil maupun gcloud storage.\n"
        "PERINGATAN: JANGAN hapus VM ini sebelum model berhasil diamankan secara manual."
    )
print("Model berhasil diunggah ke GCS!")

print("\nSaved files:")
for f in os.listdir(local_output_dir):
    size = os.path.getsize(os.path.join(local_output_dir, f)) / (1024 * 1024)
    print(f"  {f:<40} {size:>10.2f} MB")
The code is continue to initializes the model architecture and distributes it across the TPU. There are several variables and code that describe as follows:
**EOS_TOKENS**: Extracts the "End of Sentence" token from the config. This is crucial so the model knows when to stop talking.**jax.make_mesh: Defines how the TPU cores are logically organized. This is essential for Parallelism** (splitting the model's weight across multiple chips).**create_model_from_safe_tensors**: Loads the actual weights into the defined configuration and places them on the TPU memory.
The process is continue with define the LoRA and QLoRA integration. This is the “Fine-Tuning” engine. Instead of updating all billions of parameters, it only updates a tiny subset.
**target_modules**: A regex string identifying which layers to "attach" LoRA to (usually the Attention and Feed-Forward layers).- Quantization: If
USE_QUANTIZATIONis true, it uses NF4 (4-bit) precision. This allows a large model to fit into much smaller memory. **qwix.apply_lora_to_model**: Injects the LoRA layers into the base model.- Sharding Constraint: Ensures the new LoRA parameters follow the same distribution pattern across the TPU mesh as the base model.
We continue to define the actual training process by using several function and variable.
**gen_model_input_fn**is a helper that creates "Causal Attention Masks." This prevents the model from "cheating" by looking at future tokens during training.**CheckpointManager**: Automatically saves the model progress every $X$ steps so you don't lose work if the VM restarts.**PeftTrainer**: The main driver that runs the loops, calculates gradients usingoptax(AdamW optimizer), and updates the LoRA weights.
And for the final part of this code is it will save all the models as a safetensor using **save_lora_merged_model_as_safetensors. This is a critical step. It takes the learned LoRA weights and "merges" them back into the base model weights, resulting in a single, ready-to-use model folder. We use GCS **command again, to push the finished model back to Google Cloud Storage.
We copy the code from the home directory to the GCS so it can be used in the VM. After login to the VM using steps 3, we try to download the code and dataset locally and run in the local TPU Cloud VM.
gsutil cp gs://dataset-lora/code/qlora_gemma_gcp_tpu.py ~/
python3 qlora_gemma_gcp_tpu.py
qlora_gemma_gcp_tpu.py is a file that we used to train the models. Then we run the training process by using python3 command as mentioned in the example code.
- We can use the model to create an agent that run in the local environment. We test the model by giving some example question in some format to the finetuned model as follows.
<start_of_turn>user
Anda adalah AI Tutor Pendamping. Misi utama Anda BUKAN sekadar memberikan jawaban, melainkan MEMBIMBING logika siswa. Gunakan HANYA format XML berikut secara berurutan dan dilarang menulis di luar tag. PASTIKAN setiap tag yang dibuka WAJIB ditutup dengan benar (contoh: </Hint>):
<Hint>: Satu kalimat petunjuk ringkas untuk memancing ingatan siswa.
<Correct Answer>: Kunci jawaban akhir yang mutlak dan tepat.

<Question>
Dalam suatu ekosistem hutan, populasi predator mengalami penurunan drastis akibat perburuan ilegal. Beberapa bulan kemudian, terjadi ledakan populasi herbivora yang merusak vegetasi secara berlebihan. Berdasarkan konsep keseimbangan ekosistem, apa dampak utama dari hilangnya predator tersebut?
a. Herbivora menjadi lebih lemah karena tidak ada seleksi alam
b. Vegetasi meningkat karena tidak dimakan oleh predator
c. Terjadi ketidakseimbangan rantai makanan yang menyebabkan kerusakan vegetasi
d. Predator lain akan segera menggantikan posisi yang hilang tanpa dampak
 e. Ekosistem menjadi lebih stabil karena satu komponen berkurang
</Question>
<end_of_turn>
<start_of_turn>model
We then get a response from the finetuned model from this input to the models as follows. It reply with some format given by the model by giving the hint why the answer like this and the correct answer given by the models.
<bos>
<Hint>
Pikirkan apa yang terjadi pada tumbuhan jika tidak ada yang memakan tumbuhan tersebut.
</Hint>
<Correct Answer>
c. Terjadi ketidakseimbangan rantai makanan yang menyebabkan kerusakan vegetasi
</Correct Answer>
References:
- https://tunix.readthedocs.io/en/latest/
- https://docs.jaxstack.ai/en/latest/getting_started.html
- https://qwix.readthedocs.io/en/latest/
- https://google-grain.readthedocs.io/en/latest/
*Thanks to Jonathan Kenrick for helping me on finishing this articles.
Gemma #TPUSprint #Tunix #Qwix #GoogleGrain #JAX #Flax #Orbax
메타데이터
- post_id
- bb011a20efda
- slug
- fine-tuning-and-integrating-your-small-model-in-mobile-computing-device-as-standalone-assistant-bb011a20efda
- url
- https://medium.com/@joansantoso/fine-tuning-and-integrating-your-small-model-in-mobile-computing-device-as-standalone-assistant-bb011a20efda
- canonical_url
- https://medium.com/@joansantoso/fine-tuning-and-integrating-your-small-model-in-mobile-computing-device-as-standalone-assistant-bb011a20efda
- author_url
- https://medium.com/@joansantoso
- status
- ok
- fetched_at
- 2026-07-10 23:04:28