Metaballs with Runtimeshaders
Hi everyone! Today I want to walk you through one of the simplest — yet surprisingly impressive — effects: metaballs.
Metaballs with Runtimeshaders

Hi everyone! Today I want to walk you through one of the simplest — yet surprisingly impressive — effects: metaballs.
Metaballs are organic-looking shapes, characterised by their ability to meld together when in close distance to create single, contiguous objects.
Creating this effect with GLSL shaders is surprisingly simple and takes just a few lines of code. And of course, you can find tutorials online on how to port it to AGSL and use it in Compose. However, the main issue is that the effect needs two (or more) objects. All the tutorials I found just simulate two components inside a single shader. This approach works visually, but it brings a lot of limitations when you try to use it in a real project. So I set out to build this effect in a way where each element distorts only itself — to make everything as fair and clean as possible.
Alright, now that we’ve figured out why this isn’t just another metaballs tutorial but something new — let’s get started! As usual, I’ve broken everything down into a few parts:
- First, I’ll quickly explain how the effect works in the classic implementation, and then what we’re going to do differently
- Then I’ll go over the minimal Compose setup to get things running
- And finally, we’ll dive into the shader itself in more detail
In the end, we should get something that looks like this:

It’s one of the options; the effect is highly customizable.
Before we get started, just a quick note — I don’t make a tutorial for every effect I create, but you can find all of them on my GitHub. You’ll also find videos, announcements about new effects, and answers to your questions in my Telegram channel. I’d be happy to see you there!
To create the metaball effect, let’s first refresh the basics. How do we draw a simple circle in a shader? The easiest way is to define a center and a radius, then use the step function. It returns 1 if a pixel is closer to the center than the radius, and 0 if it’s farther away. Here’s how it looks in practice:
float ball( vec2 p, vec2 center, float radius ) {
    return step(length(p-center), radius);
}

void mainImage( out vec4 fragColor, in vec2 fragCoord )
{
    // Normalized pixel coordinates (from -0.5 to 0.5)
    vec2 uv = fragCoord/iResolution.xy - 0.5;
    uv.x *= iResolution.x / iResolution.y;

    float b1 = ball(uv, vec2(0.), 0.2);

    vec3 color = b1*vec3(1.);

    fragColor = vec4(color,1.0);
}
This code is written in GLSL, not AGSL, and is designed so you can copy and paste it directly into shadertoy.com. In this section, all code will follow the same approach, making it easier for you to test and see the results without having to run Android Studio.
The result is a simple circle. If you’re even slightly familiar with shaders, this part should be straightforward.

the most simpliest circle
Now let’s add a second circle and place them slightly apart horizontally instead of both in the center. This time, instead of using the step function to define the edge, we’ll use the inverse distance. We’ll still get two circles, but instead of a sharp edge, there will be a smooth fade, making the circles look more like glowing dots.
float ball(vec2 p, vec2 center, float radius) {
    float dist = length(p - center);
    return radius / dist;
}

void mainImage( out vec4 fragColor, in vec2 fragCoord )
{
   // Normalized pixel coordinates (from -0.5 to 0.5)
    vec2 uv = fragCoord/iResolution.xy - 0.5;
    uv.x *= iResolution.x / iResolution.y;

    float b1 = ball(uv, vec2(-0.4,0.), 0.1);
    float b2 = ball(uv, vec2(0.4,0.), 0.1);

    float circles = b1 + b2;

    vec3 color = circles*vec3(1.);

    fragColor = vec4(color,1.0);
}
Here’s what the result will look like:
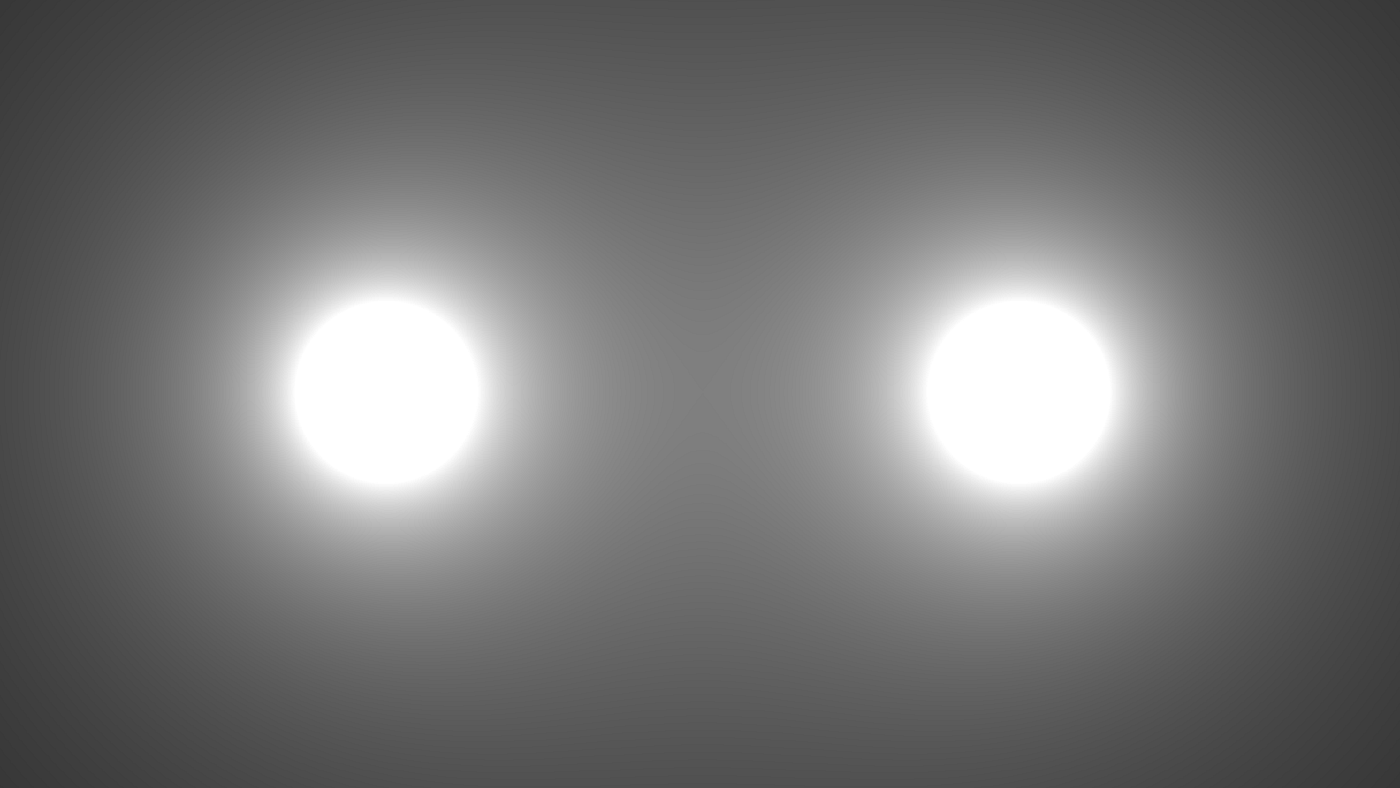
As you can see, in the final image we’re adding the values of both circles together. Even now, if you move them closer, you’ll see how they start merging. Basically, the effect is already there — all that’s left is to apply some function to the final value, or even use step again to cut off everything below a certain threshold and keep what’s inside. And that’s it — the metaball effect is ready!
float ball(vec2 p, vec2 center, float radius) {
    float dist = length(p - center);
    return radius / dist;
}

void mainImage( out vec4 fragColor, in vec2 fragCoord )
{
    // Normalized pixel coordinates (from -0.5 to 0.5)
    vec2 uv = fragCoord/iResolution.xy - 0.5;
    uv.x *= iResolution.x / iResolution.y;

    // make circles moving slightly along horizontal direction
    float horiz = (0.5*sin(iTime)+0.5)*0.2;
    float b1 = ball(uv, vec2(-0.3+horiz,0.), 0.1);
    float b2 = ball(uv, vec2(0.3-horiz,0.), 0.1);

    float circles = b1 + b2;

    float threshold = 1.0;
    float alpha = step(threshold, circles);

    vec3 color = alpha*vec3(1.);

    fragColor = vec4(color,1.0);
}
the simpliest metaballs effect
Of course, instead of the step function, you can use smoothstep, add the inverse square of the distance, or try a different formula, tweak the coefficients, and so on. All of this is possible, and all of it will change the final look, but the core idea stays the same: we define the circles with a smooth falloff formula, add the results together, and cut them off at a certain threshold. This way, when the shapes are close, the sum of their fields goes above the threshold and they merge into one shape — and when they’re far apart, they don’t.
Now that we understand how to create the metaball effect, it might seem like we can just open Android Studio and start building it! However, we’ll quickly run into two problems:
- Right now, everything works exactly like circles — which is expected. But if we want the merging buttons to have other shapes, we’ll need to use, for example, SDF methods. Even then, the shape is still defined inside the shader, meaning we can’t simply apply a RoundedCornerShape in the Compose view and expect it to work.
- Both buttons have to be defined within the same shader. If there are three buttons, then all three must be in that shader. And most importantly — how do we handle clicks on these buttons?
If you look for articles about this effect, you’ll notice that these two problems are usually ignored. For me, however, they were crucial — and that’s exactly why I decided to write this tutorial. I’m suggesting a different approach that solves both issues.
First, we won’t define the shape inside the shader. Instead, we’ll deform the coordinate system itself, which solves the problem of different shapes.
Second, each element of the effect will get its own shader instance, but we’ll also pass it the coordinates of the neighboring elements. This solves the click-handling problem, because now each one is a proper separate composable with its own attributes and lambdas. Here’s how it looks in a diagram:

Green is Composable. Pink is Shader
So, our task can be split into two major sub-tasks. Once we solve both, we’ll have the final effect. First, we need to learn how to deform the canvas to get the same visual result as with metaballs. Then, we’ll collect the position data of each child in the container and pass it to the other shaders. Let’s start by focusing on the first part.
Let’s start with the simplest setup needed to work with a shader. Below is the composable part — you can copy and paste it directly into your project, and it should work right away
@Composable
fun MetaballShaderScreen(paddingValues: PaddingValues) {
    val shader = remember { RuntimeShader(metaballShader) }

    Box(modifier = Modifier
            .padding(paddingValues)
            .fillMaxSize()
            .background(Color(0xFF171717)),
        contentAlignment = Alignment.Center
    ) {
        ShadedButton(shader)
    }
}

@Composable
fun ShadedButton(
    shader: RuntimeShader,
) {
    var boxSize by remember { mutableStateOf(IntSize.Zero) }
    Box(
        contentAlignment = Alignment.Center,
        modifier = Modifier.size(50.dp)
    ) {
        Box(
            modifier = Modifier
                .fillMaxSize()
                .onSizeChanged { boxSize = it }
                .graphicsLayer {
                    shader.setFloatUniform(
                        "resolution",
                        boxSize.width.toFloat(),
                        boxSize.width.toFloat())
                    this.renderEffect = RenderEffect
                        .createRuntimeShaderEffect(shader, "image")
                        .asComposeRenderEffect()
                }
        ) {
            Box(
                modifier = Modifier
                    .fillMaxSize()
                    .clip(RoundedCornerShape(10.dp))
                    .background(color = Color(0xFFF6F6F6))
            )
        }
        Icon(
            imageVector = Icons.Default.MoreVert,
            contentDescription = "Expand Menu",
            tint = Color.Black
        )
    }
}
And here’s the shader code:
@Language("AGSL")
private val metaballShader = """
    uniform vec2 resolution;
    uniform shader image;

    vec2 NormalizeCoordinates(vec2 o, vec2 r) {
        float2 uv = o / r - 0.5;
        if (r.x >= r.y) {
            uv.x *= r.x / r.y;
        } else {
            uv.y *= r.y / r.x;
        }
        return uv;
    }

    vec4 GetImageTexture(vec2 p, vec2 pivot, vec2 r) {
        if (r.x > r.y) {
            p.x /= r.x / r.y;
        } else {
            p.y /= r.y / r.x;
        }
        p += pivot;
        p *= r;
        return image.eval(p);
    }

    vec4 main(float2 fragCoord) {
        float2 uv = NormalizeCoordinates(fragCoord, resolution);

        vec4 final = GetImageTexture(uv, vec2(0.5), resolution);

        return vec4(final);
     }
""".trimIndent()
In the shader, I’ve already included two necessary methods: one for normalization and one for getting the color from the input texture. I covered these methods in previous lessons, so you can either treat them simply as required boilerplate — they don’t affect the core logic of the effect — or check my earlier tutorials where I explain them in detail. This lesson is already quite packed, maybe even a bit overloaded with information, so I won’t focus on that here.
Great! If everything is set up correctly, we’ll have a shader that doesn’t add anything yet — it just draws everything as if the shader wasn’t there at all. The result should simply be a normal button, nothing unusual:

nothing special, just a button :)
In the final code, the deformation will be based on other elements, but since we don’t have them yet, I’ll just add a virtual point and draw it on the canvas. This is test code, and we’ll remove it later. I’ll also pass the time to the shader and make the point move horizontally. This will be our virtual point that we’ll use as a reference for deforming the canvas:
//...
 var time by remember { mutableStateOf(0f) }
//...
  .graphicsLayer {
       //...
        shader.setFloatUniform("time", time)
//...
In shader code we have to add time uniform
uniform float time;And add that virtual circle
 float getCircle(vec2 p, vec2 pivot) {
        return step(length(pivot - p), 0.1);
 }
Also add that circle to the final output:
 vec4 main(float2 fragCoord) {
        //...

        float circleHorizontalPosition = sin(0.5*time)*2.;
        float helperCicrle = getCircle(uv, vec2(circleHorizontalPosition, 0.));

        final = mix(final, helperCicrle*vec4(1.,0.,0.,1.), helperCicrle);
        return vec4(final);
}
As a result, we should see a red reference point, which we’ll use as the basis for distorting our button.

Now let’s try calculating the point’s influence on our button, using exactly the same approach we used for the metaball:
 float getInfluence(vec2 uv, vec2 controlPoint) {
        float dist = length(controlPoint-uv);
        return 1./dist;
 }

 vec4 main(float2 fragCoord) {
        float2 uv = NormalizeCoordinates(fragCoord, resolution);

        float circleHorizontalPosition = sin(0.2*time)*2.;
        vec2 controlPointPos = vec2(circleHorizontalPosition, 0.);
        float helperCicrle = getCircle(uv, controlPointPos);

        float influence = getInfluence(uv, controlPointPos);

        uv *= 1.-influence; // why here is 1 - influence was explained in Deform the Canvas tutorial
        vec4 final = GetImageTexture(uv, vec2(0.5), resolution);

        final = mix(final,helperCicrle*vec4(1.,0.,0.,1.),helperCicrle);
        return vec4(final);
}
funny enough, but not what we are looking for
The result is funny, but not what we were aiming for. The artifact inside (the “hole” effect) can be easily fixed by clamping the influence between zero and one. However, it’s still not the result we want — we’re getting an inflated area around the control point, while what we need is almost the opposite effect. So, how do we achieve that?
The answer is simple and a bit amusing — though it took me some time to realize it. The idea is to compare the distance from the center of our coordinates to the control point with the sum of two distances: from the center to the current point (uv) and from the current point to the control point. Below is a diagram for a random point inside the button. This distance will always be greater than going directly to the center, and this trick is what will let us achieve the metaball effect!

dist from green to red would be always bigger than from center to red if we add to it dist to center
So, to turn what we have now into an almost complete effect (apart from strength settings and other small tweaks), we literally just need to add the center into the distance calculation — and that’s it!
  float getInfluence(vec2 uv, vec2 controlPoint) {
        // float dist = length(controlPoint-uv); - was like that
        float dist = length(controlPoint-uv) + length(uv); //added length(uv);
        return 1./dist;
  }
we already have what we want
You can now add “mass” or divide by the square of the distance to make the fade-out happen faster. But these are all polishing details, not part of the core effect logic. I highly recommend experimenting with the getInfluence method yourself.
The final step is to pass the coordinates of another component instead of using a control point inside the shader. Sounds simple, but there’s something to discuss here. The hardest part for me was getting the coordinates in the same “system” as the shader itself. While the control point was inside the shader, we created it using uv, which was already normalized relative to the view’s size. Now, however, we’ll be getting a position relative to the parent container. So how do we put all of this together?
First, let’s add a second button to our container and pass all the necessary parameters to the shader. After that, we’ll dive back into the core of the shader logic — which, in my opinion, is the most interesting part.
@Composable
fun TestShaderScreen(paddingValues: PaddingValues) {
    val shader = remember { RuntimeShader(metaballShader) }
    val parentBoxSize = remember { mutableStateOf(IntSize.Zero) }
    val firstButtonPosition = remember { mutableStateOf(Offset.Zero) }
    val secondButtonPosition = remember { mutableStateOf(Offset.Zero) }

    Box(
        modifier = Modifier
            .padding(paddingValues)
            .fillMaxSize()
            .background(Color(0xFF171717))
            .onSizeChanged {
                parentBoxSize.value = it
            },
        contentAlignment = Alignment.Center
    ) {
        ShadedButton(
            modifier = Modifier
                .padding(start = 70.dp)
                .size(50.dp)
                .onGloballyPositioned {
                    firstButtonPosition.value = it.positionInParent() +
                            Offset(
                                x = it.size.width * 0.5f,
                                y = it.size.height * 0.5f
                            )
                },
            icon = Icons.Filled.Favorite,
            shader = shader,
            parentBoxSize = parentBoxSize.value,
            otherViewPosition = secondButtonPosition.value,
            myPosition = firstButtonPosition.value,
        )
        ShadedButton(
            modifier = Modifier
                .padding(end = 70.dp)
                .size(50.dp)
                .onGloballyPositioned {
                    secondButtonPosition.value = it.positionInParent() +
                            Offset(
                                x = it.size.width * 0.5f,
                                y = it.size.height * 0.5f
                            )
                },
            icon = Icons.Filled.Star,
            shader = shader,
            parentBoxSize = parentBoxSize.value,
            otherViewPosition = firstButtonPosition.value,
            myPosition = secondButtonPosition.value,
        )
    }
}

@Composable
fun ShadedButton(
    modifier: Modifier = Modifier,
    icon: ImageVector,
    shader: RuntimeShader,
    parentBoxSize: IntSize,
    myPosition: Offset,
    otherViewPosition: Offset,
) {
    var boxSize by remember { mutableStateOf(IntSize.Zero) }
    Box(
        contentAlignment = Alignment.Center,
        modifier = modifier
    ) {
        Box(
            modifier = Modifier
                .fillMaxSize()
                .onSizeChanged {
                    boxSize = it
                }
                .graphicsLayer {
                    shader.setFloatUniform(
                        "resolution",
                        boxSize.width.toFloat(),
                        boxSize.width.toFloat()
                    )
                    shader.setFloatUniform(
                        "parentBoxSize",
                        parentBoxSize.width.toFloat(),
                        parentBoxSize.height.toFloat()
                    )
                    shader.setFloatUniform(
                        "otherViewPosition",
                        otherViewPosition.x,
                        otherViewPosition.y
                    )
                    shader.setFloatUniform(
                        "positionInParent",
                        myPosition.x,
                        myPosition.y
                    )
                    this.renderEffect = RenderEffect
                        .createRuntimeShaderEffect(shader, "image")
                        .asComposeRenderEffect()
                }
        ) {
            Box(
                modifier = Modifier
                    .fillMaxSize()
                    .clip(RoundedCornerShape(10.dp))
                    .background(color = Color(0xFFF6F6F6))
            )
        }
        Icon(
            imageVector = icon,
            contentDescription = "Expand Menu",
            tint = Color.Black
        )
    }
}
Basically, all we’ve added is passing the parent container’s size and the center coordinates of the neighboring view. Keep in mind that, since the Compose callback returns the position as the top-left corner, we need to adjust it slightly before passing it. Also, remember that the first component should receive the second one in the otherViewPosition parameter, and the second should receive the first. The main thing is not to mix them up :)
Let’s move on to the shader. We’ll start by adding the necessary uniforms.
 uniform float2 otherViewPosition;
 uniform float2 parentBoxSize;
 uniform float2 positionInParent;
Now for the fun part: what used to be the control point now needs to be calculated from two parameters — the parent’s size and the second view’s coordinates relative to the parent
First, let’s get the ratio of the container’s size to the button’s size.
float parentRatio = parentBoxSize.x / resolution.x;Now we just need to slightly modify the getInfluence method to bring everything into a single coordinate system:
float getInfluence(vec2 uv, float ratio) {
        float2 posInParentNormalized = (positionInParent/parentBoxSize) - 0.5;
        float2 controlPoint = otherViewPosition / parentBoxSize - 0.5;
        controlPoint.x = (controlPoint.x-posInParentNormalized.x) * ratio;

        float dist = max(1., length(controlPoint-uv) + length(uv));
        float influence = smoothstep(0.,1., 1./pow(dist,2.));
        return influence;
    }
Oh, it sounded simple, but in reality, a few not-so-obvious calculations appeared along the way. And it’s not something you can easily grasp at first glance. That’s why I tried to illustrate it as clearly as possible. So, here’s what we have in the bigger picture:

on the left our “active” view. Imagine that we are all the time “inside” that’s view shader
Okay, we have the parent container, its size, the position of our view relative to the parent, and the position of the neighbor (the control point from our earlier example). Our task is to get this control point in our uv coordinate system.

from top to bottom all the process
I tried to explain the whole process top‑down. Now let’s look at the code again and walk through it step by step.
  float2 posInParentNormalized = (positionInParent/parentBoxSize) - 0.5;
  float2 controlPoint = otherViewPosition / parentBoxSize - 0.5;
  float parentRatio = parentBoxSize.x / resolution.x;
  controlPoint.x = (controlPoint.x-posInParentNormalized.x) * parentRatio;
Let’s say the parent container has a width of 500. Our position inside it is 100, and the neighboring view’s position is 400. First, we get the normalized coordinates of both views relative to the parent (shifted by –0.5). In this example, our position becomes –0.3, and our neighbor’s position is 0.2. The distance between them is therefore 0.5 — meaning half of the parent’s width. But remember, we’re inside the shader attached to our own view, so we must multiply this by the ratio of the parent’s size to our view’s size. This is the key step: instead of 0.5, we now get another value, but it’s in our view’s coordinate system. From there, we can calculate the distance and do everything we previously did with the virtual control point!
Here I simplified everything to the horizontal coordinate, but the same logic applies vertically. I just didn’t want to make an already complex explanation even harder to follow.
In the end, we have:

In static looks a bit weird, but it is clear that two views are affected by each other
The final step is to replace the two views with an array, so we can add a third, fourth, or even fifth button.
In shaders, you can’t have a dynamic array, so we’ll need to set an upper limit — I chose ten elements. We also need a separate counter to know how many elements we actually have. Since we can’t leave the array empty, in Compose we’ll automatically fill unused slots with zero positions, but the counter will make sure this doesn’t affect the final result.
So, in the shader, the uniforms will look like this:
 uniform int count;
 uniform float2 positions[10];
 uniform float2 parentResolution;
 uniform float2 positionInParent;
And the getInfluence method will loop through the elements and accumulate the effect if multiple neighbors influence the view at the same time.
float getInfluence(float2 uv, float ratio) {
    float influence = 0.0;
    for (int i = 0; i < 10; i++) {

        float posInParentNormalized = (positionInParent/parentBoxSize) - 0.5;
        float2 controlPoint = positions[i] / parentBoxSize - 0.5;
        controlPoint.x = (controlPoint.x-posInParentNormalized) * r;
        float dist = max(1.,length(controlPoint-uv) + length(uv));
        float rawScale = 1./pow(dist,2.);
        influence += smoothstep(0., 1., rawScale);

        if(i==count-1) break;
    }
    return clamp(influence,0.,1.);
}
In Compose, we’ll need to add a list and pass all the values carefully. You could also add animations and other effects, but that would make the Compose code overloaded and harder to follow in this lesson. The tutorial is already quite packed, so I’ll only show how to pass the values into the array — the rest of the experiments I’ll leave to you :) Remember, you can always check my repository to see the complete version.
Below is an extension method I wrote for conveniently adding a list to the shader.
fun RuntimeShader.setVec2ArrayUniform(
    name: String,
    values: List<Pair<Float, Float>>,
    maxSize: Int = 10
) {
    require(values.size <= maxSize) {
        "Too many elements for uniform '$name'. Maximum allowed is $maxSize, but got ${values.size}"
    }

    val padded = values + List(maxSize - values.size) { 0f to 0f }
    val floatArray = padded.flatMap { listOf(it.first, it.second) }.toFloatArray()

    this.setFloatUniform(name, floatArray)
}
And usage:
shader.setVec2ArrayUniform(name, values)Now you can add different elements and watch them smoothly merge or separate during the animation:

here is three views with different shapes
Thanks for reading! If you find my experiments fun and my explanations helpful, feel free to join my Telegram channel or follow me on Twitter (X). This project is just a hobby, and honestly, my motivation heavily depends on the feedback I get — so I’d be really happy to see you in the channel. And if you feel like it, I’d truly appreciate it if you shared this post on your social media. Happy coding!
메타데이터
- post_id
- bb7e5f6b27c2
- slug
- metaballs-with-runtimeshaders-bb7e5f6b27c2
- url
- https://medium.com/@off.mind.by/metaballs-with-runtimeshaders-bb7e5f6b27c2
- canonical_url
- https://medium.com/@off.mind.by/metaballs-with-runtimeshaders-bb7e5f6b27c2
- author_url
- https://medium.com/@off.mind.by
- status
- ok
- fetched_at
- 2026-06-15 20:49:13