Building an OS from Scratch — Day2: Understanding the Boot Process
In this article we will understand the booting process of a system. When you press the power button the electricity starts flowing. It goes…
Building an OS from Scratch — Day2: Understanding the Boot Process

In this article we will understand the booting process of a system. When you press the power button the electricity starts flowing. It goes to the PSU(Power Supply Unit) first, which converts AC current coming from the wall into stable DC current that the components can actually use. The PSU does not just flip a switch either. It runs a self check called Power Good. Only when it is satisfied that the voltages are stable does it send a signal to the motherboard saying everything is fine.
The motherboard receives that signal and starts waking things up. RAM gets power, the chipset comes online, and eventually the CPU gets power. Now it needs to execute its first program which could load your OS and do many other things.
Now here is where it gets interesting.
The CPU is hardwired at the silicon level to start executing from a specific memory address the moment it receives power. On x86 this address is 0xFFFFFFF0. This is called the reset vector.
But RAM is empty at this point. Nothing has been loaded yet. So what is sitting at 0xFFFFFFF0?
A Firmware Chip is mapped at that address. That firmware can either be BIOS or UEFI.
But what is firmware exactly?
Usually when we talk about software we mean something stored on a secondary storage device, a hard drive or an SSD. You install it, you can delete it, you can update it. It lives on storage and gets loaded into RAM when you need it.
But think about what happens at power on. RAM is empty. The storage controller has not been set up. There is no software running that knows how to talk to a hard drive. To initialize all of that you need software running first. To run software you need to initialize the hardware first. Classic chicken and egg problem.
You might think, why not just use RAM and burn the firmware into it permanently. But you cannot. RAM is built on capacitors that need constant power to hold data. The moment power is cut everything is gone. You cannot make RAM hold data permanently without changing the underlying technology entirely. And the moment you do that you are no longer building RAM.
You also cannot fetch instructions directly from a hard drive or SSD. The CPU fetches instructions from the memory bus. RAM is on the memory bus. Hard drives are not. They sit behind a controller, they need time to initialize, they respond to a completely different set of commands. The CPU has no way to read an instruction from a storage device directly. It can only execute code that is sitting on the memory bus and responds to memory read requests instantly.
So till now the picture is this. You pressed the power button, the PSU converted the wall current into stable DC and sent a Power Good signal to the motherboard. The motherboard woke up and power reached the CPU. The CPU’s reincarnation happened in absolute chaos :3
Now CPU needs instructions but who will provide it those instructions, contents of ram disappears when it stops getting electricity due to its volatile nature. Engineers solved this with a separate chip.
ROM. Read Only Memory. It sits on the memory bus just like RAM so the CPU can read from it directly. But unlike RAM it holds its contents permanently without power. The BIOS or UEFI firmware is stored on this chip. The motherboard is wired in a way that address 0xFFFFFFF0 maps directly to this chip. CPU powers on, goes to 0xFFFFFFF0, reads from the ROM chip, starts executing.
That is what a firmware is. Firmware is a software embedded permanently into a chip on the hardware itself. The main reason this type of software is called firmware because it is embedded directly on hardware itself, Unlike other software which are stored on secondary storage devices and can be deleted.
UEFI is the modern replacement for BIOS. It is also firmware and it is also stored on a flash chip on the motherboard. The difference is what is sitting at that address. On older systems it was BIOS firmware. On modern systems it is UEFI firmware. But from the CPU’s perspective nothing changed. It just goes to 0xFFFFFFF0 and executes whatever is there.
The flash chip itself is also slightly different from old ROM. Old BIOS was on true ROM, you could not change it. UEFI sits on a flash chip which is why you can update your firmware today from within your OS or from a USB drive. But it is still a separate chip from RAM, still on the memory bus, still directly accessible by the CPU without any initialization.
UEFI directly loads the OS. It has a built in boot manager, understands the GPT partition scheme, can read FAT32 file systems, and directly executes EFI applications. Your OS just needs to provide a .efi executable and UEFI finds it and runs it. It starts in protected mode on 32 bit systems or long mode on 64 bit systems right from the beginning. It never touches real mode.
By the time your EFI executable runs the CPU is already in a modern mode with full memory access, a working memory map, and a bunch of services UEFI provides for you. That is why on modern systems with UEFI you do not need a separate bootloader like GRUB. Windows just puts bootmgfw.efi on the EFI partition and UEFI finds it and runs it directly. It has many other advantages.
But I am targeting legacy BIOS boot. The old way. BIOS does not understand file systems, does not understand EFI executables, does not know what a partition is.
Also writing your own bootloader is the whole point here. You will understand CPU addressing modes like Real Mode and Protected Mode, If you let UEFI handle it you skip those most interesting and educational parts of building an OS. BIOS starts the CPU in real mode, 16 bit, limited to 1MB of memory. Your bootloader then has to manually switch the CPU into protected mode or long mode before loading the kernel. That transition is your responsibility. That is why BIOS based systems need a bootloader.
So back to the topic after CPU starts fetching, decoding and executing instruction from the BIOS firmware chip here is what happens:
The BIOS then runs POST, Power On Self Test. It checks that RAM exists and is working, checks the keyboard, checks other hardware. If something is wrong it beeps. Those beep codes are the BIOS telling you what failed before it even has a screen to work with.
After POST passes the BIOS looks for a bootable device. It goes through its boot order, hard drive, USB, CD, whatever you configured. For each device it reads only the first 512 bytes. If the last two bytes of those 512 bytes are 0x55 and 0xAA, the BIOS says this is a valid bootloader.
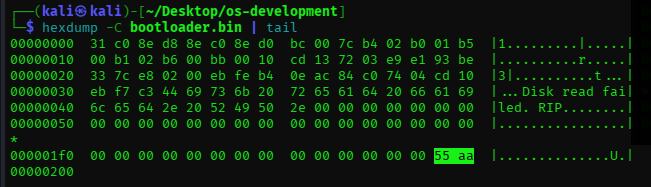
A Question That You Should Ask “Why only 512 bytes?”
It is because that is the size of one sector on a disk.
Back when BIOS was designed in the 1970s and 80s, hard drives were organized into sectors and each sector was exactly 512 bytes. That was the smallest unit a drive could read. The BIOS designers decided the simplest approach was to just read one sector from the drive, the first one, and jump to it.
The BIOS reads those 512 bytes and copies them into RAM at address 0x7C00. Then it jumps to 0x7C00. That is it. Control is handed to your code.
So the flow is:
- BIOS checks the last two bytes of first sector of each device. And Verifies the bootloader.
- BIOS reads 512 bytes from the first sector of the verified drive.
- BIOS copies those 512 bytes into RAM at
0x7C00 - BIOS does a
jmp 0x7C00 - CPU is now executing your bootloader code from RAM.
Actually understanding the boot process was important as a security researcher it matters because what if you are trying to secure your OS but the vulnerabilities resides in your firmware? If firmware itself is compromised every thing on top of that is compromised. :3
Reference Links:
https://youtu.be/PPuAhNNZjuA?si=RrkfeAOgqjmB7dW6 https://youtu.be/cREx-zKNEtY?si=a_IWW8o_lha_SiDq
https://youtu.be/rmgla4yeCXw?si=MkNyec1wEVPq6tcV (Recommended)
Index Article: https://medium.com/@0x06k/building-an-os-from-scratch-the-series-that-started-with-how-hard-can-it-be-p-331b95b03d1a
메타데이터
- post_id
- bb88c1fc59be
- slug
- building-an-os-from-scratch-part2-from-dead-silicon-to-running-kernel-bb88c1fc59be
- url
- https://medium.com/@0x06k/building-an-os-from-scratch-part2-from-dead-silicon-to-running-kernel-bb88c1fc59be
- canonical_url
- https://medium.com/@0x06k/building-an-os-from-scratch-part2-from-dead-silicon-to-running-kernel-bb88c1fc59be
- author_url
- https://medium.com/@0x06k
- status
- ok
- fetched_at
- 2026-06-09 21:21:26