Depth Illusions: Exploring the world of Autostereograms
In this blog we will discuss the beauty of autostereograms — images that may seem like repeating patterns but actually hide…
Depth Illusions: Exploring the world of Autostereograms
In this blog we will discuss the beauty of autostereograms — images that may seem like repeating patterns but actually hide three-dimensional scenes within them. Whether you’re familiar with these images or just starting to explore their magic, come along as we explore their hidden mysteries.
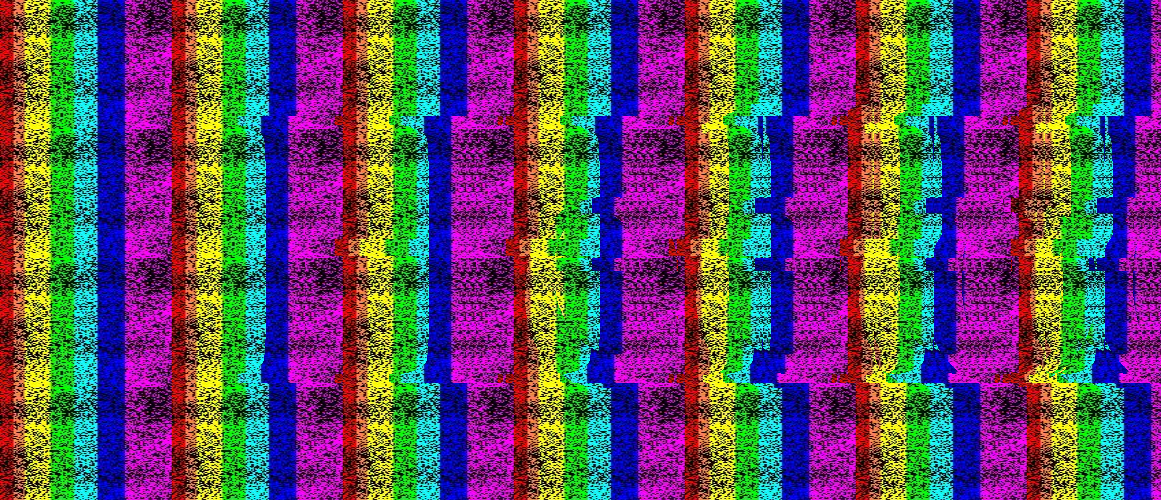
Fig1. Rainbow Pattern
Are you wondering about the image? Watching a rainbow is always fun, but not in this case. I am expecting a reply from you after looking at the image. Can you see the message I encoded in those rainbow patterns? Maybe yes, maybe no? Hello to the friends who have seen the message. For those who haven’t, let me show you what is hidden there.

Fig1: Reveling the message
Isn’t it interesting? It certainly is for me. Seeing hidden messages in stereograms becomes easier with practice. However, in this era, we have software that helps us see the hidden 3-D images. Let’s understand what exactly an autostereogram is.
Stereograms are much more than simple visual tricks; they combine art and science in a unique way. Originally created to help study how we see depth and use both of our eyes together, these images have become a form of artistic expression. Artists and designers manipulate patterns that, when viewed correctly, reveal incredible 3D images. The real appeal lies not just in the hidden image, but in how a flat picture can seem to transform into a world that feels like you could reach out and touch it.
How Autostereograms Work?
At the core of autostereograms is the principle of stereopsis, wherein each eye views a slightly different image. The brain then combines these images, interpreting the differences to perceive depth. Autostereograms take advantage of this by repeating patterns . When the eyes adjust to view these patterns at a specific focus point, the brain merges the differences, and a hidden 3-D image emerges from the background.
Autostereogram = Depth Map + Repeating Patterns
Depth Map?
Imagine you have shades of gray and want to paint a 3-D scene. Each shade, from dark charcoal to light silver, has a special power — it can make objects look closer or farther away to the person looking at them, creating depth in the image. This is what a depth map does — it’s like a magical canvas where different shades of gray control how deep or flat each part of the image seems. This helps turn a flat picture into one that looks like it has real depth.


Fig2: Image of NYC and its depth map
Wow, isn’t that what we expect from the depth our eyes perceive? The reality is that our eyes focus on objects that are nearby, capturing every minute detail, while often ignoring the finer details of distant objects. This is similar to what a depth map does for us. For instance, a bridge in white appears close to our eyes, creating the illusion of a 3-D scene on a 2D image. Meanwhile, tall buildings far from our view are depicted in darker shades. However, there’s a flag on the bridge that isn’t captured at all, even though it’s closer than the buildings. This might be due to its background and size. Typically, it should be captured because the flag is nearer than the buildings, suggesting that it should be more visible.


Fig3: US Capitol and its depth map
The illusion of the US Capitol by its depth map is pretty much giving good shape of an image, but we can see that the statue of freedom on top is a part of US Capitol and its not shown that close in depth map, this again may be because of The Statue of Freedom, being relatively small compared to the entire structure of the Capitol, might not contrast enough with the background in the grayscale image. This lack of contrast can make it blend into the surroundings rather than stand out, affecting how its depth is perceived.
We’ve discussed depth maps in detail and explored how converting an image to grayscale helps introduce depth. This conversion process assigns different shades of gray to various elements based on their distance from the viewer. This method not only enhances the perception of depth but also allows us to visualize complex scenes in a more realistic manner.

Fig4: Eiffel Tower
Consider this image, although the tower is far from the viewer, the 3-D aspect that catches the human eye is the tower, not the greenery closer. This raises an interesting question, might the depth map fail to accurately represent what humans naturally focus on in a scene? Let’s examine the depth map of this image to see how it handles these details.

Fig5: Depth map of an Eiffel Tower
Watch out! Is this surprising? Do you think the depth map is incorrect? Actually, the answer is no — the depth map is still performing its job quite well, just not necessarily in the way we might expect. Even so, we can still discern the tower, represented by slightly darker pixels. So, how do we go about extracting the actual details of the Eiffel Tower from the map? Let’s explore how we can highlight and enhance specific features, like the tower, to make them stand out more clearly in the image.
What if we take the complement of the image? In doing so, we would be focusing on the pixels that are far from the viewer by detailing with the lighter pixels, and representing those that are near with darker pixels. This approach effectively inverts our usual focus. Will this solution work? Let’s find out by converting the image to its complement and seeing the results.

Fig6: complement of the depth map
Oh yes! We can see the Eiffel Tower highlighted in the lighter pixels — awesome, that solution worked! Now, we just need to tweak our algorithm when creating the depth map. If we want to focus on the pixels nearby, we create a standard depth map. However, if our interest lies in the pixels that are far away, we should complement the depth map. This adjustment ensures that our depth maps cater to different viewing preferences effectively.
Are you ready to dive into the world of 3D illusions and create very own autostereogram?
What we want is an depth map image and a pattern for creation of auto stereogram.
I will show you the autostereogram I created try to see the if you can see the hidden scene in it.
before creating I will show you the pattern I want to repeat in the image for creating the illusions.

Fig 7: pattern for the auto stereogram
I have taken the this image and repeated these stripes in creating the pattern image embedded the depth map in it to create a magic eye image.

Fig 8: Stereogram
Can you see anything in it? Observe carefully. Is there a 3-D scene? Perhaps, for some people who can view Magic Eye images without any tools, but what if we want to reveal the hidden image? In that case, we use software to determine the pattern concealed within it. Have you figured out the solution, or would you like to see it? Wait! before revealing I want you to know methodology for creating the
For creating the depth map Image I used the the MiDas
MiDaS models utilize a deep convolutional neural network to generate depth maps. The architecture primarily uses an encoder-decoder framework, where the encoder captures features at various scales, and the decoder incrementally builds the depth map using these extracted features.
Then creating the depth map or inverted depth map based on the requirement of the pixels we are interested in.
Then using the depth map we fix the image for generating the pattern and we repeat the patterns and then embed that depth map with the patterns.
The Revealed 3D-scene in the autostereogram is

Fig 9: The Eiffel Tower in the patterns
It’s magical that with crossed eyes, we could see the Eiffel Tower in the stereogram image. I was fascinated when I was first introduced to this concept during my graduation, thanks to the computer vision faculty.
Consider this image


Fig 10: The image of Beach and its depth map
Considering the images here, the depth appears uniform to the human eye for each pixel because they were taken of a flat surface with waves and water. We can observe that the depth map model assigned different intensities to the water and land with stripes; this may be due to the intensity of the pixels in the original image.
In most cases, the depth map we obtain resembles our experiences with 3D world images. However, there are some potential drawbacks when creating depth maps. If the image was taken at a uniform depth, one solution is to invert the image. Additionally, the size of the object in the image and the angle of capture are very important factors at the same depth.
The tools I used for this project is
- MiDas : For creating the depth map of an image
- Python: For creation of Autostereogram with the patterns
- Autostereogram solver: For solving the hidden 3-D image
Future Work:
- Exploring the the drawbacks of creating the depth maps and autostereograms with various effects in images.
- Something creative using the Fractal Geometry in creation of autostereograms.
- while doing the research I have seen a Game with the keyboard arrows using autostereograms which I found interesting, lets discuss the similar kind of things in my future blogs on autostereograms.
References:
[embed]Stereogram solver Stereogram (aka Magic Eye) solver for those who can't see thempiellardj.github.io
메타데이터
- post_id
- bb8b76a3e8ca
- slug
- depth-illusions-exploring-the-world-of-autostereograms-bb8b76a3e8ca
- url
- https://medium.com/@manikantaallanki.am/depth-illusions-exploring-the-world-of-autostereograms-bb8b76a3e8ca
- canonical_url
- https://medium.com/@manikantaallanki.am/depth-illusions-exploring-the-world-of-autostereograms-bb8b76a3e8ca
- author_url
- https://medium.com/@manikantaallanki.am
- status
- ok
- fetched_at
- 2026-08-22 12:12:46