HiDPI Scaling on macOS: A Technical Exploration
Recently, I bought a Dell 40" 5K monitor (U4025QW) for my home lab. I was expecting the sharp visual experience and expansive workspace…
HiDPI Scaling on macOS: A Technical Exploration
Recently, I bought a Dell 40" 5K monitor (U4025QW) for my home lab. I was expecting the sharp visual experience and expansive workspace that a high-resolution ultrawide display should have. However, I soon noticed an unexpected issue: I could only have HiDPI resolution up to 3K resolution (3008x1269). Any resolution higher than 3k is in LoDPI mode, and I can clearly see the text starts to blur.
This constraint doesn’t make sense to me, so I investigated a bit more on how HiDPI scaling works, especially on macOS, which leads to some interesting finding.
The Basics of HiDPI Scaling
What is HiDPI?
By HiDPI (High Dots Per Inch), I’m not just referring to the screen technology that can display more pixels in the same area, but to a rendering technology that can fully utilize pixel density to produce sharper text, UI, and graphics on such screens.
Screens have been adopting higher and higher pixel densities in pursuit of better computer displays. Higher resolution can make graphics more detailed. However, using a 1:1 pixel ratio on such screens can make fonts and user interface elements too small to distinguish. Therefore, it is reasonable to lower the resolution slightly to increase their size and make them more comfortable to look at for human eyes. However, when displayed at a resolution lower than the monitor’s native physical resolution, the content on the screen needs to be scaled. During the scaling process, pixels will be lost or blended with their neighbors, which leads to blurriness. To fix the issue, the industry invented rendering techniques for HiDPI screens, which ensures that text and graphical elements are scaled to a comfortable size while taking full advantage of the increased pixel density for enhanced clarity and sharpness.

With and without HiDPI rendering
In HiDPI mode, operation systems first scale up the logical pixels to virtual pixels and then render the interface at this virtual(higher than physical) resolution. After that, the system downscales the rendered virtual pixels to fit the physical pixels on the display. This process can achieve a sharper visual experience, at the same time, without making UI elements appear in uncomfortable small sizes.
Apple introduced HiDPI rendering for macOS with their Retina Display in 2012. But, in fact, HiDPI rendering has been developed and implemented across various platforms over the years. Windows introduced HiDPI in 2006, Linux started to provide similar UI scaling features in the 2010s, and Chrome OS adopted HiDPI support in 2017. So, macOS was not the first operating system to adopt HiDPI. However, Apple does offer a superior experience in terms of HiDPI implementation, and I’m going to present my theory and explain why.
Physical Pixels/Resolution: The actual pixels present on the display hardware.
Virtual Pixels/Resolution: An intermediate, higher-resolution space where the system renders the UI. This space is larger than the logical resolution and is used to achieve better visual fidelity.
Logical Pixels/Resolution: A coordinate system used by the operating system to ensure UI elements appear at consistent sizes, regardless of the display’s pixel density.
Discovery
Back to my story, I brought home the Dell U4025QW, a stunning 40” 5K Ultrawide monitor that seemed perfect for the workspace I desired. This Dell screen stood out among the ultra-wide screens currently available in the market, which has only limited options if one’s looking for resolutions exceeding 4K. So, I hope you can understand my excitement as I took it home and connected it to my MacBook. The clarity and the amount of information that the 5120x2160 resolution can offer is just what I want.
Because the fonts were too small at full native resolution, I tried to scale down the resolution a little to make the text readable. immediately, the fonts and UI elements soon their sharpness. In the display settings, I noticed a label next to my preferred resolution of 4096x1728, marking it as “low resolution.” After some online researchs, I found that means the monitor was running in LoDPI mode rather than the HiDPI mode.
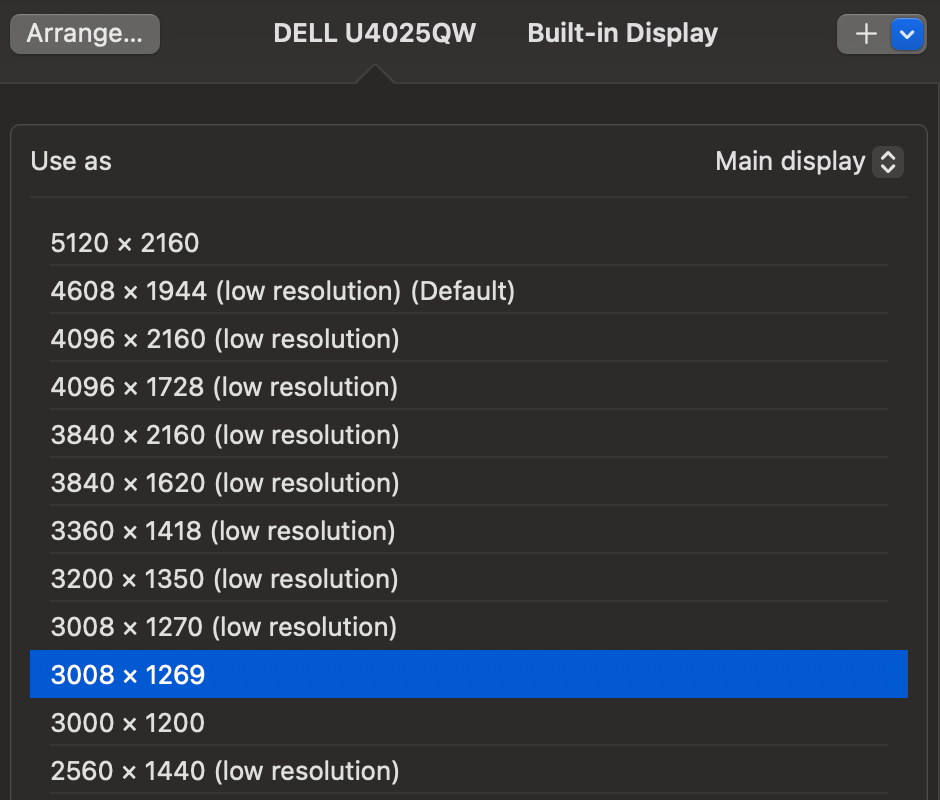
all resolutions above 3k become “(low resolution)” on my Macbook Air
Considering I spent around $1.5k on this monitor, you can imagine my frustration when I found it wasn’t performing as expected. Initially, I suspected it was a driver issue, so I downloaded and installed the latest driver and software updates from Dell. But to no avail—the display setting still shows the same “low resolution” label, and the screen clarity I sought remains nowhere close.
I explored several scripts and applications that had the reputation of enabling HiDPI for more custom resolutions. These also failed to resolve the issue. Yet, as I read into the script and tried to understand what it actually did, I began to gain a deeper understanding of how HiDPI functionality operates on macOS.
Hacking macOS HiDPI Configuration Files
I’m not sure who was the first to find out that there is a group of override files under /Library/Displays/Contents/Resources/Overrides/. Nonetheless, they surely helped people gain more insights into how macOS’ built-in mechanism brings the capabilities of each display monitor into its service.
Since there are no official documents explaining these files, as Apple usually does, the community took matters into its own hands and figured out some of it through trial and error.
Apparently, these files allow macOS to override EDID(Extended Display Identification Data) by the VendorID and ProductID, which opens ways to tweak quite a few display settings.
File Structure and Contents
The override files are typically named as DisplayVendorID-[VendorID]/DisplayProductID-[ProductID] under the Overrides folder.
These files are actually property list files(.plist inxml format), and some of the keys are related to the abilities of HiDPI resolutions:
**DisplayVendorIDand `DisplayProductID`**: Identify the specific monitor.**scale-resolutions**: An array containing encoded data representing the scaled resolutions (including HiDPI modes) that the monitor can support.**target-default-ppmm**: A value representing the target pixels per millimeter, influencing scaling calculations(presumably).
Resolution Value Decoding
Each resolution value in the scale-resolutions array is a binary data encoded in big-endian byte order, then further encoded as a Base64 string within a <data> tag.
The binary data in each entry, after decoding, is an int32 array, with each value occupying 4 bytes in big-endian. And in HiDPI mode, the first two int32 are always exactly 2x the width and height of the logical resolution.
The 3rd and 4th int32 values might represent scaling modes or factors such as HiDPI or LoDPI. The exact meaning of each value is something I am still unable to determine. However, simply copying values from existing override files works well enough.
To verify the meanings of these override settings, I did a couple of tests for my monitor:
- I set the 1st and 2nd
int32values to 3008 and 1270. As predicted, my display setting shows a new HiDPI resolution of 1504x635 in the resolution list. - If I want to run HiDPI at 3008x1270, the first two int32 in the data need to be 6016 and 2540. And it did work.
This confirms the first two int32 need to be 2x the width and height of the desired logical resolution.
Revelation
I did another set of experiments.
First, I found that the display override patch only works when I set the horizontal resolution to 3008 or less. Any value higher than that won’t work. My initial thought is that the resolution value needs to follow some kind of pattern, such as a multiple of 8 or 16 or a specific ratio. But after many failed attempts, I’m starting to realize that's not the real issue.
While in frustration, one of my MacBook's tech specs suddenly came to my mind. It hit me that my MacBook’s external display support is up to 6k resolution. That’s interesting since it seems to correlate to the 3008 limitation in my situation, which is almost exactly half of 6k.
Is the capability of up to 6k display related to the capability of providing HiDPI only up to 3k?
To validate my suspicion, I got my hands on a Mac mini M2 Pro, which has a more powerful GPU. According to its tech specs, it’s capable of supporting external displays up to 8k in resolution. And voilà, with this setup, I can get HiDPI scaling at a higher resolution, 3840×1620, exactly half the verticle resolution of standard 8k(7680x4320).
At that point, my theory was shaped up — when using HiDPI scaling, macOS performs the following steps:
- Scaling Logical Pixels to Virtual Pixels The chosen logical resolution (e.g., 2560×1440) is scaled up by a factor (e.g., 2x) to create a virtual resolution (e.g., 5120×2880).
- Rendering at the Virtual Resolution The GPU renders the desktop and all UI elements at a higher virtual resolution, utilizing more detail and allowing for finer graphics rendering.
- Downscaling to the Physical Resolution The rendered image at the virtual resolution is then scaled down to match the display's physical resolution (e.g., 5120×2160 for the Dell U4025QW).
One thing that’s worth noting is, for HiDPI resolution, macOS always renders 2x pixels virtually. Unlike some other systems, there is no 1.25x, 1.5x, 1.66x, or anything in between. Therefore, this process demands significant more GPU resources because higher virtual resolutions quadruple the number of pixels the GPU must process. And that may also be why macOS offers a superior experience in terms of HiDPI implementation and results compared to other operating systems.
In my case, the Dell U4025QW’s native resolution is 5120x2160. To achieve a HiDPI resolution of 4096x1720, macOS would need to render at 8192x3440 pixels, exceeding my MacBook Air’s GPU capabilities. As a result, macOS limits HiDPI scaling to a maximum of 3008x1269, which corresponds to 6K rendering limits — within the GPU’s specs.
Therefore, it demonstrates that macOS determines available HiDPI scaling options based on two key factors:
- Display Capabilities: The system reads the monitor’s EDID (Extended Display Identification Data) to determine its capabilities, such as native resolution and supported refresh rates.
- GPU Capability: The graphics hardware must support the higher virtual resolutions needed for HiDPI scaling.
In conclusion, I think it’s safe to presume that HiDPI scaling on macOS is determined by the GPU’s ability to handle the required virtual resolution instead of physical resolution. In the case of my MacBook, its GPU simply couldn’t handle the 8k+ virtual resolution needed for higher HiDPI modes on the Dell U4025QW.
So, if you’re considering high-resolution external monitors and need HiDPI scaling, it’s crucial to ensure your Mac has a powerful GPU capable of supporting resolutions 2x of what’s desired. I hope understanding these technical nuances can be helpful in making informed decisions when purchasing external monitors or Macs.
Due to the absence of official documentation from Apple regarding the inner workings of HiDPI scaling and its implementation, many of the explanations and theories presented in this article are based more on inferences, educated guesses, and observations. While I have made many efforts to ensure the accuracy of the information, some technical details may not precisely reflect Apple’s actual design or intentions. Please be advised to consider this context when interpreting the content.
For further technical details and tools related to HiDPI scaling on macOS, you might also find this resource helpful:
메타데이터
- post_id
- bbb6ebc403b1
- slug
- hidpi-scaling-on-macos-a-technical-exploration-bbb6ebc403b1
- url
- https://medium.com/@shensheng/hidpi-scaling-on-macos-a-technical-exploration-bbb6ebc403b1
- canonical_url
- https://medium.com/@shensheng/hidpi-scaling-on-macos-a-technical-exploration-bbb6ebc403b1
- author_url
- https://medium.com/@shensheng
- status
- ok
- fetched_at
- 2026-07-22 13:31:12