AWS Databricks Serverless Private Connectivity to Amazon MSK
Introduction
AWS Databricks Serverless Private Connectivity to Amazon MSK
Introduction
As organizations increasingly adopt Databricks Serverless for analytics and AI workloads, integrating with streaming platforms like Amazon Managed Streaming for Apache Kafka (MSK) has become a common requirement. While Databricks Serverless provides secure private connectivity to many AWS services (such as RDS, Redshift, and OpenSearch) using AWS PrivateLink, connecting to MSK introduces unique challenges:
● Kafka broker discovery and advertised listeners — Kafka clients bootstrap by connecting to any broker in the Kafka cluster, which then returns metadata containing the full list of broker hostname and port. When you place a Network Load Balancer (NLB) in front of the cluster, you must carefully address this discovery mechanism to ensure clients can reach the correct brokers.
● Authentication Mechanisms — MSK supports multiple authentication methods (unauthenticated, IAM, SASL/SCRAM, and mTLS). Each option requires precise alignment between MSK configuration, AWS networking components, and Databricks authentication and credential management.
These challenges make MSK connectivity more complex than traditional data store connections. This post provides a practical, end-to-end guide to for implementing secure, reliable connectivity between Databricks Serverless and MSK using AWS PrivateLink, covering two commonly used architecture patterns and walking through their implementation in detail.
High-Level Architecture
Databricks Serverless compute runs in Databricks-managed VPCs and connects to your Amazon VPC via PrivateLink. You expose internal services like MSK clusters through NLBs configured as VPC endpoint services. Databricks then provisions interface VPC endpoints on your behalf (via Network Connectivity Configurations private endpoint rules) to connect to those NLBs.
Pattern 1: Single NLB with Multiple Target Groups
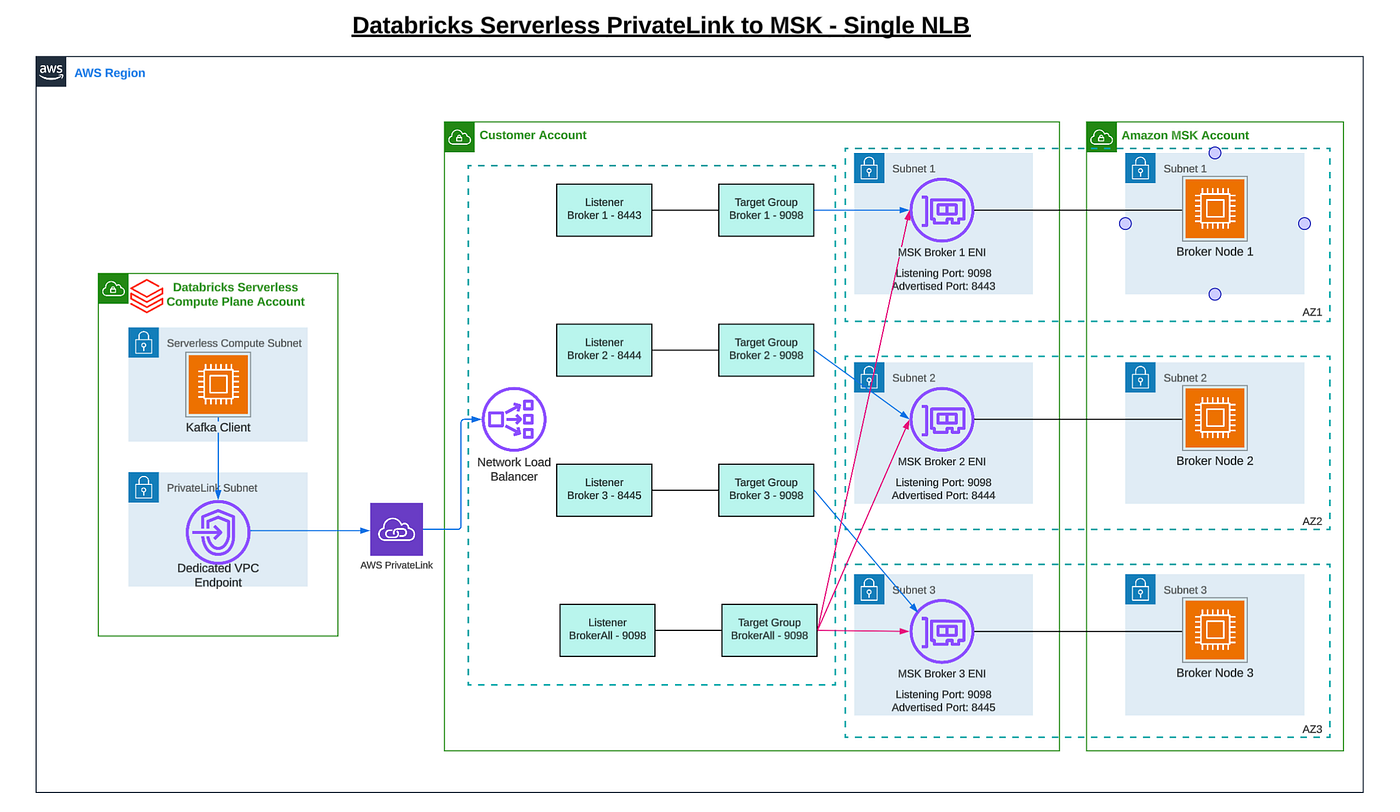
In this pattern, all MSK brokers are registered as targets to a single NLB with cross-zone load balancing enabled. You modify each broker’s advertised.listeners configuration to advertise a unique port, then create a unique NLB listener-target group pair for each broker plus an additional shared listener-target group pair for all brokers.
The following diagram illustrates this connectivity pattern:
High-level Traffic Flow
-
Initial Resolution: The Kafka client running on Databricks serverless resolves the broker DNS name to the private IP of the VPC endpoint in Databricks VPC.
-
Bootstrap Request: The client uses bootstrap string with the standard port (for example, “broker-1-fqdn:9098, broker-2-fqdn:9098,broker-3-fqdn:9098”) and initiates a TCP connection to fetch MSK cluster metadata.
-
Load Balancing: The NLB listener on port 9098 receives the connection and forwards it to the shared target group containing all brokers. The NLB then load-balances the request to any available broker (for example, broker 1).
-
Metadata Response: Broker 1 responds with cluster metadata containing broker-specific advertised listeners (for example, broker 1 on port 8443, broker 2 on port 8444, broker 3 on port 8445).
-
Direct Connection: With the cluster metadata, the client knows which broker leads its partition. It initiates a new connection to the same VPC endpoint IP on the specific port (for example, 8443).
-
Targeted Routing: The NLB listener on port 8443 forwards the request to the corresponding target group configured to receive traffic on port 9098, routing it to broker 1.
Pattern 2: Multiple NLBs (One per broker)
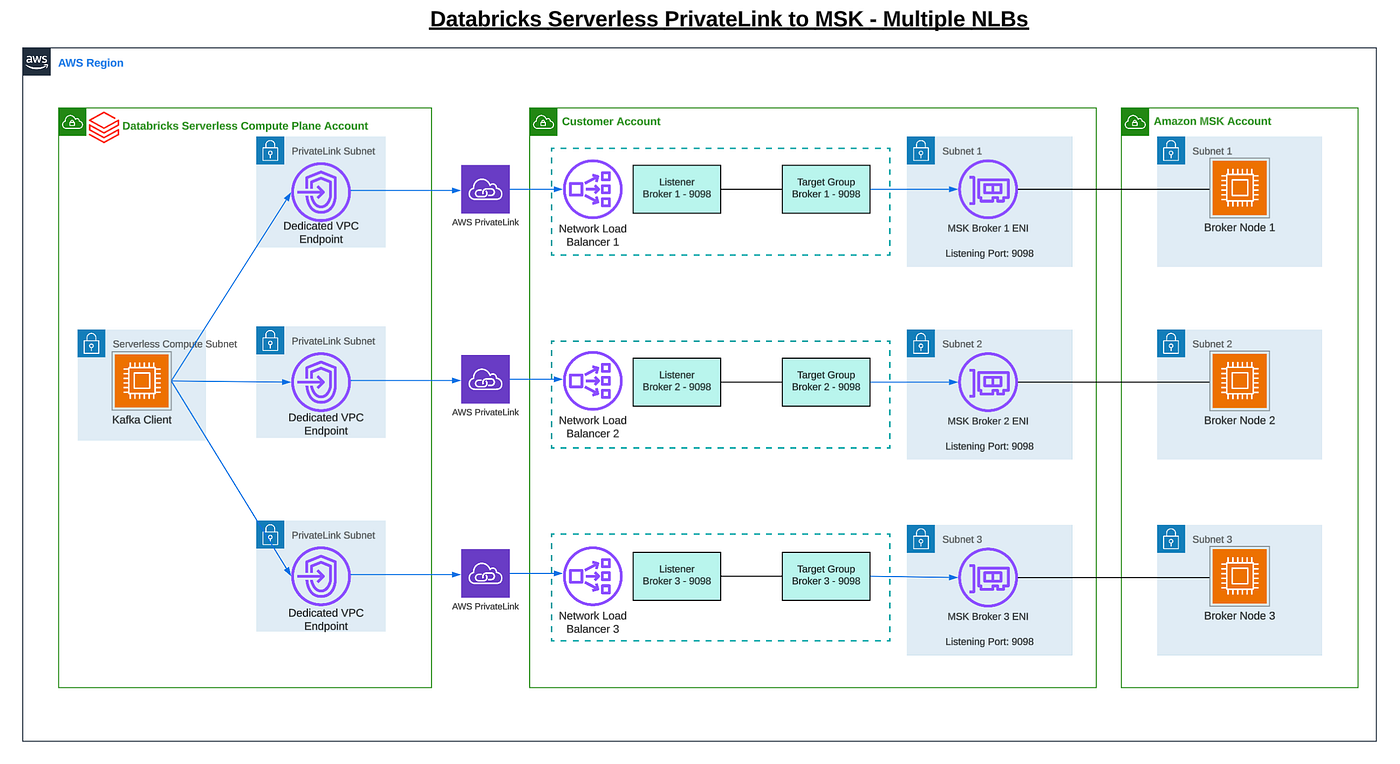
In this pattern, each broker has a dedicated NLB and listener-target group pair. No changes to the broker’s advertised.listeners configuration are required.
The following diagram illustrates this connectivity pattern:
High-level Traffic Flow
-
Broker-Specific Resolution: The Kafka client resolves the broker DNS name to the private IP of the Databricks-managed VPC endpoint dedicated to that broker.
-
Direct Connection: The client initiates a TCP connection to the VPC endpoint on the standard port 9098.
-
PrivateLink Tunnel: AWS PrivateLink receives the traffic and securely tunnels it to the corresponding NLB in the customer’s MSK account.
-
NLB Forwarding: The NLB listener on port 9098 forwards the traffic directly to the intended broker.
5. Broker Response:
· Bootstrap request: The broker responds with cluster metadata containing all broker DNS names (for example, broker-1-fqdn:9098, broker-2-fqdn:9098,broker-3-fqdn:9098).
· Data request: The client continues producing or consuming data over this established connection.
Implementation Walkthrough
This section provides detailed configuration steps for establishing private connectivity to your MSK cluster from Databricks Serverless compute. Most steps apply to both patterns, with differences noted where applicable.
Requirements
● Databricks Enterprise account
● Databricks workspace on AWS with Unity Catalog and Serverless compute enabled
● AWS account access with IAM permissions to create VPCs, MSK clusters, NLBs, and VPC Endpoint Services
● Databricks account administrator privileges
Step 1 — Create required AWS resources
You will need the following AWS resources:
· One VPC with three private subnets (for MSK and NLB) and two security groups, one for NLB and one for MSK cluster
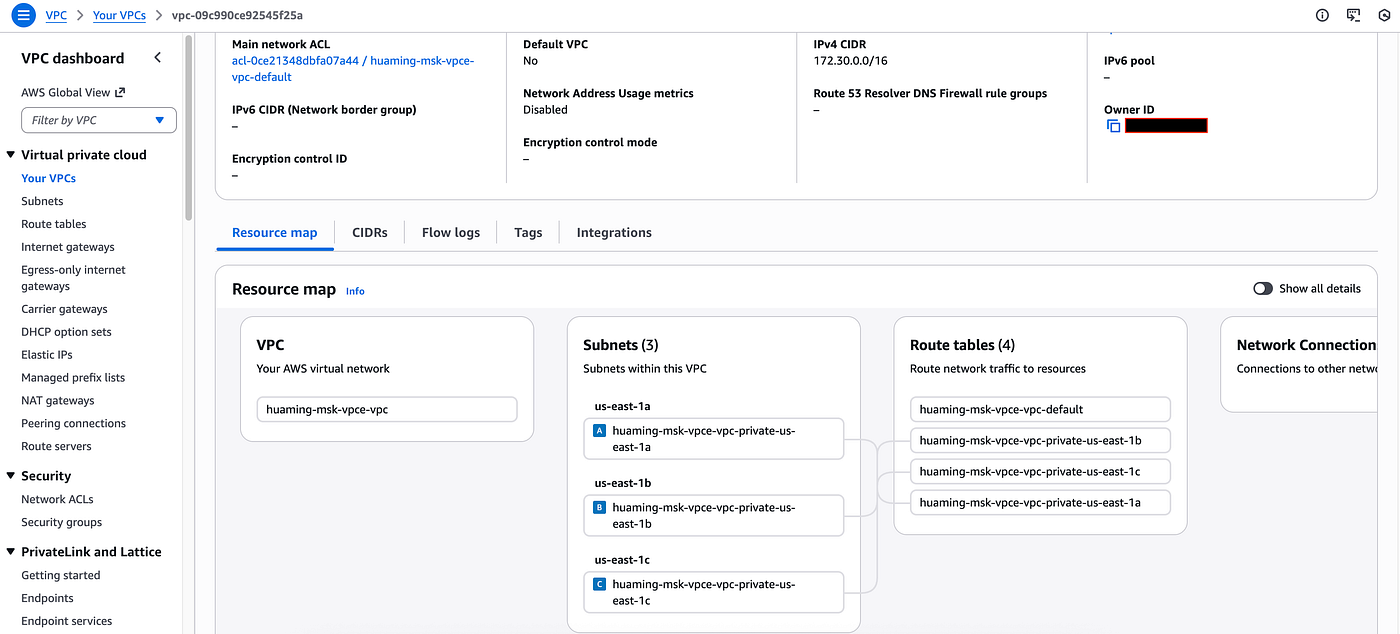
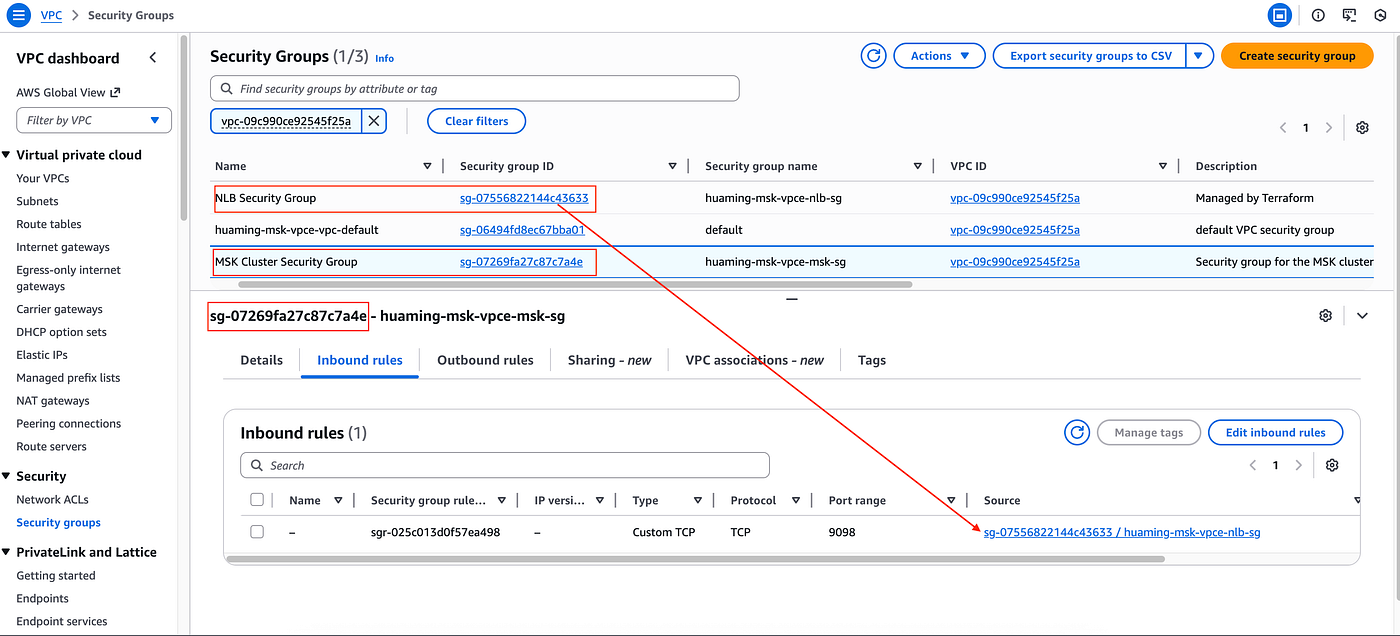
⚠️NOTE: Ensure the MSK security group allows inbound traffic on port 9098 from the NLB security group
· A three-broker provisioned MSK cluster with IAM authentication enabled
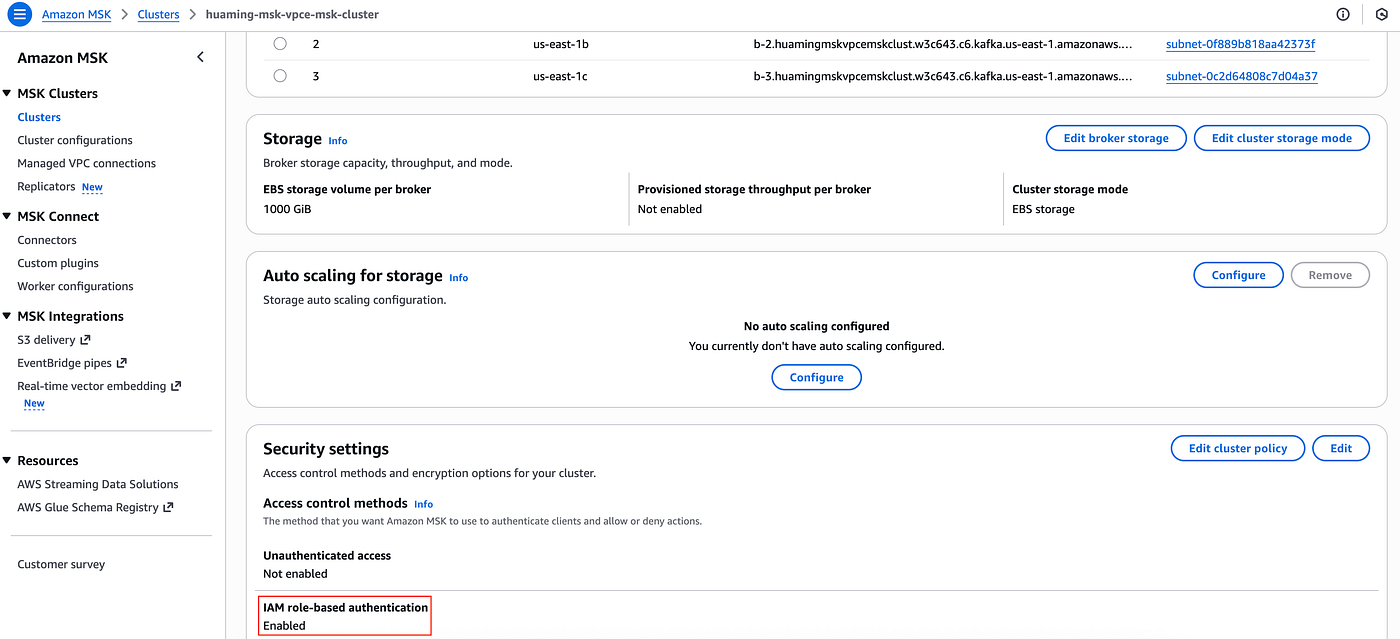
· (Pattern 1) One NLB with three listener-target group pairs, one for each broker, plus one shared listener-target group pair for all brokers
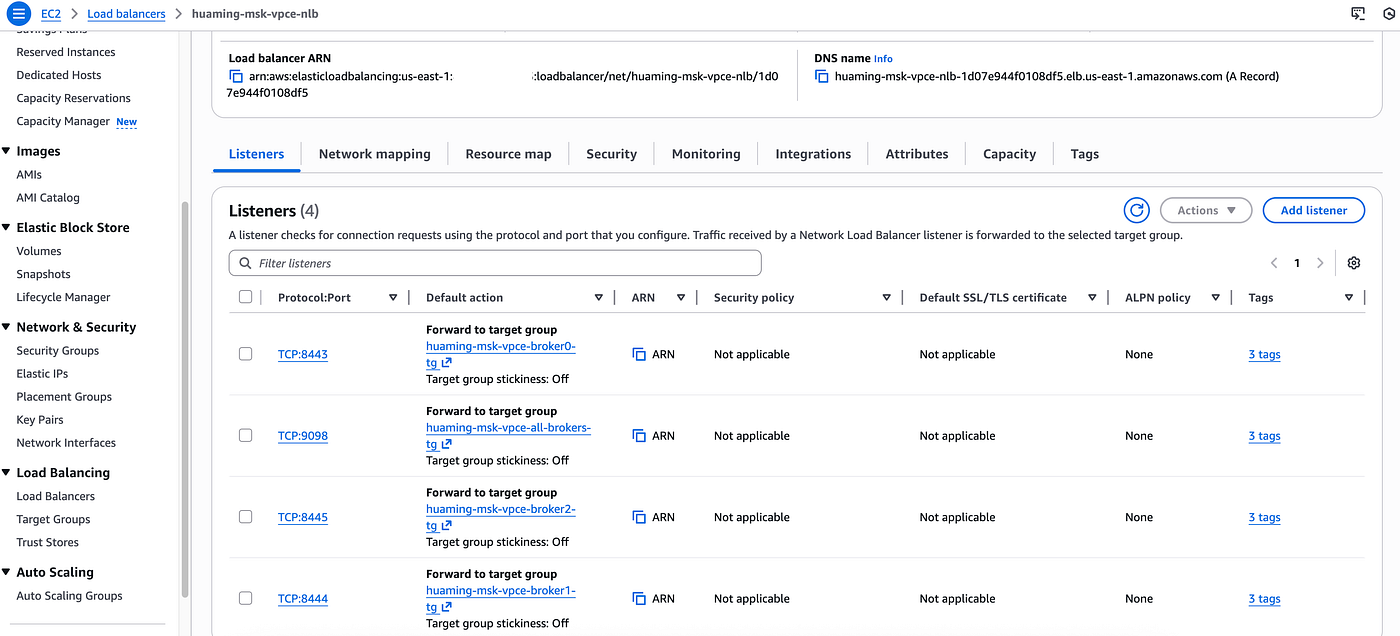
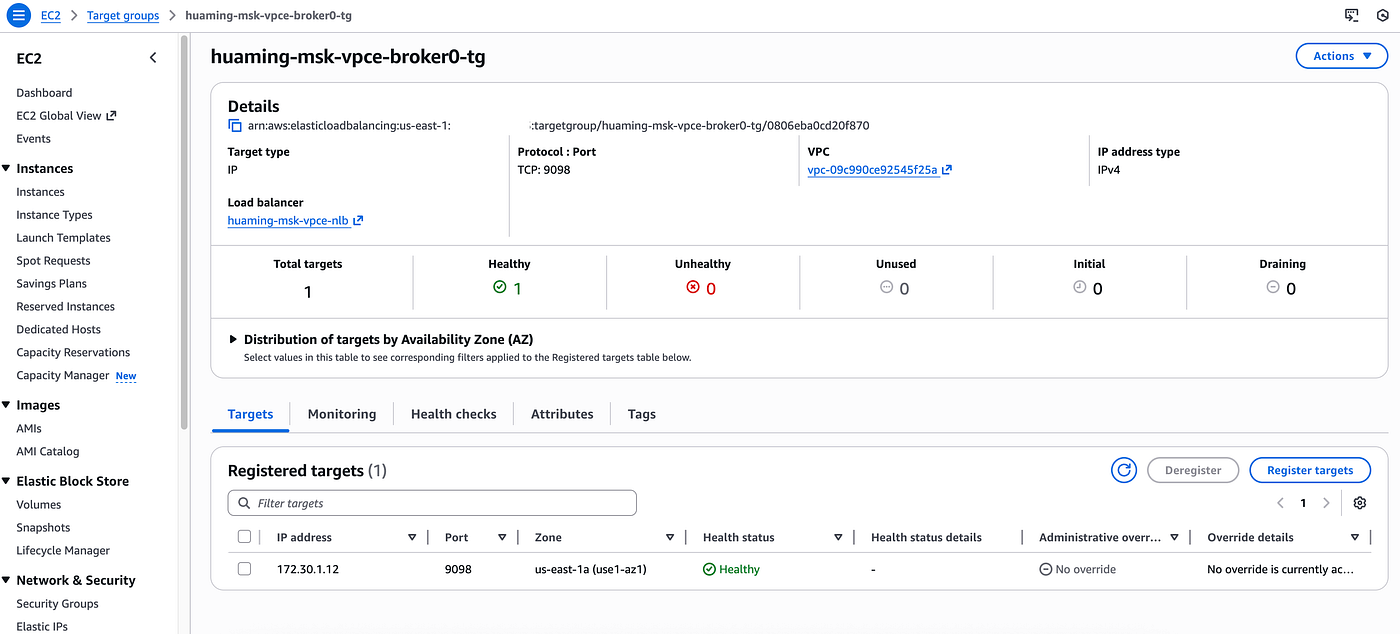
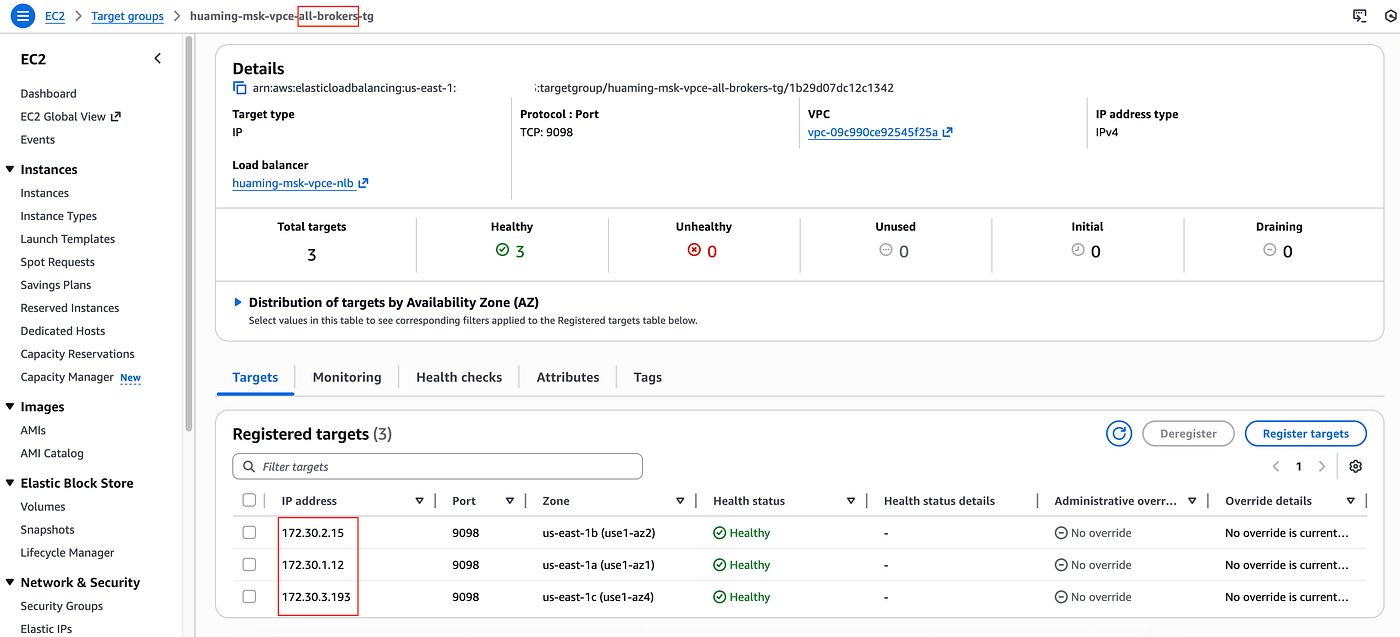
⚠️NOTE: Enable “cross-zone load balancing” and disable “enforce inbound rules on PrivateLink traffic” security settings on the NLB.
(Pattern 2) Three NLBs, each in a separate subnet matching the broker AZ. Each NLB has one listener-target group pair forwarding port 9098 traffic to the broker in the same AZ as NLB.
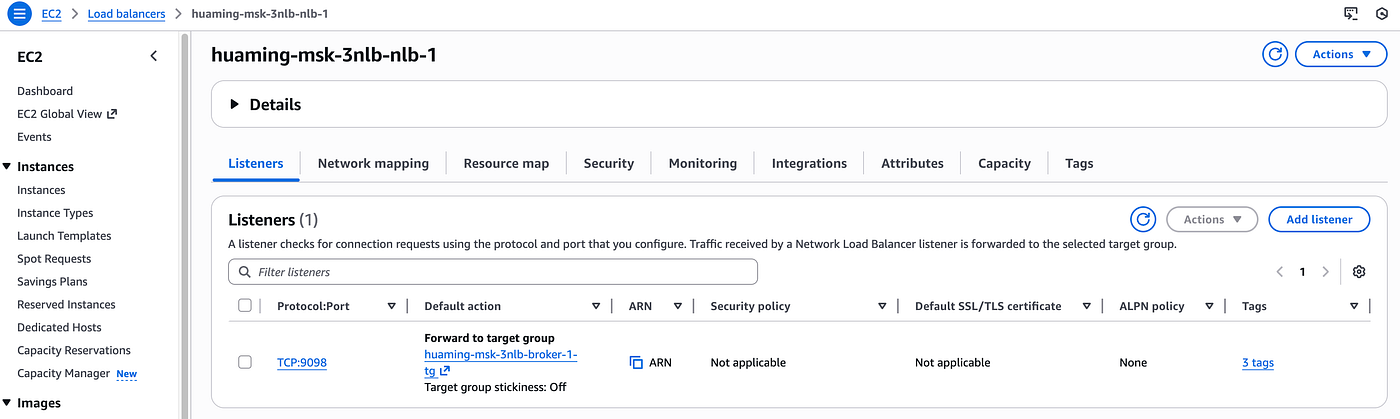
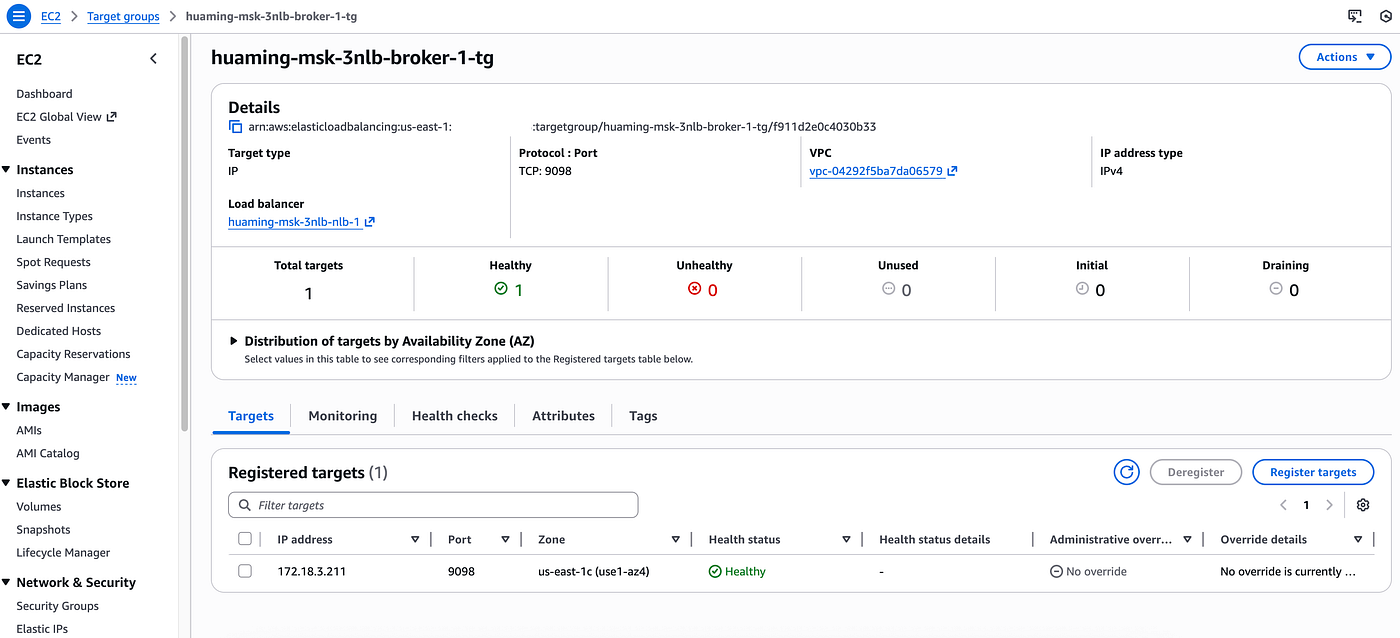
⚠️NOTE: “Cross-zone load balancing” can be disabled since each NLB resides in the same AZ as its broker.
· For pattern 1, two IAM roles are required, one for Databricks service credentials and one for the instance profile attached to the dedicated cluster running the advertised.listeners update notebook. Pattern 2 requires only the service credentials role.
Sample permission policy:
{
    "Version": "2012-10-17",
    "Statement": [
        {
            "Action": [
                "kafka-cluster: WriteDataIdempotently",
                "kafka-cluster:DescribeCluster",
                "kafka-cluster:Connect",
                "kafka-cluster:AlterCluster"
            ],
            "Effect": "Allow",
            "Resource": "arn:aws:kafka:us-east-1:123456789012:cluster/huaming-msk-vpce-msk-cluster/826c928e-0716-48f9-bb60-e95a1a064631-6"
        },
        {
            "Action": [
                "kafka-cluster:WriteData",
                "kafka-cluster:ReadData",
                "kafka-cluster:*Topic*"
            ],
            "Effect": "Allow",
            "Resource": [
                "arn:aws:kafka:us-east-1:123456789012:transactional-id/huaming-msk-vpce-msk-cluster/826c928e-0716-48f9-bb60-e95a1a064631-6/*"
                "arn:aws:kafka:us-east-1:123456789012:topic/huaming-msk-vpce-msk-cluster/826c928e-0716-48f9-bb60-e95a1a064631-6/*"
            ]
        },
        {
            "Action": [
                "kafka-cluster:DescribeGroup",
                "kafka-cluster:AlterGroup"
            ],
            "Effect": "Allow",
            "Resource": "arn:aws:kafka:us-east-1:123456789012:group/huaming-msk-vpce-msk-cluster/826c928e-0716-48f9-bb60-e95a1a064631-6/*"
        },
        {
            "Action": [
                "kafka-cluster:DescribeTransactionalId",
                "kafka-cluster:AlterTransactionalId"
            ],
            "Effect": "Allow",
            "Resource": "arn:aws:kafka:us-east-1:123456789012:transactional-id/huaming-msk-vpce-msk-cluster/826c928e-0716-48f9-bb60-e95a1a064631-6/*"
        }
    ]
}
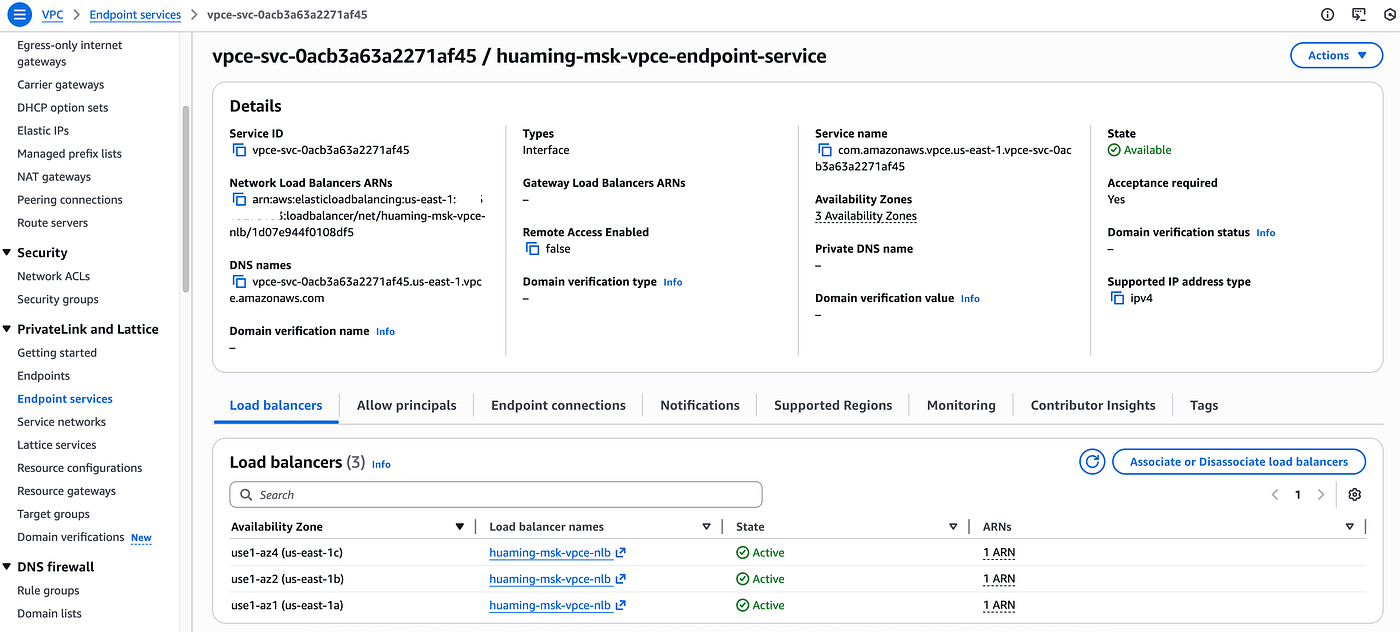
· (Pattern 1) A VPC endpoint service associated with the NLB
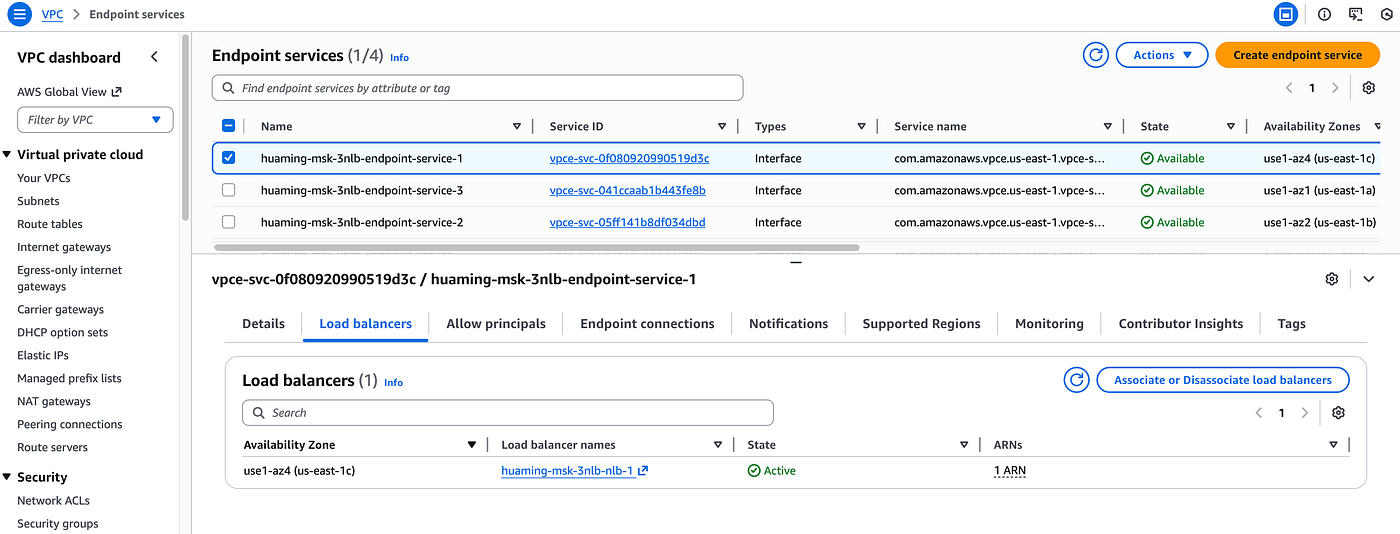
(Pattern 2) Three VPC endpoint services, one for each NLB
Step 2 — Create Databricks NCC private endpoint rules
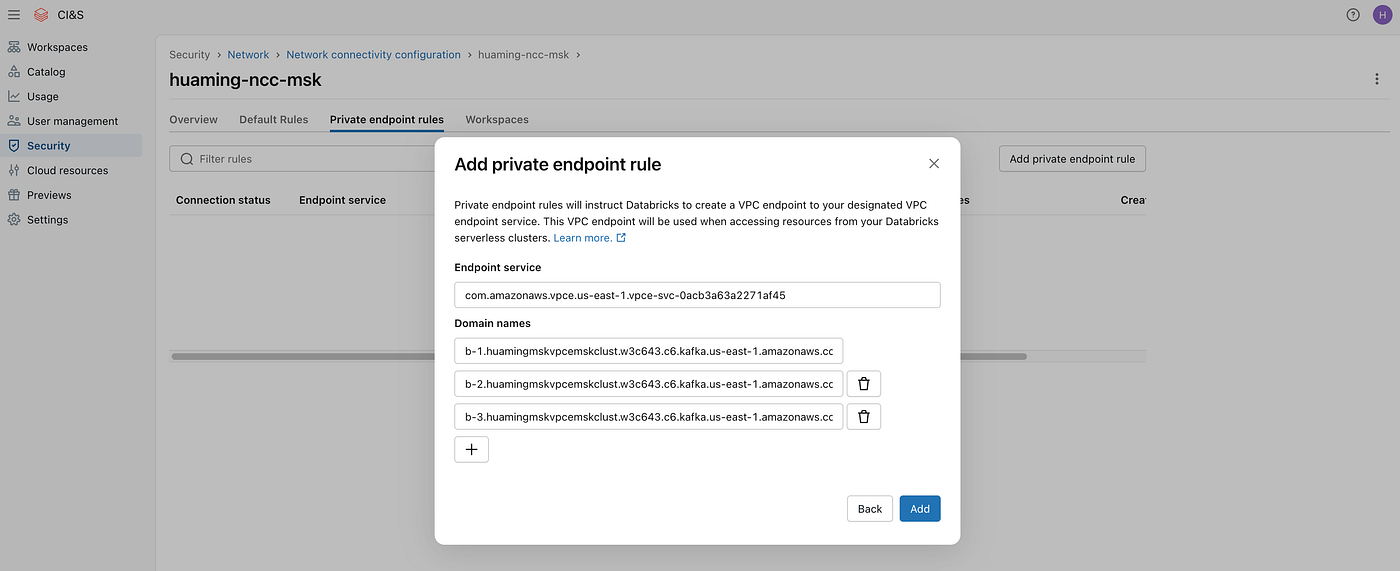
(Pattern 1) Add one single private endpoint rule referencing the VPC endpoint service. Include all broker FQDNs in the domain name list
(Pattern 2) Add three private endpoint rules, one for each VPC endpoint service
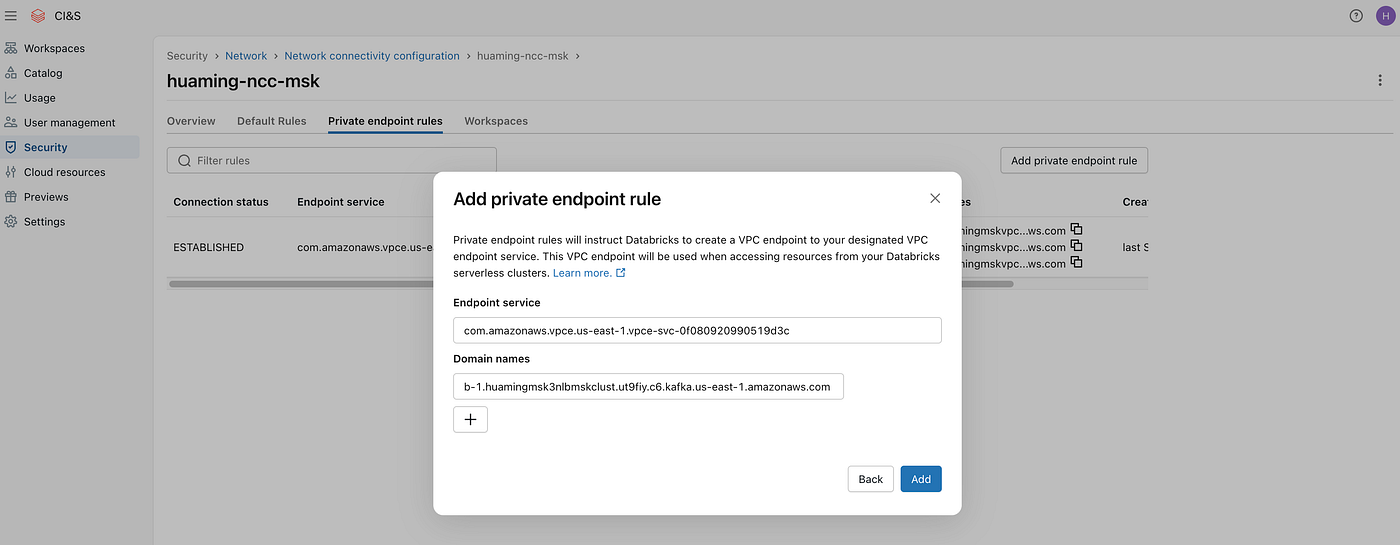
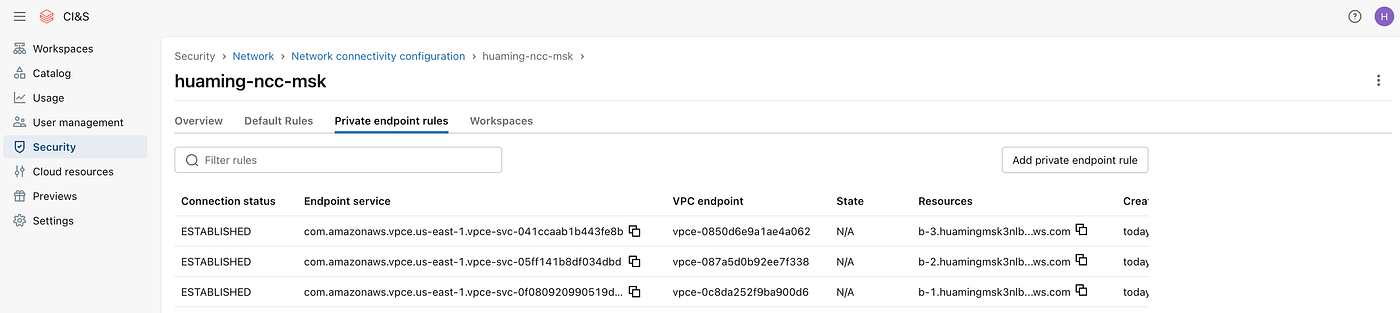
⚠️NOTE: Approve the Databricks VPC endpoint connection request in AWS and verify that the NCC private endpoint rules show ESTABLISHED status.
Step 3 (Pattern 1 Only) — Update broker advertised listeners
Because Pattern 1 relies on unique ports per broker, advertised.listeners must be updated. This can be accomplished using a Kafka client running on a Databricks dedicated cluster (classic compute) with appropriate network access and IAM permissions to the MSK cluster.
Create a Databricks instance profile based on the IAM role created in step 1
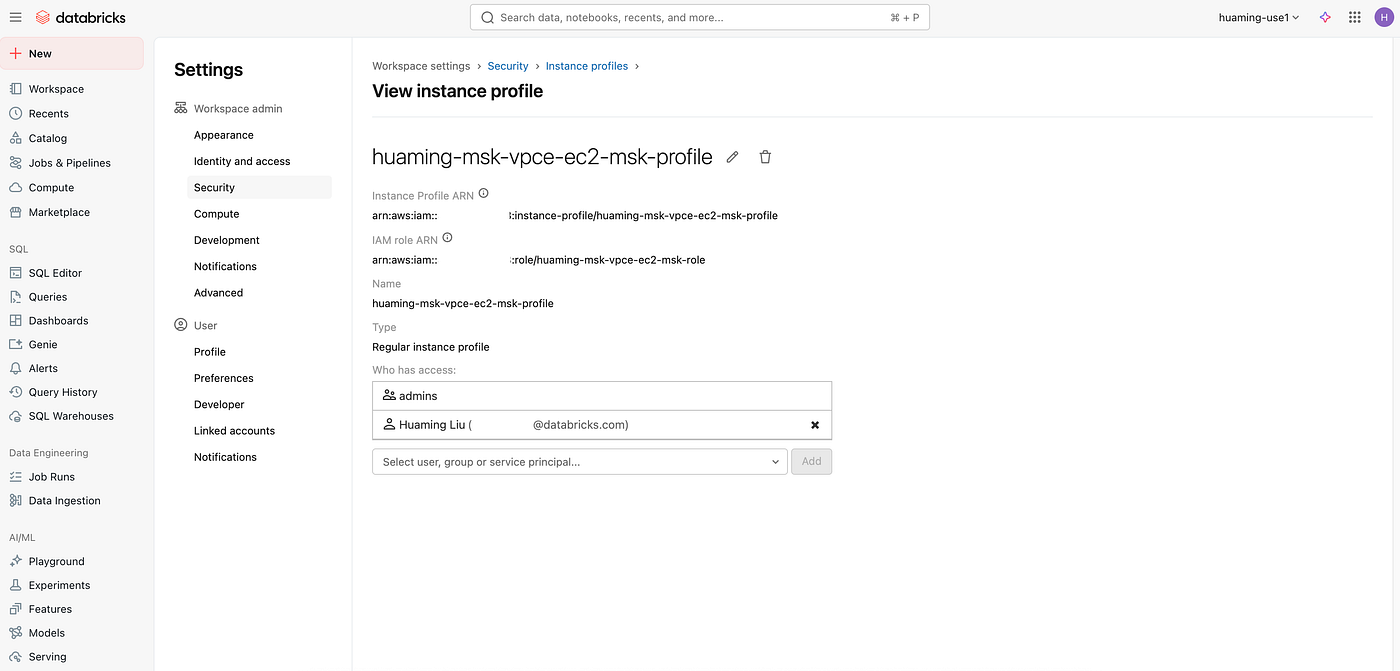
⚠️NOTE: Ensure the following block is added to the permission policy of Databricks workspace cross-account IAM role:
{
    "Effect": "Allow",
    "Action": "iam:PassRole",
    "Resource": "arn:aws:iam::123456789012:role/huaming-msk-vpce-ec2-msk-role"
}
· Launch a dedicated cluster with the instance profile attached
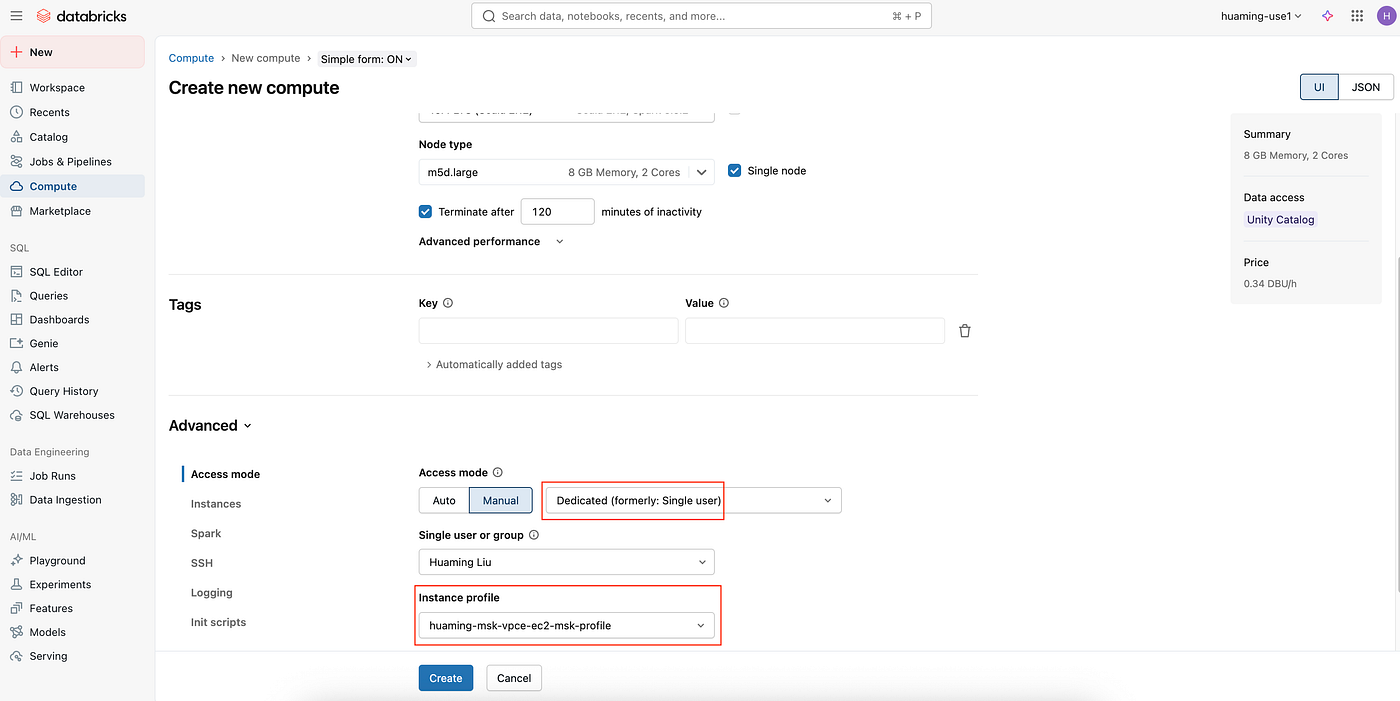
⚠️NOTE: Ensure the dedicate cluster has the connectivity to MSK cluster. If they are in two different VPCs, create a VPC peering connection. Additionally, workspace security group must allow outbound traffic on port 9098 to the MSK cluster security group, while the MSK cluster security group must allow corresponding inbound traffic from workspace security group.
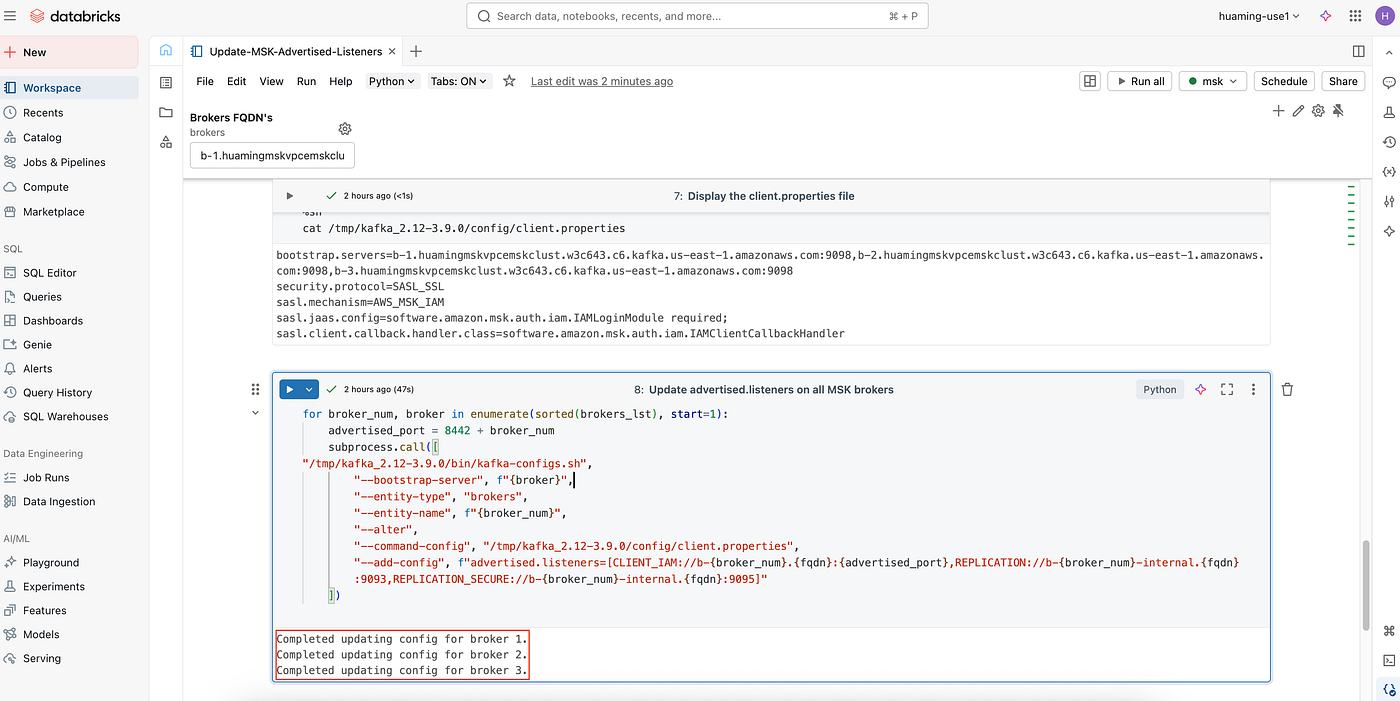
· Run the following Python notebook to install Kafka client and update advertised.listeners on all MSK brokers:
import subprocess

def extract_msk_cluster_dns(broker: str) -> str:
    # Remove port
    host = broker.split(':')[0]
    # Drop the first segment (e.g., b-1)
    return '.'.join(host.split('.')[1:])

brokers = dbutils.widgets.get('brokers')
brokers_lst = brokers.split(',')
fqdn = extract_msk_cluster_dns(brokers_lst[0])
print('brokers: ', brokers)
print('brokers list: ', brokers_lst)
print('fqdn: ', fqdn)

%sh
#Install Kafka client and download the aws-msk-iam-auth JAR file
wget -P /tmp/ https://dlcdn.apache.org/kafka/3.9.0/kafka_2.12-3.9.0.tgz
tar xvzf /tmp/kafka_2.12-3.9.0.tgz -C /tmp/
cd /tmp/kafka_2.12-3.9.0/libs
wget https://github.com/aws/aws-msk-iam-auth/releases/download/v2.3.4/aws-msk-iam-auth-2.3.4-all.jar

#Create client.properties file in Kafka config folder
subprocess.call(
    [f"echo 'bootstrap.servers={brokers}\\nsecurity.protocol=SASL_SSL\\nsasl.mechanism=AWS_MSK_IAM\\nsasl.jaas.config=software.amazon.msk.auth.iam.IAMLoginModule required;\\nsasl.client.callback.handler.class=software.amazon.msk.auth.iam.IAMClientCallbackHandler'  > /tmp/kafka_2.12-3.9.0/config/client.properties"],
    shell=True
)

for broker_num, broker in enumerate(sorted(brokers_lst), start=1):
    advertised_port = 8442 + broker_num
    subprocess.call([
"/tmp/kafka_2.12-3.9.0/bin/kafka-configs.sh",
        "--bootstrap-server", f"{broker}",
        "--entity-type", "brokers",
        "--entity-name", f"{broker_num}",
        "--alter",
        "--command-config", "/tmp/kafka_2.12-3.9.0/config/client.properties",
        "--add-config", f"advertised.listeners=[CLIENT_IAM://b-{broker_num}.{fqdn}:{advertised_port},REPLICATION://b-{broker_num}-internal.{fqdn}:9093,REPLICATION_SECURE://b-{broker_num}-internal.{fqdn}:9095]"
    ])
⚠️NOTE: Ensure the Kafka client version matches your MSK cluster version.
Step 4 — Create Databricks service credentials, and update the permission policy (add self-assuming block) and trust policy (external ID) in the corresponding IAM role
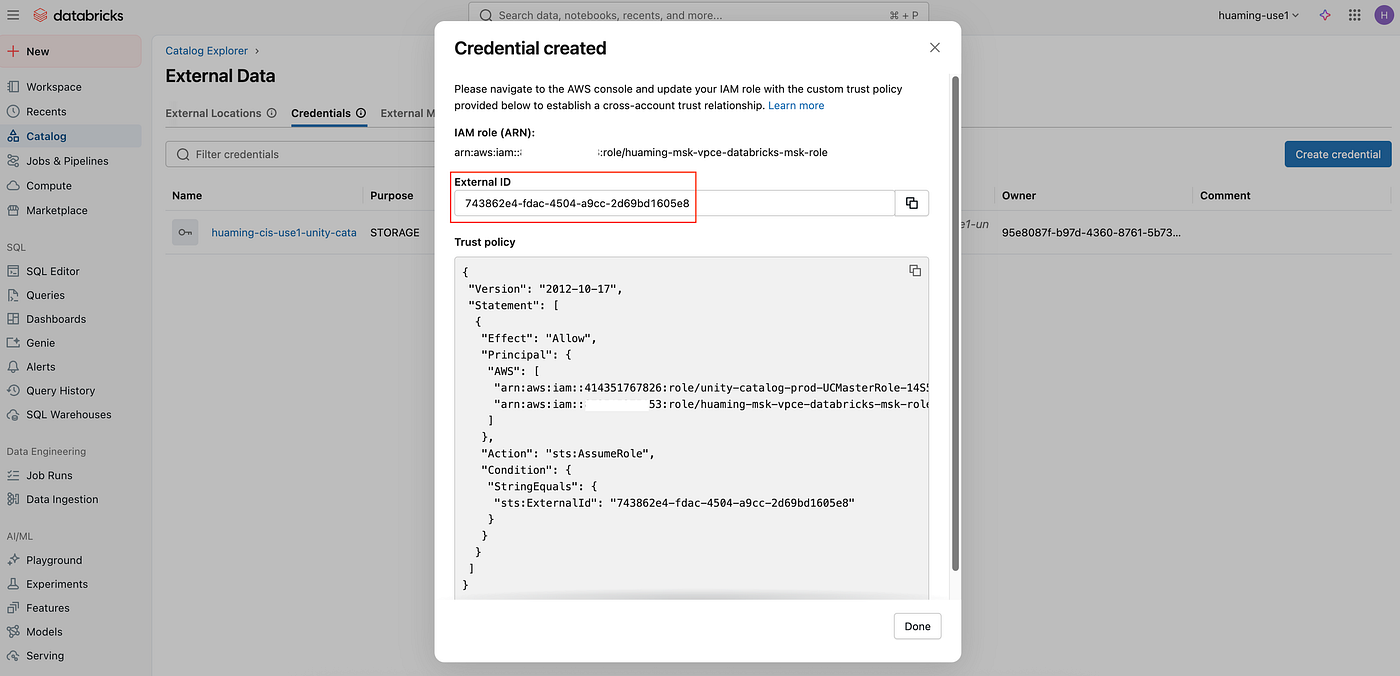
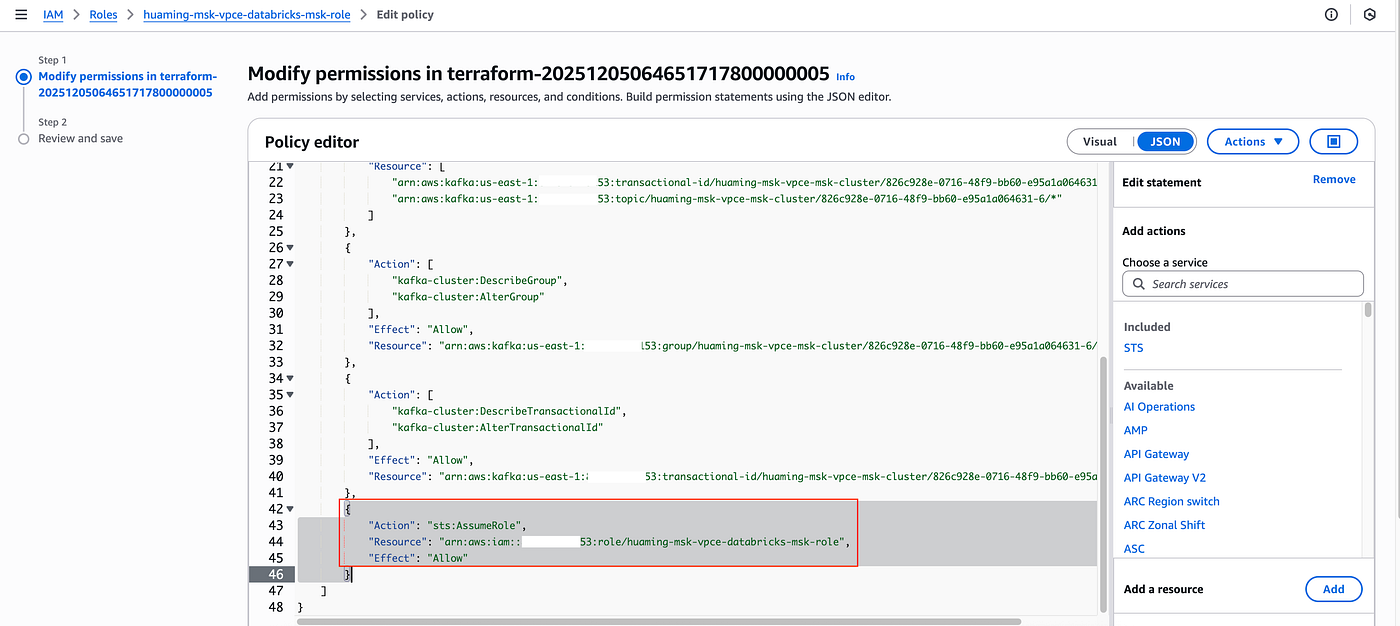
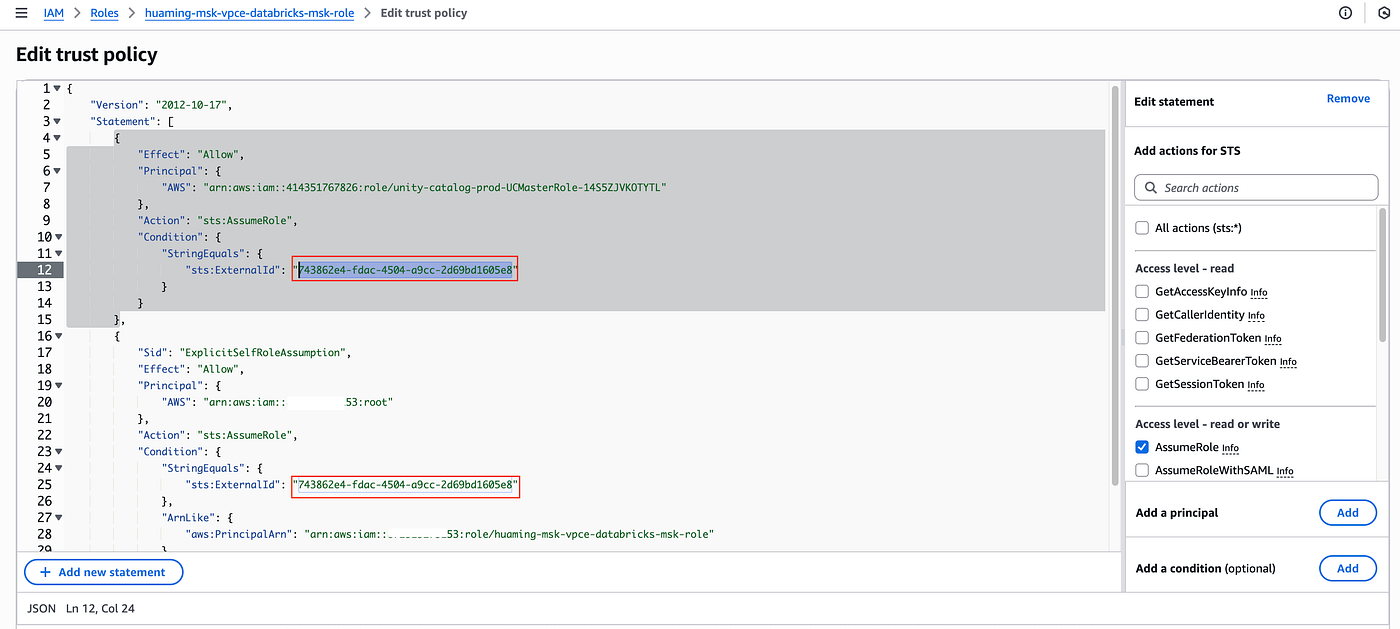
⚠️NOTE: After the update, allow a few minutes for propagation and validate the service credentials before proceeding.
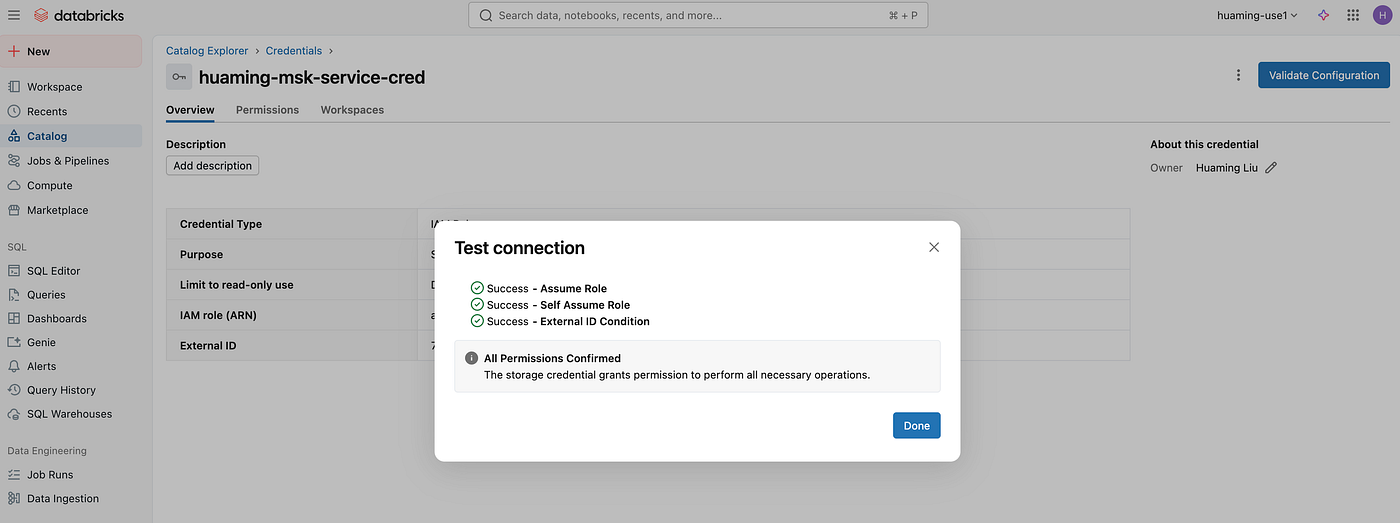
Step 5 — Validate connectivity from Databricks serverless notebook
Sample test notebook:
%pip install faker
%restart_python

%sh
nc -vz  b-1.huamingmskvpcemskclust.w3c643.c6.kafka.us-east-1.amazonaws.com 9098

import json

kafkaBrokers = dbutils.widgets.get("kafka_brokers")
sourceTopic = dbutils.widgets.get("source_topic")

from pyspark.sql.functions import pandas_udf, lit
from pyspark.sql.types import StructType, StructField, StringType, DoubleType
import pandas as pd
from faker import Faker
import random
import time

# Define the schema for the output struct
transaction_schema = StructType([
    StructField("id", StringType()),
    StructField("user_id", StringType()),
    StructField("amount", DoubleType()),
    StructField("timestamp", StringType()),
    StructField("location", StringType()),
    StructField("payment_method", StringType()),
])

@pandas_udf(transaction_schema)
def generate_transaction_udf(_: pd.Series) -> pd.Series:
    """PySpark Pandas UDF that generates fake transaction records"""
    fake = Faker()
    Faker.seed(int(time.time() * random.random()))  # Seed for better randomness in distributed environment

    # Generate list of transactions matching input series length
    def generate_transaction(_):
        return (
            fake.uuid4(),
            fake.uuid4(),
            round(random.uniform(-100, 1000), 2),
            fake.iso8601(),
            fake.country(),
            random.choice(["Credit Card", "DebitCard", "CCard", "PayPal", "Crypto"])
        )

    # Generate transactions for the entire batch
    transactions = [generate_transaction(None) for _ in range(len(_))]

    return pd.DataFrame(transactions)

df = (
  spark.readStream
  .format("rate")
  .option("rowsPerSecond", 50)
  .option("numPartitions", 4)
  .load()
  .withColumn("transaction", generate_transaction_udf(lit(1)))
)

dbutils.fs.rm("/tmp/checkpoints/kafka-transactions", recurse=True)
(
  df.selectExpr(
    "cast(transaction.id as STRING) key",
    "to_json(transaction) value"
  )
  .writeStream
  .format("kafka")
  .option("kafka.bootstrap.servers", kafkaBrokers)
  .option("databricks.serviceCredential", "huaming-msk-service-cred")
  .option("topic", sourceTopic)
  .option("kafka.acks", "1")
  .option("checkpointLocation", "/tmp/checkpoints/kafka-transactions")
  .trigger(availableNow=True) # added
  .start()
)

from pyspark.sql.functions import col, from_json

# 1. Read raw Kafka messages
kafka_df = (
    spark.readStream
    .format("kafka")
    .option("kafka.bootstrap.servers", kafkaBrokers)
    .option("databricks.serviceCredential", "huaming-msk-service-cred")
    .option("subscribe", sourceTopic)                 # same topic
    .option("startingOffsets", "earliest")            # only read new messages
    .load()
)

# 2. Cast from binary -> string
kafka_df = kafka_df.selectExpr(
    "CAST(key AS STRING)",
    "CAST(value AS STRING)"
)

# 3. Parse JSON payload into structured columns
parsed_df = (
    kafka_df.withColumn("transaction", from_json(col("value"), transaction_schema))
            .select("transaction.*")
)

# 4. Display the live stream in Databricks
display(parsed_df)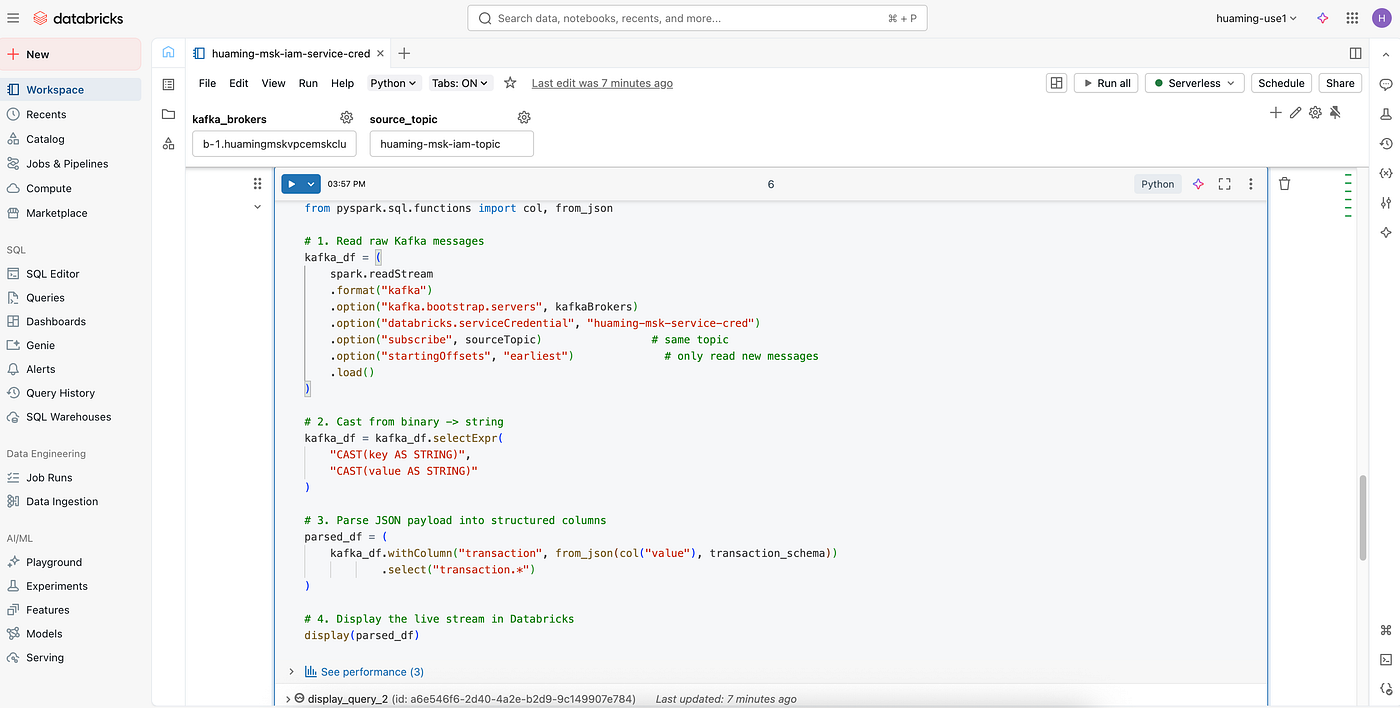
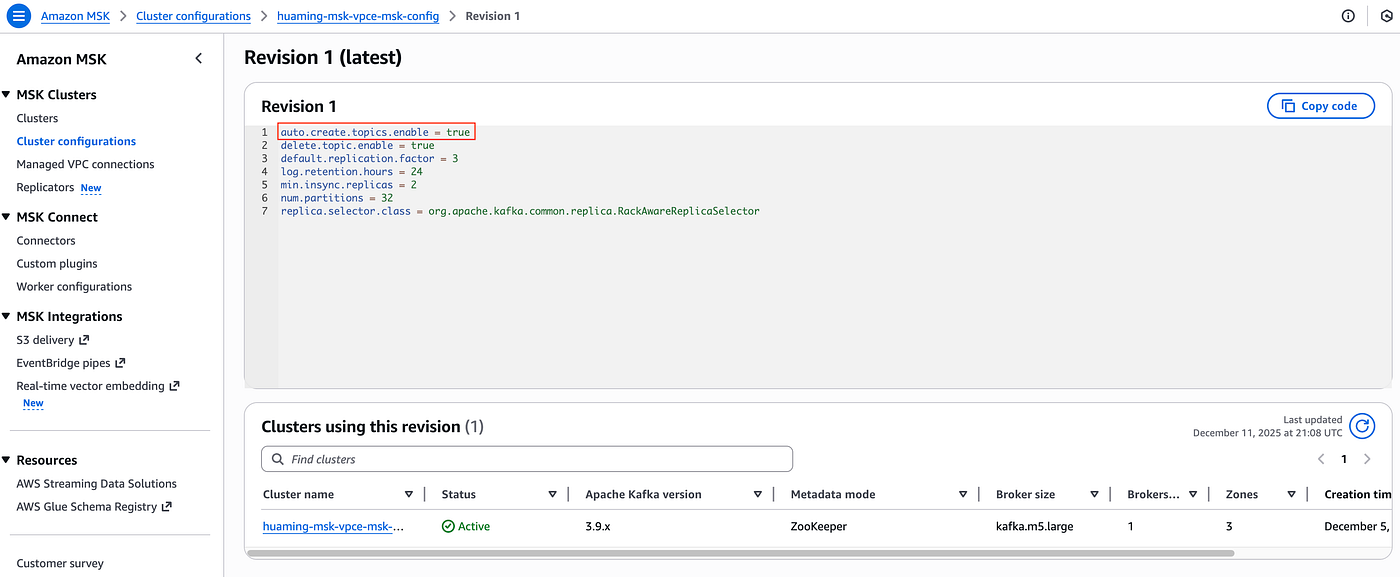
⚠️NOTE: If you choose the sample notebook to validate your configuration, ensure auto.create.topics.enable is set to true in your MSK cluster configuration.
Terraform Automation
Sample Terraform code is provided here to help you quickly deploy all AWS resources mentioned in Step 1. Simply adjust the environment variables in myvars.auto.tfvars and run “terraform apply — auto-approve”.
Disclaimer: The code is provided for reference and testing purposes only. Review and adapt it for production workloads according to your organization’s security and compliance requirements.
Pattern Comparison
Single NLB Pattern
Pros:
• Cost-Effective: Only one NLB and one Databricks VPC endpoint to maintain
• Simpler Infrastructure: Fewer AWS resources to manage
• Centralized Management: All routing through one NLB simplifies monitoring and logging
Cons:
• Configuration Complexity: Requires updating advertised.listeners on MSK brokers and tracking port-to-broker mappings
• Potential Disruption: Updating advertised.listeners prevents Kafka clients local to the MSK cluster from connecting without setting up Route 53 Private Hosted Zone to point broker DNS name to NLB DNS name
• Scaling Challenges: Adding or removing brokers requires reconfiguring listeners and ports
• Single Point of Failure: One NLB handles all traffic (though NLBs are highly available within AZs)
When to Use:
• Cost optimization is a priority
• You have a stable MSK cluster that doesn’t frequently scale
• Your team prefers managing fewer AWS infrastructure components
• You are comfortable with the additional configuration complexity for advertised listeners
Multiple NLBs Pattern
Pros:
• Clean Setup: Each broker advertises its standard DNS name on the default port (for example, 9098), which is cleaner and more intuitive
• Better Isolation: Dedicated infrastructure per broker improves fault isolation
• Easier Scaling: Adding or removing a broker simply requires adding or removing an NLB
Cons:
• Higher Cost: Three NLBs and Databricks VPC endpoints triple NLB and VPC endpoint hourly costs
• Infrastructure Complexity: More AWS resources mean additional monitoring, alarms, and logs to manage
When to Use:
• You need clear broker isolation for troubleshooting or compliance
• You want to minimize MSK configuration complexity and budget allows multiple NLBs
• Your MSK cluster scales frequently and you have automation for infrastructure management
Limitations and Considerations
● The implementation in this post was specific to a provisioned MSK cluster with three brokers and IAM authentication. Adjust for different configurations as needed.
● AWS instance profile is not currently supported for Databricks serverless PrivateLink connectivity to MSK cluster. Use Unity Catalog service credentials instead.
● Databricks serverless compute doesn’t currently support PrivateLink connectivity to MSK Serverless. For MSK Serverless, use Databricks classic compute.
● For extremely high-volume streaming workloads, consider Databricks classic compute with VPC peering between workspace VPC and MSK cluster VPC.
Conclusion
AWS Databricks Serverless private connectivity to Amazon MSK via AWS PrivateLink enables secure, scalable, low-latency streaming pipelines without exposing traffic to the public internet. Whether you choose a single NLB for cost efficiency or multiple NLBs for simplified deployment depends on your operational priorities, cost constraints, and network governance requirements.
By combining Databricks Serverless flexibility with AWS PrivateLink’s performance and isolation, you can confidently build secure, production-grade streaming data architectures on AWS.
메타데이터
- post_id
- bbf8cf02efe0
- slug
- aws-databricks-serverless-private-connectivity-to-amazon-msk-bbf8cf02efe0
- url
- https://medium.com/databricks-platform-sme/aws-databricks-serverless-private-connectivity-to-amazon-msk-bbf8cf02efe0
- canonical_url
- https://medium.com/databricks-platform-sme/aws-databricks-serverless-private-connectivity-to-amazon-msk-bbf8cf02efe0
- author_url
- https://medium.com/@huaming.liu
- status
- ok
- fetched_at
- 2026-07-08 02:40:31