“From Raw to Remarkable: Optimizing Image Preprocessing for Machine Learning”
“Imagine you’re handed a high-resolution wildlife photograph captured by a drone. The image is stunning — lush greenery, a river winding…
“From Raw to Remarkable: Optimizing Image Preprocessing for Machine Learning”
“Imagine you’re handed a high-resolution wildlife photograph captured by a drone. The image is stunning — lush greenery, a river winding through, and somewhere in the corner, a rare animal you need to detect. You feed the image straight into your machine learning model, expecting magic… but the results are disappointing. The model misclassifies the animal, struggles with lighting, and even mistakes shadows for other objects. The problem isn’t the algorithm — it’s the data. Just like a chef needs clean, properly prepared ingredients before cooking, machine learning models need well-preprocessed images before they can truly perform. That’s where image preprocessing steps in — the quiet hero behind accurate, efficient, and robust computer vision systems.”

Image Preprocessing Workflow in Machine Learning
As the diagram shows, a raw image must go through several preprocessing steps before it can be effectively used by a machine learning model. Let’s break down what image preprocessing really means and why it’s crucial in the ML workflow.
Understanding Image Preprocessing
What is Image Preprocessing?
Image preprocessing is the process of transforming raw images into a clean, standardized, and model-ready form, so algorithms can extract meaningful patterns without getting distracted by irrelevant noise.
Why is Image Preprocessing Crucial in Machine Learning?
A well-trained model is only as good as the data it’s given. Preprocessing ensures that:
- Standardization: All images have the same size, aspect ratio, and resolution.
- Focus on Features: Important details are preserved while irrelevant noise is removed.
- Faster Training: Reduces the amount of unnecessary data, speeding up computations.
- Better Accuracy: Models can learn more effectively from clean, consistent data.
Example: Back to the Wildlife Story
In our wildlife detection case:
- The drone’s raw image might be too large for the model to handle.
- Different lighting conditions could confuse the model.
- Unnecessary background elements (trees, rocks) might distract from the actual animal.
By resizing the image, normalizing brightness, and filtering noise, we ensure the model sees just what it needs to see — improving classification accuracy and reducing false detections.
Image Datatypes in Machine Learning

- File Format (Storage Level)
- Images are usually stored as files in formats like JPG, PNG, BMP, and TIFF.
- At this stage, they are compressed or encoded for storage efficiency.
2. Array Representation (Processing Level)
- Once loaded into Python using libraries like OpenCV or Pillow, an image becomes a NumPy array.
- Each pixel is represented as a numerical value.
- Grayscale Image → 2D array (height × width) where each value is intensity (0–255).
- Color Image (RGB/BGR) → 3D array (height × width × 3 channels).
3. Pixel Value Datatypes
- uint8 (Unsigned 8-bit Integer) → Most common; pixel values range from 0 to 255.
- float32 / float64 → Used after normalization or advanced processing; values range from 0.0 to 1.0 or -1.0 to 1.0.
“Now that we understand how images are represented as arrays in machine learning, let’s look at another important aspect: bit depth — the number of bits used to represent the color of a single pixel. Bit depth determines the range of colors or shades an image can store, which directly impacts how we preprocess and use it in ML models.”
Types of Digital Images by Bit Depth
The bit depth of an image defines how much information each pixel can store , which in turn affects color range, file size, and processing requirements.

Understanding the type and bit depth of your images helps in making the right preprocessing decisions. For example, converting a 24-bit RGB photo into 8-bit grayscale reduces file size and speeds up training, but may cause loss of important color-based features if the task depends on them.

Why This Matters in Machine Learning & Computer Vision
The way images are represented has a direct impact on model accuracy, computational efficiency, and storage requirements. Choosing the right representation ensures better performance for the task at hand:
- Monochrome (1-bit): Ultra-lightweight representation, ideal for tasks focused on shapes, edges, or binary classification. Fastest to process but carries minimal detail.
- Grayscale (8-bit): Strips away color while preserving textures, edges, and structural patterns. Reduces noise and computation, making it widely used in classical CV tasks.
- 8-bit Color (Indexed): Efficiently represents images with limited color diversity. Useful in compression and memory-sensitive applications where color still plays a role.
- 24-bit Color (RGB): Captures the full richness of visual information (16.7M colors), making it the preferred choice for deep learning and high-accuracy computer vision models.
“Bit depth tells us how much color information a pixel can store — but it doesn’t define how that color is represented. That’s where color spaces come in, organizing this information in ways that make image processing and ML tasks more effective.”
Understanding Color Spaces in Image Processing
What are Color Spaces?
A color space defines a specific way of representing colors using numerical values, enabling computers to process and analyze visual information effectively. Different color spaces are designed to highlight particular aspects of color, brightness, or contrast, making them suitable for specific image processing or machine learning tasks.
The 3 most used color spaces are:
- RGB (Red, Green, Blue):
- The RGB color space represents images using three color channels: Red, Green, and Blue. Each pixel is a combination of these three values, typically ranging from 0 to 255 in 8-bit images.
- Most commonly used in digital cameras, monitors, and computer vision models, RGB is employed because it aligns with how electronic displays generate color.
2. CMYK (Cyan, Magenta, Yellow, Key/Black):
- CMYK is a subtractive color model used primarily for printing. Instead of adding light to produce color (as in RGB), it removes brightness from white paper by applying colored inks: Cyan, Magenta, Yellow, and Black (Key).
- It is used for printing due to the large color variation.
3. HSV (Hue, Saturation, Value): HSV represents colors in terms of:
- Hue: The actual color type (angle on a color wheel, e.g., red, green, blue).
- Saturation: The intensity or purity of the color.
- Value: The brightness of the color.
- This is considered best for editing purposes because it separates out lightness variations from the hue and saturation variations

Contrast, Clarity, and Sharpness: The Visual Pillars of Image Quality
After exploring how colors are represented through different color spaces (RGB, CMYK, HSV), it’s time to focus on the qualities that directly impact how an image looks to both humans and machines. These qualities — contrast, clarity, and sharpness — may sound alike, but each plays a unique role in image processing and machine learning.

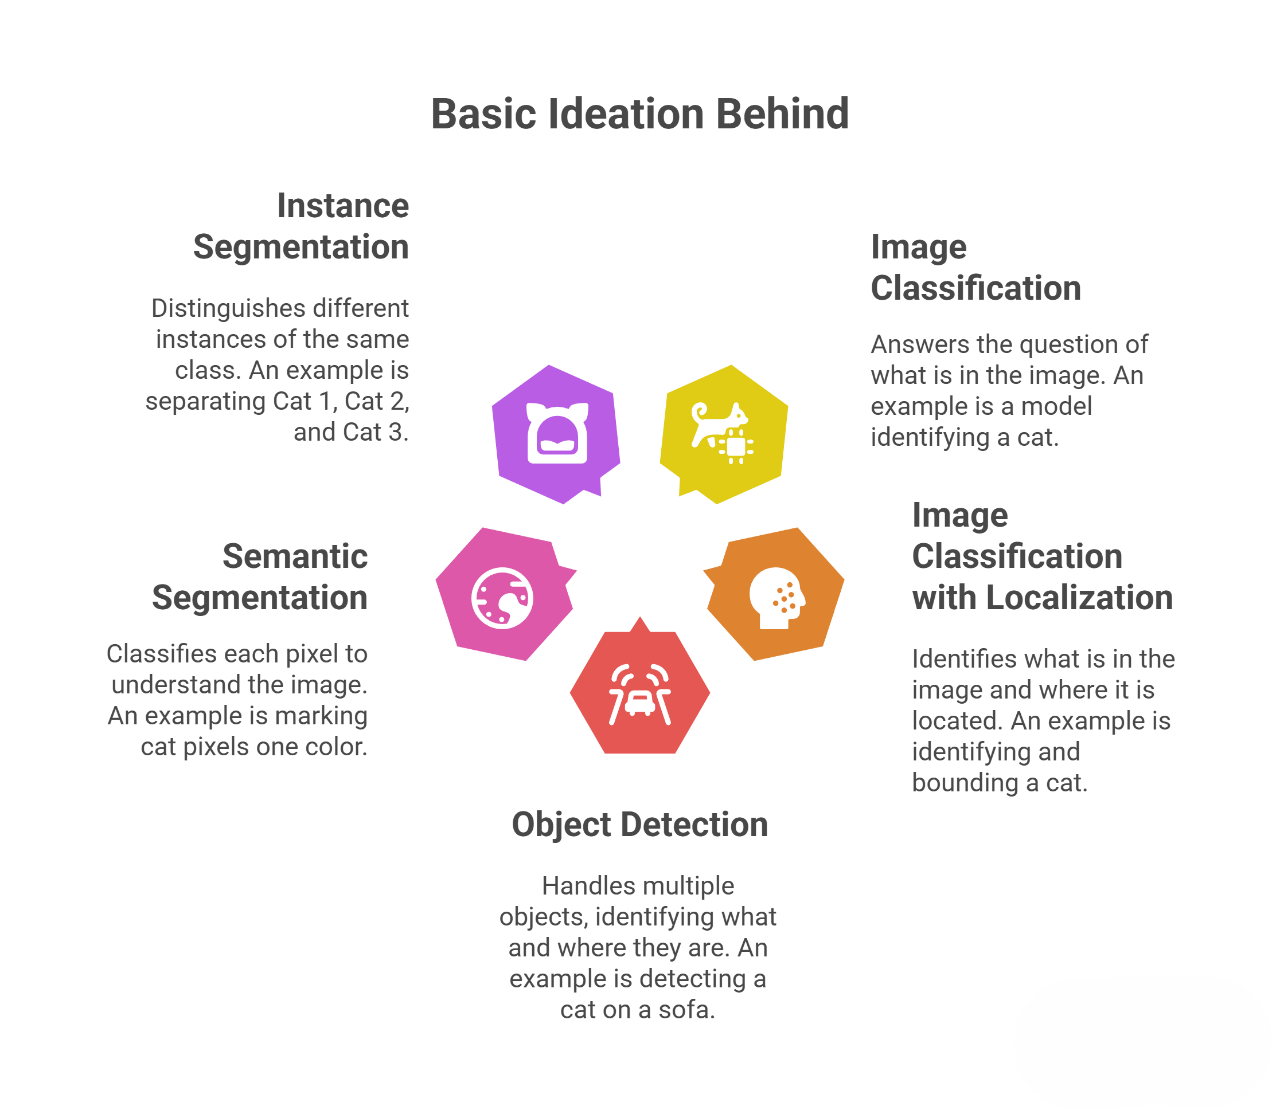
Basic Ideation Behind Core Computer Vision Tasks
Image preprocessing is not the end goal — it’s the foundation that powers the bigger tasks in computer vision. Once images are cleaned, resized, and enhanced, they can be used for more advanced applications like recognition, detection, and segmentation. Let’s break down the key concepts in simple terms:
Case Study: Power of Image Preprocessing in Action
Think of a Marvel superhero poster. To us, the characters are instantly recognizable — Iron Man’s red-gold armor, Hulk’s green skin, or Captain America’s shield. But for a machine learning model, the raw poster is chaotic:
- Too many colors and details competing for attention,
- Image sizes and scales vary,
- Backgrounds add noise that the model doesn’t care about.
Without preprocessing, the model struggles to “see the hero.”
Just like superheroes prepare before battle, images also need preprocessing before entering a machine learning pipeline.
Here’s how we transformed a Marvel image step by step:
Import & Inspect the Raw Image
# import required libraries
from PIL import Image, ImageEnhance, ImageOps, ImageDraw, ImageFont, ImageFilter
import numpy as np
import pandas as pd
import matplotlib.pyplot as plt
import seaborn as sns

from matplotlib import image
Why we import [ from matplotlib import image ] :
- matplotlib.image is a submodule of Matplotlib that provides functions to read and write images (mostly as NumPy arrays).
- It’s different from PIL (Pillow) — while PIL is mainly for image processing, matplotlib.image is more about loading images into arrays for analysis or plotting.
#Task 1: Open { Fundo Heróis gibi.jpeg } Print its format, size, and mode.

from PIL import Image
# Load the image
img = Image.open("Fundo Heróis gibi.jpeg")

# Inspect properties
print("Size of image:",img.size) # Resolution → Geometry
print("Mode of image:",img.mode) # Pixel representation (RGB, Grayscale, etc.)
print("Format of image:",img.format) # Storage format (JPEG, PNG, etc.)
Import Image – Core Image Object :
Handles opening, saving, and basic operations.
#Task 2: Show the image inline in your notebook output.
plt.imshow(img)
#Task 3: Convert the image to grayscale.
from PIL import ImageEnhance
plt.figure(figsize =(12,12))

# vibrance enhancer
color_enhancer = ImageEnhance.Color(img)

plt.subplot(1,2,1)
plt.title("Original Image")
plt.imshow(img)

plt.subplot(1,2,2)
plt.title("Gray Enhanced Image")
plt.imshow(color_enhancer.enhance(0))
Import ImageEnhance – Image Adjustments
Used to enhance properties like brightness, color, contrast, and sharpness.
Enhancement Classes:
ImageEnhance.Color(img)→ Adjust color.ImageEnhance.Contrast(img)→ Adjust contrast.ImageEnhance.Brightness(img)→ Adjust brightness.ImageEnhance.Sharpness(img)→ Adjust sharpness.
#Task 4: Resize the image to 200 × 200 pixels and display it.

resized_img = img.resize((200,200))

resized_img.save("resized_img_marvel_200.png")
print("Original_image_size:",img.size)
print("resized_image_size:" ,resized_img.size)

plt.figure(figsize = (12,12))

plt.subplot(1,2,1)
plt.title("Original Image")
plt.imshow(img)

plt.subplot(1,2,2)
plt.title("Resized Image in 200x200 pixels")
plt.imshow(resized_img)
# Task 5: Draw a red rectangle around Spider-Man. What changes when the size or position is adjusted?

from PIL import ImageDraw

img_copy = img.copy() # Work on a copy so the original isn't changed

red_rectangle = ImageDraw.Draw(img_copy) # Create a drawing object

# Define the coordinates for the rectangle
xy = [(240,20) , (490,280)]

# Draw a filled red rectangle
red_rectangle.rectangle(xy, outline= "RED", fill= None, width = 2)

img_copy.save("Spiderman_captured.jpg")

img_copy.show()
Import ImageDraw – Drawing on Images
Used to draw shapes, lines, and text.
Key Methods:
draw.text((x,y), "Hello", font=font, fill=color)→ Write text.draw.line(coords, fill, width)→ Draw line.draw.rectangle(coords, fill, outline)→ Rectangle.draw.ellipse(coords, fill, outline)→ Circle/ellipse.
# Task 6: Crop Spider-Man from the image and display only the cropped part.

Spiderman_imgg_cropped = img.crop((240,20,490,280))
plt.imshow(Spiderman_imgg_cropped )
#Task 7: Rotate the image by 45 degrees and show the result.

img_rotated = img.rotate(45)
plt.imshow(img_rotated)
Image preprocessing is more than just a technical step — it is the foundation of every successful computer vision project. By carefully transforming raw data into a cleaner, more structured form, we ensure that downstream tasks like recognition, detection, and segmentation can perform at their best.
In this case study, we explored 7 practical steps that demonstrate how preprocessing techniques directly impact the quality of image analysis. These steps not only prepare images for machine learning pipelines but also highlight the importance of thoughtful data preparation in real-world applications.
If you’d like to dive deeper and explore the complete step-by-step code, you can check out my GitHub repository:
📌 Takeaway: A well-preprocessed image is the key to unlocking accurate, reliable, and efficient computer vision models.
💡 Let’s connect and grow together! 👉 Follow me on LinkedIn for more projects, insights, and learning resources.
메타데이터
- post_id
- bcafad5bb14a
- slug
- from-raw-to-remarkable-optimizing-image-preprocessing-for-machine-learning-bcafad5bb14a
- url
- https://medium.com/@shrutikakkapade21/from-raw-to-remarkable-optimizing-image-preprocessing-for-machine-learning-bcafad5bb14a
- canonical_url
- https://medium.com/@shrutikakkapade21/from-raw-to-remarkable-optimizing-image-preprocessing-for-machine-learning-bcafad5bb14a
- author_url
- https://medium.com/@shrutikakkapade21
- status
- ok
- fetched_at
- 2026-06-09 15:37:30