How to do Unit Testing in Android (Kotlin) using JUnit
Gone are the days when ‘it works on my machine’ was enough to ship a feature. Modern development requires us to be our own first line of…
How to do Unit Testing in Android (Kotlin) using JUnit
Gone are the days when ‘it works on my machine’ was enough to ship a feature. Modern development requires us to be our own first line of defense. While we still lean on QA for the heavy lifting like regression and load testing, mastering basic unit tests is no longer optional — it’s part of the job description.
While new projects in Android Studio typically include JUnit 4 by default, you may need additional libraries depending on your requirements.
- Essential JUnit Dependencies(add in build gradle file)
- JUnit 4 (Standard): Most default projects include
testImplementation("junit:junit:4.13.2"). - JUnit 5 (Jupiter): To use modern features, you must manually add the JUnit Jupiter engine:
tasks.withType<Test> {
    useJUnitPlatform()
}testImplementation("org.junit.jupiter:junit-jupiter:5.10.3")📁 Project Structure
app/
 └── src/
     ├── main/   → your app code
     └── test/   → your test code
1. App Code
📄 File: **UserScoreManager**.kt
class UserScoreManager {
fun getUserLevel(score: Int): String {
        return when {
            score < 0 -> "Invalid score"
            score < 40 -> "Beginner"
            score < 70 -> "Intermediate"
            score < 90 -> "Advanced"
            else -> "Expert"
        }
    }
}
Logic
The function checks conditions from top to bottom:
- If score is negative → invalid
- If score < 40 → beginner
- If score < 70 → intermediate
- If score < 90 → advanced
- Otherwise → expert
Example:
score = 60 → Intermediate2. Test Code
Go to:
app/src/test/📄 File: UserScoreManagerTest.kt
class UserScoreManagerTest {📄 File: UserScoreManagerTest.kt
private lateinit var manager: UserScoreManagerWhy?
We will initialize it before each test.
📄 File: **UserScoreManagerTest**.kt
@Before
fun setup() {
    manager = UserScoreManager()
}
What this does:
Creates a fresh object before every test.
3. Test Cases
📄 File: **UserScoreManagerTest**.kt
@Test
fun getUserLevel_returnsInvalid_whenScoreNegative() {
val result = manager.getUserLevel(-5)
    assertEquals("Invalid score", result)
}
📄 File: **UserScoreManagerTest**.kt
@Test
fun getUserLevel_returnsBeginner_whenScoreLow() {
val result = manager.getUserLevel(20)
    assertEquals("Beginner", result)
}
📄 File: **UserScoreManagerTest**.kt
@Test
fun getUserLevel_returnsIntermediate_whenScoreMedium() {
val result = manager.getUserLevel(60)
    assertEquals("Intermediate", result)
}
📄 File: **UserScoreManagerTest**.kt
@Test
fun getUserLevel_returnsAdvanced_whenScoreHigh() {
val result = manager.getUserLevel(85)
    assertEquals("Advanced", result)
}
📄 File: **UserScoreManagerTest**.kt
@Test
fun getUserLevel_returnsExpert_whenScoreVeryHigh() {
val result = manager.getUserLevel(95)
    assertEquals("Expert", result)
}
4. How This Works
Each test follows the same flow:
Input → Function → Output → CheckExample:
60 → getUserLevel() → "Intermediate" → verified5. Why This Matters
If someone changes logic incorrectly:
score <= 70 -> "Intermediate"Your test will fail.
That’s the power of testing.
How to Run Tests and Read Results
You’ve written your test. Now the real question is:
“How do I actually run it… and know if it passed or failed?”
Let’s go step by step.
1. Where Your Test File Is
📄 File: UserScoreManagerTest.kt
Location:
app/src/test/java/your_package_name/UserScoreManagerTest.ktMake sure your test file is inside the test folder, not androidTest.
- How to Run the Test (Android Studio)
Option 1: Run Single Test File
- Open:
UserScoreManagerTest.kt - Right-click anywhere inside the file & Click:
Run 'UserScoreManagerTest'Option 2: Run Specific Test Function
Inside the file:
@Test
fun getUserLevel_returnsBeginner_whenScoreLow() { ... }- Click the small ▶️ icon next to the function name & Select:
Run 'getUserLevel_returnsBeginner_whenScoreLow'Option 3: Run All Tests in Project
- Go to top menu & Click:
Run → Run 'All Tests'3. What Happens After Running
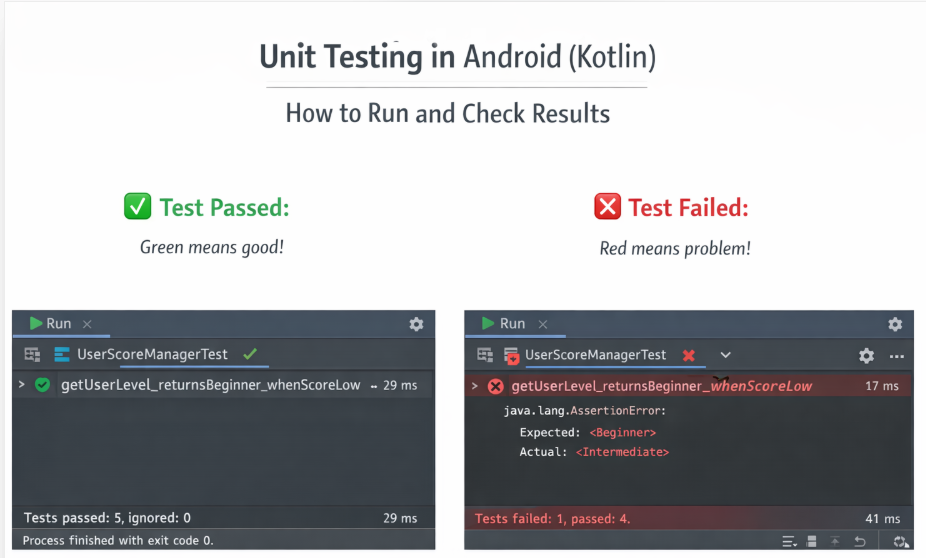
Android Studio opens a panel at the bottom:
Run / Test Results Window✅ If Test Passes
You’ll see:
✔ getUserLevel_returnsBeginner_whenScoreLow- Green color
- No errors
- Means your logic is correct for that case
❌ If Test Fails
You’ll see:
✘ getUserLevel_returnsBeginner_whenScoreLow
Expected: Beginner
Actual: Intermediate
What This Means
- Your logic is wrong
- Or your expected value is wrong
Now you investigate.
4. Example: Understanding a Failure
📄 File: **UserScoreManager**.kt
score < 70 -> "Intermediate"If someone changes it to:
score <= 70 -> "Intermediate"Now test:
val result = manager.getUserLevel(70)Output
Expected: Advanced
Actual: Intermediate
👉 Test catches the bug instantly
5. Reading the Test Results Panel
In the results window:
- Left side → list of tests
- Right side → error details
You can:
- Click any test → see output
- Expand stack trace → debug issue
6. Re-running Tests
After fixing code:
- Click Run again ▶️
- Or press:
Ctrl + Shift + F10 (Windows)7. Quick Checklist
Before running tests, confirm:
✔ File is inside /test folder
✔ @Test annotation is present
✔ Dependencies are added
✔ Code compiles
Final Mental Model
Running a test is simple:
Write Test → Run → Check Result → Fix if needed → Run AgainFinal Thought
Tests are not just for writing. They are for feedback.
Every time you run them, they tell you:
“Your logic is correct” or “Something is broken”
And that feedback is what makes you a better developer.
Final Thought
Testing becomes easy when:
- You know where code goes
- You understand the logic
- You verify each condition
No confusion. No guessing. Just clear behavior.
Optional Recommended Dependencies
For more comprehensive Kotlin testing, developers often add these popular libraries:
- Mocking Frameworks: Since unit tests should run in isolation, you use these to mock dependencies.
- MockK:
testImplementation("io.mockk:mockk:1.13.10")(Highly recommended for Kotlin). - Mockito:
testImplementation("org.mockito.kotlin:mockito-kotlin:5.2.1"). - Coroutine Support: If your code uses
suspendfunctions or Flows. testImplementation("org.jetbrains.kotlinx:kotlinx-coroutines-test:1.8.0").- Architecture Components: If you are testing
ViewModelorLiveData. testImplementation("androidx.arch.core:core-testing:2.2.0").- Assertions: For more readable test results.
- Google Truth:
testImplementation("com.google.truth:truth:1.4.2")
We will have separate tutorials on how to use these libraries to keep this tutorial simple. Try it out this simple one and move one step ahead.
Thank you.
메타데이터
- post_id
- bdbcfbcde2c7
- slug
- how-to-do-unit-testing-in-android-kotlin-using-junit-bdbcfbcde2c7
- url
- https://medium.com/@meghakumari2203/how-to-do-unit-testing-in-android-kotlin-using-junit-bdbcfbcde2c7
- canonical_url
- https://medium.com/@meghakumari2203/how-to-do-unit-testing-in-android-kotlin-using-junit-bdbcfbcde2c7
- author_url
- https://medium.com/@meghakumari2203
- status
- ok
- fetched_at
- 2026-06-24 13:29:15




