How to Set Up a Static IP for Your Team Using OpenVPN on AWS EC2
When working with backend systems, teams often need access to private resources such as databases, staging servers, internal APIs, admin…
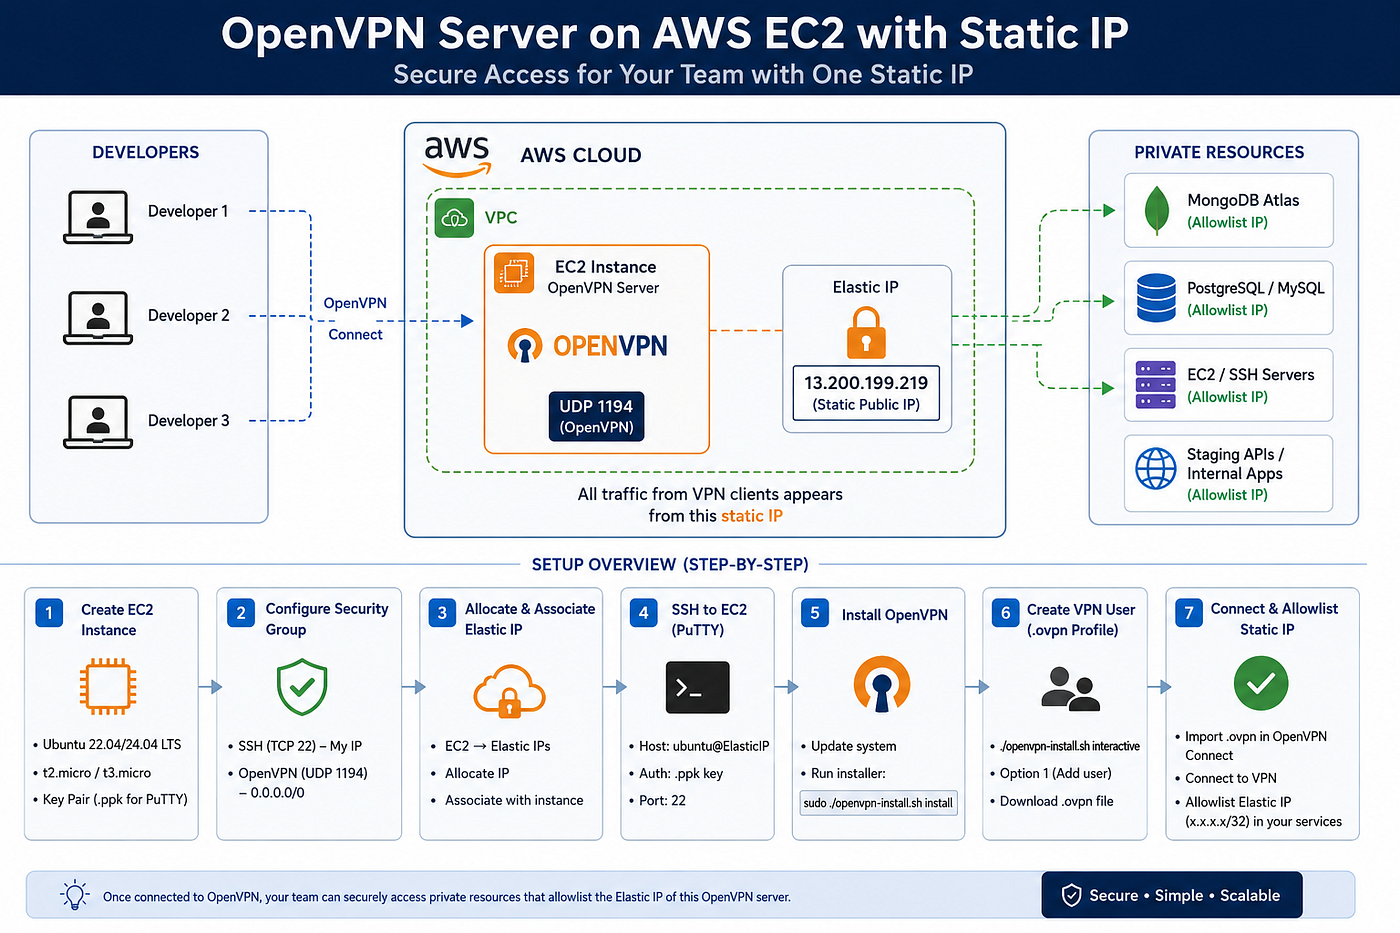
How to Set Up a Static IP for Your Team Using OpenVPN on AWS EC2
When working with backend systems, teams often need access to private resources such as databases, staging servers, internal APIs, admin panels, SSH servers, or cloud dashboards.
A common problem is that every developer has a different internet IP address. Some developers work from home, some from office networks, some from mobile hotspots, and most of these IP addresses are dynamic. That makes IP allowlisting difficult.
Instead of allowlisting every developer’s changing IP, a better approach is to set up a single VPN server with a static public IP.
In this article, we will set up:
Developer laptops
        ↓
OpenVPN server on AWS EC2
        ↓
Static Elastic IP
        ↓
Private databases / servers / staging APIs
Once this is configured, your team connects to OpenVPN, and your private systems only need to allowlist one static IP: the Elastic IP of the OpenVPN EC2 instance.
What Problem Are We Solving?
Let’s say your team wants to access MongoDB Atlas, PostgreSQL, Redis, SSH servers, or a staging backend.
Without VPN, each developer connects directly:
Developer laptop → Internet → Database / ServerThe database sees each developer’s real internet IP.
That creates problems:
Developer A has IP 39.x.x.x
Developer B has IP 103.x.x.x
Developer C has IP 182.x.x.x
If a developer’s ISP changes their IP, access breaks.
The better setup is:
Developer laptop → OpenVPN server → Database / ServerNow the database sees only the VPN server IP.
For example:
OpenVPN Elastic IP: 13.xxx.xxx.xxxSo instead of allowlisting many developer IPs, you allowlist:
13.xxx.xxx.xxx/32/32 means exactly one IP address.
What Is OpenVPN Actually Doing?
OpenVPN creates an encrypted tunnel between a developer’s laptop and a VPN server.
After the developer connects to OpenVPN, requests to private services can go through the VPN server.
In simple words:
OpenVPN gives your team one secure entry point into private infrastructure.The OpenVPN server becomes the common gateway.
Your database, staging API, SSH server, or internal dashboard can then trust traffic coming from the VPN server’s static IP.
Why Use AWS EC2?
For a team VPN setup, the VPN server should be:
Always online
Publicly reachable
Stable
Attached to a static IP
Not dependent on a developer’s laptop
A local Windows machine is not ideal because:
It may shut down
It may sleep
Its IP may change
Its network may disconnect
Router port forwarding can be painful
The whole team depends on one local machine
That is why an always-on cloud server is better.
In this guide, we use:
AWS EC2 Ubuntu instance
Elastic IP
OpenVPN server
Individual .ovpn profiles for developers
Final Architecture
The final architecture looks like this:
Developer 1 ┐
Developer 2 ├── OpenVPN Connect ── AWS EC2 OpenVPN Server ── Private Resources
Developer 3 ┘                         Static Elastic IP
Private resources can include:
MongoDB Atlas
PostgreSQL
Redis
EC2 SSH servers
Staging APIs
Admin dashboards
Internal tools
Step 1: Create an EC2 Instance
Log in to the AWS Console and go to:
EC2 → Instances → Launch instancesRecommended values:
Name: openvpn-server
AMI: Ubuntu Server 22.04 LTS or Ubuntu Server 24.04 LTS
Architecture: 64-bit x86
Instance type: t2.micro or t3.micro
Key pair: Create a new key pair
If you are using PuTTY on Windows, choose or convert your key to:
.ppkIf you are using PowerShell, Git Bash, WSL, macOS, or Linux, you can use:
.pemFor this guide, we used PuTTY on Windows, so the key was converted/used as:
openvpn-server.ppkStep 2: Configure Security Group Inbound Rules
After creating the instance, open its Security Group.
Go to:
EC2 → Instances → Select your instance → Security tab → Security groupsClick the security group, then go to:
Inbound rules → Edit inbound rulesAdd/update these rules:
SSH
Protocol: TCP
Port: 22
Source: My IP
Description: SSH access
Custom UDP
Protocol: UDP
Port: 1194
Source: Anywhere IPv4
Description: OpenVPNFinal inbound rules should look like:
Type          Protocol   Port     Source
SSH           TCP        22       Your-current-IP/32
Custom UDP    UDP        1194     0.0.0.0/0
Why SSH Should Be “My IP”
SSH should not be open to the entire internet.
Avoid this for SSH:
0.0.0.0/0Use:
My IPAWS will automatically fill your current IP as:
x.x.x.x/32If your home IP is dynamic and changes later, SSH may stop working. That is normal. You can return to the Security Group and update the SSH rule to your new current IP.
Why OpenVPN Uses 0.0.0.0/0
For OpenVPN, using:
0.0.0.0/0on UDP port 1194 is acceptable because your developers may connect from different locations and changing networks.
Security is still handled by VPN certificates and profiles.
Step 3: Allocate and Associate an Elastic IP
The EC2 instance needs a static public IP.
Go to:
EC2 → Network & Security → Elastic IPsClick:
Allocate Elastic IP addressAfter it is created, select the Elastic IP and click:
Actions → Associate Elastic IP addressChoose:
Resource type: Instance
Instance: openvpn-server
Private IP: select the available private IP
Then click:
AssociateAfter association, your EC2 instance should show:
Elastic IP address: x.x.x.x
Public IPv4 address: x.x.x.x
This Elastic IP is the static IP your team will use.
This is also the IP you will allowlist in external systems such as MongoDB Atlas or cloud firewalls.
Step 4: SSH Into the EC2 Instance Using PuTTY
Open PuTTY.
In the main session screen:
Host Name: ubuntu@YOUR_ELASTIC_IP
Port: 22
Connection type: SSH
Example:
ubuntu@13.xxx.xxx.xxxThen go to:
Connection → SSH → Auth → CredentialsUnder:
Private key file for authenticationBrowse and select your .ppk file.
Example:
openvpn-server.ppkGo back to:
SessionSave the session as:
openvpn-serverClick:
OpenIf this is your first connection, PuTTY may ask you to accept the server fingerprint. Accept it.
Once connected, you should see something like:
ubuntu@ip-172-31-xx-xxx:~$Step 5: Update Ubuntu Packages
Run:
sudo apt update && sudo apt upgrade -yThen install curl:
sudo apt install curl -yIf curl is already installed, you may see something like:
curl is already the newest versionThat is fine.
Step 6: Download the OpenVPN Installer Script
We used the angristan/openvpn-install script, which provides a convenient CLI for installing and managing OpenVPN.
Run:
curl -O https://raw.githubusercontent.com/angristan/openvpn-install/master/openvpn-install.sh
chmod +x openvpn-install.sh
In some older tutorials, you may see:
sudo ./openvpn-install.shHowever, the current script may show a command-based menu like this:
Usage: openvpn-install <command> [options]Commands:
install Install and configure OpenVPN server
uninstall Remove OpenVPN server
client Manage client certificates
server Server management
interactive Launch interactive menuSo use:
sudo ./openvpn-install.sh installOr:
sudo ./openvpn-install.sh interactiveStep 7: Install OpenVPN
Run:
sudo ./openvpn-install.sh installDuring installation, choose sensible defaults.
Recommended choices:
Protocol: UDP
Port: 1194
DNS: Cloudflare or Google
Compression: No
Client name: your-name
Password-protect client file: No
If the installer asks for the public IPv4 address or endpoint, use your Elastic IP.
Example:
13.xxx.xxx.xxxOnce installation finishes, OpenVPN should be installed on the EC2 instance.
Step 8: Open the Interactive OpenVPN Menu
Run:
sudo ./openvpn-install.sh interactiveYou should see something like:
=== OpenVPN Management ===[OK] OpenVPN is already installed.What do you want to do?
1) Add a new user
2) List client certificates
3) Revoke existing user
4) Renew certificate
5) Remove OpenVPN
6) List connected clients
7) Exit
Select an option [1-7]:This menu is used to manage VPN users.
Step 9: Add a New VPN User
Select:
1Then provide a client name.
Example:
Client name: sarfarazWhen it asks certificate validity:
Certificate validity days: 3650For password protection:
1) Add a passwordless client
2) Use a password for the client
For simple team setup, choose:
1After generation, you should see something like:
Client sarfaraz added and is valid for 3650 days.
The configuration file has been written to /home/ubuntu/sarfaraz.ovpn.
That means the client profile has been created successfully.
Step 10: Download the .ovpn File to Windows
The generated VPN profile is usually located at:
/home/ubuntu/sarfaraz.ovpnOn Windows, open PowerShell and use pscp.
Example:
pscp -i "C:\Users\YOUR_USER\Downloads\openvpn-server.ppk" ubuntu@YOUR_ELASTIC_IP:/home/ubuntu/sarfaraz.ovpn .Real example format:
pscp -i "C:\Users\sarfa\Downloads\openvpn-server.ppk" ubuntu@13.xxx.xxx.xxx:/home/ubuntu/sarfaraz.ovpn .If successful, you will see something like:
sarfaraz.ovpn | 3 kB | 100%This means the .ovpn file has been downloaded to your current Windows directory.
For example:
C:\Users\sarfa\sarfaraz.ovpnCommon PSCP Error
If you see:
Unable to use key file "...openvpn-key.ppk" (unable to open file)
FATAL ERROR: No supported authentication methods available
It usually means the key file path is wrong.
Check the actual file name in your Downloads folder.
For example, maybe the file is named:
openvpn-server.ppknot:
openvpn-key.ppkThen rerun pscp with the correct file path.
Step 11: Install OpenVPN Connect on Windows
Install OpenVPN Connect on your Windows machine.
Then open OpenVPN Connect and import the profile:
OpenVPN Connect → Import Profile → Upload FileSelect:
sarfaraz.ovpnClick:
ConnectOnce connected, your laptop is connected to the OpenVPN server.
Step 12: Verify Connected Clients
On the EC2 server, run:
sudo ./openvpn-install.sh interactiveThen choose:
6) List connected clientsIf the connection is active, your client should appear in the connected clients list.
Step 13: Allowlist the Elastic IP in Private Services
Now allowlist the EC2 Elastic IP wherever you need stable access.
Example:
YOUR_ELASTIC_IP/32For MongoDB Atlas:
MongoDB Atlas → Network Access → Add IP Address → YOUR_ELASTIC_IP/32For AWS Security Group of another EC2 instance:
Inbound rule source → YOUR_ELASTIC_IP/32For a private admin panel or API firewall:
Allow source IP → YOUR_ELASTIC_IP/32After this, developers should first connect to OpenVPN, then access the protected service.
Important: Your Local IP Does Not Need to Be Static
This is a common confusion.
There are two different IPs:
Your local internet IP
EC2 Elastic IP
Your local IP may change. That is okay.
The important static IP is:
EC2 Elastic IPThat is the IP your database/server/firewall will trust.
Your local IP only matters for SSH access to the EC2 server if you restricted SSH to My IP.
If your local IP changes and SSH stops working, update the EC2 Security Group SSH rule again:
Security Group → Inbound rules → Edit inbound rules → SSH → My IP → SaveOpenVPN itself can remain available to users from changing networks because UDP 1194 is open for VPN connections.
Step 14: Add More Team Members
To add another developer, SSH into the EC2 instance and run:
sudo ./openvpn-install.sh interactiveChoose:
1) Add a new userUse a unique client name:
developer1
developer2
qa-user
backend-user
Each developer should get their own .ovpn file.
Do not share one .ovpn file across the whole team.
Recommended rule:
One developer = one VPN profileThis is important because if someone leaves the team, you can revoke only that person’s certificate.
Step 15: Revoke a User
To revoke a VPN user:
sudo ./openvpn-install.sh interactiveChoose:
3) Revoke existing userSelect the user to revoke.
This removes their VPN access without affecting the rest of the team.
Security Recommendations
1. Do Not Share One VPN Profile
Avoid:
team.ovpn shared by everyoneUse:
sarfaraz.ovpn
developer1.ovpn
developer2.ovpn
This allows proper revocation and better user tracking.
2. Keep SSH Restricted
SSH should usually be restricted to:
Your IP/32not:
0.0.0.0/03. Keep OpenVPN Port Open
OpenVPN usually needs:
UDP 1194 from 0.0.0.0/0This allows developers to connect from different networks.
4. Still Use Service-Level Authentication
VPN is not a replacement for proper credentials.
Even after connecting to VPN, developers should still use:
Database username/password
SSH keys
Admin panel login
MFA where possible
Role-based access
VPN is one layer of security, not the only layer.
5. Allowlist Only the VPN Elastic IP
Avoid allowing databases from everywhere:
0.0.0.0/0Use:
YOUR_ELASTIC_IP/32Troubleshooting
Problem: Cannot SSH into EC2
Check:
Security Group allows SSH TCP 22 from your current IP
Correct username is ubuntu
Correct .ppk or .pem key is used
Elastic IP is associated with the instance
Instance is running
For Ubuntu EC2, the username is usually:
ubuntunot:
rootand not:
ec2-userProblem: OpenVPN Client Cannot Connect
Check:
Security Group allows UDP 1194 from 0.0.0.0/0
OpenVPN service is running
The .ovpn file has the correct Elastic IP
You imported the correct .ovpn file
Your local network is not blocking UDP VPN traffic
Problem: PSCP Cannot Download .ovpn
If this happens:
Unable to use key fileCheck:
The .ppk path is correct
The file name is correct
The file exists in the given directory
You are using the same key that works in PuTTY
Problem: SSH Worked Yesterday but Not Today
Your local IP may have changed.
Update the SSH inbound rule:
Security Group → Inbound rules → Edit inbound rules → SSH → My IP → SaveThis does not affect the VPN static IP setup.
Summary
We created an OpenVPN server on AWS EC2 and attached an Elastic IP to it.
The final setup is:
Developers connect to OpenVPN
OpenVPN runs on AWS EC2
EC2 has a static Elastic IP
Private systems allowlist only that Elastic IP
Each developer gets their own .ovpn profile
This gives the team:
A single static IP for allowlisting
Secure access to private resources
Better control over developer access
Easy revocation per developer
Less dependency on changing home/office IPs
This setup is especially useful for backend teams working with private databases, staging servers, internal APIs, SSH access, and admin dashboards.
Quick Command Reference
Update server
sudo apt update && sudo apt upgrade -yInstall curl
sudo apt install curl -yDownload installer
curl -O https://raw.githubusercontent.com/angristan/openvpn-install/master/openvpn-install.sh
chmod +x openvpn-install.sh
Install OpenVPN
sudo ./openvpn-install.sh installOpen management menu
sudo ./openvpn-install.sh interactiveFind .ovpn files
sudo find / -name "*.ovpn" 2>/dev/nullDownload .ovpn from Windows using PSCP
pscp -i "C:\Users\YOUR_USER\Downloads\openvpn-server.ppk" ubuntu@YOUR_ELASTIC_IP:/home/ubuntu/CLIENT_NAME.ovpn .Example Security Group Inbound Rules
SSH          TCP   22     Your-current-IP/32
Custom UDP   UDP   1194   0.0.0.0/0
Example Allowlist Entry for Private Services
YOUR_ELASTIC_IP/32메타데이터
- post_id
- bfdc2170ef8e
- slug
- how-to-set-up-a-static-ip-for-your-team-using-openvpn-on-aws-ec2-bfdc2170ef8e
- url
- https://medium.com/@sarfarazahmed1012/how-to-set-up-a-static-ip-for-your-team-using-openvpn-on-aws-ec2-bfdc2170ef8e
- canonical_url
- https://medium.com/@sarfarazahmed1012/how-to-set-up-a-static-ip-for-your-team-using-openvpn-on-aws-ec2-bfdc2170ef8e
- author_url
- https://medium.com/@sarfarazahmed1012
- status
- ok
- fetched_at
- 2026-07-18 10:19:35


