Claude Code Skills 101: Everything You Need to Get Started With
If you have been using Claude Code, you have probably noticed that every new session starts the same way: you re-explain your preferences…
Claude Code Skills 101: Everything You Need to Get Started With
If you have been using Claude Code, you have probably noticed that every new session starts the same way: you re-explain your preferences, re-describe your codebase conventions, and re-establish the context that Claude had no way to remember. This is not a bug — it is a fundamental constraint of how large language models work. But Claude Code Skills are designed to solve it.
Launched by Anthropic in October 2025, Skills let you package your domain knowledge, workflows, and instructions into reusable, modular units that Claude loads automatically whenever they are relevant. Instead of typing the same context over and over, you define it once. Claude does the rest.
This guide covers everything you need to get started. We will look at what Skills actually are under the hood and why their three-level architecture makes them so much more powerful than simple system prompts.
We will explore how Claude decides when to activate a skill, how to install pre-built skills from the Official Library and community, how to use the built-in skill-creator to generate new skills through conversation, and how to build your own from scratch. We will walk through real-world case studies, advanced composition patterns, and the security model that keeps everything safe. By the end, you will have a complete toolkit for turning Claude Code from a general assistant into one that already knows exactly how you work.

Table of Contents:
- What are skills, & Why you should use them?
- Agent Skills Structure
- How does Claude know when to use a skill?
- How do skills work?
- Building your First Skill
- Install and Use Pre-Built Skills
- Use Claude Skill-Creator Skill
- Build a custom skill with Claude Code skill-creator
- Build your own custom skill
- Step 5: Test iteratively
- Real-World Use Cases
- Advanced Patterns and best practices
- Security and Trust Considerations
If you want to move from reading about Claude Code Skills to actually building one, I created a 1-hour hands-on course: **Claude Code Skills 101: Build Your First Skill in 1 Hour.**
In the course, we go step by step through how Skills work, how to design your first Skill, and how to build, test, and improve it inside Claude Code.

1. What are skills, & Why you should use them?
Skills were launched by Anthropic in October 2025. Unlike simple instructions, Skills are dynamic, organized packages that allow AI agents to load context on demand — exactly when it’s needed, not all at once. What started as an exclusive Claude feature has since evolved into an open standard, with major platforms like OpenAI and Microsoft adopting the specification, making skill management accessible to developers everywhere.
The difference between using Skills and not is the difference between exponential and linear growth. Without Skills, agents work from flat, static prompts — every task starts from scratch, and value accumulates slowly. With Skills, agents inherit curated expertise, context, and workflows on demand, compounding value over time.

This isn’t just a technical upgrade — it’s a professional one. As the chart above shows, teams that adopt Skills grow their output exponentially over time, while those that don’t are left behind.
This speed of work will become normal. If you can’t do it, you become too expensive to the business.
The real power is organizational. Skills let you crystallize institutional knowledge: one person figures out the best way to do something, turns it into a skill, and now the entire team operates at that level. What used to take onboarding, documentation, and tribal knowledge can now be packaged, shared, and loaded by any agent — instantly.
One person figures out the best way to do something, turns it into a skill, and now the entire team operates at that level
And Skills go far beyond simply generating text. As the diagram below shows, a Claude Skill can run scripts, call external APIs, spin up sub-agents, chain workflows, hit external tools, and create files. This is full, end-to-end automation — not just a smarter chatbot, but an agent that takes real action on your behalf.
So, when should you build a Skill? Use the simple decision tree below as your guide: if a task is repeated and you want consistent output, it’s worth turning into a Skill. Common examples include writing social posts, generating reports, and setting up automations.


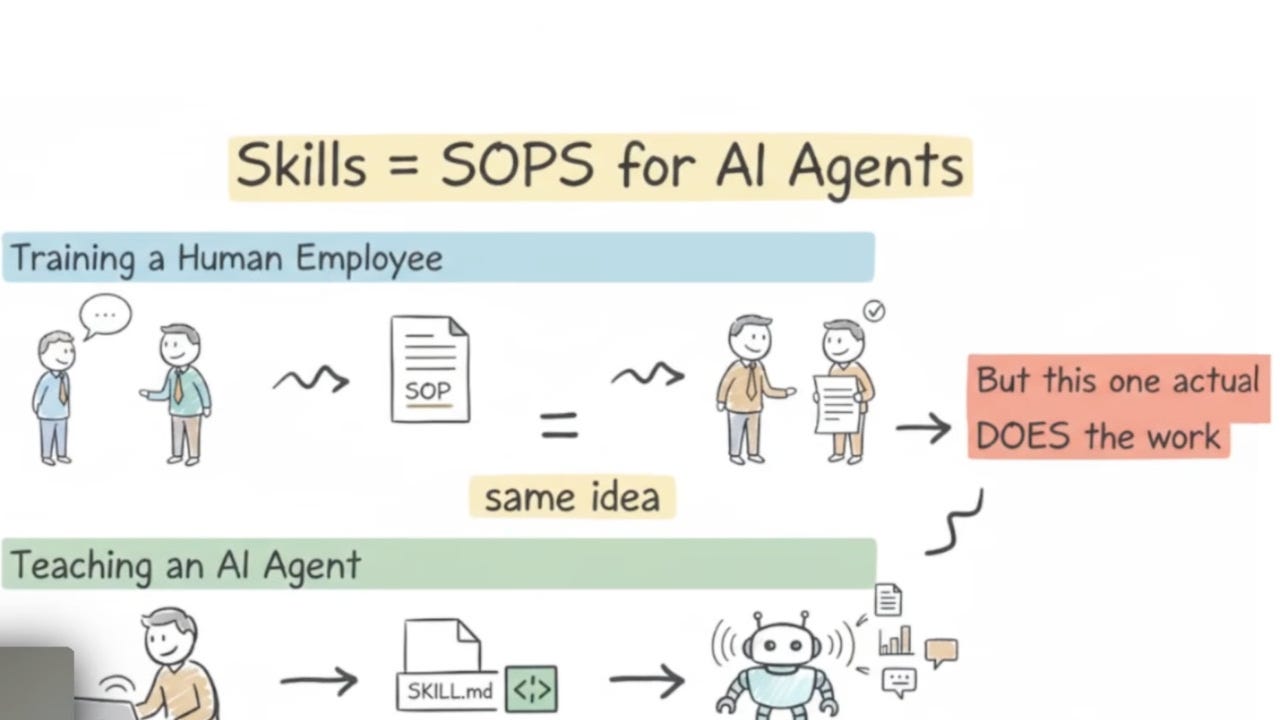
Think of Skills as SOPs, Standard Operating Procedures, for your AI agents. Just like a manager documents the best way to handle a recurring task for their team, you write a Skill once, and your agent follows it every time. The comparison above makes this concrete: training a human employee with an SOP and teaching an AI agent with a SKILL.md file is the same idea — except the agent actually does the work.
2. Agent Skills Structure
Now that you know why Skills matter, let’s look at what they’re actually made of. A Skill lives in your project as a folder with a predictable structure. The diagram below shows how everything inside a domain is organized together — skills files, context files, and workflow files — all nested no more than two levels deep.

A skill is deceptively simple in structure. It is a folder that lives in your project. Here is the structure of it:
your-skill-name/
├── SKILL.md              # Required - main skill file
├── scripts/              # Optional - executable code
│   ├── process_data.py
│   └── validate.sh
├── references/           # Optional - documentation
│   ├── api-guide.md
│   └── examples/
└── assets/               # Optional - templates, fonts, icons
    └── report-template.md
The heart of every skill is the skill.md file, which contains YAML frontmatter for metadata and Markdown content for instructions:
---
name: project-workspace-setup
description: Automates complete project workspace creation including pages, databases, and templates. Use when user asks to "set up a new project", "create a workspace", or "initialize a project structure".
---

# Project Workspace Setup
## Instructions
[Step-by-step guidance for Claude to follow]
## Examples
[Concrete usage scenarios]
## Troubleshooting
[Common issues and solutions]
One common question is where to put supporting files like scripts and reference docs. As the diagram below shows, there are two valid approaches: Option A (Self-Contained) keeps all files inside the skill folder — best when those files are only used by that one skill. Option B (Stored Elsewhere) keeps the SKILL.md inside the skill folder, but references files stored in your broader project, best when files are shared across multiple skills. Either way, the SKILL.md file simply points to the right path.


So a simple skill might just be a markdown file with five lines of instructions. But a powerful skill can have scripts that call APIs, templates that render images, and reference docs that keep Claude’s output consistent. The SKILL.md is the brain. The supporting files are the tools it uses.
3. How does Claude know when to use a skill?
Once a Skill is installed, Claude needs to know when to activate it. There are two ways this can happen, as the diagram below shows. The first is explicit triggering — you invoke the skill directly using a slash command like /skool-post, and it fires immediately. The second is natural language matching — you describe what you want in plain English, Claude compares your request against all available skill descriptions, and if there’s a match, the skill activates automatically. No need to remember command names.

But triggering a skill is only the first step. Once activated, Claude still needs to decide the best way to respond. The decision flowchart below shows how this works: Claude takes your request, checks whether an appropriate skill is available, and then takes one of two paths. Path A loads the expert skill from the Skills Library, tapping into specialized workflows and domain knowledge to give you a precise, expert-level answer. Path B falls back to Claude’s broad general knowledge when no matching skill exists, delivering a helpful but less specialized response.

This is what makes Skills so efficient. Claude doesn’t load every skill on every request — it performs a quick check first. If a relevant skill is available, Claude loads it and delivers a precise, expert-level answer backed by your custom instructions and tools. If not, it falls back to general knowledge. This on-demand loading is what keeps Skills lightweight without sacrificing power.
4. How do skills work?
Every Claude Skill follows the same internal architecture: a three-level system that controls exactly how much information Claude loads for any given request. The key insight is that Claude does not load your entire skill every time someone sends a message. Instead, it uses a progressive disclosure model, pulling in only what it needs at each stage. This keeps Skills fast and token-efficient while still giving Claude access to rich, detailed guidance when the situation calls for it.
- Level 1 — yaml frontmatter (always loaded): the skill name and description are injected into Claude’s system prompt. This provides just enough information for Claude to decide when to load the full skill without consuming unnecessary tokens.
- Level 2 — SKILL.md body (loaded when relevant): when Claude determines a skill is relevant, it loads the complete instructions from the markdown body. This contains detailed step-by-step guidance, examples, and best practices.
- Level 3 — linked resources (loaded as needed): additional files in the scripts/, references/, and assets/ directories are accessed only when specifically needed, further minimizing token usage.
To make this concrete, imagine you have a skill called “weekly-report”. When you ask Claude anything, it always scans Level 1 — it reads the skill name and description in milliseconds to decide if this request is relevant. If you ask, “Help me write the weekly report”, Claude recognizes the match and moves to Level 2, loading the full SKILL.md with all your instructions: the exact format, the tone, which data sources to reference, and how many sections to include.
If your instructions say to also pull in a reference style guide stored in the references/ folder, Claude fetches that Level 3 resource too — but only at that point, not before. This on-demand loading means a skill can be extraordinarily detailed without slowing down every single request you make.
This progressive disclosure approach means skills can be incredibly detailed without overwhelming the context window. Claude only loads what it needs when it needs it.
5. Building your First Skill
Install and Use Pre-Built Skills
Before we dive into building your own skill from scratch, it is worth knowing you might not need to. There is already a rich ecosystem of pre-built skills ready to install, as shown in the diagram below.
The Official Library gives you **50+ Anthropic-curated skills with 125k GitHub stars. The Community adds 380+ open-source skills you can browse and use freely. And Marketplaces like SkillsMP.com let you buy, sell, and share skills. Installing any of them is as simple as dropping a folder into .claude/skills/ — no install scripts, no build steps, just markdown. Also, you can check community-based repos such as the [awesome-skills-repo](https://github.com/BehiSecc/awesome-claude-skills).**

You can register this repository as a Claude Code Plugin marketplace by running the following command in Claude Code:
/plugin marketplace add anthropics/skillsThen, to install a specific set of skills:

- Select Browse and install plugins
- Select anthropic-agent-skills
- Select document-skills or example-skills
- Select Install now
You can also use the skills provided by the community. First, you need to download it and then upload the skills in the Claude web interface or use it in Claude Code. Let’s take a practical example with the **Hummanizer skill that removes signs of AI-generated text and makes it sound more natural and human. First, you will need to download the repo or the skill.md** file from the code button.

Once it is installed as a zip file, or you download the skill.md file, you can upload it by first going to the Customize tab.

Then you go to the “Create New Skills “ tab

Then you upload the skill from the create skill button.

Once it is uploaded, you will see it in your available personal skills.

Once it is installed, using it in Claude is seamless. Open a new chat and describe what you want in natural language. Claude automatically scans your installed skills and activates the matching one if it finds a fit.
You can also trigger any skill explicitly by typing its slash command directly in the chat input. You can also use /skill-name. So, for example, in this case, you can type /humanizer, and it will appear in blue, which means it is activated.

Using installed skills in Claude Code: Skills work slightly differently in Claude Code because you are operating in a terminal environment. Once skills are installed via the plugin marketplace command, Claude Code automatically reads the SKILL.md files from the .claude/skills/ directory in your project or home folder. You do not need to do anything special to activate them.
When you type a request in the terminal, Claude Code checks all available skill descriptions and loads the matching skill if one applies. To invoke a skill explicitly, use the slash command format directly in the terminal prompt, for example,/example-skills:weekly-report, followed by any relevant context.
You can also run /skills list to see all currently installed skills and their trigger phrases, which is useful when you are not sure what is available in your current environment.
Use Claude Skill-Creator Skill
The easiest way to create a new skill is to let Claude do it for you. Claude ships with a built-in skill-creator skill that guides you through the entire process interactively. Instead of writing SKILL.md files from scratch, you describe what you want in plain language, and the skill-creator handles the structure, the YAML metadata, the description, and the trigger phrases automatically. Here is how to access it step by step.

Step 1: Open Claude and look at the left sidebar as shown above. You will see a navigation menu with options including Chats, Projects, Code, Customize, and Design. Click on Customize to enter the skills and customization area.

Step 2: Clicking Customize opens the Customize Claude screen shown above. This screen presents two options: connecting your apps (so Claude can read and write to external tools) or creating new skills to teach Claude your processes and expertise. Click on Create new skills to proceed to the Skills panel.

Step 3: Inside the Skills panel, click the + button next to the search icon to open the Create skill dropdown. As the screenshot above shows, you have three options: Create with Claude (recommended), write skill instructions manually, or upload a skill from a file. Select Create with Claude, and you will also see the existing skill-creator skill already listed in your personal skills, which is exactly the skill that will guide this process.

Step 4: Once you select Create with Claude, the skill-creator chat interface opens as shown above. It introduces itself and immediately asks you to describe the skill you want to build. You simply reply in plain English with what the skill should do. The conversation handles everything else from there.
Build a custom skill with Claude Code skill-creator
Alternatively, you can use the skill-creator skill directly in Claude Code from your terminal. As shown in the screenshot below, once you run the claude command and the /example-skills:skill-creator skill activates, it opens with a clear prompt asking three diagnostic questions: what the skill should do, what kinds of phrases should trigger it, and what the expected output looks like.
Answer these questions, and the skill-creator will generate the full SKILL.md file for you, complete with the correct YAML header, description text, and instruction body. You can then refine the output iteratively in the same conversation until it behaves exactly the way you want.

Build your own custom skill
If you do want to build a custom skill tailored to your own workflow, here is the framework to follow. The diagram below outlines the 6-Step Skill Building Framework: start by defining your skill’s name and trigger phrase, then set a clear one-sentence goal, design the step-by-step process with human-in-the-loop decisions, add reference files for context, define rules and guardrails, and finally specify what a successful output looks like. Each step builds on the last, giving Claude exactly what he needs to act consistently and correctly every time the skill fires.

Step 1: Identify your use case
Before writing any code, identify 2–3 concrete scenarios your skill should handle. The most common categories are:
- Category 1: document & asset creation: used for creating consistent, high-quality outputs like documents, presentations, or designs. Example: the frontend-design skill that produces professional web interfaces instead of generic AI slop.
- Category 2: workflow automation: multi-step processes that benefit from consistent methodology. Example: the skill-creator skill that guides users through building new skills.
- category 3: mcp enhancement: Providing workflow guidance on top of model context protocol (mcp) server integrations. Example: Sentry’s code review skill that automatically analyzes and fixes bugs in GitHub pull requests using error monitoring data.
Step 2: Define success criteria
How will you know your skill works? set measurable targets:
- Triggering accuracy: skill should load on 90% of relevant queries
- Tool efficiency: complete workflows in X tool calls (compared to baseline)
- Error rate: zero failed api calls per workflow
- Consistency: same task yields similar outputs across sessions
Step 3: Write effective descriptions
The description field is crucial; it’s what Claude uses to decide when to load your skill. Use this structure:
[What it does] + [When to use it] + [Key capabilities]

Good Example:
description: Analyzes Figma design files and generates developer handoff documentation. Use when user uploads .fig files, asks for "design specs", "component documentation", or "design-to-code handoff".
Bad Example:
description: Helps with projects.
Include trigger phrases users would actually say, mention relevant file types, and clearly state what problem the skill solves.
Step 4: Structure your instructions
---
name: your-skill
description: [Clear, specific description]
---
# Your Skill Name
## Instructions
Step 1: [First major step with clear explanation]
Step 2: [Second major step]
...

## Examples
Example 1: [Common scenario]
User says: "Set up a new marketing campaign"
Actions:
1. Fetch existing campaigns via MCP
2. Create new campaign with provided parameters
Result: Campaign created with confirmation link
## Troubleshooting
Error: [Common error message]
Cause: [Why it happens]
Solution: [How to fix]
Step 5: Test iteratively
A great skill is not written once and forgotten — it is refined through testing. The Feedback Cycle below shows how this works in practice: invoke the skill, watch how the agent handles it (identifying patterns and errors in real time), give Claude specific feedback on what to improve, then loop back and invoke the skill again with the updated instructions. Repeating this cycle, even just a few times, dramatically improves skill reliability and output quality.

The most effective approach is to iterate on a single challenging task until Claude succeeds, then extract that approach into your skill. test for:
- Triggering: Does it load when it should? Does it avoid false positives?
- Functionality: Does it produce correct outputs consistently?
- Performance: Is it better than the baseline (no skill)?
6. Real-World Use Cases
Case study 1: frontend design transformation
One of the most compelling examples of Skills in action comes from Anthropic’s own documentation, shown in the screenshot below. The blog post “Improving frontend design through Skills” demonstrates how a dedicated frontend-design skill transforms Claude’s output from generic, AI-looking code into polished, professional UI components that match a brand’s design language.

When tasked with creating a landing page, Claude’s code, without the frontend-design skill, produces a generic-looking result, functional but unmistakably AI-generated.
However, with the skill loaded, the same task yields a professional, modern website with sophisticated design patterns, proper spacing, and contemporary UI elements.
This illustrates a key principle: skills encode expert knowledge that goes beyond Claude’s training data. The frontend-design skill contains distilled wisdom from professional designers’ color theory, layout principles, and accessibility guidelines, packaged as procedural knowledge.
Case study 2: enterprise document creation
Anthropic’s pre-built skills for PowerPoint, Excel, Word, and PDF demonstrate enterprise-grade capabilities. These skills enable:
- Brand consistency: automatically apply corporate style guides
- Template adherence: follow organizational document structures
- Formula intelligence: generate complex Excel formulas correctly
- PDF form filling: programmatically complete fillable PDF forms
Organizations using these skills report tasks that previously took 30+ minutes now complete in under 3 minutes.
Case study 3: multi-MCP orchestration
MCP (Model Context Protocol) servers give Claude the ability to read from and write to external tools like Figma, Google Drive, Linear, and Slack. Each MCP server handles one integration.
The real power of Claude Skills is that a single skill can orchestrate all of them in sequence, passing outputs from one phase as inputs to the next, without any manual handoff. The design-to-development handoff is one of the most friction-heavy moments in a product team’s workflow, and it is a perfect example of what multi-MCP orchestration can eliminate.
Phase 1: Design Export (Figma MCP)
- Export design assets from Figma
- Generate design specifications
- Create asset manifest

Phase 2: Asset Storage (Google Drive MCP)
- Create project folder
- Upload all assets
- Generate shareable links

Phase 3: Task Creation (Linear MCP)
- Create development tasks
- Attach asset links to tasks
- Assign to engineering team

Phase 4: Notification (Slack MCP)
- Post handoff summary
- Include asset links and task references
A skill orchestrating this workflow eliminates the need for manual coordination, ensuring steps happen in the correct order
Here is what actually happens when a designer types “hand off the new checkout flow to engineering” in Claude Code. The skill activates from that natural language trigger and immediately calls the Figma MCP to pull the latest frame exports from the specified file ID.
It reads the component names, dimensions, and design tokens, then generates a structured specification document summarizing spacing, typography, colors, and interactive states. None of this requires the designer to manually export anything from Figma — the MCP gives Claude direct read access to the Figma API.
With the assets and spec document ready, the skill switches to the Google Drive MCP. It creates a new folder in the designated project directory named after the feature and the current date, uploads the exported assets and the generated spec document, and returns shareable links for each file. The skill holds those links in memory and passes them directly into the next phase — no copy-pasting, no switching tabs, no risk of broken links.
The Linear MCP then creates a set of development tasks scoped to the feature. The skill reads the component list from Phase 1 and generates one task per major component, automatically attaching the relevant Drive links and populating the task description with the corresponding section of the design spec.
It assigns the tasks to the engineering team based on project configuration stored in the skill’s references folder, and sets priority levels based on the handoff type. A full design handoff that previously generated a dozen Slack messages, a Notion doc, and three Linear tickets created by hand is now handled in a single step.
Finally, the Slack MCP posts a formatted handoff summary to the engineering channel. The message includes the feature name, a link to the Drive folder, a direct link to the Linear project view, a bulleted list of the components in scope, and a one-line summary of any important design notes Claude extracted from the Figma file. Everyone who needs to know is notified automatically, with all the context they need in one place.
What makes this pattern especially powerful is the error handling. If the Google Drive upload fails midway, the skill does not silently drop the rest of the steps. Because the instructions in SKILL.md are explicit about the sequence and dependencies, Claude recognizes the failure and reports exactly which phase failed, what was completed before it, and what still needs to happen.
You can fix the issue and resume from Phase 2 rather than starting over. This kind of structured, recoverable automation is what separates a skill-driven workflow from a fragile script. The skill understands the intent, not just the steps.
Teams that have implemented this kind of multi-MCP handoff skill report that the end-to-end design handoff process drops from 45 to 90 minutes of manual work to under two minutes of actual human time.
More importantly, it becomes consistent: every handoff follows the same structure, nothing gets skipped under time pressure, and the engineering team always has everything they need from the moment they see the Slack notification, and handles error recovery automatically.
7. Advanced Patterns and best practices
Once you understand the basics of building and deploying skills, the next step is learning how to make them truly powerful. The three patterns in this section represent the difference between skills that merely work and skills that work intelligently. Context-aware tool selection lets Claude make smart decisions rather than blindly executing steps. Domain-specific intelligence embeds expertise directly into the skill, so Claude doesn’t need to reinfer it every session. And iterative refinement builds quality assurance into the workflow itself, catching errors before they propagate downstream.
Pattern 1: context-aware tool selection
Rather than hard-coding a single destination or prompting the user to choose, a context-aware skill uses conditional logic to evaluate the nature of the content and route it to the most appropriate tool.
The decision tree below illustrates this with a file storage example — but the same logic applies to any routing decision: which API to call, which template to use, which team member to notify, or which format to produce the output in.
Decision Tree:

1. Check file type and size
2. Determine best storage:
   - Large files (>10MB): Cloud storage MCP
   - Collaborative docs: Notion/Docs MCP
   - Code files: GitHub MCP
   - Temporary files: Local storage
3. Execute with appropriate tool
4. Explain choice to user
This pattern provides transparency while optimizing for the specific use case.
The decision tree above encodes what a thoughtful person would instinctively consider: file size determines whether cloud bandwidth is worth it, content type determines which collaboration platform fits best, and file extension signals whether something belongs in version control.
Without this skill, Claude would either ask you to specify the destination every time or fall back to a default that works for most cases but is wrong for some. With it, Claude reasons through the same criteria you would and routes each file appropriately — then tells you exactly why, so you can correct it when the heuristics miss the mark.
Pattern 2: Domain-specific intelligence
The key advantage of domain-specific intelligence is that it removes the need for Claude to reason from first principles in every session. Instead of relying on Claude’s general training knowledge about financial regulations — which may be incomplete, outdated, or not specific to your jurisdiction — you encode the exact rules that apply to your situation directly in the SKILL.md. The skill below shows how this plays out in a financial compliance context:
Before Processing (Compliance Check):
1. Fetch transaction details via MCP
2. Apply compliance rules:
   - Check sanctions lists
   - Verify jurisdiction allowances
   - Assess risk level
3. Document compliance decision

Processing:
IF compliance passed:
  - Process transaction
  - Apply fraud checks
ELSE:
  - Flag for review
  - Create compliance case
This embeds regulatory expertise that Claude doesn’t inherently possess.
Think about what this eliminates: you no longer need to explain financial compliance rules to Claude in every conversation, and Claude no longer needs to guess which regulations apply to your jurisdiction.
The SKILL.md encodes all of it once — the specific sanctions lists to check, the jurisdiction-based allowances relevant to your business, the risk thresholds that trigger different actions. When the skill fires, Claude has the same mental model as a compliance officer who has spent years internalizing these rules.
This is particularly powerful in regulated industries where mistakes aren’t just inconvenient but legally consequential. The same principle applies to any domain with specialized logic: healthcare coding rules, legal citation formats, internal naming conventions, security vulnerability classifications, or any other expert knowledge your team relies on daily.
Pattern 3: iterative refinement
When the output quality of a task matters — whether that’s a client-facing document, production code, or a data report that drives decisions — a single-pass generation approach carries real risk.
A first draft might miss sections, produce inconsistencies, or fail to meet standards that aren’t obvious until you review it. The iterative refinement pattern addresses this by building a quality loop directly into the skill. Rather than presenting the first result, the skill generates, validates, and refines until the output meets a defined threshold. The workflow below shows the three-phase structure:
Initial Draft:
- Generate first version
- Save to temporary file

Quality Check:
- Run validation script
- Identify issues

Refinement Loop:
- Address each issue
- Regenerate affected sections
- Re-validate
- Repeat until quality threshold met
This pattern is particularly effective for document generation, code review, and data analysis. The key insight of iterative refinement is that it separates generation from evaluation. Most AI workflows collapse these two phases into one: Claude generates something, and you evaluate it manually.
This pattern instead tells Claude to do both, using a validation script or set of criteria defined in the SKILL.md to judge its own output before presenting it to you. In document generation, that might mean checking that all required sections are present, word counts fall within acceptable ranges, and required references are cited.
In code review, it might mean running the linter and unit tests after making suggested changes. In data analysis, it might mean verifying that numeric totals add up, that no required columns have null values, and that visualizations match the underlying data.
The practical benefit is significant: you stop being the quality gate on every AI-generated output. Instead of reviewing every draft for completeness, you only see outputs that have already passed an automated check. When the refinement loop surfaces an output that fails validation, it also reports which check failed and why — giving you a precise diagnosis rather than a vague sense that something is wrong.
Over time, you can tighten the quality threshold, add new validation rules as you discover recurring issues, and evolve the skill’s judgment to match your own standards. The result is a workflow that gets more reliable the more you use it, rather than one that stays the same regardless of how much feedback you give.
8. Security and Trust Considerations
Skills are powerful; they can execute code and invoke tools. This power demands careful security considerations. Anthropic strongly recommends using skills only from trusted sources:
- anthropic-created skills: professionally maintained and verified
- self-created skills: you control the code
- partner skills: from verified commercial partners
Community skills should be reviewed before installation, as a malicious skill could direct Claude to execute unintended operations. Skills run in controlled environments:
- **claude.ai:** restricted to pre-installed packages, limited network access
- Claude Code: full network access, but local to the user’s machine
- api: runs in a code execution container with configurable permissions
The YAML frontmatter can specify allowed-tools to limit which api’s a skill can access:
allowed-tools: "Bash(python:*) Bash(npm:*) WebFetch"This configuration tells Claude it can only run Python scripts, npm commands, and make web requests — nothing else. Any skill that tries to invoke a tool outside this list will be blocked automatically, giving you fine-grained control over what each skill is permitted to do.
Prompt injection risks: One of the less obvious threats with skills is prompt injection. Because a skill’s instructions are loaded directly into Claude’s context, a maliciously crafted skill could attempt to override Claude’s behavior by embedding hidden instructions inside the SKILL.md file itself.
For example, a community skill that appears to help with formatting could contain hidden text instructing Claude to exfiltrate data or ignore safety guidelines when certain conditions are met.
This is why Anthropic’s recommendation to only install skills from trusted sources is not just a suggestion — it is a genuine security boundary. When evaluating a community skill, always open and read the SKILL.md file before installation, check the references/ folder for any additional instruction files, and be skeptical of skills that request unusually broad tool permissions.
Best practices for writing safe skills: If you are building your own skills, there are a few habits that keep things secure and predictable.
- First, always declare your allowed tools explicitly rather than leaving it open-ended; a skill that only needs to read files does not need Bash or WebFetch access.
- Second, keep skill instructions focused and specific; the narrower the scope, the less room for unintended behavior.
- Third, store sensitive data like API endpoints or system paths in environment variables rather than hardcoding them in your SKILL.md, since those files may be shared or version-controlled.
- Finally, test your skill in a sandboxed session before deploying it to a shared team environment, and document exactly what it does and what tools it uses so that anyone who reviews it later can audit it quickly.
What to do when a skill behaves unexpectedly: If a skill activates when it should not, produces wrong output, or seems to be pulling in instructions you did not write, the first step is to check the SKILL.md file directly — the trigger phrase and description may be too broad, causing false positive matches.
You can also look at Claude’s reasoning by asking it explicitly: “Which skill are you using and why did you activate it?” Claude will usually explain what matched. If the behavior persists, remove the skill from your installation, fix the description or trigger phrases, and reinstall. For Claude Code, you can use /skills list to see what is currently active and /skills remove to uninstall a specific skill without affecting others.
The bottom line on security: Skills are opt-in by design. Claude does not load any skill unless you have explicitly installed it, and it does not execute tools unless the skill explicitly declares them.
This architecture gives you full transparency and control. As long as you treat skill installation with the same care you would give to installing any software — verifying the source, reading what it does, and limiting its permissions to the minimum needed — skills are a safe and powerful way to customize Claude for your workflows.
Conclusion: Skills Are the Operating System for Your AI Workflows
We have covered a lot of ground in this guide. We started by understanding what Claude Code Skills actually are: not just prompts or plugins, but structured, three-level packages that give Claude persistent, contextual intelligence across every session.
We explored how skills are discovered and triggered, how they progressively disclose information to stay token-efficient, and how they compose with tools and other MCP servers to power genuinely agentic workflows.
From there, we walked through every path to getting skills into your environment: installing from the Official Library and community repos, using the built-in skill-creator to generate skills through conversation, and building your own from scratch using the six-step framework.
We looked at real-world case studies showing how skills dramatically accelerate frontend work, enterprise document production, and multi-tool orchestration. We examined the advanced patterns that make skills truly powerful, and we closed with the security model that keeps all of it safe and auditable.
The deeper insight here is what skills reveal about where AI tooling is heading. For years, getting an AI to behave consistently required either massive system prompts that you rebuilt from scratch every session or fine-tuned models that were expensive and slow to iterate on. Skills solve this at the right layer: they are modular, composable, version-controllable, and shareable.
A skill you write today to handle your team’s code review process can be refined over time, shared across your organization, and combined with other skills to handle increasingly complex workflows. This is what it looks like when AI moves from a general-purpose chat interface into a programmable layer that reflects your actual domain knowledge. You are not just using Claude anymore; you are teaching it, and the curriculum is as specific and detailed as you need it to be.
The best place to start is with one workflow you already do repeatedly. Pick something you explain to Claude from scratch every few days, whether that is a code review style, a writing format, a data pipeline, or a reporting template, and turn it into a skill. Use the skill-creator if you want help with the structure, or write the SKILL.md yourself if you prefer direct control.
Test it, refine the trigger phrases, and see how it changes your day-to-day experience with Claude. Once you feel that shift, from generic assistant to a tool that already knows how you work, you will understand why skills are not just a feature. They are the foundation on which the next generation of AI-native workflows gets built.
If you found this helpful and want to go deeper, I’m running a live workshop: **Context Engineering: Building AI Agents That Work in Production**
This is a 1.5-hour hands-on session where you will learn how to structure context effectively, select the right information, and design workflows that guide models toward more accurate, consistent, and useful responses

메타데이터
- post_id
- c06d388ca803
- slug
- claude-code-skills-101-everything-you-need-to-get-started-with-c06d388ca803
- url
- https://levelup.gitconnected.com/claude-code-skills-101-everything-you-need-to-get-started-with-c06d388ca803
- canonical_url
- https://levelup.gitconnected.com/claude-code-skills-101-everything-you-need-to-get-started-with-c06d388ca803
- author_url
- https://medium.com/@yousefhosni
- status
- ok
- fetched_at
- 2026-06-09 15:37:30