You don’t need an AI agent for every single thing!
Your AI your Rules: Open Web UI and llama.cpp are all you need to work with your documents in full privacy and efficiency
You don’t need an AI agent for every single thing!
Your AI your Rules: Open Web UI and llama.cpp are all you need to work with your documents in full privacy and efficiency
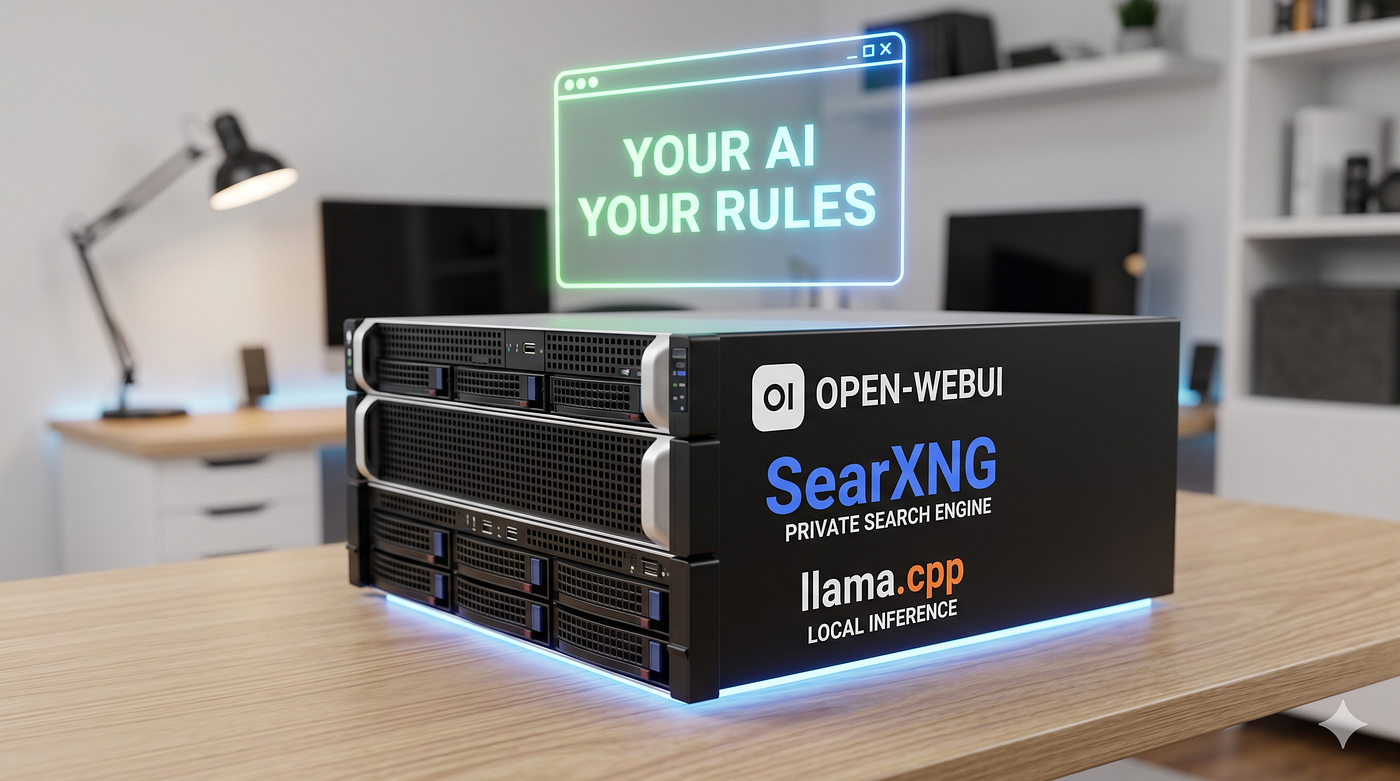
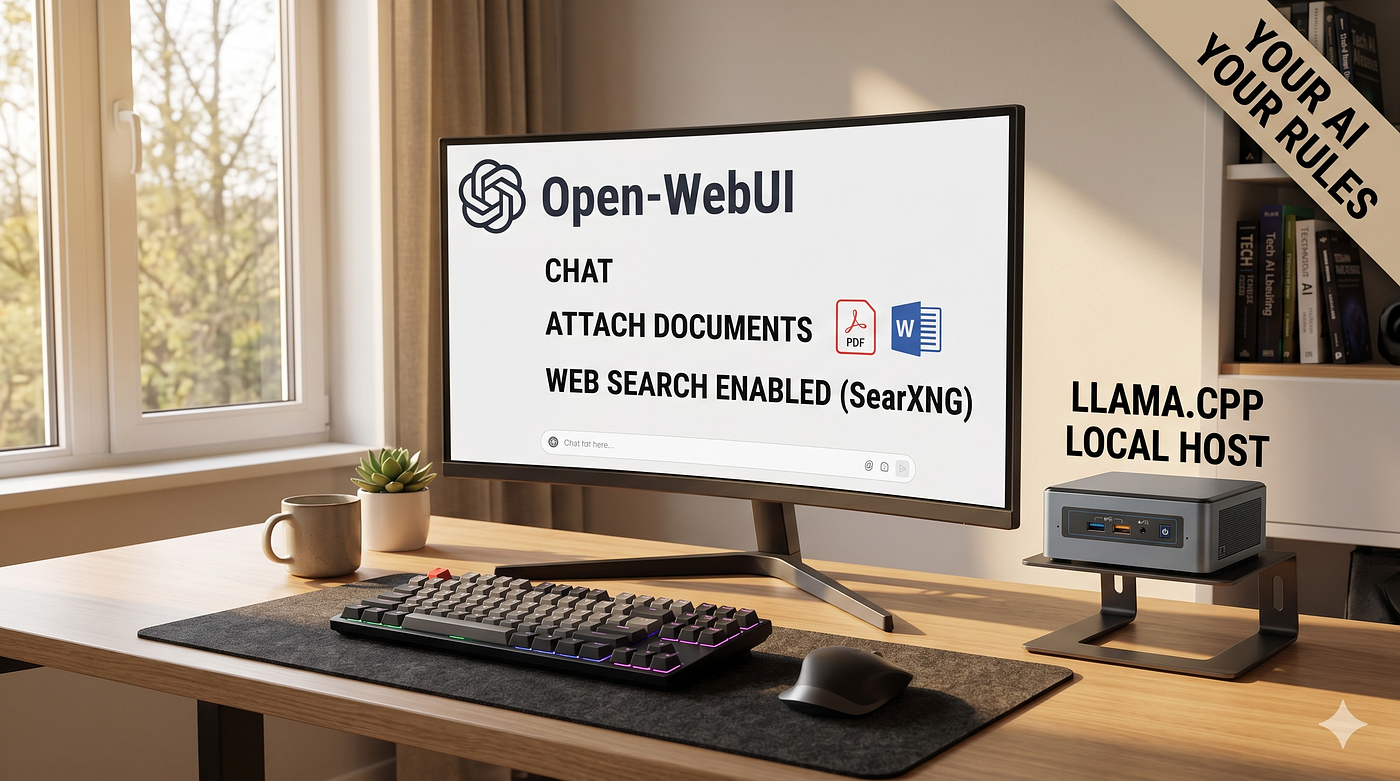
In this article I will show you how to have a full working local AI (model, tools, read PDF, docx, excel files and more) with web-search capabilities. Your data will never leave your PC.
Why SearXNG? Because is the only free wbe-search available able to compete with the paid ones: Tavily, SERP and so on
You will be able to:
- read and chat with PDFs, excel file, Word documents and emails
- expand your studies and researches with a powerful and free web-search
I have to say that the most complicated thing was to make SearXNG working inside Open-WebUI: I spent months and finally browsing through tutorials and user comments I made it.
It is going to be a long and detailed tutorial, but you will not find a better one, believe me.
I also published a free article only about connecting SearXNG to Open-WebUI: everyone should know this.
Without any further ado, let’s start!
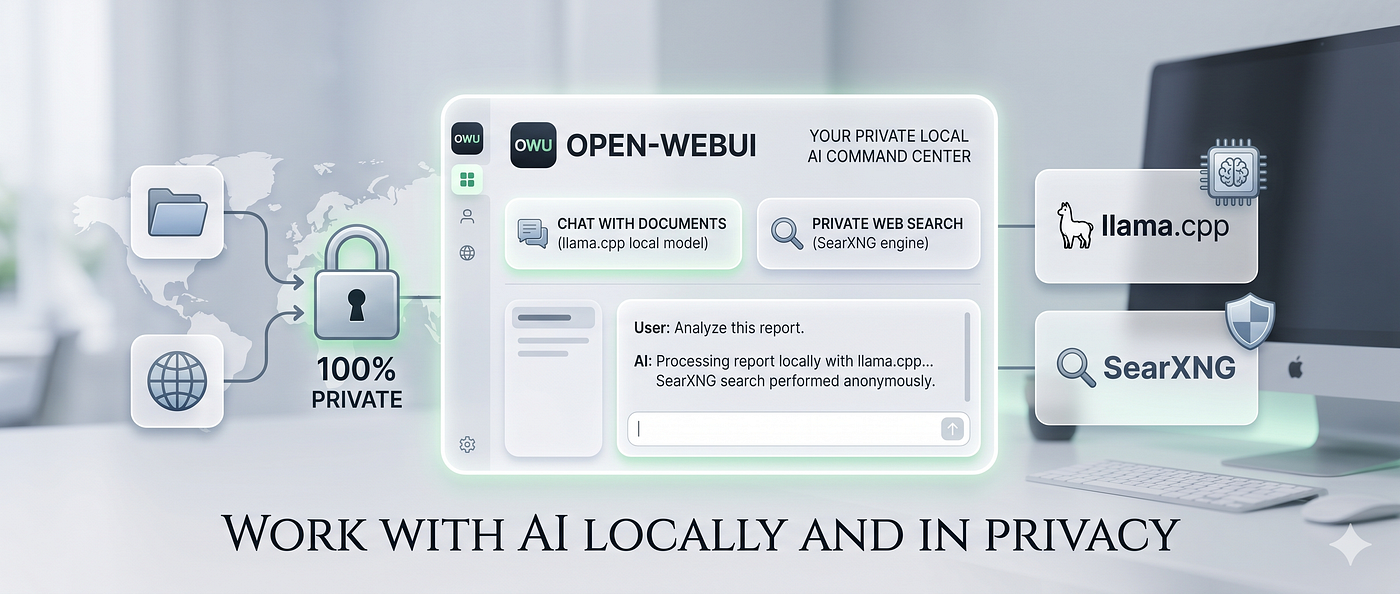
The world is buzzing with AI agents
But do we really need a swarm of agents and tools for every single daily task? I can confidently say that we don’t need it.
In fact, many of the daily activity can be handle with a well crafted Chat interface. Moreover, when you want to keep your documents private, you need a tool that allows you to work without sending any data to outside providers.
And here comes Open-WebUI: an open-source chat interface that orchestrate for you the most used features of Generative AI!
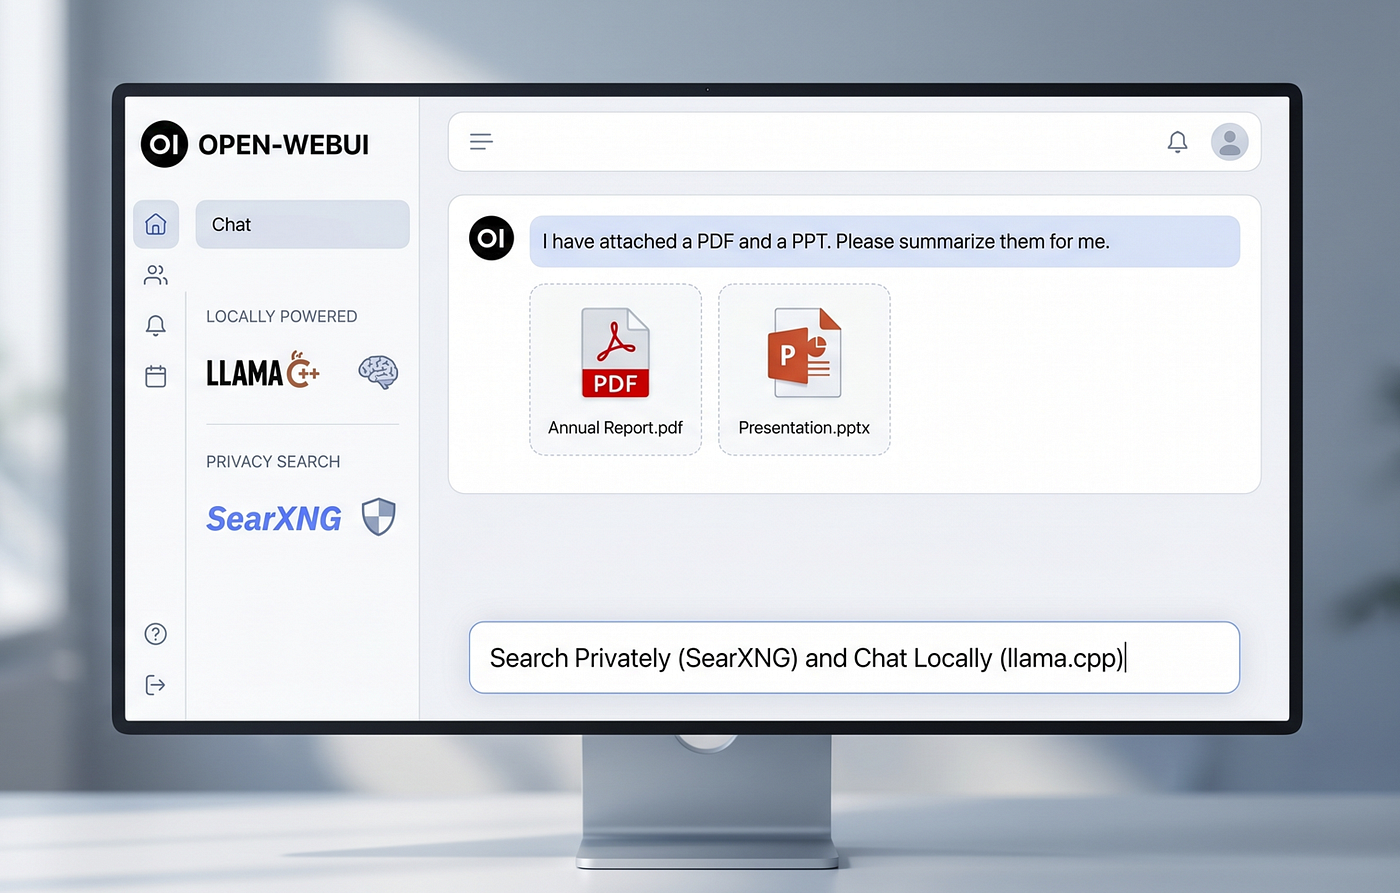
Without configuring a single thing you can attach PDFs and Office documents, and start talking with them. You can fire up web-search for news and expand your knowledge with online resources.
The LLM options are also flexible: you can connect llama.cpp and Ollama local models, or use free API (or paid if you have them) calls to Google AI, OpenAI, NVIDIA and so on.
Today I will show you two scenarios with two different LLM:
- a free API with NVIDIA models, to be used for web-search or non sensitive documents
- llama.cpp serving a local LLM to handle personal documents, NDA related tasks and so on
Next Steps
- install Docker Desktop
- install Open-WebUI docker container
- install SearXNG docker container
- configure a virtual network to make Open-WebUI and SearXNG talk together
- configure
settings.ymlin SearXNG to enablejsonformat output - test connectivity
- configure from Open-WebUI interface the wbe-search
- download llama.cpp binaries for Windows and a GGUF (quantized) model
- run the model with llama-server
- connect from Open-WebUI interface the local model
- connect from Open-WebUI interface the NVIDIA free model
Install Docker Desktop
To install docker desktop, download the software the installer here
During installation you will be asked if to use WSL or Hyper-V. I wanted to use Hyper-V, but both options are good. Remember to check if you have the feature enabled (valid for both WSL or Hyper-V)
Go to Turn Windows Features on/off
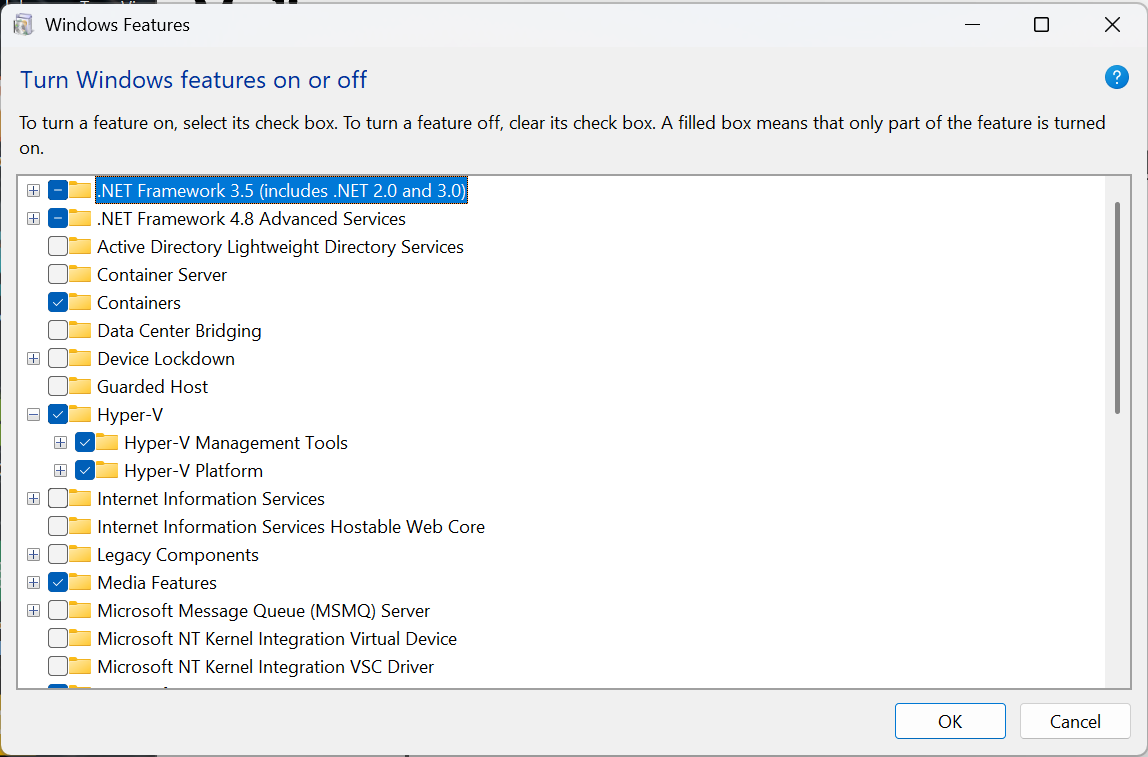
There is a similar option to enable also for WSL (Windows Subsystem for Linux).
Should I use Hyper-V or WSL? Docker Desktop’s functionality remains consistent on both WSL and Hyper-V, without a preference for either architecture. Hyper-V and WSL have their own advantages and disadvantages, depending on your specific setup and your planned use case. Note that Hyper-V is only available with all-users installation. If you install Docker Desktop in per-user mode, WSL 2 is the only supported backend.
After installation of Docker Desktop Windows will ask you to log off and log on again.
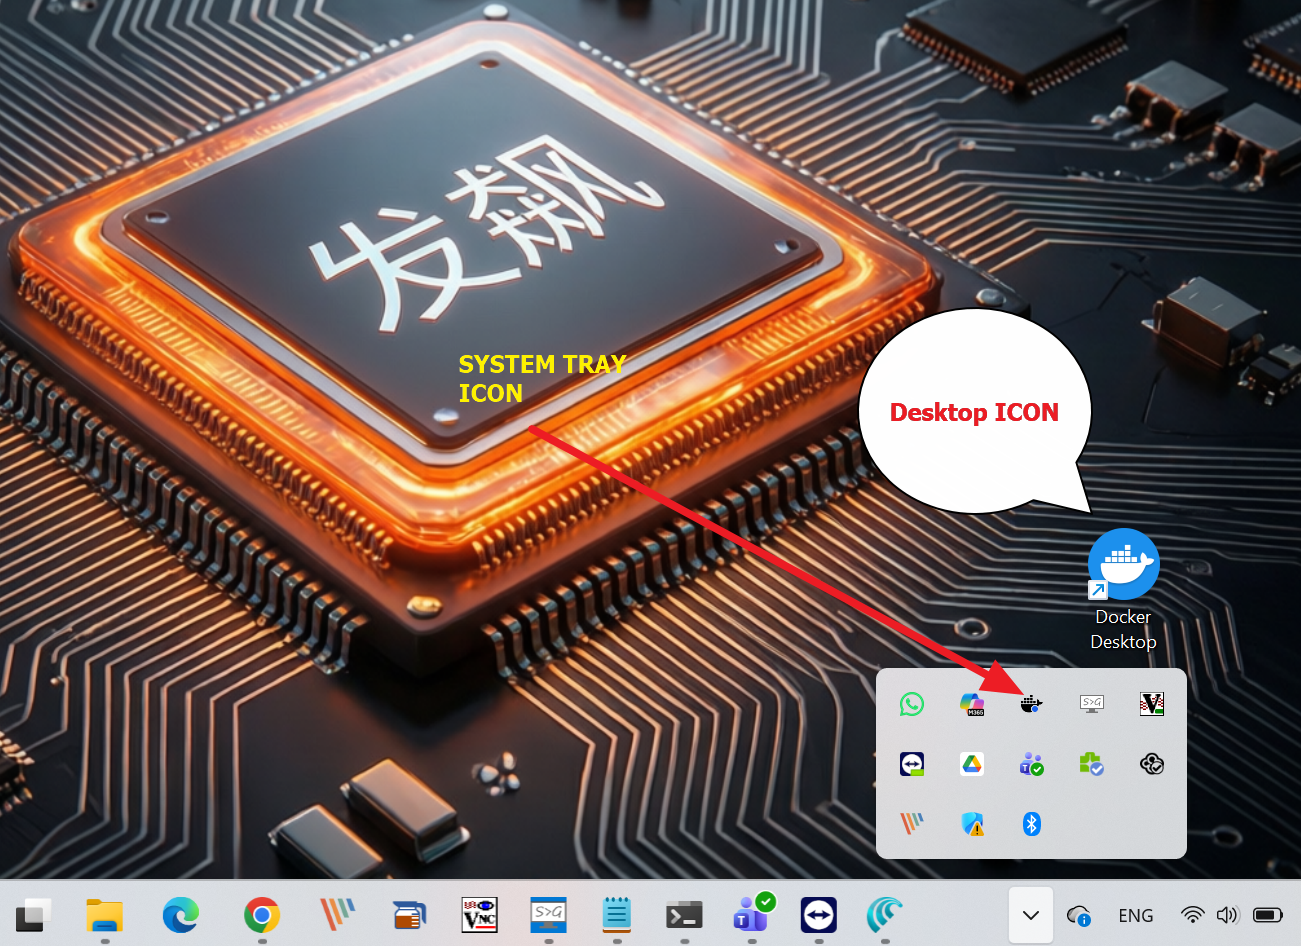
When you are back in Windows, you can start Docker Desktop clicking on the desktop ICON: you will also see an icon in the System tray.
Run it and let’s move to the next step
Install Open Web UI
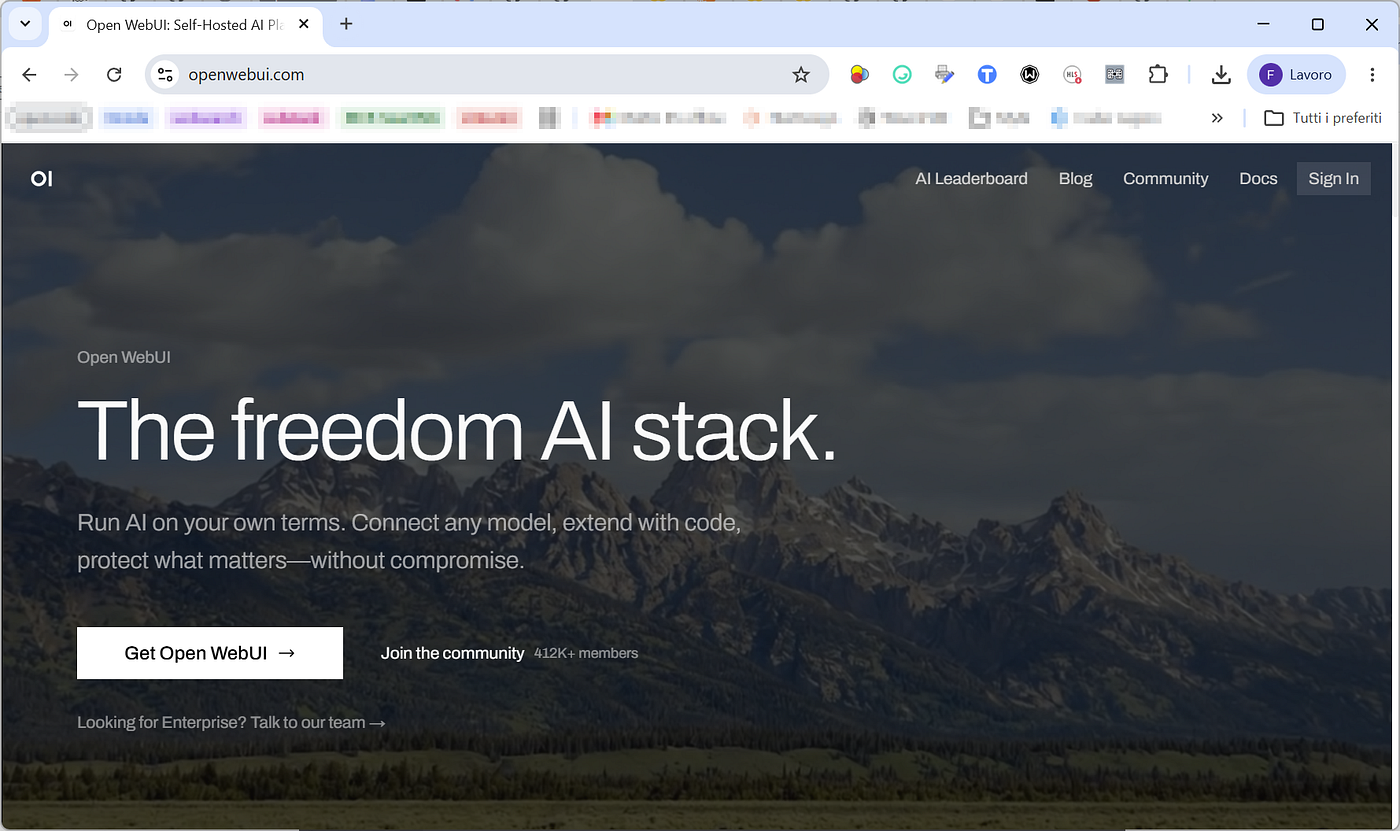
Open WebUI is an extensible, feature-rich, and user-friendly self-hosted AI platform designed to operate entirely offline. It supports Llama.cpp, Ollama and OpenAI-compatible APIs, making it a powerful, provider-agnostic solution for both local and cloud-based models.
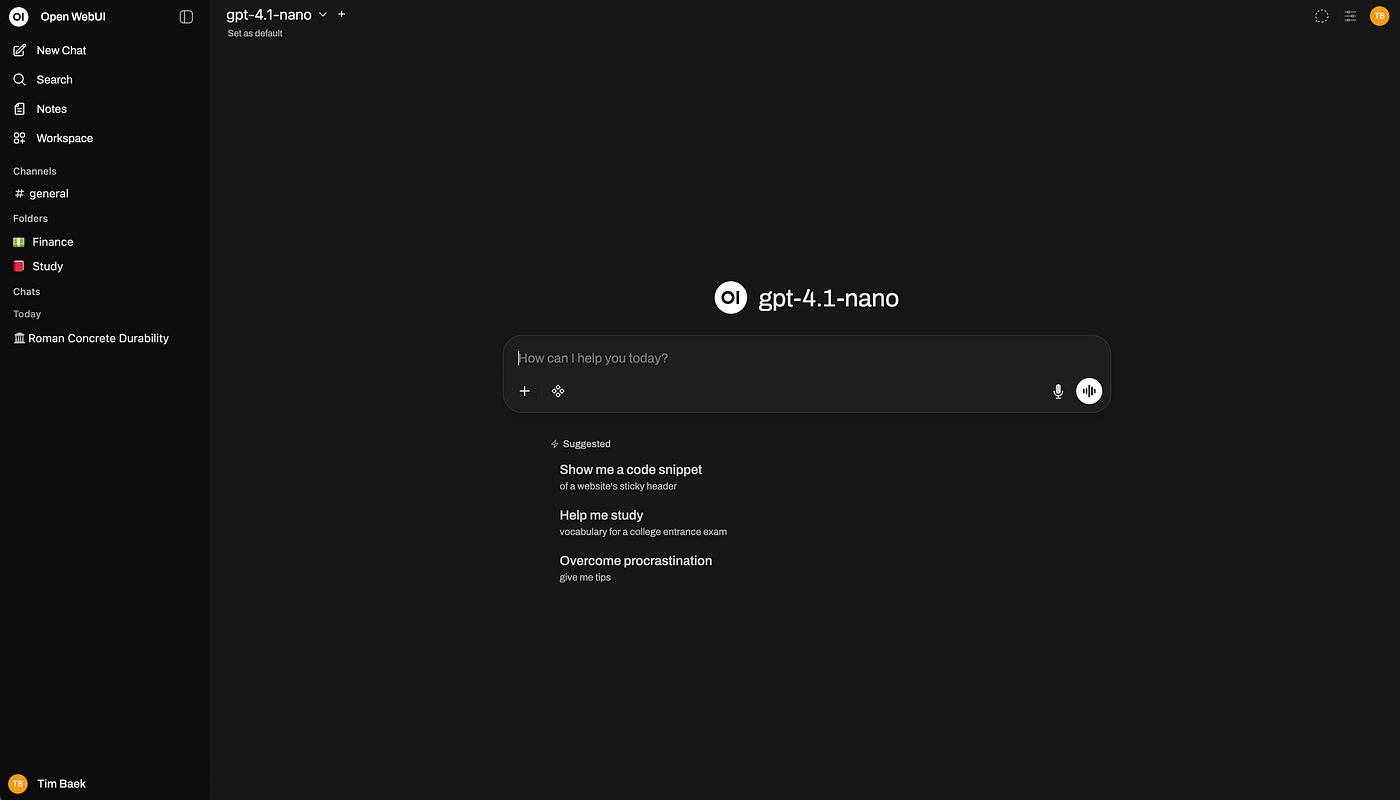
To install with Docker is the best option. You get the entire thing running as a container.
Open a Windows Terminal anywhere and run the following command
docker run -d -p 3000:8080 --add-host=host.docker.internal:host-gateway -v open-webui:/app/backend/data --name open-webui --restart always ghcr.io/open-webui/open-webui:mainTo check if it is running, open the Docker Desktop (should be started already with an icon in the system tray)
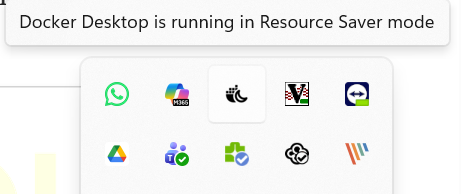
and go to Containers looking for open-webui. If you see CPU usage and memory usage than you are good to go.
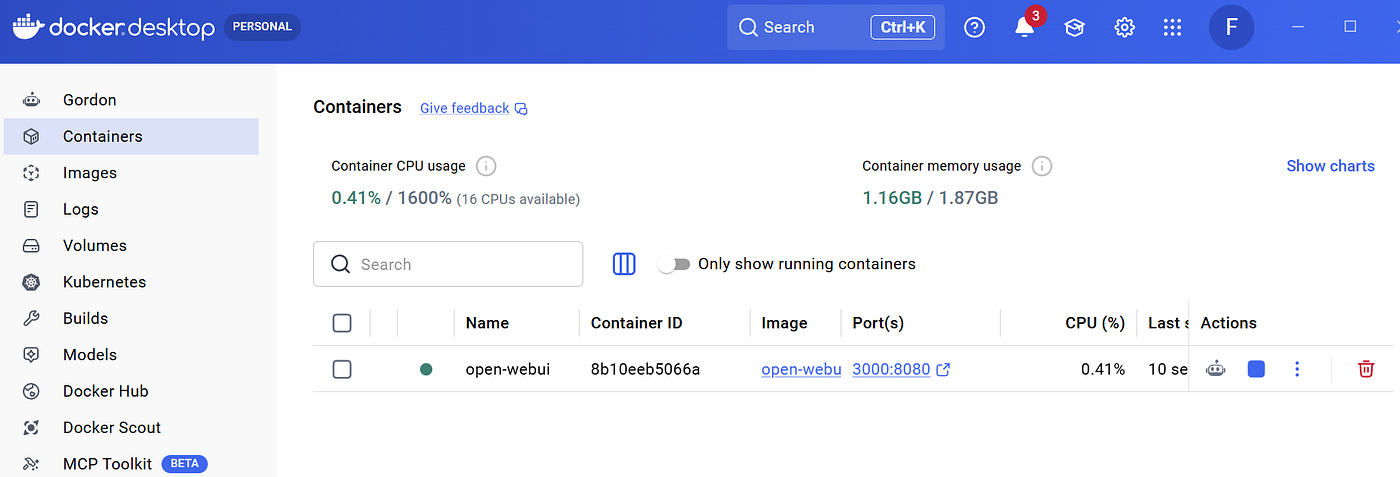
If it is running, you can test it opening your Browser at http://localhost:3000.
You can read more about what you can do in the **Essentials for Open WebUI** guide, that covers the six things every new user needs to know: plugins, tool calling, task models, context management, RAG, and Open Terminal.
Install SearXNG docker container
Starting few days ago (end of May 2026) the original SearXNG GitHub repo has been arichived. This means that 99% of the existing tutorials and quick start guides are not working anymore (even the official one in the openwebui docs).
The only working tutorial I found is no youtube (please follow the guy there), but I had to read comments almost on any social to get it working 100%.
Moving on…
The core idea is to download the searXNG docker image, create a local folder to access the settings and then proceed with the next steps.
Download the docker image
You can open the windows terminal anywhere and run:
docker pull docker.io/searxng/searxng:latestThis command will download the image ready to be used by Docker Desktop: for know there is no container yet, only the image of it.
Before proceeding, create on your PC a directory where we will store the personal settings for SearXNG. Mine is called c:\Fabio-AI\searxng
Open Docker Desktop, go to Images and click on Run for searxng/searxng
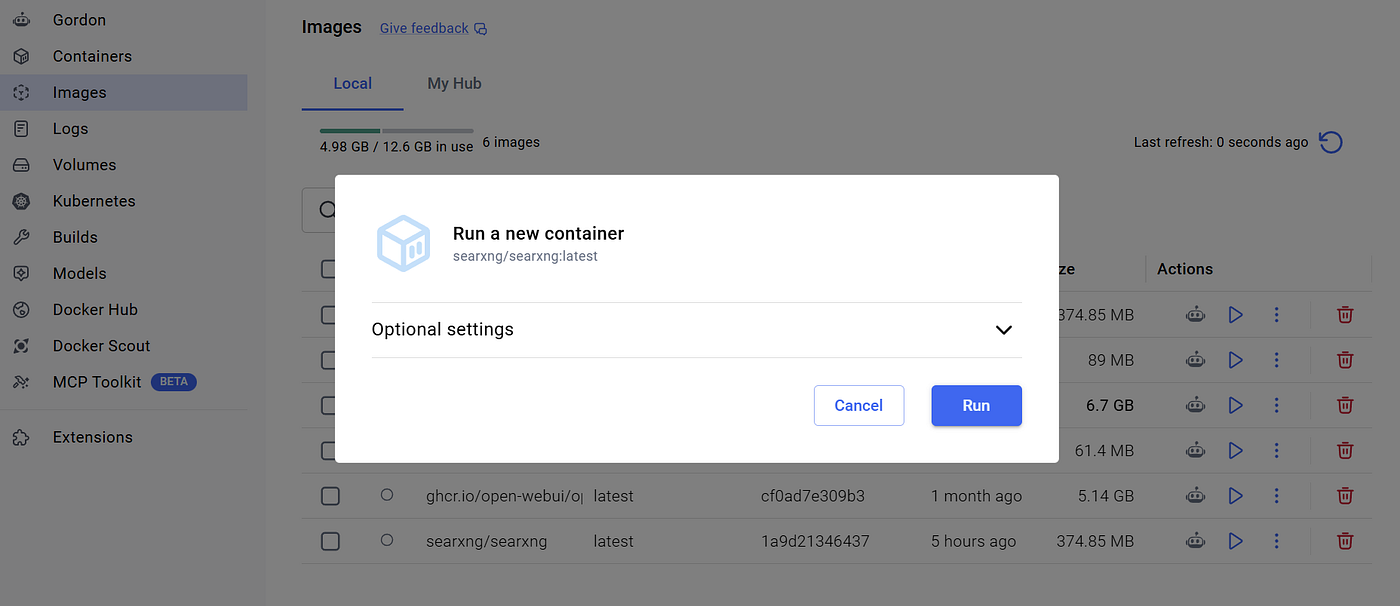
go to Images and click on Run for searxng/searxng
Expand the Optional settings, because we need to do few things here: the Container name, the Ports (I choose 8181) and the Volumes: when completed all parts, click run.
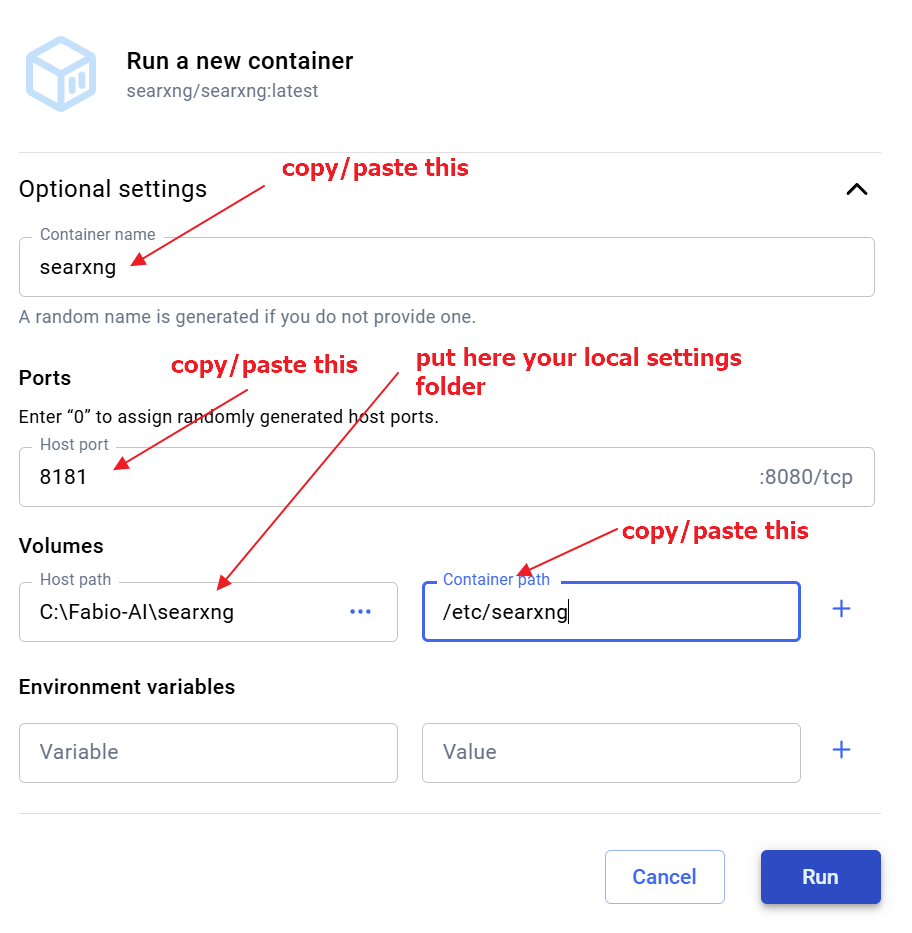
when completed all parts, click run
At the end you should have 2 containers running in Docker.
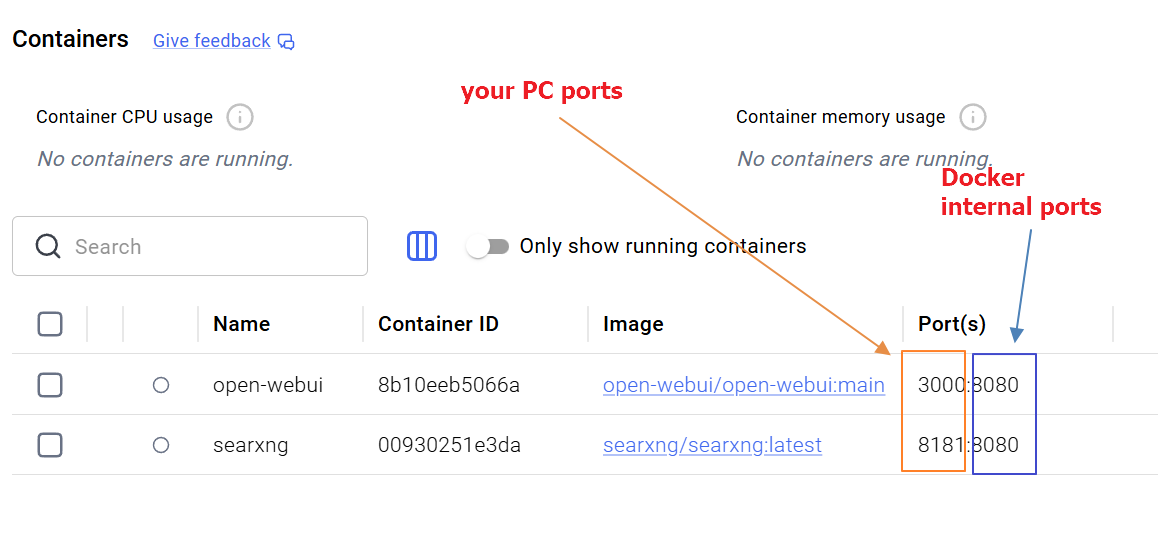
note that you can see always a pair of ports
👉 Remember this: when you call the app or service inside the Docker, you need to use the ports on the right. From your Browser the ports to be called are the one on the left (l
ocalhost:3000for Open-WebUI andlocalhost:8181for SearXNG).
Configure a virtual network to make Open-WebUI and SearXNG talk together
The only problem now is that the two containers are not able to talk each others. The easiest way to fix it is to create inside Docker a virtual network, and move both of them inside that very same network.
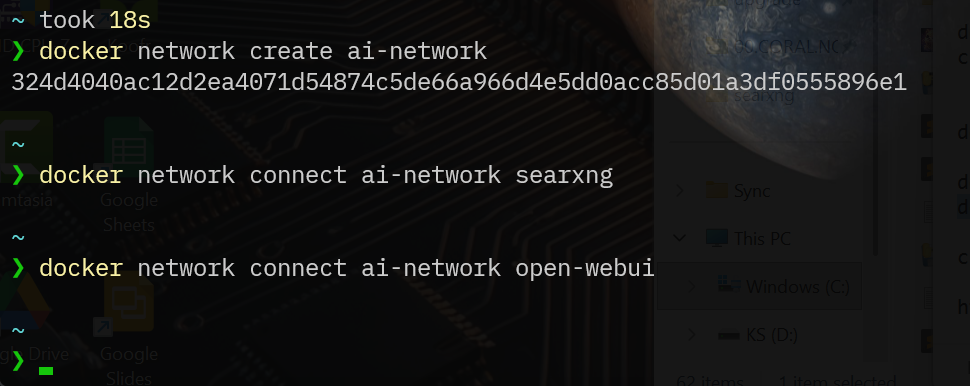
From the same terminal you pulled the SearXNG docker image you can run the following:
docker network create ai-networkThis will create a new virtual network called ai-network
then to add Open-WebUI to the network
docker network connect ai-network open-webuiand to add SearXNG to the same network
docker network connect ai-network searxngNow, stop both the containers from Docker.
Configure SearXNG for json output
This is an important action. By default SearXNG will return only html outputs, but we want to be able to work on structured json as Open-WebUI expect it.
Once the container are stopped, go to the folder we created earlier (mine was c:\Fabio-AI\searxngremeber?)
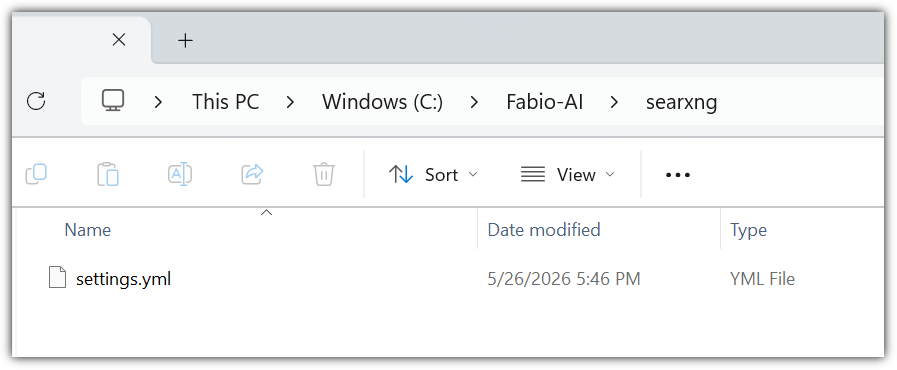
After the first run (that we have already done) a new file has been created. It is time to modify that settings.yml in SearXNG to enable jsonformat output.
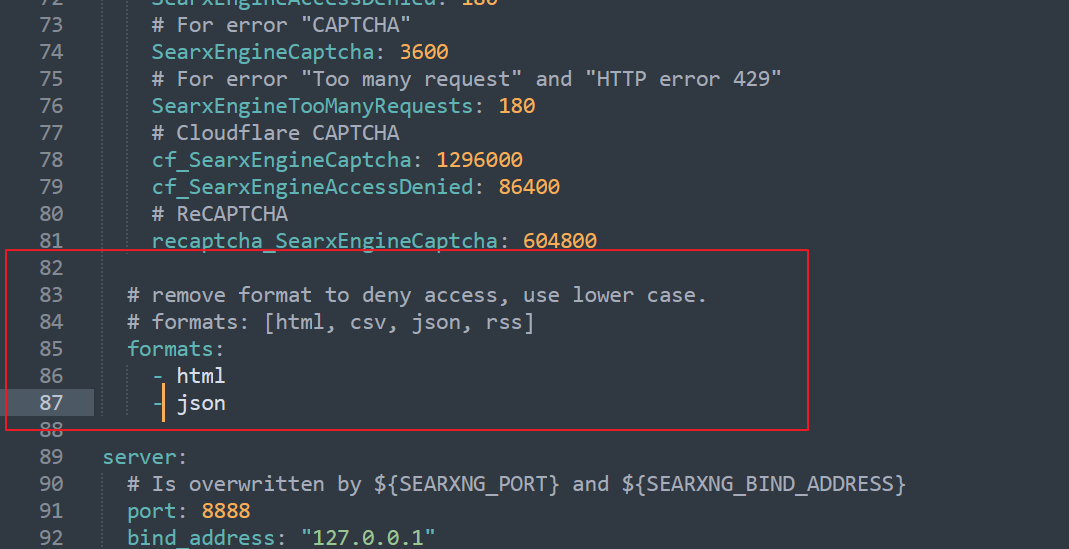
Open the file and add - json to the formats: before only html was there, now it should be like in the picture above. Save the file and close it.
Restart both the containers (openwebui and searxng) that now will work under the same network with the json outputs enabled.
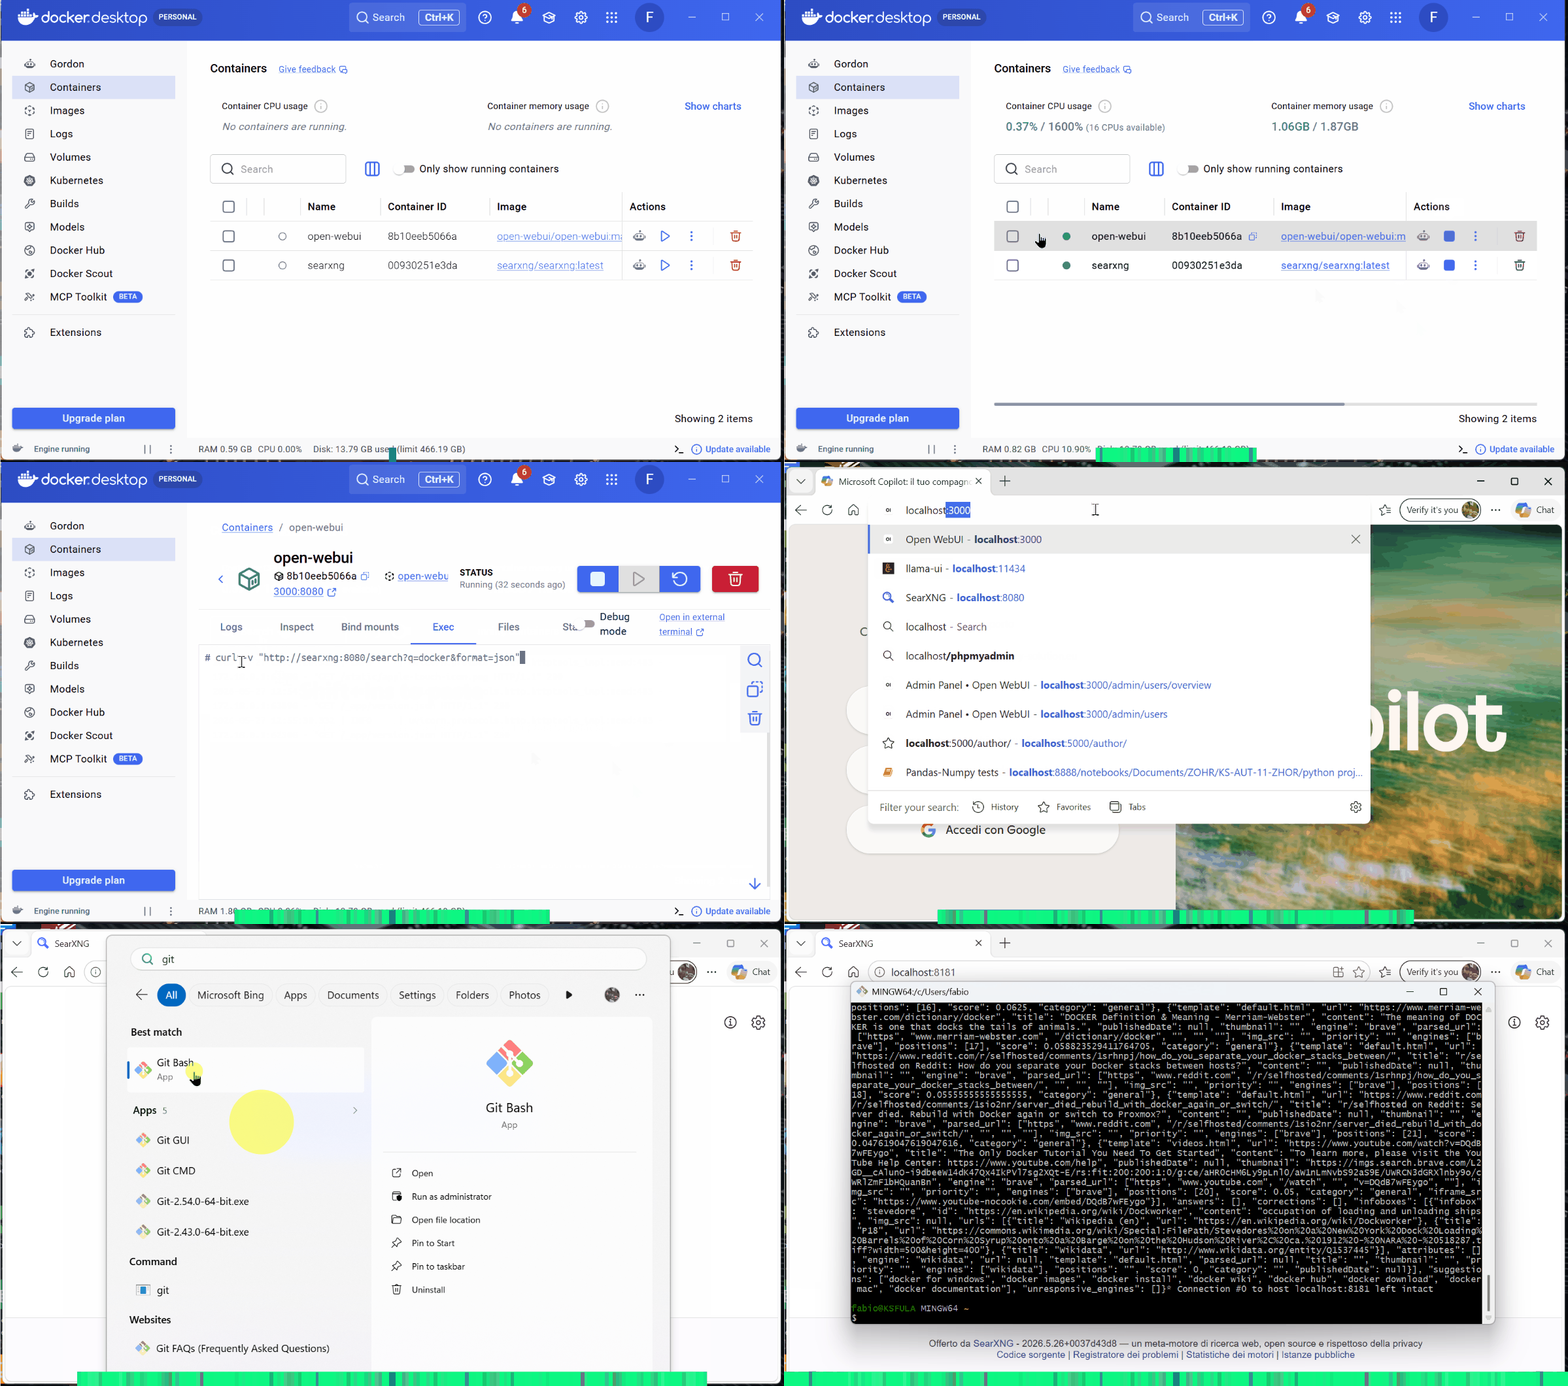
Test connectivity
It is time to test if everything is working properly.
Remember that we have two different ports and addresses, depending of where we are querying the SearXNG.
From the terminal inside the docker
- click on the openwebui instance and move to terminal
- paste this command (Ctrl+V does not work there, use Shift+Ins)
curl -v "http://searxng:8080/search?q=docker&format=json"If you see the structured output all is OK
From outside the docker
- Open your browser and try to access localhost:8181
- if you see the webpage for SearXNG all still good
- Open Git Bash or Windows terminal and paste this (Ctrl+V works only in Terminal, in Git Bash use Shift+Ins)
curl -v "http://localhost:8181/search?q=docker&format=json"If you see the structured output all is OK
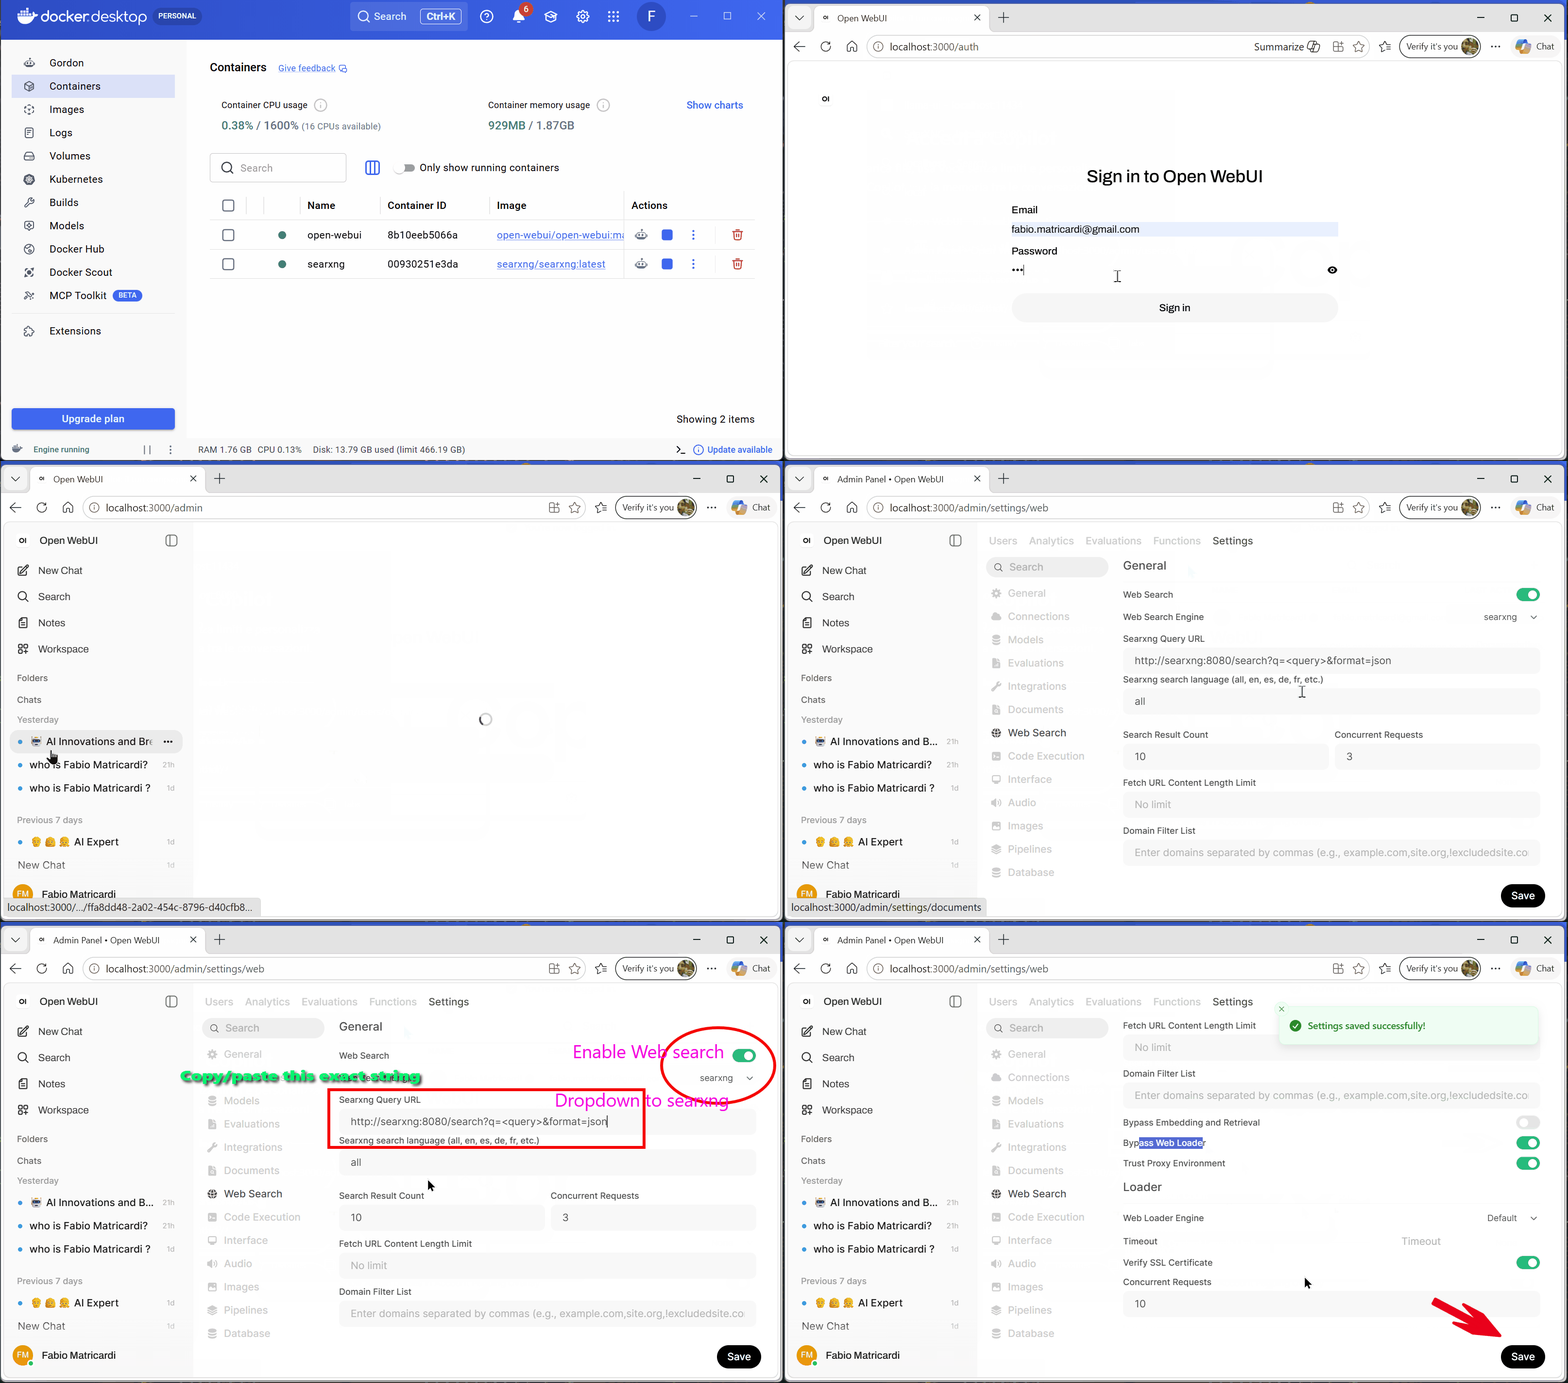
Configure from Open-WebUI interface the web-search
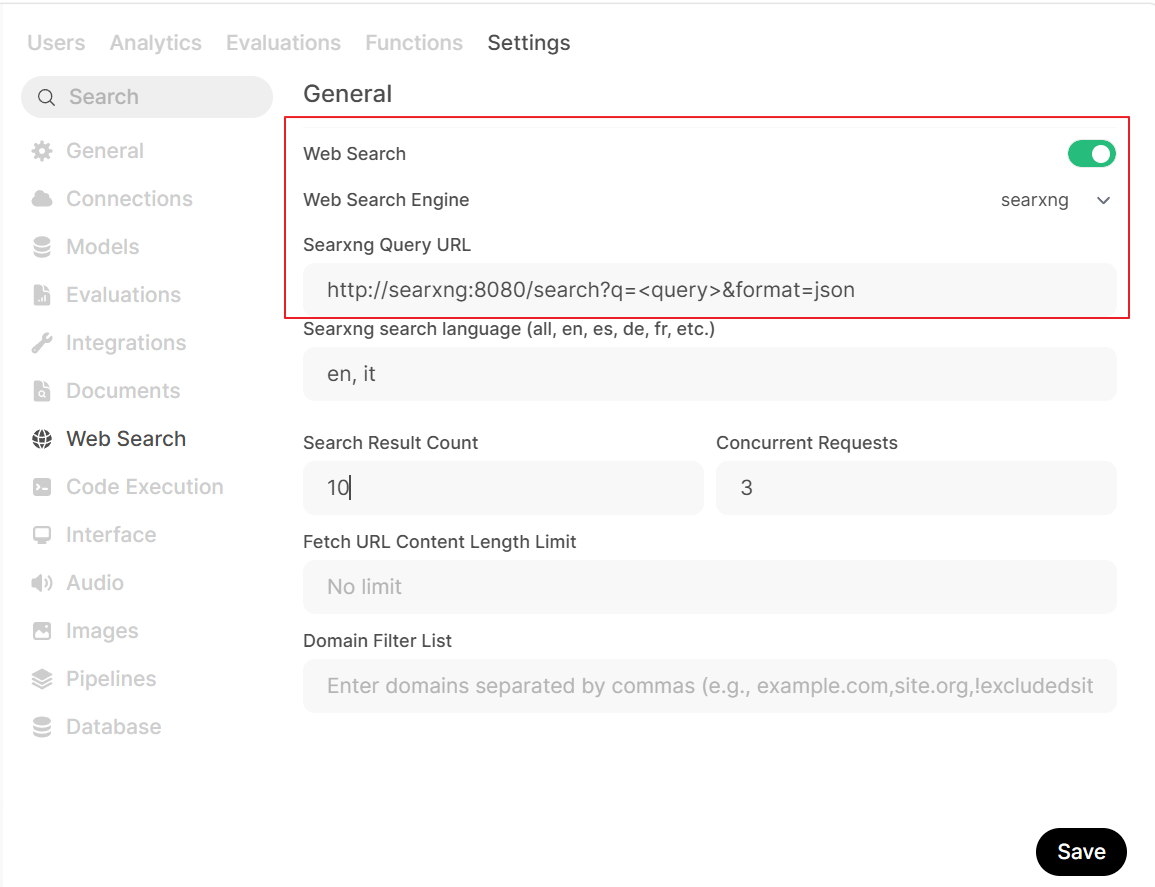
This is the last step for web search: enable the feature in Open-WebUI and change few critical configuration parameters:
- enable web-search
- set Search Engine to searxng
- change the SearXNG Query URL
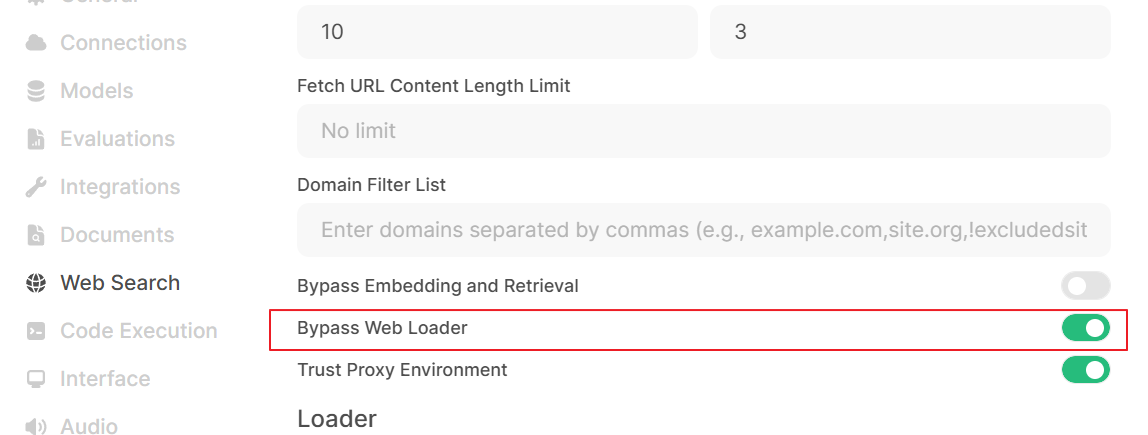
- Bypass the web loader
The Query URL is quite important: in fact we will pass to the right address both the query and the response format, like this:
http://searxng:8080/search?q=<query>&format=jsonAlso, CRITICAL for 2026: Bypass Web Loader, otherwise you will never get any reply from the SearXNG to the LLM making the tool call!
It is time to get the Models ready to work with Open WebUI. But first we need the model and the engine (llama.cpp).
Connect Llama.cpp to Open WebUI
Llama.cpp is the best method to run a Language Model locally. It doesn’t have a fancy interface like LMStudio or Ollama, but consider that they are running llama.cpp under the hood.
So I will show you how to do it easily: consider that my step by step guide is for Windows.
First of all download the binaries (executable) of llama.cpp: I took the Vulkan for Windows x64. They work on every Windows PC, even only with a CPU.
- download llama-b9360-bin-win-vulkan-x64.zip
- extract the ZIP archive into your directory (I called mine
llama-cpp) - create a subdirectory called
models: we will download there the GGUF model
One of the best Chinese AI lab (openBMB) just released a powerful 3 Billion parameters model, perfect for constrained hardware specs. The innovation is that this model is trained from scratch with 1.58-Bit Ternary Quantization: it compresses model weights to ternary values {-1, 0, 1}, achieving ~90% bit-width reduction compared to BF16.
BitCPM-CANN is the first end-to-end 1.58-bit (ternary) large language model training system natively built on Huawei Ascend NPU.
- download the GGUF bitcpm4-3b-tq2_0.gguf directly in the newly created folder
llama-cpp/models .
Now open the terminal window inside the llama-cpp directory and run the following command:
.\llama-server.exe -m models\bitcpm4-3b-tq2_0.gguf --mmap -ngl 0 -t 4 -c 92288 --port 11434 -fa on --temp 0.7 -ctk q4_0 -ctv q4_0 -a bitCPM3b --reasoning on --jinjaTo briefly explain the parameters, here a quick overview:
--mmap            enable memory map: load the entire model from the start
-ngl 0            no GPU layers, only CPU
-t 4              4 threads of CPU
-c 92000          number of tokens for the context window = 92000
--port 11434      port for the llama server. 11434 emulate Ollama port
-fa on            Flash Attention active
--temp 0.7        Temperature set to 0.7 as per model card
-ctk q4_0         K-cache quantized in q4
-ctv q4_0         V-cache quantized in q4
-a bitCPM3b       alias for the model, to be called and explored by others
--reasoning on    Activate model reasoning (think-/think)
--jinja           expose full chat template with function tool calls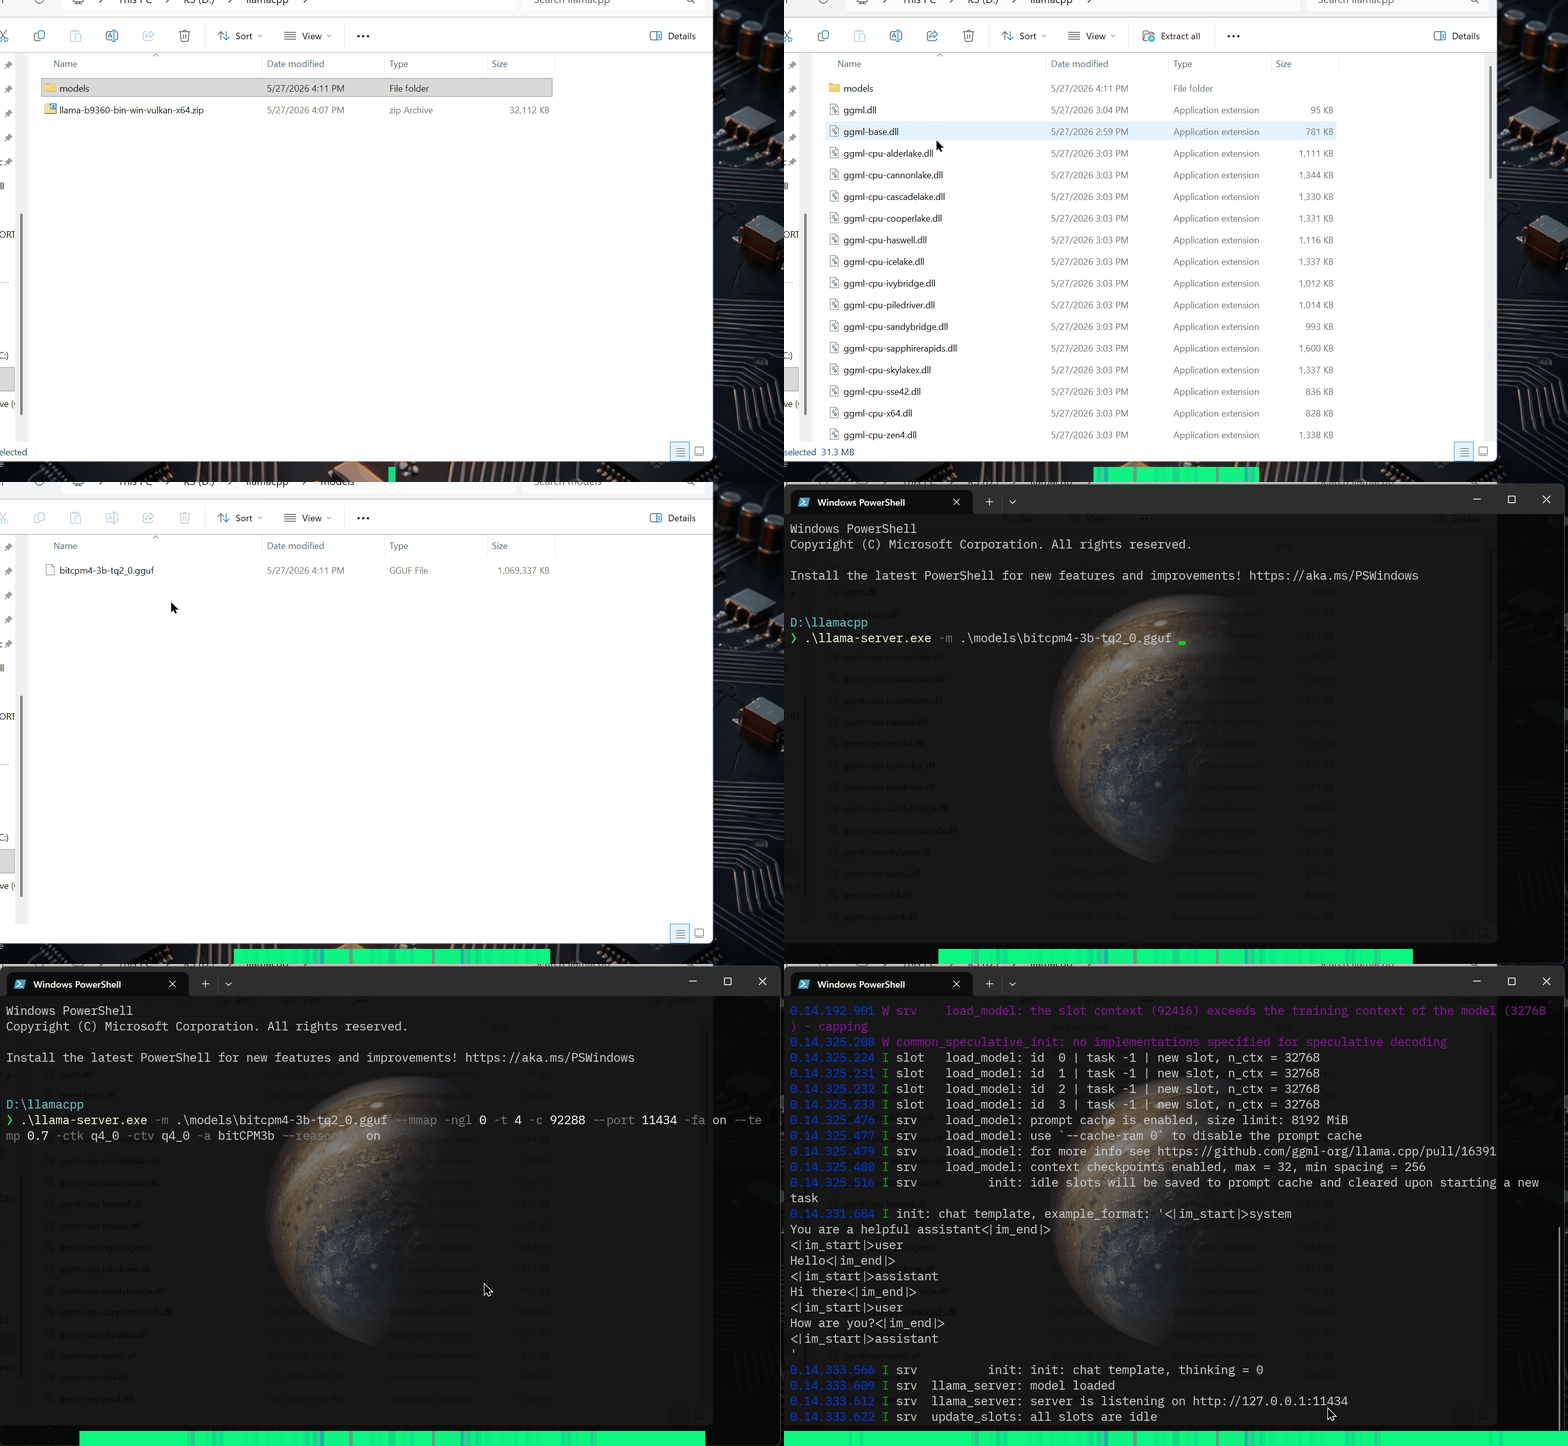
Now you have already two amazing features running on your local PC:
- a fully compatible OpenAI API endpoint server (that we will connect to OpenWebUI)
- A minimal but efficient Chat app shipped together with llama.cpp (you can read more here)
I will explain in the next sections how to connect the API endpoint to Open-WebUI. For the llama.cpp UI just open your browser at localhost:11434 and you have it!
Note: if you want an alternative local AI model, enterprise ready, fine tuned to be reliable on RAG tasks, grab on of the last from the IBM Granite-4.1 family
Granite 4.1 language models are a family of state-of-the-art open foundation models featuring dense decoder-only architectures in three sizes — 3B, 8B, and 30B. They natively support multilingual capabilities, a wide range of coding tasks, retrieval-augmented generation (RAG), tool usage, and structured JSON output.
So:
- download granite-4.1-3b-Q3_K_S.gguf in the same
modelsdirectory
And in the terminal change only the model filepath and name and remove the reasoning (not supported by these models)
.\llama-server.exe -m models\granite-4.1-3b-Q3_K_S.gguf --mmap -ngl 0 -t 4 -c 92288 --port 11434 -fa on --temp 0.2 -ctk q4_0 -ctv q4_0 -a ganite4.1-3b --jinja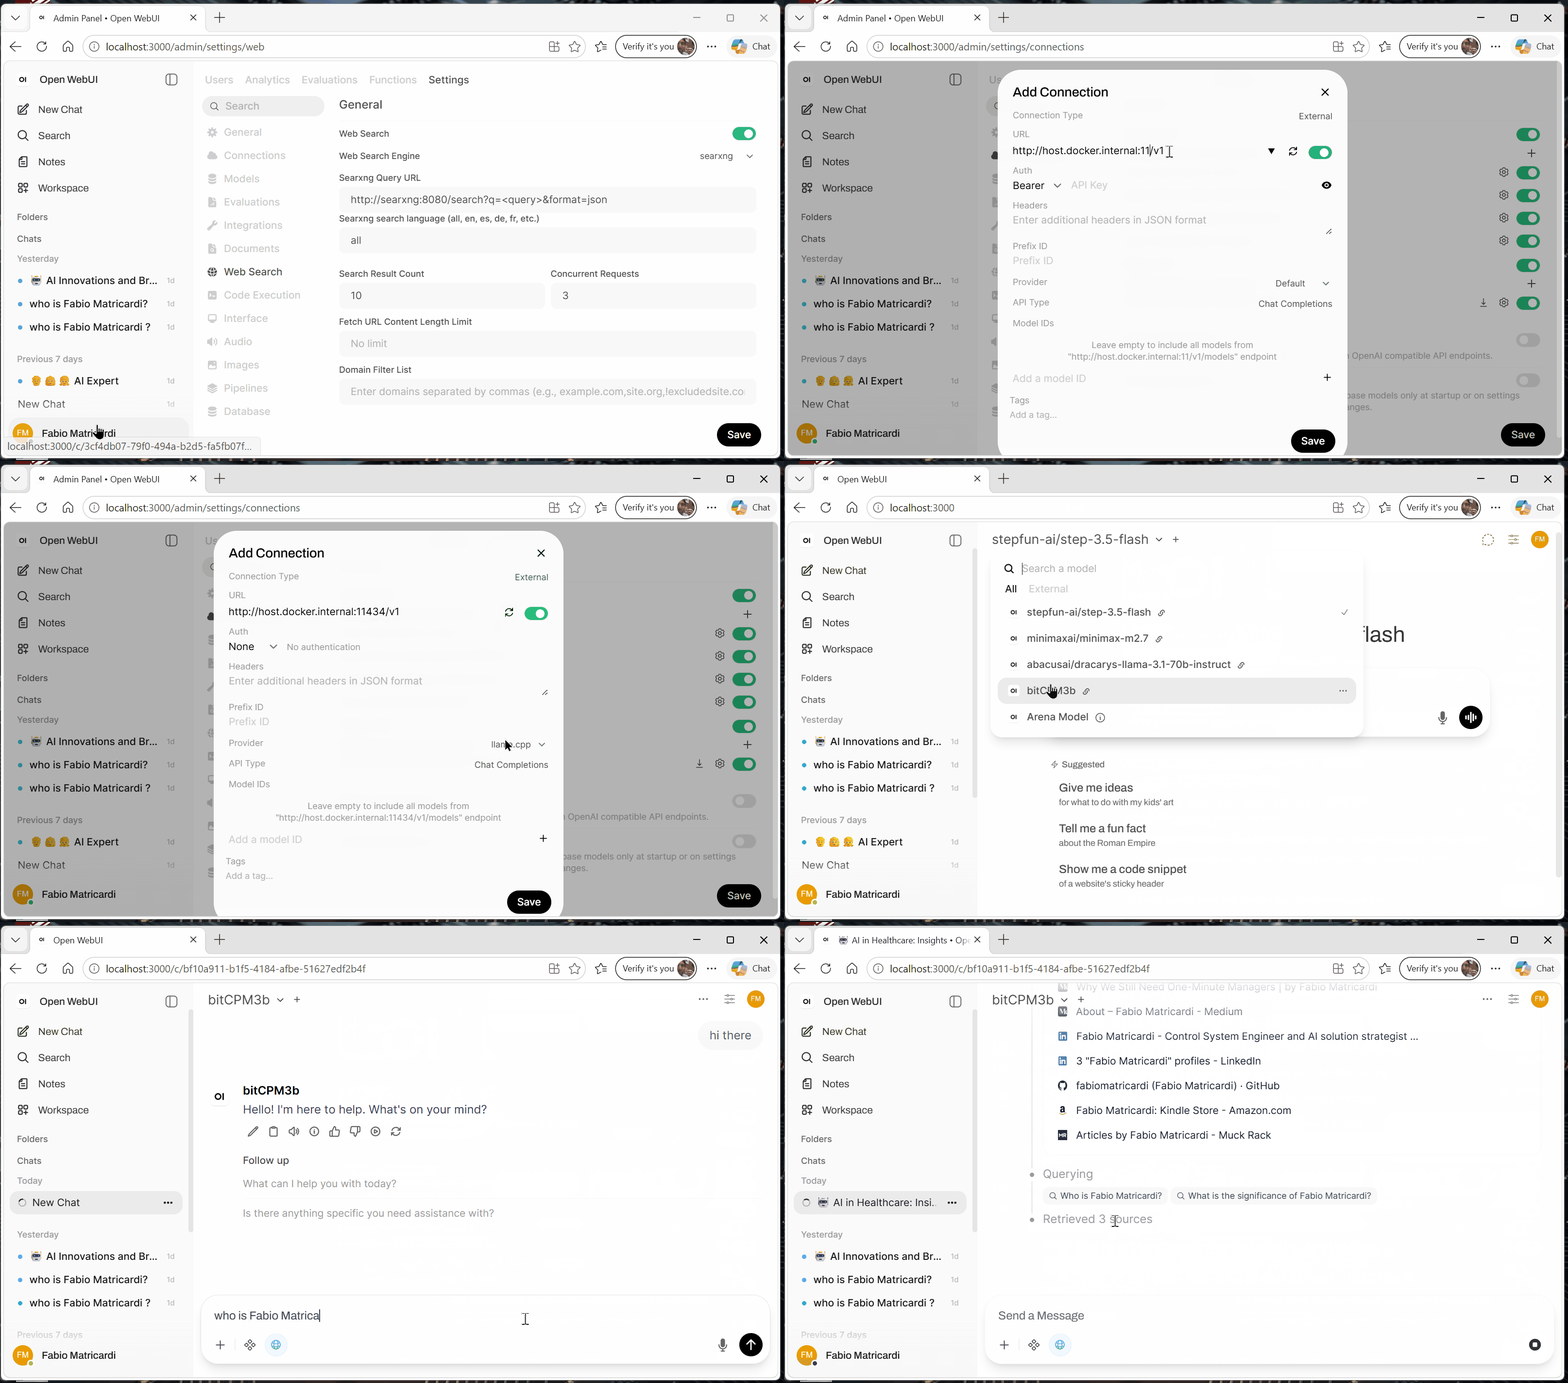
Configure the Connection and the Model in Open WebUI
The last step is to configure Open-WebUI to connect to our llama.cpp server running on your computer.
To connect a local model with llama.cpp server
- Open Open WebUI in your browser
- Go to ⚙️ Admin Panel → Settings → Connections → OpenAI.
- Click ➕ Add Connection.
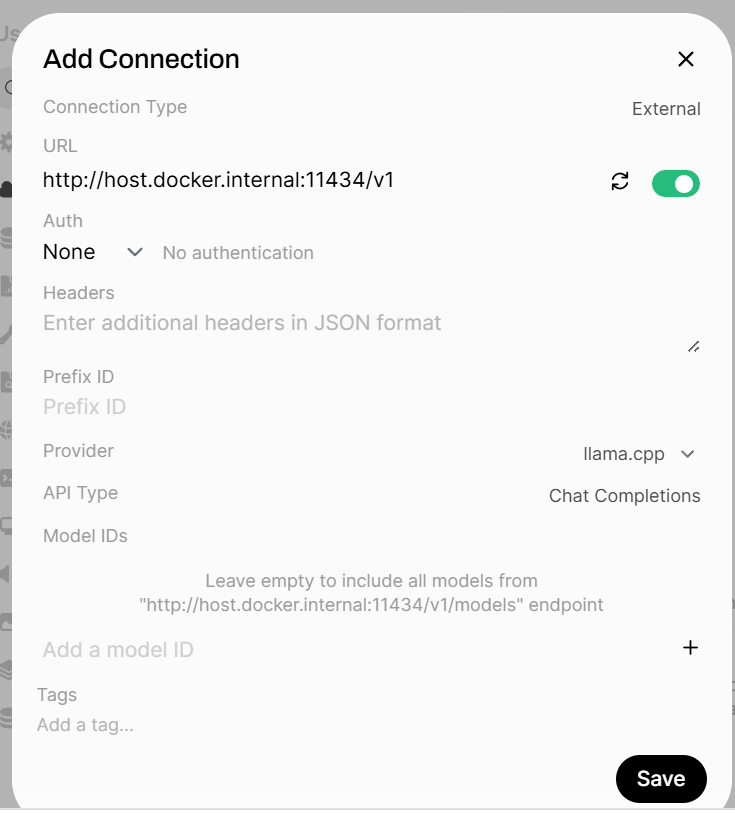
Set the following (under Standard / Compatible if tabs are visible):
- Connection type: External
- URL:
http://127.0.0.1:11434/v1(Or usehttp://host.docker.internal:11434/v1if running WebUI inside Docker. Note the/v1at the end!). Since we are running OpenWebUI in the Docker we will put[http://host.docker.internal:11434/v1](http://host.docker.internal:11434/v1) - API Key:
none(leave blank or type specific key if configured) - Provider: pick
llama.cppfrom the Provider dropdown. This unlocks the loaded-model indicator and the admin Eject button in the model selector — see Unloading Loaded Models below. Leave atDefaultif you do not need that feature.
💡 Once saved, Open WebUI will begin using your local Llama.cpp server as a backend!
Here below a test done with Granite-4.1 too.
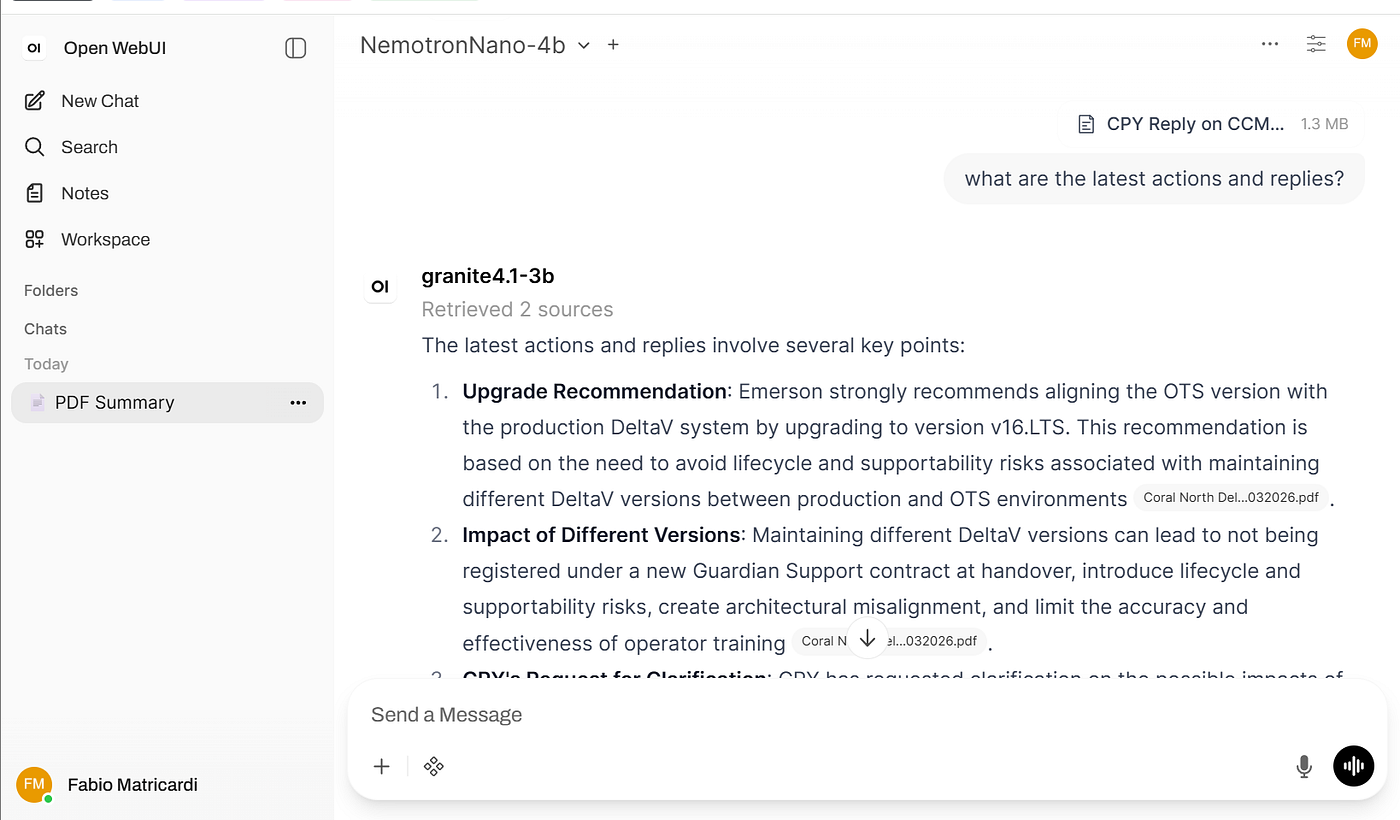
To connect an external model (NVIDIA) with OpenAI compatible API
I put all the steps to craete a free API from NVIDIA NIM in my previous article.
Note that free endpoints may change over time. So browse them and check the correct model name.
- Open Open WebUI in your browser
- Go to ⚙️ Admin Panel → Settings → Connections → OpenAI.
- Click ➕ Add Connection.
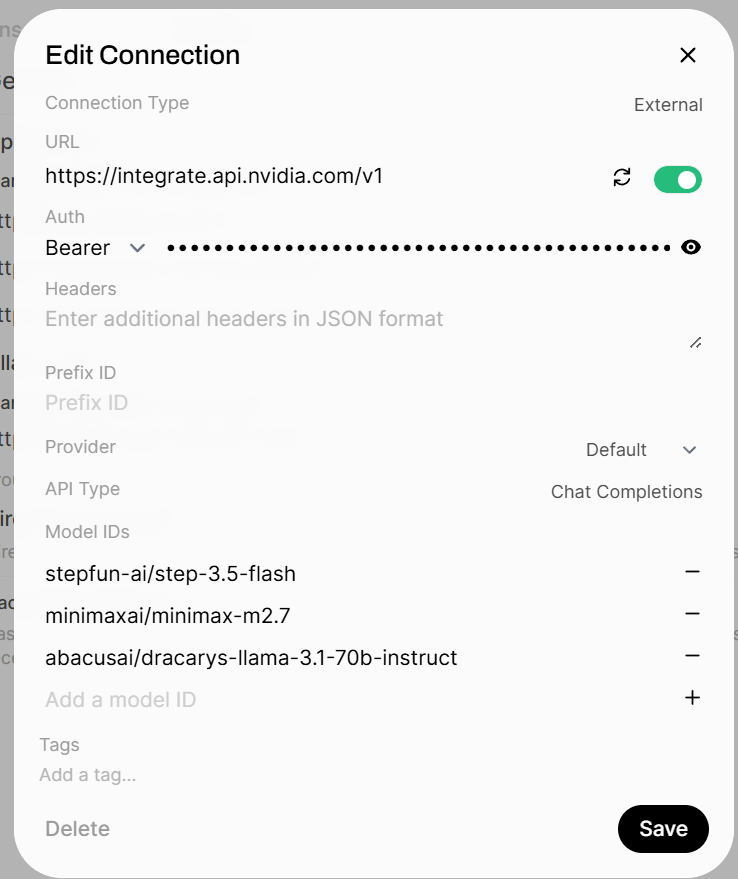
Set the following (under Standard / Compatible if tabs are visible):
- Connection type: External
- URL:
[https://integrate.api.nvidia.com/v1](https://integrate.api.nvidia.com/v1) - API Key:
your NVIDIA API Key(and set the method to Bearer) - Provider: Leave at
Default.
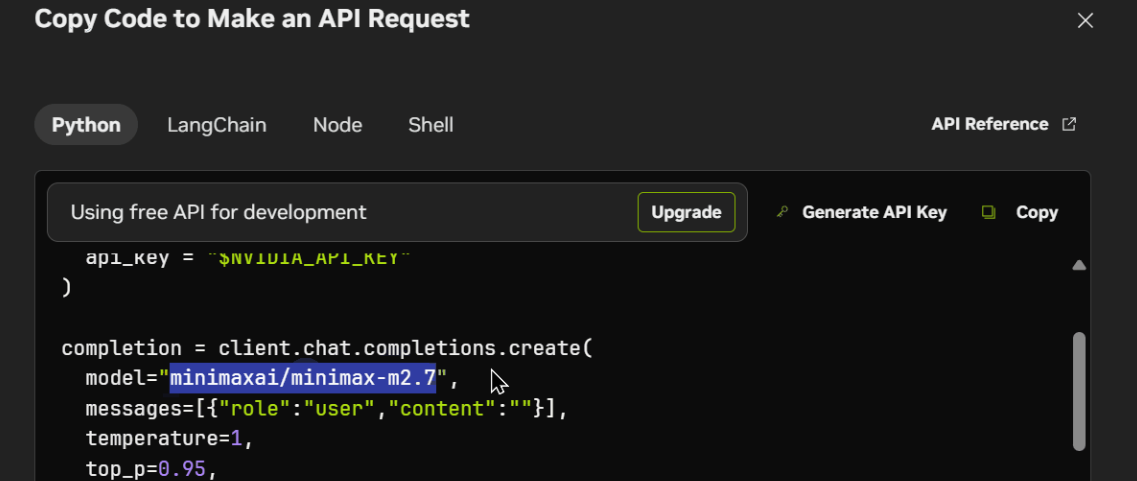
- Model IDs: here you need to add the model ID you can find browsing the free endpoints from NVIDIA NIM and click on ➕. As you can see you can add more than one. I put
minimaxai/minimax-m2.7
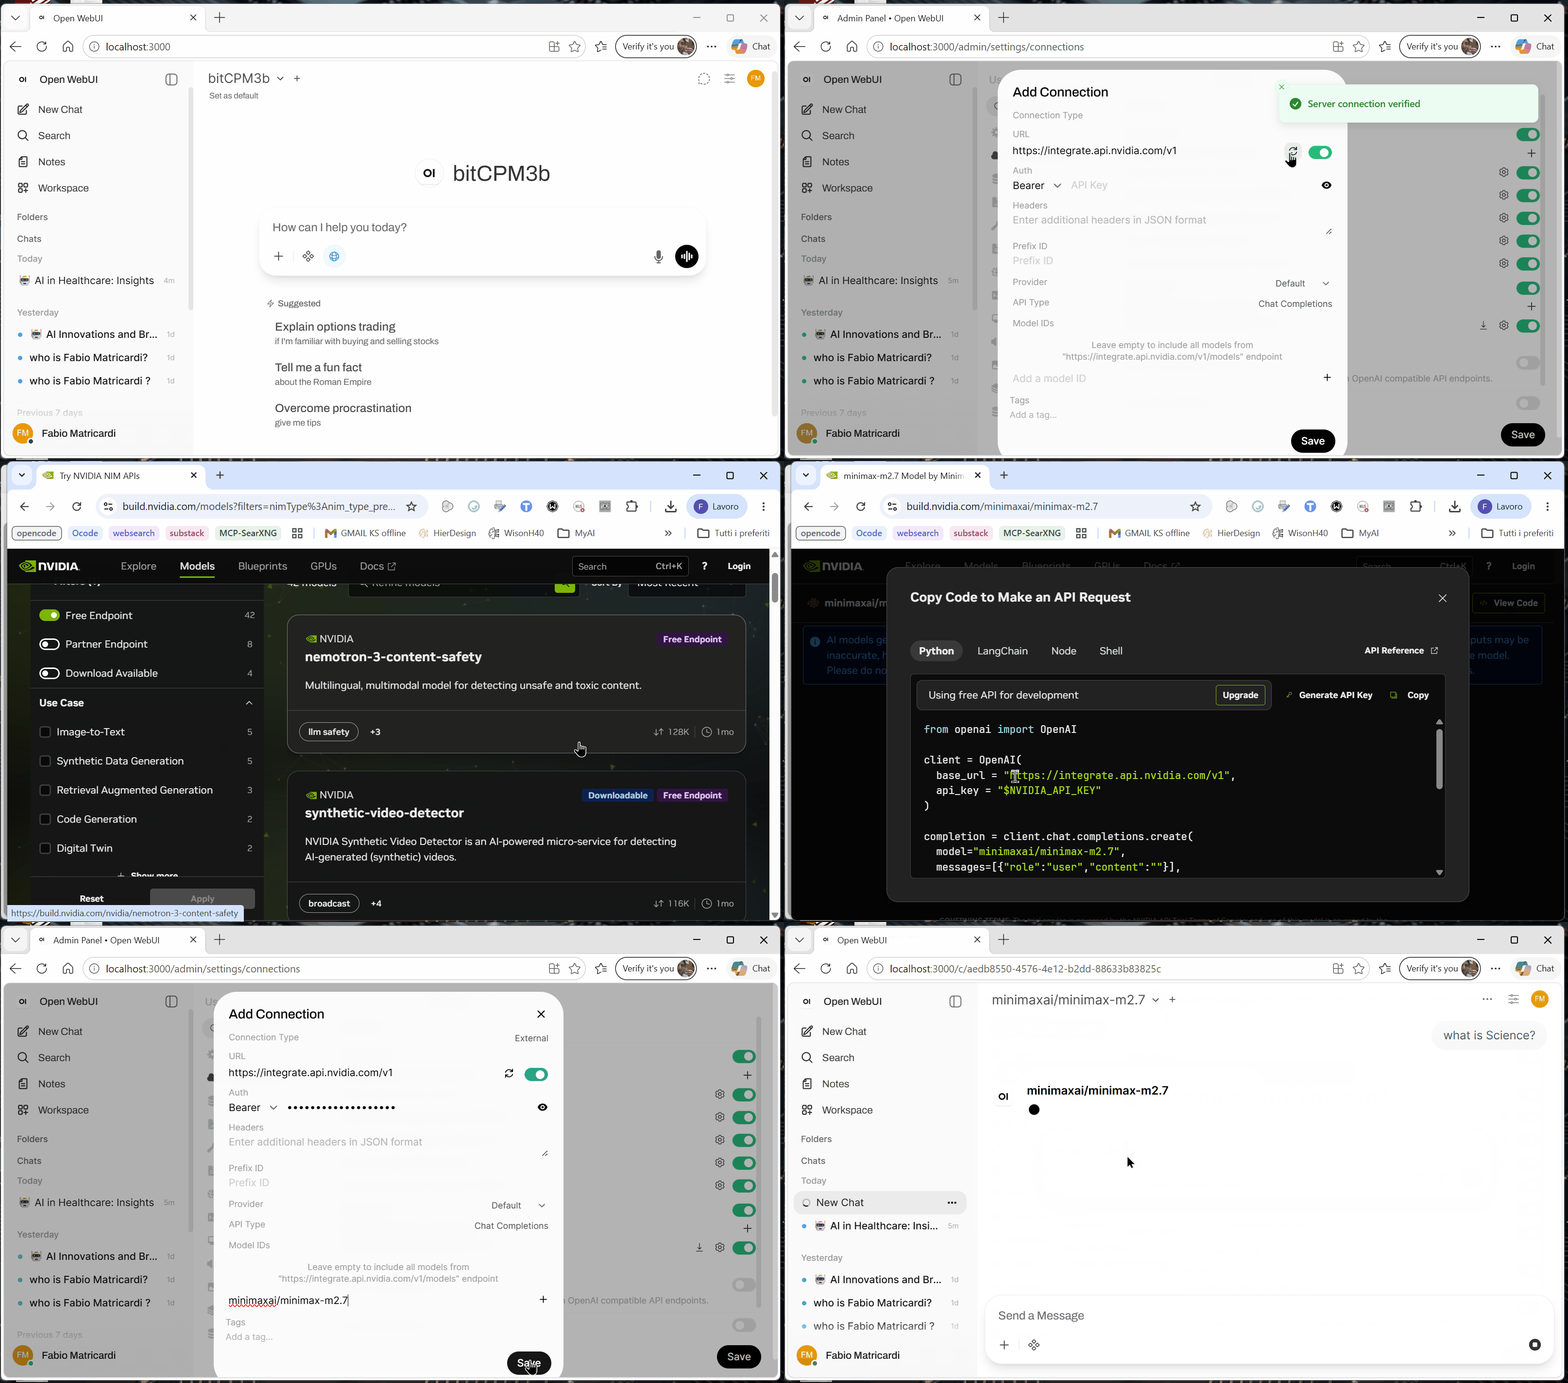
💡 Once saved, Open WebUI will put your new model served by NVIDIA in the model list available from the Chat.
Analyze Your Documents and Data
Got a pile of spreadsheets, PDFs, Word documents, or emails you need to make sense of? Drop them into the file browser and let the AI read them for you. Open Terminal can open and understand all of these formats — no special setup needed.
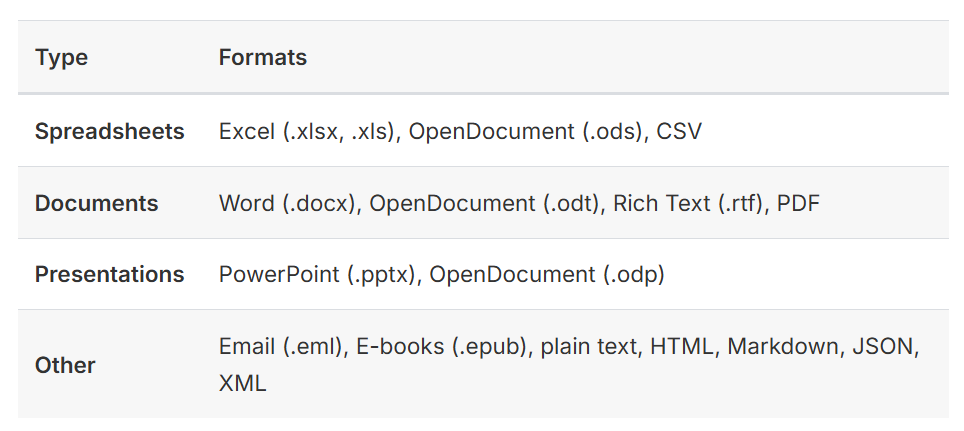
The AI can read all of these directly — it doesn’t need to upload them to any external service. File content stays on your server and is processed locally.
Here few examples:
“Summarize this report”
You: (drag-drop a PDF into the file browser) Can you read this quarterly report and give me the key takeaways?
The AI opens the PDF, reads through it, and gives you a concise summary — pulling out revenue figures, key decisions, notable changes, whatever matters.
Many of the tools people look for are already built into Open WebUI and just need to be turned on: web search, code execution, image generation, memory, and knowledge-base retrieval are all available without installing any plugins. Once enabled, these appear automatically as system tools when using Native Mode.
Most of these need a small amount of setup (choosing a provider, adding an API key, or enabling a toggle). Setup guides for the most popular ones:
- **Web Search** — connect a search provider (Google, Brave, DuckDuckGo, SearXNG and many more) so the model can look things up.
Note: the SearXNG tutorial will not work… use mine!
- **Image Generation** — connect an image provider (OpenAI DALL-E, ComfyUI, Automatic1111, etc.) for in-chat image creation
- **Code Execution** — run code blocks directly in chat (Pyodide runs in-browser by default, or connect Jupyter for server-side execution)
- **Memory** — let the model remember facts about you across conversations
For anything not built in, the **Open WebUI Community site** is worth browsing. A few categories to give a sense of what is available:
- Observability / cost tracking: Langfuse, OpenLit, Portkey. Log every chat turn, token usage, and latency to your own stack.
- Smart-home / automation: Home Assistant tools that let the model control devices, routines, and scenes.
- Research: arXiv, PubMed, Semantic Scholar, Wolfram Alpha. Structured results with real citations.
- Issue tracking / messaging: Jira, Linear, GitHub Issues, Slack, Discord, email.
- Databases / APIs: read-only SQL against your own database, or calls to your internal API.
- Domain-specific: weather, stocks, crypto, shipping tracking, recipes, and many more.
Tools appear in the + menu in the chat input. The model only sees the tools you have enabled for that conversation.
I hope you enjoyed the article. If this story provided value and you wish to show a little support, you could:
- Clap a lot of times for this story
- Highlight the parts more relevant to be remembered (it will be easier for you to find them later and for me to write better articles)
- Join my totally free weekly Substack newsletter here
- Follow me on Medium
- Follow my publication https://medium.com/artificial-intel-ligence-playground
If you want to read more, here are some ideas:
Sources
https://docs.docker.com/desktop/setup/install/windows-install/
메타데이터
- post_id
- c2f5dd62ce59
- slug
- you-dont-need-an-ai-agent-for-every-single-thing-c2f5dd62ce59
- url
- https://medium.com/artificial-intel-ligence-playground/you-dont-need-an-ai-agent-for-every-single-thing-c2f5dd62ce59
- canonical_url
- https://medium.com/artificial-intel-ligence-playground/you-dont-need-an-ai-agent-for-every-single-thing-c2f5dd62ce59
- author_url
- https://medium.com/@fabio.matricardi
- status
- ok
- fetched_at
- 2026-06-16 19:09:56