Autoscaling EKS with Karpenter — A Practical Guide
If you’ve run Kubernetes on AWS, you’ve probably come across the challenges of Cluster Autoscaler: slow scale-up, rigid node groups, and…
Autoscaling EKS with Karpenter — A Practical Guide

If you’ve run Kubernetes on AWS, you’ve probably come across the challenges of Cluster Autoscaler: slow scale-up, rigid node groups, and instances that sit idle because a pod needed “just a little more resources” than what the group offered.
You bump the node group, wait ten minutes, and pray the pod gets scheduled.
Karpenter fixes that.
It’s purpose-built for EKS, reacts to unschedulable pods in seconds, and picks the cheapest instance that actually fits your workload across spot and on-demand, across instance families, no node groups required.
In this blog, I’ll walk you through provisioning a fully Karpenter-enabled EKS cluster with Terraform, and then we’ll watch it scale in real time.
Why choose karpenter over Cluster Autoscaler? The key difference between them:-
- Cluster Autoscaler scales node groups, Karpenter scales nodes.
- When a pod is pending, Karpenter looks at the pod’s requests, finds the single cheapest instance that satisfies them, and launches it. No group, no waiting on an ASG.
What we’ll build
All infrastructure is defined as Terraform modules:
karpenter/
├── modules/
│   ├── vpc/             # VPC, public/private subnets, NAT gateway
│   ├── ec2/             # A small jumpbox for SSH/kubectl access
│   ├── security-group/  # Reusable SG with configurable ingress
│   └── eks/             # EKS cluster + node group + Karpenter
├── k8s-manifests/       # NodePool, EC2NodeClass, demo workload
└── main.tf              # Wires the modules together

# Let's setup the infra for this activity
git clone https://github.com/shash2121/karpenter.git

cd karpenter
# Update the S3 backend bucket and your key_name in terraform.tfvars first
terraform init
terraform apply

# Connect to cluster
aws eks update-kubeconfig --name karpenter-demo --region us-east-1

# Before starting the activity, let's have a look at the Terraform code and
# also how Karpenter autoscaling works in EKS.
The EKS module contains:-
- The EKS cluster (v1.35) and a small managed node group for system pods
- The EKS Pod Identity Agent addon (how Karpenter gets AWS credentials)
- Karpenter’s IAM roles, policies, and Pod Identity association
- An SQS queue + EventBridge rules for interruption handling
- The Karpenter Helm release
The Karpenter controller IAM policy
Karpenter needs a fairly broad set of EC2 and IAM permissions to launch instances, tag them, create launch templates, and clean them up.
Rather than attaching AmazonEC2FullAccess (please don’t), the Terraform defines a scoped-down policy based on AWS’s official recommendations. Here’s the structure of it:
- Every permission is scoped to the cluster using tag-based conditions (
kubernetes.io/cluster/<name> = owned). Karpenter can only touch instances it created. This matters in shared AWS accounts. - The controller gets these credentials via **EKS Pod Identity it’s the modern way, and the Terraform sets it up with an aws_eks_pod_identity_association resource binding the karpenter** service account to the role.
Interruption handling
Karpenter needs to know before a node disappears so it can drain it and reschedule pods. The Terraform creates:
-
An SQS queue (karpenter-demo-karpenter-interruption)
-
Four EventBridge rules that forward events to that queue:
- AWS Health events:-
- EC2 Spot Instance Interruption Warnings
- EC2 Instance Rebalance Recommendations
- EC2 Instance State-change Notifications
EC2NodeClass:-
- It defines the “how”.
- Defines the AWS infrastructure spec for nodes Karpenter creates: AMI family, IAM role, subnet/security group selectors, block device mappings, and tags.
- Think of it as a template for the EC2 instances backing the nodes.
# k8s-manifests/karpenter-ec2nodeclass.yaml
apiVersion: karpenter.k8s.aws/v1
kind: EC2NodeClass
metadata:
  name: default
spec:
  amiFamily: AL2023
  amiSelectorTerms:
    - alias: al2023@latest

  # IAM role attached to every Karpenter-provisioned node.
  # This matches the role created by Terraform:
  #   <cluster_name>-karpenter-node-role
  role: "karpenter-demo-karpenter-node-role"

  # Discover subnets tagged with karpenter.sh/discovery = <cluster-name>
  # (the VPC module tags private subnets with this value)
  subnetSelectorTerms:
    - tags:
        karpenter.sh/discovery: karpenter-demo

  # Discover security groups tagged with karpenter.sh/discovery = <cluster-name>
  # The EKS-managed cluster security group is used by default when this is
  # omitted; keep it simple and let Karpenter pick the cluster SG.
  securityGroupSelectorTerms:
    - tags:
        kubernetes.io/cluster/karpenter-demo: owned

  # Tags applied to every EC2 instance Karpenter launches
  tags:
    Team: karpenter-demo

  # 50 GiB gp3 root volume for each node
  blockDeviceMappings:
    - deviceName: /dev/xvda
      ebs:
        volumeSize: 50Gi
        volumeType: gp3
        encrypted: true
        deleteOnTermination: true
NodePool:-
- It defines the “when & what”.
- Defines scheduling constraints (instance types, architecture, spot vs on-demand), scaling limits (max CPU/memory), disruption policies (consolidation, node expiry), and which EC2NodeClass to use.
- It’s the Kubernetes-side policy that decides when to scale and what kind of nodes to spin up.
# k8s-manifests/karpenter-nodepool.yaml
apiVersion: karpenter.sh/v1
kind: NodePool
metadata:
  name: default
spec:
  # Template applied to every node Karpenter provisions from this pool
  template:
    metadata:
      labels:
        NodePool: default
    spec:
      # Reference the EC2NodeClass created above
      nodeClassRef:
        group: karpenter.k8s.aws
        kind: EC2NodeClass
        name: default

      # Broad set of instance types so Karpenter can pick the cheapest /
      # best-fit option. Small + medium instances keep the demo cheap.
      requirements:
        - key: kubernetes.io/arch
          operator: In
          values: ["amd64"]
        - key: karpenter.sh/capacity-type
          operator: In
          values: ["on-demand"]
        - key: node.kubernetes.io/instance-type
          operator: In
          values:
            - t3.small
            - m7i-flex.large
            - c7i-flex.large

  # Resource limits cap total spend / node count
  limits:
    cpu: 100
    memory: 200Gi

  # Disruption policy — how aggressively Karpenter replaces nodes
  disruption:
    consolidationPolicy: WhenEmptyOrUnderutilized
    consolidateAfter: 30s
    budgets:
      - nodes: "10%"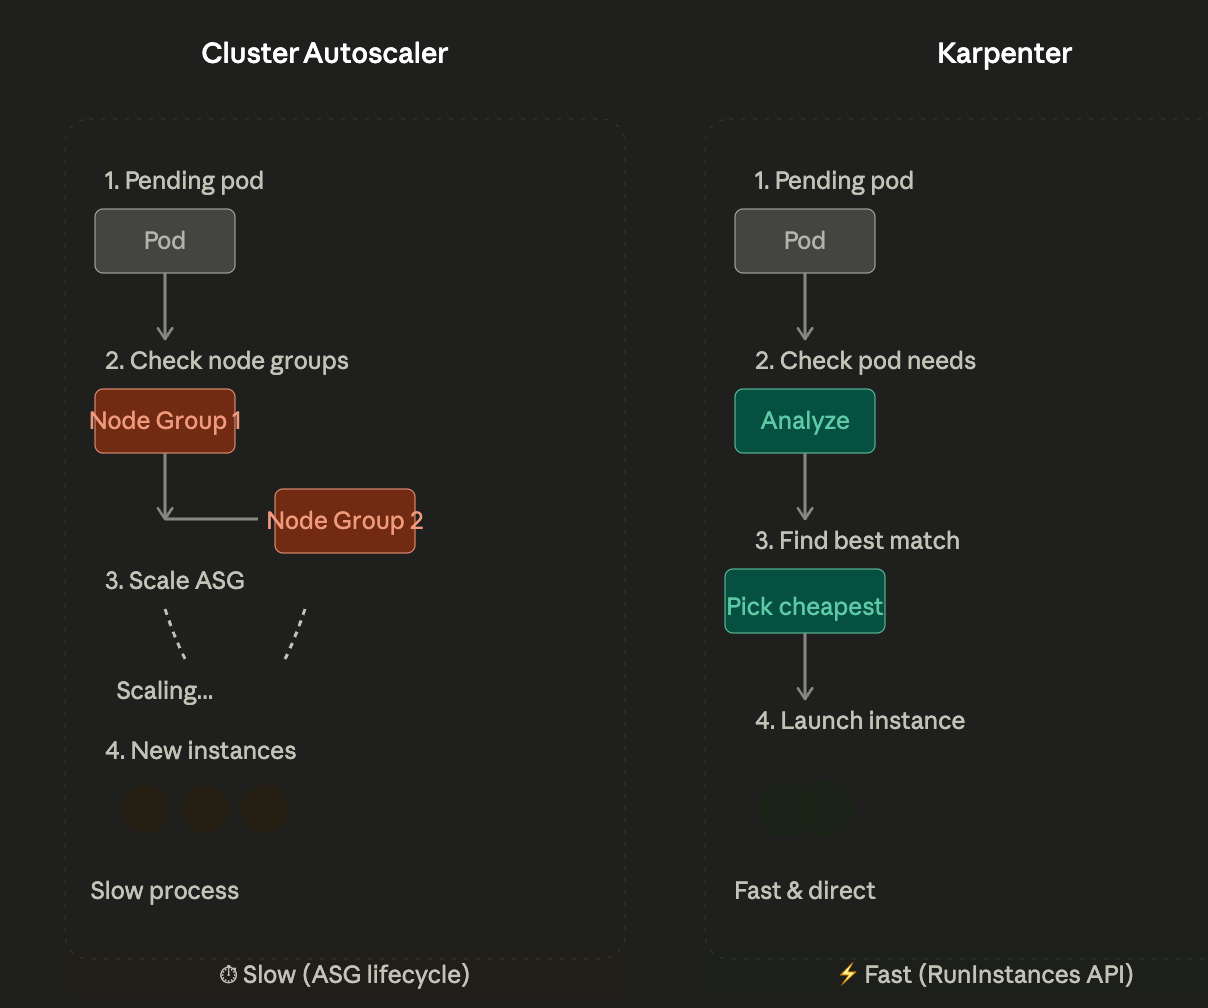
A few things worth highlighting:
-
requirements:- Karpenter picks the cheapest instance from this list that fits the pending pod. Spot is preferred when available.
-
limits:- a hard cap on total CPU/memory so a runaway deployment can’t drain your budget.
-
disruption.consolidationPolicy: WhenEmptyOrUnderutilized:- Karpenter will not only remove empty nodes, but also move pods off underutilised nodes and bin-pack them onto fewer instances. This is where the real savings come from.
-
Let’s see Karpenter in action:-
cd karpenter/k8s-manifests/

kubectl apply -f karpenter-ec2nodeclass.yaml
kubectl apply -f karpenter-nodepool.yaml

# Verify
kubectl get ec2nodeclass
kubectl get nodepool
kubectl get pods -n kube-system -l app.kubernetes.io/name=karpenter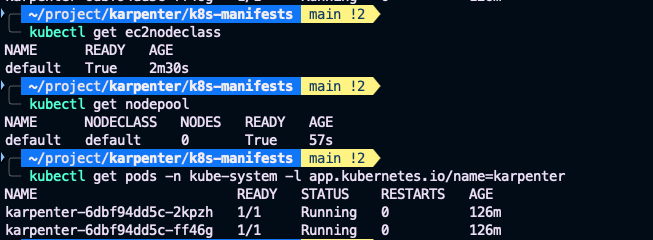
# Deploy the application
kubectl apply -f nginx-deployment.yaml

# Scale up the nginx deployment
kubectl scale deployment nginx --replicas=10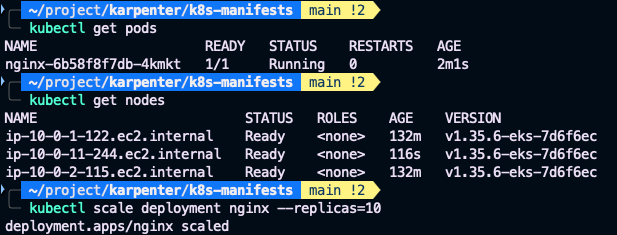
Within seconds, you’ll see Karpenter:-
- Detect the pending pods
- Select the cheapest instance type that fits
- Wait for the node to register with the cluster
- Bind the pods to it
# Run following commands to verify
kubectl get nodes
Kubectl get pods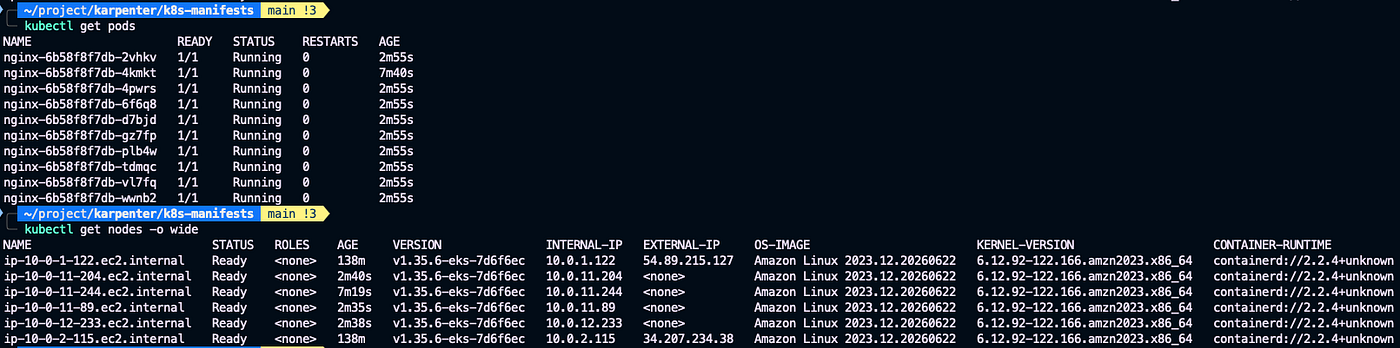
- As you can see that Karpenter launched additional nodes in response to deployement being scaled up.
# To list only the Karpenter provisioned nodes, execute following:-
kubectl get nodes -l karpenter.sh/nodepool -o jsonpath='{range .items[*]}{.metadata.name}{"\t"}{.metadata.labels.node\.kubernetes\.io/instance-type}{"\t"}{.metadata.labels.karpenter\.sh/capacity-type}{"\n"}{end}'
- Now scale back the deployment:-
kubectl scale deployment nginx --replicas=1

# Watch Karpenter drain and terminate the now-empty nodes
# Execute
kubectl get nodes
kubectl get nodes -l karpenter.sh/nodepool -o jsonpath='{range .items[*]}{.metadata.name}{"\t"}{.metadata.labels.node\.kubernetes\.io/instance-type}{"\t"}{.metadata.labels.karpenter\.sh/capacity-type}{"\n"}{end}'- The empty nodes have been drained and terminated by Karpenter:-

Here’s the entire flow at a glance:-
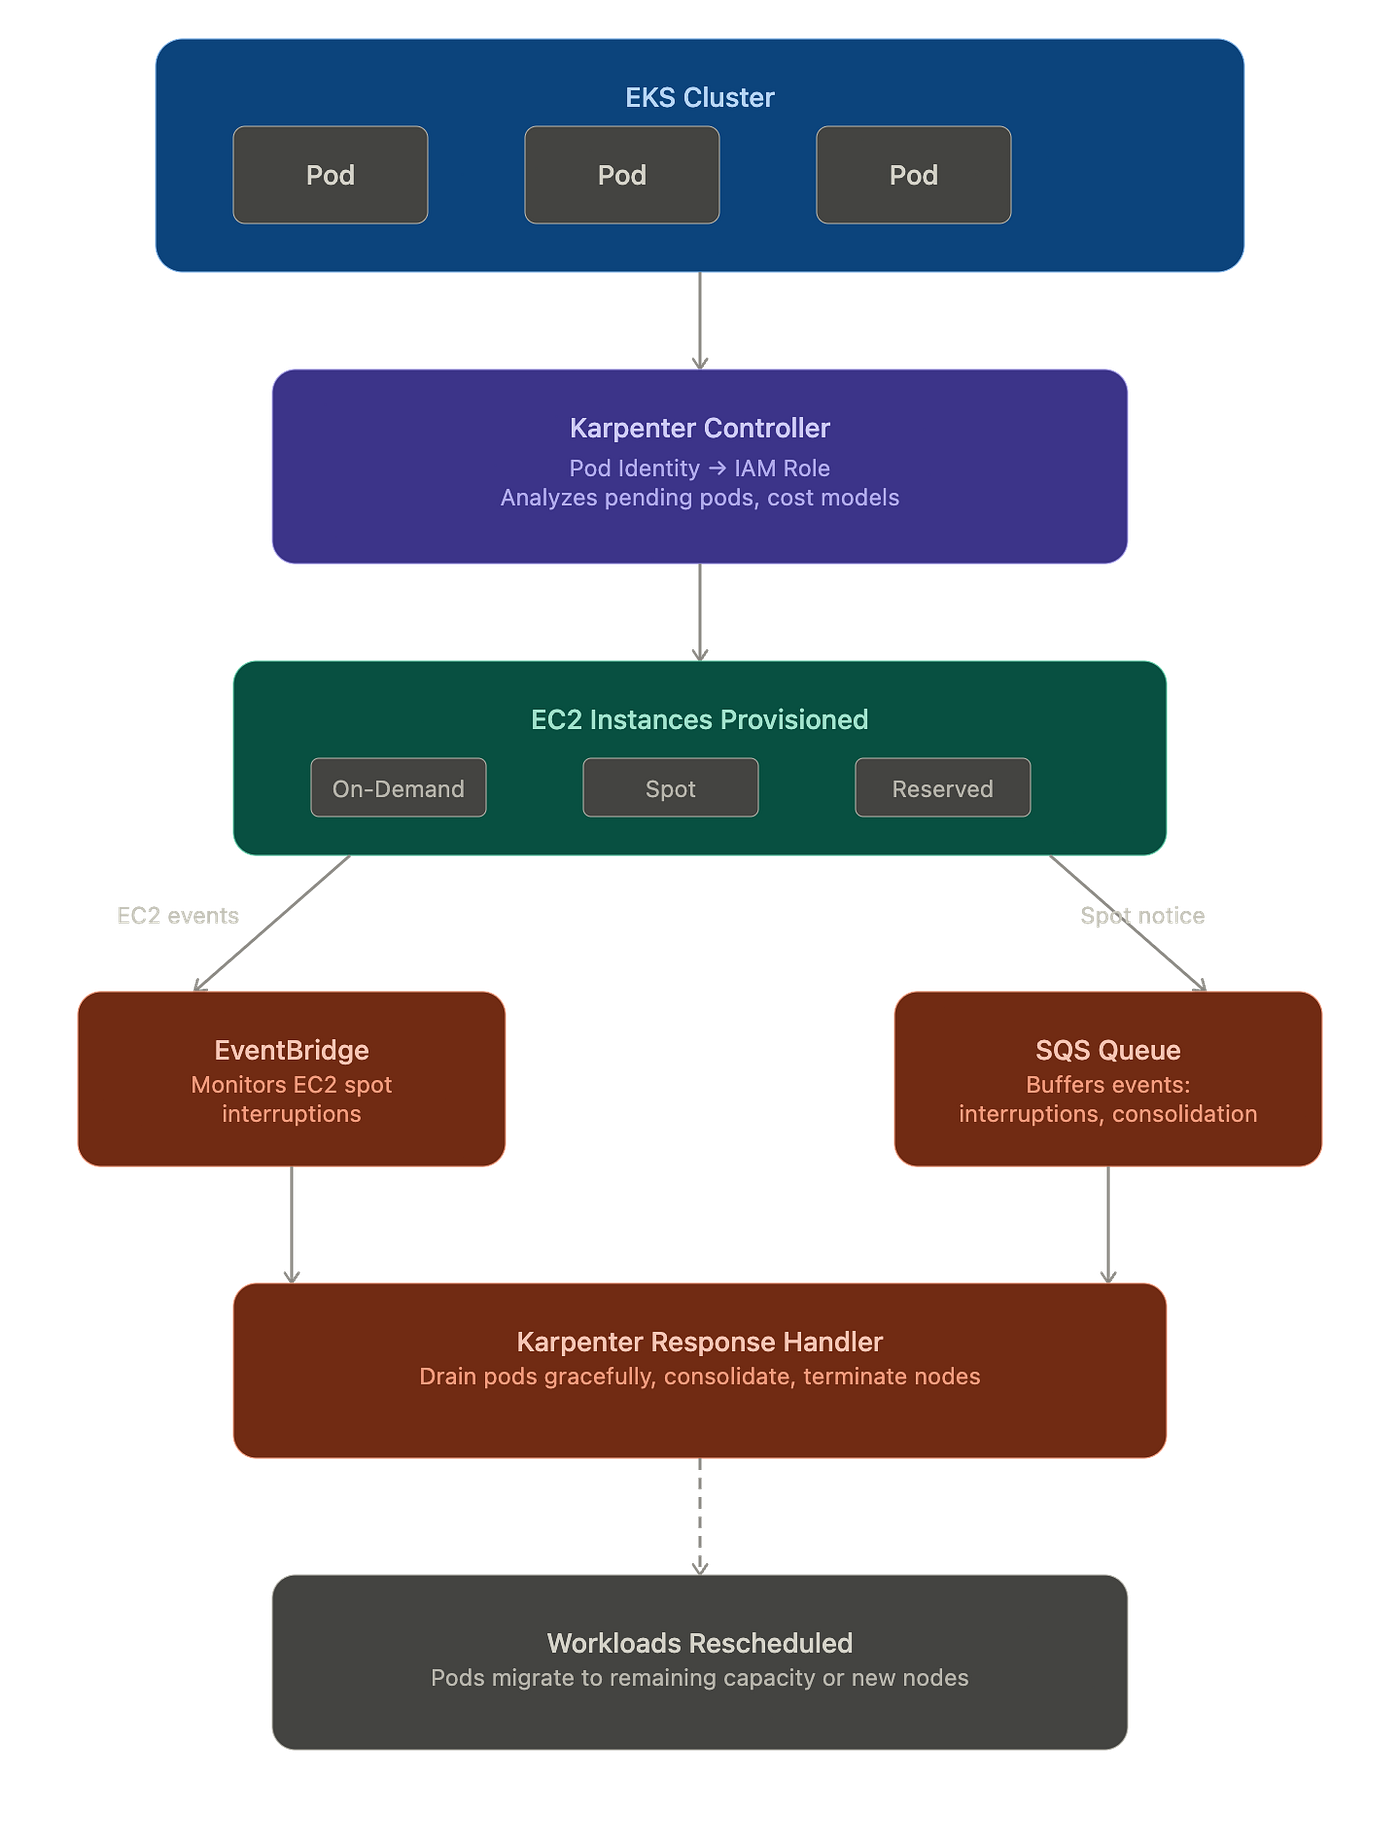
- Pending pods trigger Karpenter's controller to analyze resource requests
- Karpenter controller runs inside the cluster as a pod and uses EKS Pod Identity to assume an IAM role — this gives it permissions to call EC2 APIs without hardcoded credentials
- EC2 instances are provisioned automatically (choosing between on-demand and spot based on cost)
- EventBridge continuously listens for EC2 interruption notices (2-minute warning before AWS terminates a spot instance)
- SQS queue buffers these interruption events plus consolidation tasks (Karpenter's bin-packing to remove underutilized nodes)
- Karpenter actions read from the queue and gracefully drain pods before terminating nodes
Follow me for more practical DevOps/SRE deep dives.
Connect with me on LinkedIn as well.
메타데이터
- post_id
- c846dcd05492
- slug
- autoscaling-eks-with-karpenter-a-practical-guide-c846dcd05492
- url
- https://awstip.com/autoscaling-eks-with-karpenter-a-practical-guide-c846dcd05492
- canonical_url
- https://awstip.com/autoscaling-eks-with-karpenter-a-practical-guide-c846dcd05492
- author_url
- https://medium.com/@shashwattripathi11
- status
- ok
- fetched_at
- 2026-07-13 06:23:13