How to Send reusable Magic links in PingOne Advanced Identity Cloud
Showcasing new P1AIC functionality — Back Channel Journeys, Custom Nodes and Annotations
Reimagining Magic Links with PingOne Advanced Identity Cloud
Introduction
The SaaS world never stands still — new features and capabilities are constantly reshaping what’s possible. In this blog, we’ll explore how to configure reusable magic link journeys using three powerful new features in PingOne Advanced Identity Cloud (P1AIC):
- Back-Channel Journeys — Enable out-of-band delegated authentication with the new Backchannel Initialize and Backchannel Status nodes.
- Custom Nodes — Build and reuse your own custom nodes across journeys and even environments. They also appear directly in the journey editor for easy drag-and-drop with zero additional configuration.
- Annotations — Add sticky notes and comments to journeys in the editor to document, explain, and share journey context
Problem Space
Many customers rely on magic links to verify elevated actions such as password resets. These links are designed for one-time use only. The challenge is that some email clients, like Microsoft Outlook, include security features such as Safe Links, which automatically test URLs for spam or phishing threats before the user clicks them. The unintended consequence is that the magic link is consumed and invalidated prematurely — breaking the flow for the user.
The blog overcomes this through back channel journeys, custom nodes with annotations for ease of understanding.
To note — as a security best practice, the magic links are designed to expire; either after a configurable timeout or once the back-channel journey has been completed.
Solution
All assets are located on GitHub here.
Step 1 — Import Custom Nodes
First lets go ahead and import the three new custom nodes used by the front and back channel journeys:
- Debugger — Outputs all state data onscreen for the user.
- Set BackChannel State Properties — Collects
nodeStateproperties and passes them to the back-channel journey for consumption. - User Message to Display — Displays a configurable message to the user.
- Download
custom_nodes.jsonfrom GitHub here to your local machine. - From the P1AIC platform admin UI, expand Journeys on the left navigation panel > Custom Nodes > Import Nodes.
- Click Browse, locate
custom_nodes.json, click open and finally hit Import Nodes. - You should end up with 3 shiny new nodes to use as below. These now appear in the journey editor palette to use across any journey 🎉
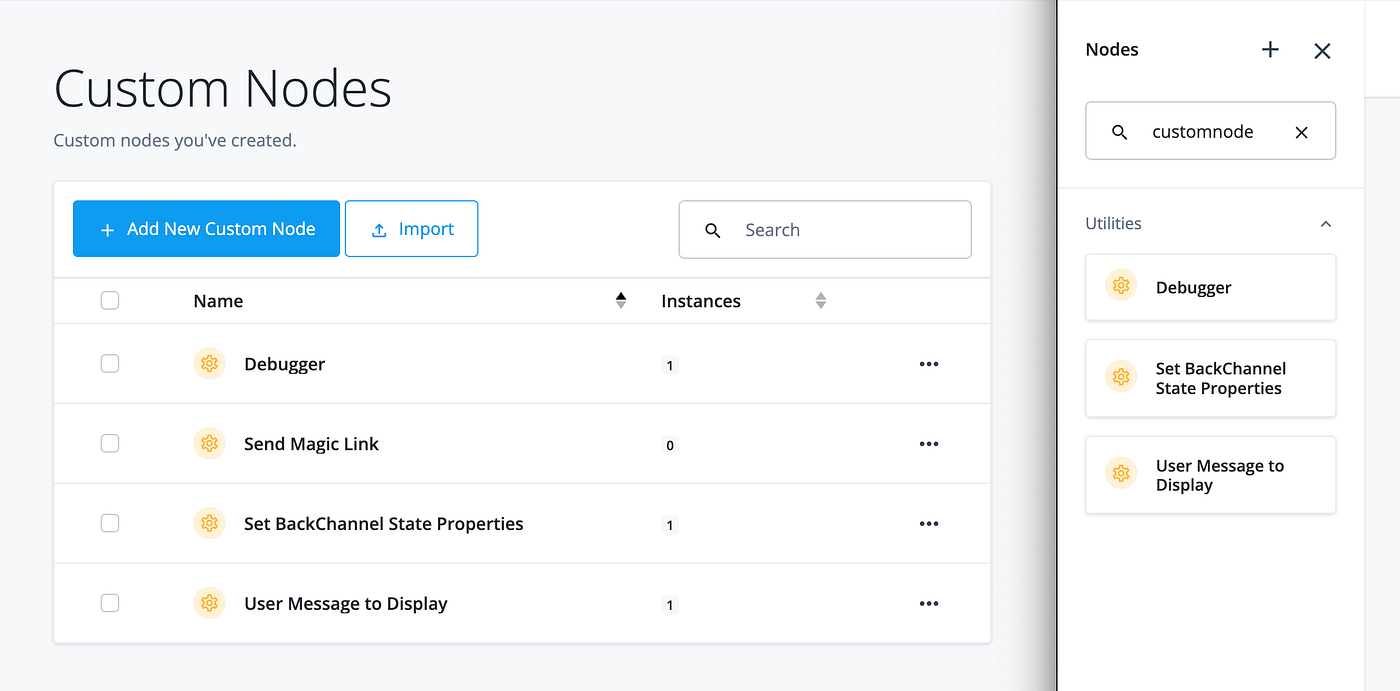
Custom node list on the left and the nodes available to drag and drop in the journey editor on the right
Step 2 — Import Journeys
Next, we’ll import the front- and back-channel journeys needed to support magic links for a password reset use case.
- From this
journey_exportsdirectory here, download both journeys to your local machine. - From the P1AIC platform admin UI, expand Journeys on the left navigation panel > click Journeys > Import.
- If need be take a backup or skip.
- Click Browse > find the
ResetBackChannel-journeyExport.jsonfile > Open > Next > Start Import. - Repeat steps 2–4 for the
ResetFrontChannel-journeyExport.json, which also imports a new email template calledchangePassword.
All done!
Note for completeness all scripts used by the custom nodes and journeys are located in the script directory here on GitHub.
Journey Breakdown
ResetFrontChannel
We should now have a ResetFrontChannel which looks like this:

The ResetFrontChannel journey
Things to note:
- Sticky notes highlight and explain the key phases of the journey.
- Set Back-Channel State Properties is a custom node that defines which state properties are passed to the back-channel journey. In this example:
_id, objectAttributes,andusername. - User Message to Display is a custom node that shows a confirmation message after a successful password change: “Password successfully reset. Hit Next to log in.”
- An Email Suspend Node has been added for the negative path to ensure consistent behaviour, whether or not a valid email address exists. This node displays a no-button message to the user, mirroring the experience of the successful flow.
ResetBackChannel
We should now have a ResetBackChannel which looks like this:

The ResetBackChannel journey
Things to note:
- For testing purposes, a Debugger Custom Node is used first to show the state properties passed from the front-channel journey to the back-channel journey.
- The journey has been annotated to aid description and explanation.
- On success, the journey redirects back to the front channel to complete the flow.
Demo
Now we’re all done let’s demonstrate the flow:
- Ensure an end user exists with a valid email address and given name set. Note the email address must be unique.
- In a different browser or private browing window call the the front channel journey e.g.
https://openam<tenant>/am/XUI/?realm=alpha&authIndexType=service&authIndexValue=ResetFrontChannel - Enter a valid email address and the following message should return.

Front channel pause message
-
Locate the email and either click the link if you are not signed in to the Platform Admin UI, or copy the link address into a private window if you are.
-
The Debug node from the back channel journey will execute, which shows all
nodeStateattributes on screen including, those which have been passed from the front channel to the back channel.

Debug output including _id, objectAttributes and username passed from the front channel
-
Hit Next and enter a password which confirm to the password policy`
-
The journey will now redirect to the front channel to resume and if all is well the following confirmation message will be returned.

Success confirmation message
- Hit Next and the user will be logged in.
Conclusion
Reusable magic link journeys in PingOne Advanced Identity Cloud turn a frustrating customer experience into a seamless one. By combining Back-Channel Journeys to handle out-of-band authentication, Custom Nodes to encapsulate and reuse functionality, and Annotations to clearly document and explain each step, you can overcome the limitations of one-time-use links invalidated by email security features.
The result is a more resilient, transparent, and reusable approach to magic links — one that not only solves today’s Safe Links challenge but also sets the foundation for more adaptable authentication journeys in the future.
메타데이터
- post_id
- c8b0f7302600
- slug
- how-to-send-reusable-magic-links-in-pingone-advanced-identity-cloud-c8b0f7302600
- url
- https://medium.com/@darinder.shokar/how-to-send-reusable-magic-links-in-pingone-advanced-identity-cloud-c8b0f7302600
- canonical_url
- https://medium.com/@darinder.shokar/how-to-send-reusable-magic-links-in-pingone-advanced-identity-cloud-c8b0f7302600
- author_url
- https://medium.com/@darinder.shokar
- status
- ok
- fetched_at
- 2026-08-10 01:00:38