Git & GitHub Setup for Beginners — Install, Connect VS Code, Push & Clone (Step by Step)
Every developer’s journey starts with one lesson: version control. Today we set up Git and GitHub from scratch, connect everything to VS…
Git & GitHub Setup for Beginners — Install, Connect VS Code, Push & Clone (Step by Step)
Every developer’s journey starts with one lesson: version control. Today we set up Git and GitHub from scratch, connect everything to VS Code, and push our very first code — twice, two different ways. Let’s go step by step, exactly like a Day 1 classroom session. 💻
Why Git & GitHub Matter (Before We Touch Any Code)
Before installing anything, understand why this lesson exists.
Imagine you’re writing an assignment in Word. You save it as assignment.docx. Then you make changes and save as assignment_final.docx. Then more changes: assignment_final_v2.docx, assignment_FINAL_USE_THIS.docx... Sound familiar? This is exactly what happens with code if you don't use version control — messy, confusing, and risky.
Git solves this. It’s a version control system — software that tracks every change you make to your code over time. Think of it as an infinite “undo history” combined with a time machine: you can see exactly what changed, when, and by whom, and jump back to any earlier version instantly.
GitHub is different from Git, and this trips up every beginner:
- Git = the tool that runs on your computer and tracks changes locally.
- GitHub = a website that stores your Git projects online, so you can back them up, share them, and collaborate with others.
Analogy: Git is like the “Save” and “Undo” system inside a video game. GitHub is like the cloud save that lets you access your game progress from any device, and even let friends play alongside you.
Why Every Developer Needs This
- Backup: your code lives safely online, even if your laptop crashes.
- Collaboration: teams work on the same project without overwriting each other’s work.
- History: you can always see who changed what, and revert mistakes.
- Portfolio: your GitHub profile is like a resume — companies actually check it!
Step 1: Install Git on Your Computer
Windows
- Go to git-scm.com.
- Download the Windows installer and run it.
- During installation, keep clicking Next with default options — the defaults are fine for beginners.
- Once done, open Command Prompt or Git Bash and type:
bash
git --versionIf it shows something like git version 2.44.0, Git is installed correctly. ✅
Mac
- Open Terminal.
- Type:
bash
git --version- If Git isn’t installed, macOS will prompt you to install “Command Line Developer Tools” — click Install.
Linux
bash
sudo apt update
sudo apt install git
Step 2: Tell Git Who You Are
Git needs to know your name and email — this gets attached to every change (called a “commit”) you make, so your team knows who did what.
Open your terminal and run:
bash
git config --global user.name "Your Name"
git config --global user.email "your.email@example.com"
Step by step:
git config→ the command to set Git's settings.--global→ applies this setting to every project on your computer, not just one.user.name/user.email→ the two pieces of identity info Git attaches to your work.
Use the same email you’ll use for your GitHub account — this connects your local commits to your GitHub profile properly.
Step 3: Create Your GitHub Account
- Go to github.com.
- Click Sign Up.
- Enter your email, create a password, and choose a username — pick something professional, since this becomes part of your public profile URL (
github.com/yourusername). Avoid nicknames likecoolgamer123— recruiters do look at this! - Verify your email address.
- Done! You now have your own GitHub profile — your coding portfolio for life.
Step 4: Install VS Code and Connect Git
- Download VS Code from code.visualstudio.com and install it.
- Open VS Code.
- Go to the Source Control tab in the left sidebar (the icon looks like a branching tree — or press
Ctrl+Shift+G). - If Git is installed correctly (Step 1), VS Code will automatically detect it here — no extra setup needed for basic use.
Optional but recommended: Sign in to GitHub directly inside VS Code:
- Click the Accounts icon (bottom-left corner).
- Choose Sign in with GitHub.
- This lets VS Code push/pull code without repeatedly asking for your password.
Step 5: Understand the “Main Branch” Before We Push Anything
A branch in Git is like a separate timeline of your project. The main branch (sometimes called master in older projects) is the primary, default timeline — it's usually treated as the "official" or "production-ready" version of your code.
Classroom analogy: think of your project like a story. main is the published, official storyline. If you want to experiment with a wild plot twist without ruining the original story, you create a new branch (like feature-login or experiment), make your changes there, and only merge it back into main once you're confident it's ready.
For Day 1, we’ll work directly on main to keep things simple — branching strategies come later once you're comfortable with the basics.
Method A: Creating a New Project Locally and Pushing to GitHub
This is the “push a brand-new project” flow — you start coding on your computer first, then send it up to GitHub.
Step 1: Create Your Project Folder
bash
mkdir my-first-project
cd my-first-project
Step 2: Initialize Git in This Folder
bash
git initThis creates a hidden .git folder — this is what turns a normal folder into a Git repository (a project Git is now tracking).
Step 3: Open the Folder in VS Code and Add a File
bash
code .This opens the current folder in VS Code. Create a file, e.g., index.html, and write some simple content:
html
<!DOCTYPE html>
<html>
<head><title>My First Project</title></head>
<body>
  <h1>Hello, Git and GitHub!</h1>
</body>
</html>
Save the file.
Step 4: Stage Your Changes
bash
git add .What does “staging” mean? Git works in three stages: Working Directory (your actual files) → Staging Area (files you’ve marked as “ready to save”) → Repository (the permanent saved history). git add . moves all changed files into the staging area, telling Git "include these in my next save."
Step 5: Commit Your Changes
bash
git commit -m "Initial commit: added homepage"A commit is a permanent snapshot of your staged changes, saved into your project’s history — like hitting “Save” in a video game. The -m flag lets you attach a short commit message describing what you did. Always write clear messages — "fixed stuff" is a bad message; "fixed navbar alignment bug" is a good one.
Step 6: Rename Your Branch to main (if needed)
bash
git branch -M mainNewer Git versions default to main already, but this ensures it explicitly.
Step 7: Create an Empty Repository on GitHub
- Go to github.com → click the + icon (top-right) → New repository.
- Give it a name, e.g.,
my-first-project. - Do NOT initialize with a README (we already have local code) — keep it empty.
- Click Create repository. GitHub will show you a URL like:
https://github.com/yourusername/my-first-project.gitStep 8: Connect Your Local Project to GitHub
bash
git remote add origin https://github.com/yourusername/my-first-project.gitWhat is a “remote”? It’s simply a saved nickname for a GitHub repository URL. origin is the conventional name for "the main remote copy of this project" — you'll type origin instead of the full URL every time from now on.
Step 9: Push Your Code
bash
git push -u origin mainBreaking this down:
git push→ send your committed changes up to GitHub.origin→ the remote you just connected.main→ the branch you're pushing.-u→ sets this as the default remote/branch, so next time you can simply typegit push.
Refresh your GitHub repository page — your code is now live online! 🎉
Method B: Cloning an Existing Repository and Pushing Changes
This is the “someone else already made the project, I want to work on it” flow — very common in team projects, open source, and college group assignments.
Step 1: Copy the Repository URL
On GitHub, open the repository you want to work on, click the green Code button, and copy the HTTPS URL — something like:
https://github.com/someoneelse/team-project.gitStep 2: Clone It to Your Computer
bash
git clone https://github.com/someoneelse/team-project.gitWhat does “clone” mean? It downloads a complete copy of the repository — all files, plus the entire commit history — onto your computer. Unlike a simple ZIP download, a clone remembers where it came from (its origin), so you can push updates back later.
Step 3: Move into the Cloned Folder and Open in VS Code
bash
cd team-project
code .
Step 4: Make Your Changes
Edit an existing file, or create a new one — for example, add your name to a contributors.md file.
Step 5: Check What Changed
bash
git statusThis shows you which files were modified, added, or deleted — always a good habit before committing.
Step 6: Stage, Commit, and Push
bash
git add .
git commit -m "Added my name to contributors list"
git push origin main
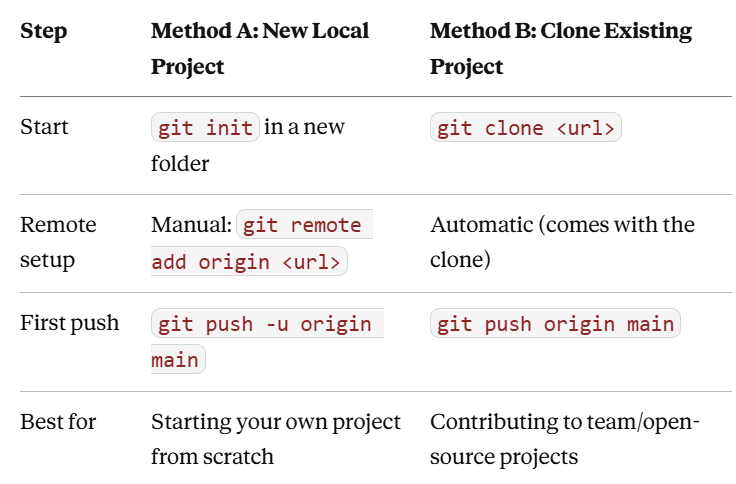
Notice we didn’t need git remote add this time — because when you clone, Git automatically sets up the origin remote for you, pointing back to the repository you cloned from. That's the key difference between Method A (starting fresh) and Method B (starting from an existing repo).
Push a New Project vs. Clone-and-Push: Side-by-Side
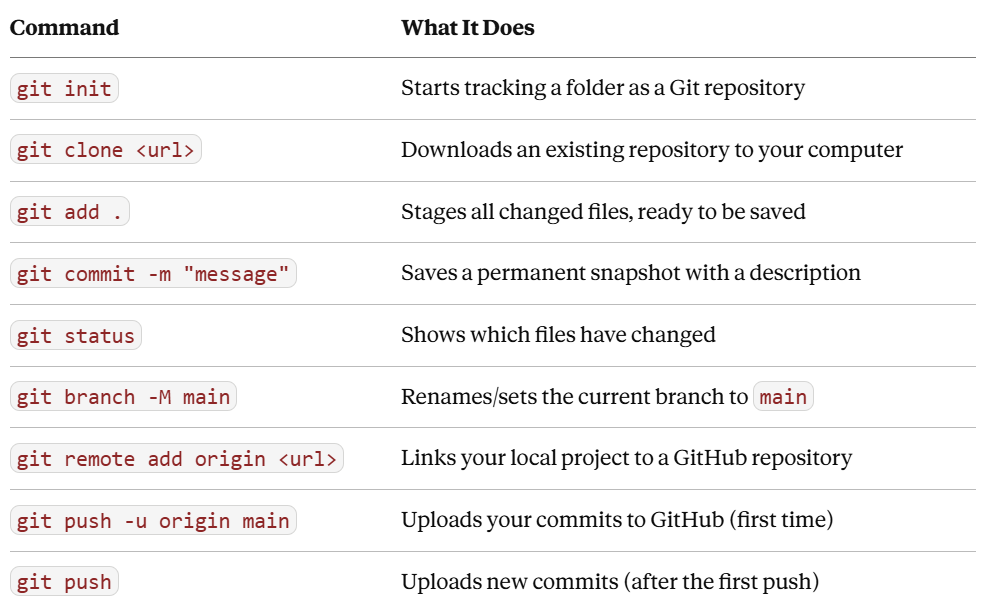
Quick Recap: The Core Git Commands from Today
Common Beginner Mistakes to Watch Out For
- Forgetting
git addbeforegit commit→ nothing gets saved, since nothing was staged. - Writing vague commit messages like “update” or “final” → makes history useless later.
- Not checking
git statusbefore committing → you might accidentally commit files you didn't mean to (like temporary files). - Pushing without pulling first (in team projects) → can cause conflicts if a teammate already pushed changes. We’ll cover
git pulland merge conflicts in a later session! - Confusing Git and GitHub → remember: Git = local tool, GitHub = online storage/collaboration platform.
What We Achieved Today (Day 1 Recap)
✅ Understood why Git and GitHub exist and how they’re different
✅ Installed Git and configured our identity
✅ Created a GitHub account
✅ Connected Git to VS Code
✅ Learned what the main branch means
✅ Created a brand-new project locally and pushed it to GitHub
✅ Cloned an existing project and pushed changes back
That’s a complete beginner-to-functional Git workflow in one session! From tomorrow, we’ll build on this with branching, pull requests, and handling merge conflicts — the tools real development teams use every day.
Practice today’s steps two or three times on your own dummy projects before the next class — muscle memory with these commands will make everything else in Git much easier to learn. 🚀
Found helpful? Give it a clap 👏 and follow along for next, where we dive into branching and pull requests!
메타데이터
- post_id
- c8dca7ae4461
- slug
- git-github-setup-for-beginners-install-connect-vs-code-push-clone-step-by-step-c8dca7ae4461
- url
- https://medium.com/@pranshi100verma/git-github-setup-for-beginners-install-connect-vs-code-push-clone-step-by-step-c8dca7ae4461
- canonical_url
- https://medium.com/@pranshi100verma/git-github-setup-for-beginners-install-connect-vs-code-push-clone-step-by-step-c8dca7ae4461
- author_url
- https://medium.com/@pranshi100verma
- status
- ok
- fetched_at
- 2026-07-30 04:15:25