Structural Design Pattern: Decorator Pattern — Typescript
Overview
Structural Design Pattern: Decorator Pattern — Typescript
Overview
The Decorator design pattern allows you to dynamically attach new behaviors and responsibilities to objects by placing them inside special wrapper objects. Instead of creating a massive tree of subclasses to handle every possible feature combination, you wrap a base object with the exact features you need. Because behaviors are added using wrappers, you can change or stack an object’s capabilities at runtime based on user input, rather than fixing them at compile time.
The Coffee example
Imagine a coffee shop that offers a variety of drinks on its menu. Every customer has their own preference, and each type of coffee requires a different brewing process. As a software engineer, if you were designing a system to handle all these different orders, you would look for a design pattern that fits this perfectly. This is where the Decorator pattern steps in — allowing us to dynamically ‘brew’ complex objects by wrapping a simple base in layers of custom functionality.
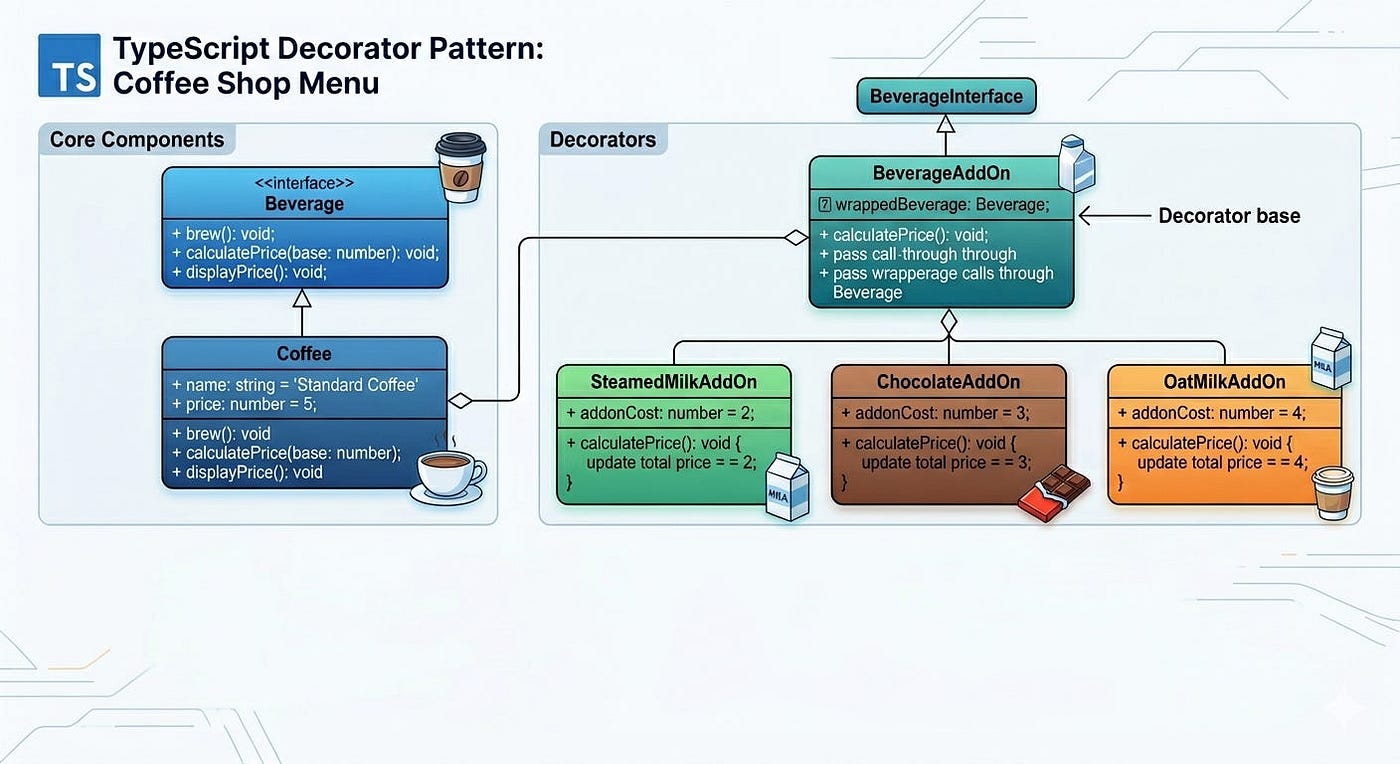
Consider the diagram below to understand better how the decorator pattern helps design the brewing process.
Let’s Code the Coffee Brewing example
The implementation follows the above-mentioned diagram explaining the design of brew process using the Decorator Pattern
Beverage Interface
interface BeverageInterface {
    brew(): Beverage;
    calculatePrice(price: number): void;
    displayPrice(): void;
    addAddOn(addOn: BeverageAddOn): void;
}

type Beverage = {
    name: string;
    price: number;
    status: string;
}
The concrete classes implementing the Beverage Interface. Below is the coffee class implementation considering the design in the above-mentioned diagram. Here, the design keeps one concrete implementation of coffee, and adds decorators to the base class to brew the coffee variety like Cafe Mocha, etc.
Coffee Class
class Coffee implements BeverageInterface {
    private name: string;
    private price: number;
    private static basePrice: number = 5;

    constructor(name: string) {
        this.name = name;
        this.price = Coffee.basePrice;
    }

     brew(): Beverage {
        console.log("brewing: " + this.name);
        switch (this.name) {
            case "Mocha":
                this.addAddOn(new SteamedMilkAddOn(this));
                this.addAddOn(new ChocolateAddOn(this));
                break;
            case "OatMilkMocha":
                this.addAddOn(new OatMilkAddOn(this));
                this.addAddOn(new ChocolateAddOn(this));
                break;
            case "Latte":
                this.addAddOn(new SteamedMilkAddOn(this));
                break;
            default:
                this.addAddOn(new SteamedMilkAddOn(this));
        }
        return {
            name: this.name,
            price: this.price,
            status: "Ready"
        }
    }

    calculatePrice(addOnPrice: number): void {
        this.price += addOnPrice;
    }

    displayPrice(): void {
        console.log("displayPrice: " + this.price);
    }
}
Referring to the above-mentioned design diagram, let’s add the decorators that would enable brewing different coffee varieties.
Interface BeverageAddOn
interface BeverageAddOn {
    calculatePrice(): void;
}
As mentioned in the above diagram, the coffee shop, which currently has three varieties of coffee available on the menu
- Cafe Latte
- Cafe Mocha
- Cafe Mocha with Oat Milk
Based on the menu availability, below are the concrete implementations of BeverageAddOn
Steamed Milk
class SteamedMilkAddOn implements BeverageAddOn {
    private coffee: BeverageInterface;
    private static addOnPrice: number = 2;
    constructor(coffee: BeverageInterface) {
        this.coffee = coffee;
    }
    calculatePrice(): void {
        this.coffee.calculatePrice(SteamedMilkAddOn.addOnPrice)
    }
}
Chocolate(choco syrup or powder)
class ChocolateAddOn implements BeverageAddOn {

    private coffee: BeverageInterface;

    private static addOnPrice: number = 3;

    constructor(coffee: BeverageInterface) {
        this.coffee = coffee;
    }
    calculatePrice(): void {
        this.coffee.calculatePrice(ChocolateAddOn.addOnPrice)
    }
}
Oat Milk
class OatMilkAddOn implements BeverageAddOn {

    private coffee: BeverageInterface;
    private static addOnPrice: number = 4;

    constructor(coffee: BeverageInterface) {
        this.coffee = coffee;
    }
    calculatePrice(): void {
        this.coffee.calculatePrice(OatMilkAddOn.addOnPrice)
    }
}
Putting It All Together
Main
import {BeverageInterface} from "./interfaces/Beverage.ts";
import {Coffee} from "./concerete-classes/Coffee.ts";

const mocha: BeverageInterface = new Coffee("OatMilkMocha");
const brew = mocha.brew();
console.log("Brewed Coffee:", brew);
Test Results
brewing: OatMilkMocha
Brewed Coffee: { name: 'OatMilkMocha', price: 12, status: 'Ready' }
Conclusion
The Decorator pattern is your best friend when you need to add responsibilities to objects without messing with the original code. It keeps your classes small, your logic separated, and your coffee orders infinitely customizable.
메타데이터
- post_id
- c9f8fa54e2f5
- slug
- structural-design-pattern-decorator-pattern-typescript-c9f8fa54e2f5
- url
- https://medium.com/the-quick-learners/structural-design-pattern-decorator-pattern-typescript-c9f8fa54e2f5
- canonical_url
- https://medium.com/the-quick-learners/structural-design-pattern-decorator-pattern-typescript-c9f8fa54e2f5
- author_url
- https://medium.com/@sparshneel.chanchlani
- status
- ok
- fetched_at
- 2026-06-24 04:09:36