Bare-metal 4k Streaming on KV260: The 2025.2 Guide Pt. 3
In part 3, we will be writing the firmware to program our own digital design we put together in Pt 2.
Bare-metal 4k Streaming on KV260: The 2025.2 Guide Pt. 3
In part 3, we will be writing the firmware to program our own digital design we put together in Pt 2.
See the other 2 parts here:
Writing the Software: Vitis 2025.2
In Vitis the general flow is
- Set up Workspace
- Set up Platform component
- Set up Application component
- Set up UART terminal
- Run the application
- Debug the application with Vitis and Vivado
In this tutorial, we’ll be going over how to do all of these steps to get our bare metal application running. For a full repository with the codebase, see this link: https://github.com/Vitro3D/4k_tpg_tutorial
Set up Workspace
- Open Vitis (see here for installation and opening instructions)
- Make a new folder and set it as your workspace
- Make sure the path to the folder doesn’t contain any spaces in the folder names
Set up a Platform
Platform components are the Vitis abstraction for the hardware we’ve created/want to use. If you’re familiar with Arduino development, this is like the Arduino hardware libraries you get when you work on a specific model of Arduino, like Arduino Uno. Follow these steps to create a platform out of the .xsa file we created in Vivado. See here for a great walkthrough from AMD: https://docs.amd.com/r/en-US/ug1209-embedded-design-tutorial/Creating-the-Platform-Project
- In vitis click File -> New Component -> Platform
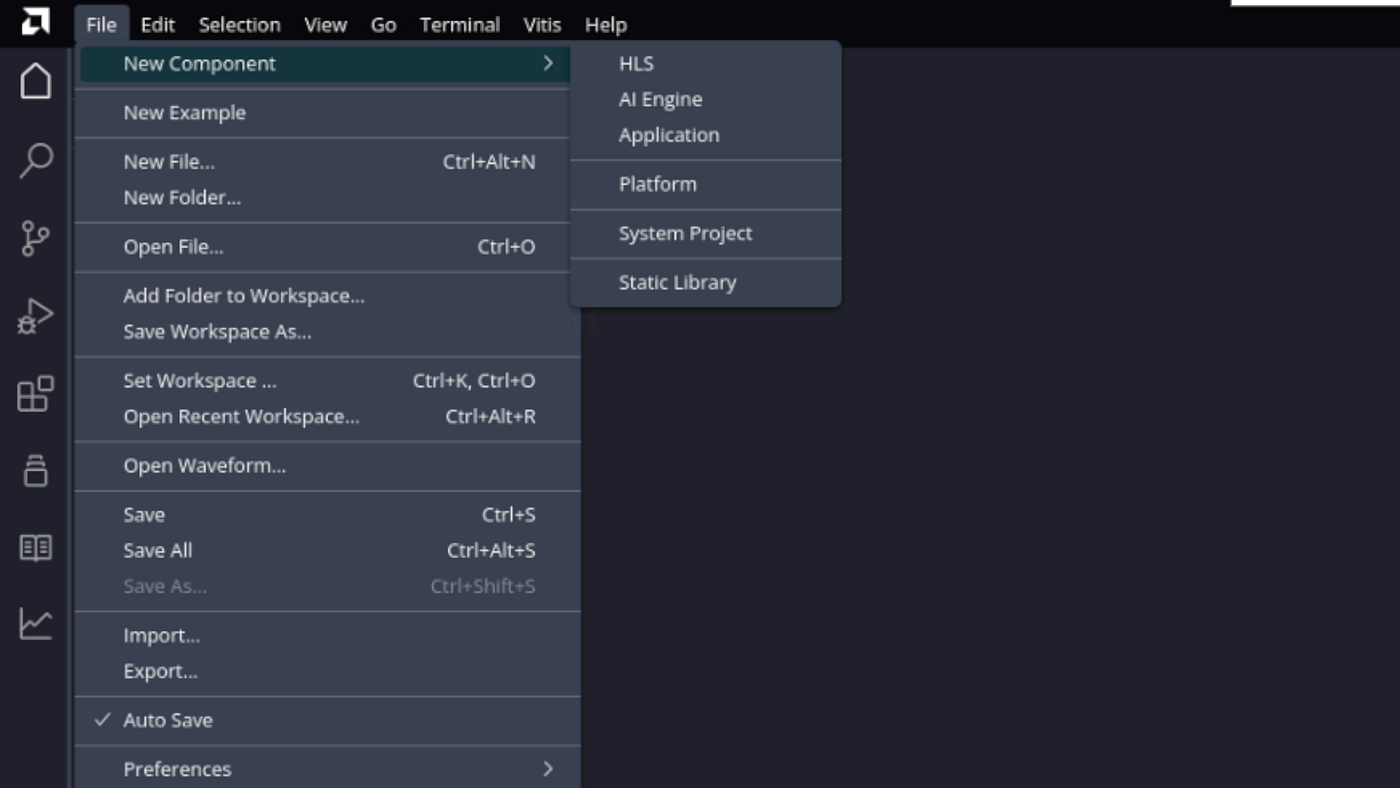
- In the Create Platform Component page, enter
platform-> Next - In the Flow view, select Hardware Design -> Browse -> Find your .xsa file that you exported from Vivado -> Next. Device tree will get created it might take a few minutes

- Vivado will save the file in your project folder, for example, I have my Vivado projects in
C:\vivado_projects\and my project folder wasC:\vivado_projects\4k_tpg_tutorial, so my xsa is at:C:\vivado_projects\4k_tpg_tutorial\design_1_wrapper.xsa - Your xsa file might have a different name depending on what you named your design and your wrapper, but it will end in .xsa all the same
- Note: you can use the Select a platform from repository tab when you have a pre-built platform and you prefer to copy it to local to modify.
- Use default settings for the preferred operating system, processor, and architecture as shown below.

- Click next and finish. The platform will be created and will take a few minutes
- Build the platform by selecting it in the Vitis Explorer and clicking build

Set up application templates
Application components are the Vitis abstraction for the code that we write to run/control the hardware we have in our platform. Now that we have a platform with all of our custom hardware we synthesized in Vivado, we can access it from an application component.
As we build larger projects, we need to be able to leverage existing code to save time and reduce risks of bugs. Accordingly, we are going to set up our application in a few steps
- Set up Hello World template app
- Set up DP driver code
- Write our custom
main()to tie it all together
Hello World application/template
Setting up this application will allow us to run code on the hardware and read our code output on the terminal, quick and easy. We will get introduced to board settings, and learn how to make cable connections, connect to the board through your PC, and run a simple “Hello World” software application from one of the Arm Cortex-A53 processors in JTAG mode using the System Debugger in the Vitis IDE.
- Board setup: Connect a USB-A to Micro-USB cable from your computer to the board and plug it into power through ports shown below.

- UART Output: In Vitis, open up a Serial Monitor by clicking Vitis at the top menu -> Serial Monitor -> Select the smallest COM port that says
(FTDI)next to it -> Select 115200 Baud Rate
Create the app component
- Click File -> New Example -> Scroll to and select Hello World -> Click Create Application Component from Template button at the top
- In wizard -> Component name:
app-> Component location: use default, orC:\vitis_workspaces\4k_tpg_tutorial\app-> Next -> Select Platform, platform -> Next -> Domain: clickstandalone_psu_cortexa53_0-> Next -> Finish - This will create the source code and settings for a simple app
- Find the
main()function in the .c file in under the app component/folder in the VITIS Explorer at this path:app/Sources/src/helloworld.c

Run the app
- Click on the app in Vitis Explorer -> click Build -> Click always build platform with application
- Make sure your computer is connected, the Serial Monitor is connected, and the board is powered on
When you plug in the board and are monitoring the UART through Serial Monitor, you’ll see something like
ethernet@ff0e0000 Waiting for PHY auto negotiation to complete.............at the end of some initialization messages. That is totally normal. Every time you power and board, it runs an automatic boot sequence. Whenever you run the Hello World application, it has settings to reset the board and power it up correctly to see the output on the screen
- Press Run in the application component pane, below Vitis Explorer. You should see something like this after successfully running

The white box highlights the c file we just ran. The Green boxes show the messages coming from the init_platform() code, which is very important. Without it, we wouldn't have access to the UART and our app may not even run! Finally, in the red boxes, you have the output for our application.
You should take a pause here to celebrate! If you’re seeing the messages on the screen, you just ran your first bare metal application!!! The c code in helloworld.c is running entirely on on one of the Cortex-A53 processors, no OS, no additional firmware, just your code!
Now that we have a basic set up validated, we can add our DP driver code.
DP Driver code
In order to speed up development with the DP, Xilinx has provided lots of sample code for us.
- Import it in Vitis 2025.2 by clicking the gear icon next to the platform (will appear as you hover) -> Platform -> psu_cortexa53_0 -> standalone_psu_cortexa53_0 -> Board Support Package -> drivers -> search “dp” -> find psu_dpdma -> Import Examples

- Click checkbox next to xdpdma_video_example to import all the source code -> OK
- You will now have a new application component called
xdpdma_video_example, with the following three main source files

- Copy the three files into your app component to have the following set up

- Now that we have the source code moved, we need to also update the compiler to add the source file, do this by clicking gear next to the app folder -> clicking Sources -> Add
xdpdma_video_example.c-> Click OK

Now that we have all the DP source code in one place, we’re going to start modifying it to call it from our helloworld.c main function
Set up run_dppsu() function for calling from helloworld.c#main()
- Rename
app/Sources/src/xdpdma_video_example.c#main()torun_dppsu() - Add
int run_dppsu();function definition toapp/Sources/src/xdpdma_video_example.h - The renamed main() function in
xdpdma_video_example.c, should look like this:
/*****************************************************************************/
/**
*
* Main function to call the DPDMA Video example.
*
* @param None
*
* @return XST_SUCCESS if successful, otherwise XST_FAILURE.
*
* @note  None
*
******************************************************************************/
//Used to be called: main()
int run_dppsu()
{
 int Status;

 Xil_DCacheDisable();
 Xil_ICacheDisable();

 xil_printf("DPDMA Generic Video Example Test \r\n");
 Status = DpdmaVideoExample(&RunCfg);
 if (Status != XST_SUCCESS) {
   xil_printf("DPDMA Video Example Test Failed\r\n");
   return XST_FAILURE;
 }

 xil_printf("Successfully ran DPDMA Video Example Test\r\n");

    return XST_SUCCESS;
}
Set up 4K resolution, 30Hz frame rate video settings
- Update
app/Sources/src/xdpdma_video_example.c#BUFFERSIZEto:3840 * 2160 * 3 - Update
app/Sources/src/xdpdma_video_example.c#LINESIZEto:3840 * 3 - Update
app/Sources/src/xdpdma_video_example.c#InitRunConfig()VideoMode line as follows:RunCfgPtr->VideoMode = XVIDC_VM_1920x1080_60_P;toRunCfgPtr->VideoMode = XVIDC_VM_3840x2160_30_P; - The lines of code we updated should look like this:
...
#define BUFFERSIZE   3840 * 2160 * 3  /* HTotal * VTotal * BPP */
#define LINESIZE   3840 * 3   /* HTotal * BPP */
...
void InitRunConfig(Run_Config *RunCfgPtr)
{
  /* Initial configuration parameters. */
  ...
  RunCfgPtr->VideoMode = XVIDC_VM_3840x2160_30_P;
...
Update app/Sources/src/xdpdma_video_example.c#InitDpDmaSubsystem()
- Update second two arguments of this function:
XAVBuf_InputVideoSelect(AVBufPtr, XAVBUF_VIDSTREAM1_NONE, XAVBUF_VIDSTREAM2_NONLIVE_GFX);To thisXAVBuf_InputVideoSelect(AVBufPtr, XAVBUF_VIDSTREAM1_LIVE, XAVBUF_VIDSTREAM2_NONE); - Below that same function, add this:
XAVBuf_SetInputLiveVideoFormat(AVBufPtr, RGB_8BPC); - Find the line where it calls:
XAVBuf_EnableGraphicsBuffers()Update the second argument to be0to turn it off. - Add
XAVBuf_EnableVideoBuffers(RunCfgPtr->AVBufPtr, 1);to turn on Video buffers - The full
app/Sources/src/xdpdma_video_example.c#InitDpDmaSubsystem()method should look like this
/*****************************************************************************/
/**
*
* The purpose of this function is to initialize the DP Subsystem (XDpDma,
* XAVBuf, XDpPsu)
*
* @param RunCfgPtr is a pointer to the application configuration structure.
*
* @return None.
*
* @note  None.
*
*****************************************************************************/
int InitDpDmaSubsystem(Run_Config *RunCfgPtr)
{
 u32 Status;
 XDpPsu  *DpPsuPtr = RunCfgPtr->DpPsuPtr;
 XDpPsu_Config *DpPsuCfgPtr;
 XAVBuf  *AVBufPtr = RunCfgPtr->AVBufPtr;
 XDpDma_Config *DpDmaCfgPtr;
 XDpDma  *DpDmaPtr = RunCfgPtr->DpDmaPtr;

 /* Initialize DisplayPort driver. */
#ifndef SDT
 DpPsuCfgPtr = XDpPsu_LookupConfig(DPPSU_DEVICE_ID);
#else
 DpPsuCfgPtr = XDpPsu_LookupConfig(DPPSU_BASEADDR);
#endif
 XDpPsu_CfgInitialize(DpPsuPtr, DpPsuCfgPtr, DpPsuCfgPtr->BaseAddr);
 /* Initialize Video Pipeline driver */
#ifndef SDT
 XAVBuf_CfgInitialize(AVBufPtr, DpPsuPtr->Config.BaseAddr, AVBUF_DEVICE_ID);
#else
 XAVBuf_CfgInitialize(AVBufPtr, DpPsuPtr->Config.BaseAddr);
#endif

 /* Initialize the DPDMA driver */
#ifndef SDT
 DpDmaCfgPtr = XDpDma_LookupConfig(DPDMA_DEVICE_ID);
#else
 DpDmaCfgPtr = XDpDma_LookupConfig(DPDMA_BASEADDR);
#endif
 XDpDma_CfgInitialize(DpDmaPtr,DpDmaCfgPtr);

 /* Initialize the DisplayPort TX core. */
 Status = XDpPsu_InitializeTx(DpPsuPtr);
 if (Status != XST_SUCCESS) {
  return XST_FAILURE;
 }
 /* Set the format graphics frame for DPDMA*/
 Status = XDpDma_SetGraphicsFormat(DpDmaPtr, RGBA8888);
 if (Status != XST_SUCCESS) {
   return XST_FAILURE;
 }
 /* Set the format graphics frame for Video Pipeline*/
 Status = XAVBuf_SetInputNonLiveGraphicsFormat(AVBufPtr, RGBA8888);
 if (Status != XST_SUCCESS) {
   return XST_FAILURE;
 }
 /* Set the QOS for Video */
 XDpDma_SetQOS(RunCfgPtr->DpDmaPtr, 11);

 /* Enable the Buffers required by Graphics Channel */
 XAVBuf_EnableGraphicsBuffers(RunCfgPtr->AVBufPtr, 0);

 XAVBuf_EnableVideoBuffers(RunCfgPtr->AVBufPtr, 1);

 /* Set the output Video Format */
 XAVBuf_SetOutputVideoFormat(AVBufPtr, RGB_8BPC);

 /* Select the Input Video Sources.
  * Here in this example we are going to demonstrate
  * graphics overlay over the TPG video.
  */
 XAVBuf_InputVideoSelect(AVBufPtr, XAVBUF_VIDSTREAM1_LIVE,
       XAVBUF_VIDSTREAM2_NONE);

 XAVBuf_SetInputLiveVideoFormat(AVBufPtr, RGB_8BPC);
 /* Configure Video pipeline for graphics channel */
 XAVBuf_ConfigureGraphicsPipeline(AVBufPtr);
 /* Configure the output video pipeline */
 XAVBuf_ConfigureOutputVideo(AVBufPtr);
 /* Disable the global alpha, since we are using the pixel based alpha */
 XAVBuf_SetBlenderAlpha(AVBufPtr, 0, 0);
 /* Set the clock mode */
 XDpPsu_CfgMsaEnSynchClkMode(DpPsuPtr, RunCfgPtr->EnSynchClkMode);
 /* Set the clock source depending on the use case.
  * Here for simplicity we are using PS clock as the source*/
 XAVBuf_SetAudioVideoClkSrc(AVBufPtr, XAVBUF_PS_CLK, XAVBUF_PS_CLK);
 /* Issue a soft reset after selecting the input clock sources */
 XAVBuf_SoftReset(AVBufPtr);

 return XST_SUCCESS;
}
Set up App Launch
Now that we have all the DP DMA example code updated for our use case, we are going to set up the application to run correctly so that the board is initialized correctly to run our code on a valid PL layer that has all the clocks and signals connected and started.
- Update launch.json to use TCL instead of FBSL: Expand the app folder -> Click Settings folder -> launch.json -> Find Board Initialization setting -> Select TCL radio button

- Add .elf downloading for psu_pmu_0: Expand the app folder -> Click Settings folder -> launch.json -> Scroll down to Processor .elf Section -> Click + to add a processor .elf

- Set up the new processor to look like this with: Click Processor dropdown -> select
psu_pmu_0-> Select Application text edit field and enter:C:\...\[YOUR_WORKSPACE]\platform\export\platform\sw\standalone_psu_cortexa53_0\qemu\pmufw.elf-> OK (you can also browse to the file in your platform folder

- Once you add it, make sure you Select the
RESET PROCESSORfor the processor's checkbox - Update the order these .elf files run in in the launch.json file, to have the
psu_pmu_0run first

Add math library
There are some utilities in the DPDMA sample that need this library but you can get silent failures without it (screen is just black) so make sure you have this set up.
- Click on app component -> Settings -> UserConfig.cmake -> Linker Settings -> Libraries
- Click add item -> type in
"m", including the quotes around the m - Add Library Search path to be something similar to:
"C:/AMDDesignTools/2025.2/gnu/aarch64/nt/aarch64-none/aarch64-xilinx-elf/usr/include"; your specific path will depend on where you installed the AMDDesignTools

Now that we have all the dependencies set up, we can start setting up our custom app in helloworld.c#main()!
Streaming Custom App
For this section, we are going to be updating the C code in our main() function in helloworld.c that currently initiates the platform, prints hello, and cleans up the platform before retuning 0 and ending. In this function, we are going to be combining the initialization of our custom platform, with the initialization of the DP/video components, and running the sample video application.
Current state of helloworld.c
//helloword.c
#include <stdio.h>
#include "platform.h"
#include "xil_printf.h"

int main()
{
    init_platform();

    print("Hello World\n\r");
    print("Successfully ran Hello World application");
    cleanup_platform();
    return 0;
}
First, we’re going to add the core methods to set up the video output, mainly: initializing the VTC and TPG drivers, setting up timing information and frame rate, configuring VTC and TPG, and finally running the application.
//helloword.c
#include <stdio.h>
#include "platform.h"
#include "xil_printf.h"

int main()
{
    init_platform();

    //------------------- ADDITIONS --------------//
    driverInit();

    TimingPtr = XVidC_GetTimingInfo(VidStream.VmId);

    VidStream.FrameRate = XVidC_GetFrameRate(VidStream.VmId);

    ConfigTpg(&VidStream);

    ConfigVtc(&VidStream);

    run_dppsu();
    //----------------------------------------------//

    // REMOVE: print("Hello World\n\r");
    // REMOVE: print("Successfully ran Hello World application");
    cleanup_platform();
    return 0;
}
Let’s now define these methods and add dependencies one by one, starting with driverInit()
//helloworld.c
#include <stdio.h>
#include "platform.h"
#include "xil_printf.h"

//------------------- ADDITIONS ------------------------------------//
#include "xv_tpg.h"
#include "xvtc.h"

XV_tpg tpg;
XVtc vtc;
XVtc_Config *vtc_config;

void driverInit() {
 int status;

 status = XV_tpg_Initialize(&tpg, XPAR_XV_TPG_0_BASEADDR);
 if (status != XST_SUCCESS) {
        xil_printf("CRITICAL ERROR: TPG Init Failed!\r\n");
    } else {
  xil_printf("Succesfully initialized tpg!\n");
 }

 vtc_config = XVtc_LookupConfig(XPAR_V_TC_0_BASEADDR);
 if (vtc_config == NULL) {
        xil_printf("CRITICAL ERROR: VTC Lookup Failed!\r\n");
    } else {
        XVtc_CfgInitialize(&vtc, vtc_config, vtc_config->BaseAddress);
  xil_printf("VTC IsReady flag is: %d\r\n", vtc.IsReady);
    }
}
//------------------------------------------------------------------//

int main()
{
    init_platform();

    driverInit();

    TimingPtr = XVidC_GetTimingInfo(VidStream.VmId);

    VidStream.FrameRate = XVidC_GetFrameRate(VidStream.VmId);

    ConfigTpg(&VidStream);

    ConfigVtc(&VidStream);

    run_dppsu();

    cleanup_platform();
    return 0;
}
Now let’s set up the XVidC_GetTimingInfo() and XVidC_GetFrameRate() calls.
//helloworld.c

#include <stdio.h>
#include "platform.h"
#include "xil_printf.h"
#include "xv_tpg.h"
#include "xvtc.h"

//------------------- ADDITIONS ------------------------------------//
#include "xvidc.h"
//------------------------------------------------------------------//

XV_tpg tpg;
XVtc vtc;
XVtc_Config *vtc_config;

void driverInit() {
 int status;

 status = XV_tpg_Initialize(&tpg, XPAR_XV_TPG_0_BASEADDR);
 if (status != XST_SUCCESS) {
        xil_printf("CRITICAL ERROR: TPG Init Failed!\r\n");
    } else {
  xil_printf("Succesfully initialized tpg!\n");
 }

 vtc_config = XVtc_LookupConfig(XPAR_V_TC_0_BASEADDR);
 if (vtc_config == NULL) {
        xil_printf("CRITICAL ERROR: VTC Lookup Failed!\r\n");
    } else {
        XVtc_CfgInitialize(&vtc, vtc_config, vtc_config->BaseAddress);
 xil_printf("VTC IsReady flag is: %d\r\n", vtc.IsReady);
    }
}

int main()
{
    init_platform();

    //------------------- ADDITIONS ------------------------------------//
    XVidC_VideoTiming const *TimingPtr;
    XVidC_VideoStream VidStream;
    //------------------------------------------------------------------//

    driverInit();

    TimingPtr = XVidC_GetTimingInfo(VidStream.VmId);

    VidStream.FrameRate = XVidC_GetFrameRate(VidStream.VmId);

    ConfigTpg(&VidStream);

    ConfigVtc(&VidStream);

    run_dppsu();

    cleanup_platform();
    return 0;
}
Now let’s define ConfigTpg() and ConfigVtc() like this
//helloworld.c
#include <stdio.h>
#include "platform.h"
#include "xil_printf.h"
#include "xv_tpg.h"
#include "xvtc.h"
#include "xvidc.h"

XV_tpg tpg;
XVtc vtc;
XVtc_Config *vtc_config;

void driverInit() {
 int status;

 status = XV_tpg_Initialize(&tpg, XPAR_XV_TPG_0_BASEADDR);
 if (status != XST_SUCCESS) {
        xil_printf("CRITICAL ERROR: TPG Init Failed!\r\n");
    } else {
  xil_printf("Succesfully initialized tpg!\n");
 }

 vtc_config = XVtc_LookupConfig(XPAR_V_TC_0_BASEADDR);
 if (vtc_config == NULL) {
        xil_printf("CRITICAL ERROR: VTC Lookup Failed!\r\n");
    } else {
        XVtc_CfgInitialize(&vtc, vtc_config, vtc_config->BaseAddress);
 xil_printf("VTC IsReady flag is: %d\r\n", vtc.IsReady);
    }
}

//------------------- ADDITIONS ------------------------------------//
void ConfigVtc(XVidC_VideoStream *StreamPtr) {
 XVtc_Timing vtc_timing = { 0 };
 u16 PixelsPerClock = 1;

 vtc_timing.HActiveVideo = StreamPtr->Timing.HActive / PixelsPerClock;
 vtc_timing.HFrontPorch = StreamPtr->Timing.HFrontPorch / PixelsPerClock;
 vtc_timing.HSyncWidth = StreamPtr->Timing.HSyncWidth / PixelsPerClock;
 vtc_timing.HBackPorch = StreamPtr->Timing.HBackPorch / PixelsPerClock;
 vtc_timing.HSyncPolarity = StreamPtr->Timing.HSyncPolarity;
 vtc_timing.VActiveVideo = StreamPtr->Timing.VActive;
 vtc_timing.V0FrontPorch = StreamPtr->Timing.F0PVFrontPorch;
 vtc_timing.V0SyncWidth = StreamPtr->Timing.F0PVSyncWidth;
 vtc_timing.V0BackPorch = StreamPtr->Timing.F0PVBackPorch;
 vtc_timing.VSyncPolarity = StreamPtr->Timing.VSyncPolarity;
 XVtc_SetGeneratorTiming(&vtc, &vtc_timing);
 XVtc_RegUpdateEnable(&vtc);
 XVtc_Enable(&vtc);
 XVtc_EnableGenerator(&vtc);

}

void ConfigTpg(XVidC_VideoStream *StreamPtr) {
 XV_tpg_DisableAutoRestart(&tpg);
 XV_tpg_Set_height(&tpg, StreamPtr->Timing.VActive);
 XV_tpg_Set_width(&tpg, StreamPtr->Timing.HActive);
 XV_tpg_Set_colorFormat(&tpg, XVIDC_CSF_RGB);
 XV_tpg_Set_bckgndId(&tpg, XTPG_BKGND_COLOR_BARS);
 XV_tpg_Set_ovrlayId(&tpg, 1);
 XV_tpg_Set_boxSize(&tpg, 100);
 XV_tpg_Set_motionSpeed(&tpg, 10);
 XV_tpg_EnableAutoRestart(&tpg);
 XV_tpg_Start(&tpg);
}
//------------------------------------------------------------------//

int main()
{
    init_platform();

    XVidC_VideoTiming const *TimingPtr;
    XVidC_VideoStream VidStream;

    driverInit();

    TimingPtr = XVidC_GetTimingInfo(VidStream.VmId);

    VidStream.FrameRate = XVidC_GetFrameRate(VidStream.VmId);

    ConfigTpg(&VidStream);

    ConfigVtc(&VidStream);

    run_dppsu();

    cleanup_platform();
    return 0;
}
Now let’s bring in the definition header file for the DP DMA example method, run_dppsu() with:
//---------------------ADDITIONS------------------------------------//
#include "xdpdma_video_example.h"
//------------------------------------------------------------------//
Finally, let’s add additional dependencies and validation for the main() method
#include <stdio.h>
#include "platform.h"
#include "xil_printf.h"
#include "xv_tpg.h"
#include "xvtc.h"
#include "xvidc.h"
#include "xdpdma_video_example.h"

XV_tpg tpg;
XVtc vtc;
XVtc_Config *vtc_config;

void driverInit() {
 int status;

 status = XV_tpg_Initialize(&tpg, XPAR_XV_TPG_0_BASEADDR);
 if (status != XST_SUCCESS) {
        xil_printf("CRITICAL ERROR: TPG Init Failed!\r\n");
    } else {
  xil_printf("Succesfully initialized tpg!\n");
 }

 vtc_config = XVtc_LookupConfig(XPAR_V_TC_0_BASEADDR);
 if (vtc_config == NULL) {
        xil_printf("CRITICAL ERROR: VTC Lookup Failed!\r\n");
    } else {
        XVtc_CfgInitialize(&vtc, vtc_config, vtc_config->BaseAddress);
  xil_printf("VTC IsReady flag is: %d\r\n", vtc.IsReady);
    }
}

void ConfigVtc(XVidC_VideoStream *StreamPtr) {
 XVtc_Timing vtc_timing = { 0 };
 u16 PixelsPerClock = 1;

 vtc_timing.HActiveVideo = StreamPtr->Timing.HActive / PixelsPerClock;
 vtc_timing.HFrontPorch = StreamPtr->Timing.HFrontPorch / PixelsPerClock;
 vtc_timing.HSyncWidth = StreamPtr->Timing.HSyncWidth / PixelsPerClock;
 vtc_timing.HBackPorch = StreamPtr->Timing.HBackPorch / PixelsPerClock;
 vtc_timing.HSyncPolarity = StreamPtr->Timing.HSyncPolarity;
 vtc_timing.VActiveVideo = StreamPtr->Timing.VActive;
 vtc_timing.V0FrontPorch = StreamPtr->Timing.F0PVFrontPorch;
 vtc_timing.V0SyncWidth = StreamPtr->Timing.F0PVSyncWidth;
 vtc_timing.V0BackPorch = StreamPtr->Timing.F0PVBackPorch;
 vtc_timing.VSyncPolarity = StreamPtr->Timing.VSyncPolarity;
 XVtc_SetGeneratorTiming(&vtc, &vtc_timing);
 XVtc_RegUpdateEnable(&vtc);
 XVtc_Enable(&vtc);
 XVtc_EnableGenerator(&vtc);

}

void ConfigTpg(XVidC_VideoStream *StreamPtr) {
 XV_tpg_DisableAutoRestart(&tpg);
 XV_tpg_Set_height(&tpg, StreamPtr->Timing.VActive);
 XV_tpg_Set_width(&tpg, StreamPtr->Timing.HActive);
 XV_tpg_Set_colorFormat(&tpg, XVIDC_CSF_RGB);
 XV_tpg_Set_bckgndId(&tpg, XTPG_BKGND_COLOR_BARS);
 XV_tpg_Set_ovrlayId(&tpg, 1);
 XV_tpg_Set_boxSize(&tpg, 100);
 XV_tpg_Set_motionSpeed(&tpg, 10);
 XV_tpg_EnableAutoRestart(&tpg);
 XV_tpg_Start(&tpg);
}

int main()
{
    init_platform();

    XVidC_VideoTiming const *TimingPtr;
    XVidC_VideoStream VidStream;

    //--------------------------------ADDITIONS---------------------//
    XVidC_VideoMode TestModes[2] = { XVIDC_VM_1080_60_P, XVIDC_VM_UHD_30_P };
    //--------------------------------------------------------------//

    driverInit();

    //--------------------------------ADDITIONS---------------------//
    /*Set stream parameters*/
    VidStream.PixPerClk = tpg.Config.PixPerClk;
    VidStream.ColorFormatId = XVIDC_CSF_RGB;
    VidStream.ColorDepth = tpg.Config.MaxDataWidth;
    VidStream.VmId = TestModes[1];
    //--------------------------------------------------------------//

    TimingPtr = XVidC_GetTimingInfo(VidStream.VmId);

    //--------------------------------ADDITIONS---------------------//
    VidStream.Timing = *TimingPtr;
    //--------------------------------------------------------------//

    VidStream.FrameRate = XVidC_GetFrameRate(VidStream.VmId);

    //--------------------------------ADDITIONS---------------------//
    xil_printf("\r\n********************************************\r\n");
    xil_printf("Test Input Stream: %s (%s)\r\n",
 XVidC_GetVideoModeStr(VidStream.VmId),
 XVidC_GetColorFormatStr(VidStream.ColorFormatId));
    xil_printf("********************************************\r\n");
    //--------------------------------------------------------------//

    ConfigTpg(&VidStream);

    ConfigVtc(&VidStream);

    run_dppsu();

    cleanup_platform();
    return 0;
}
Your final helloworld.c should look like this
//helloworld.c

#include <stdio.h>
#include "platform.h"
#include "xil_printf.h"
#include "xv_tpg.h"
#include "xvtc.h"
#include "xvidc.h"
#include "xdpdma_video_example.h"

XV_tpg tpg;
XVtc vtc;
XVtc_Config *vtc_config;

void driverInit() {
 int status;

 status = XV_tpg_Initialize(&tpg, XPAR_XV_TPG_0_BASEADDR);
 if (status != XST_SUCCESS) {
        xil_printf("CRITICAL ERROR: TPG Init Failed!\r\n");
    } else {
  xil_printf("Succesfully initialized tpg!\n");
 }

 vtc_config = XVtc_LookupConfig(XPAR_V_TC_0_BASEADDR);
 if (vtc_config == NULL) {
        xil_printf("CRITICAL ERROR: VTC Lookup Failed!\r\n");
    } else {
        XVtc_CfgInitialize(&vtc, vtc_config, vtc_config->BaseAddress);
  xil_printf("VTC IsReady flag is: %d\r\n", vtc.IsReady);
    }
}

void ConfigVtc(XVidC_VideoStream *StreamPtr) {
 XVtc_Timing vtc_timing = { 0 };
 u16 PixelsPerClock = 1;

 vtc_timing.HActiveVideo = StreamPtr->Timing.HActive / PixelsPerClock;
 vtc_timing.HFrontPorch = StreamPtr->Timing.HFrontPorch / PixelsPerClock;
 vtc_timing.HSyncWidth = StreamPtr->Timing.HSyncWidth / PixelsPerClock;
 vtc_timing.HBackPorch = StreamPtr->Timing.HBackPorch / PixelsPerClock;
 vtc_timing.HSyncPolarity = StreamPtr->Timing.HSyncPolarity;
 vtc_timing.VActiveVideo = StreamPtr->Timing.VActive;
 vtc_timing.V0FrontPorch = StreamPtr->Timing.F0PVFrontPorch;
 vtc_timing.V0SyncWidth = StreamPtr->Timing.F0PVSyncWidth;
 vtc_timing.V0BackPorch = StreamPtr->Timing.F0PVBackPorch;
 vtc_timing.VSyncPolarity = StreamPtr->Timing.VSyncPolarity;
 XVtc_SetGeneratorTiming(&vtc, &vtc_timing);
 XVtc_RegUpdateEnable(&vtc);
 XVtc_Enable(&vtc);
 XVtc_EnableGenerator(&vtc);

}

void ConfigTpg(XVidC_VideoStream *StreamPtr) {
 XV_tpg_DisableAutoRestart(&tpg);
 XV_tpg_Set_height(&tpg, StreamPtr->Timing.VActive);
 XV_tpg_Set_width(&tpg, StreamPtr->Timing.HActive);
 XV_tpg_Set_colorFormat(&tpg, XVIDC_CSF_RGB);
 XV_tpg_Set_bckgndId(&tpg, XTPG_BKGND_COLOR_BARS);
 XV_tpg_Set_ovrlayId(&tpg, 1);
 XV_tpg_Set_boxSize(&tpg, 100);
 XV_tpg_Set_motionSpeed(&tpg, 10);
 XV_tpg_EnableAutoRestart(&tpg);
 XV_tpg_Start(&tpg);
}

int main()
{
    init_platform();

    XVidC_VideoTiming const *TimingPtr;
    XVidC_VideoStream VidStream;
    XVidC_VideoMode TestModes[2] = { XVIDC_VM_1080_60_P, XVIDC_VM_UHD_30_P };

    driverInit();

    /*Set stream parameters*/
    VidStream.PixPerClk = tpg.Config.PixPerClk;
    VidStream.ColorFormatId = XVIDC_CSF_RGB;
    VidStream.ColorDepth = tpg.Config.MaxDataWidth;
    VidStream.VmId = TestModes[1];

    TimingPtr = XVidC_GetTimingInfo(VidStream.VmId);

    VidStream.Timing = *TimingPtr;

    VidStream.FrameRate = XVidC_GetFrameRate(VidStream.VmId);

    xil_printf("\r\n********************************************\r\n");
    xil_printf("Test Input Stream: %s (%s)\r\n",
    XVidC_GetVideoModeStr(VidStream.VmId),
        XVidC_GetColorFormatStr(VidStream.ColorFormatId));
    xil_printf("********************************************\r\n");

    ConfigTpg(&VidStream);

    ConfigVtc(&VidStream);

    run_dppsu();

    cleanup_platform();
    return 0;
}
Let’s build it and run it!
- In the Flow pane (in lower left of IDE)-> Select app from dropdown -> Build

To run the application do the following
- Connect your computer to the KV260 through USB
- Connect KV260 to power
- Connect KV260 to monitor through a DP cable
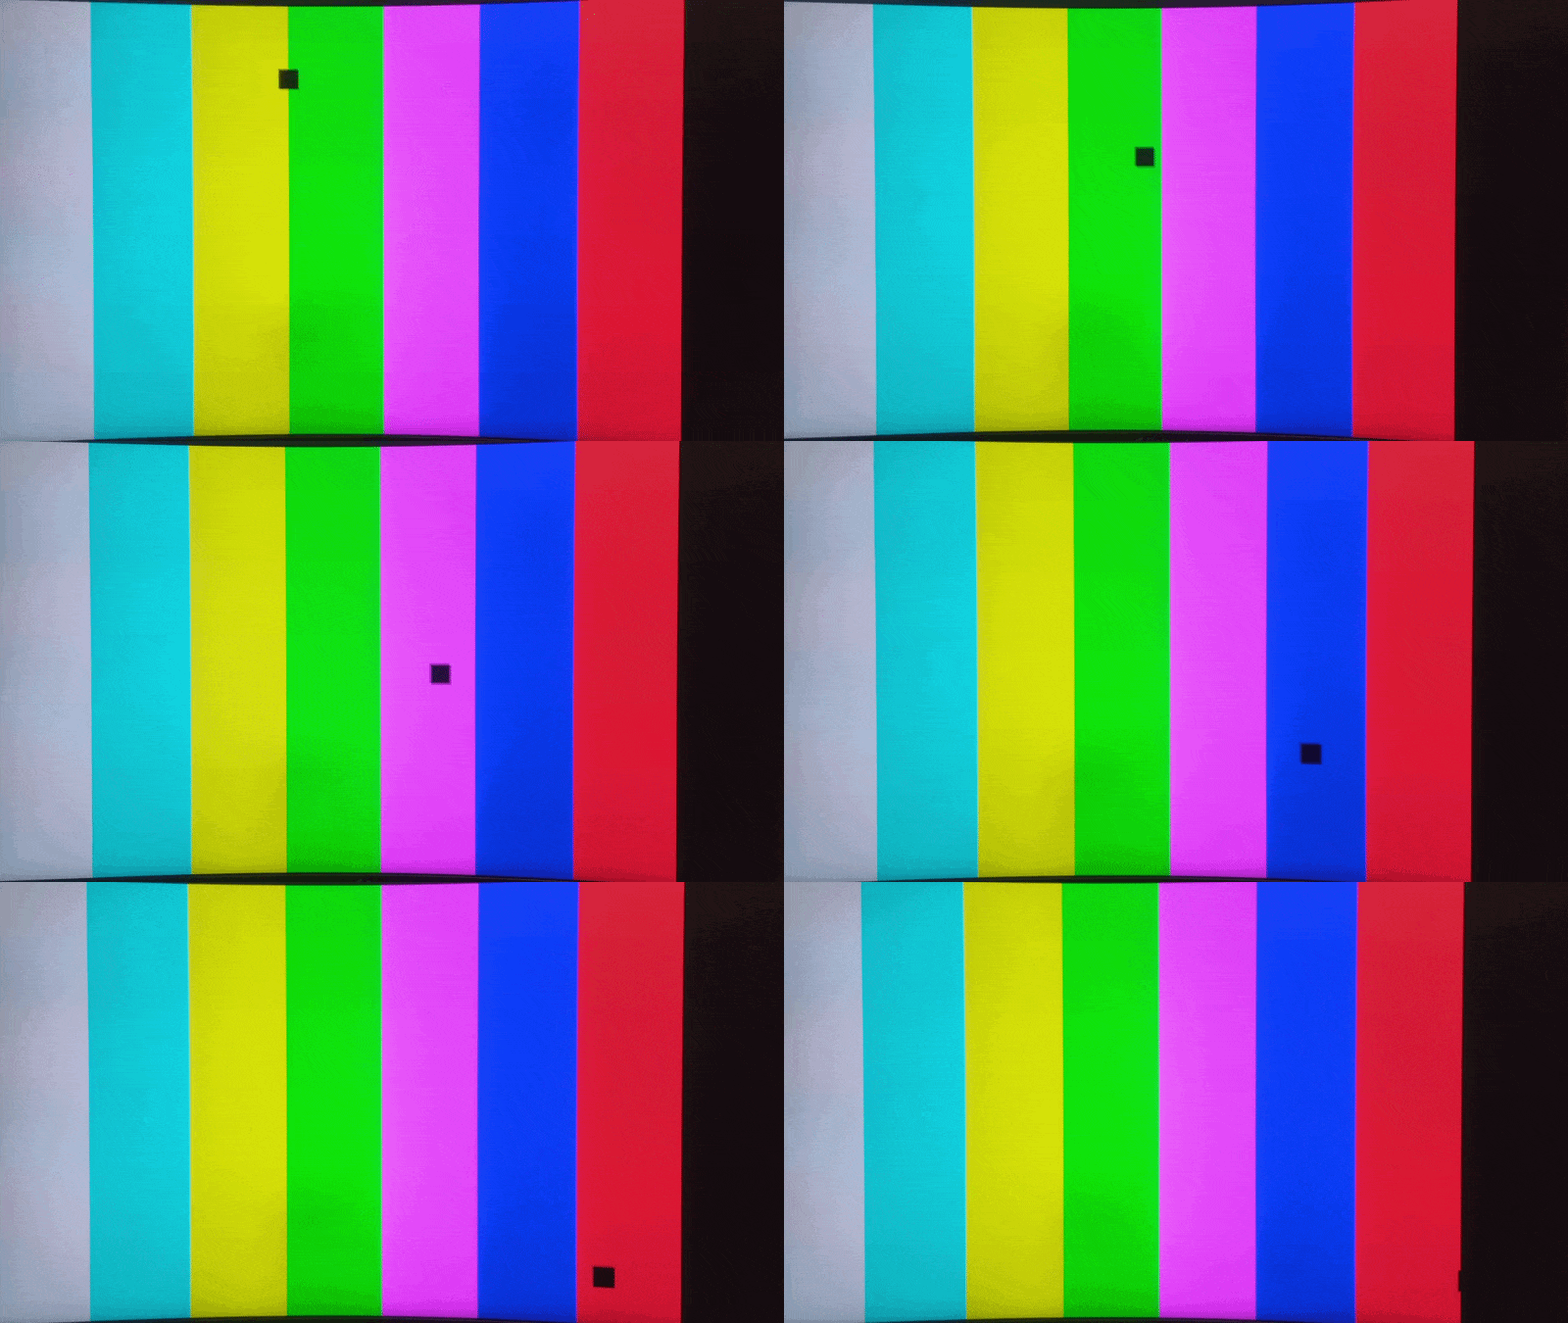
- Click Run in the application Flow Panel, and you should see your monitor showing this pattern:
List of common bugs/issues
Vitis fixes
- Update launch.json to use TCL instead of FBSL
- Update launch.json to reset psu_pmu_0
- Update launch.json to reset psu_pmu_0 first then the cortex-A53
- Move driverInit() in helloworld.c down under the variables
- Use TPG instead of DMA updates in DP driver example
- Add
XAVBuf_EnableVideoBuffers(RunCfgPtr->AVBufPtr, 1);and set second argument of:XAVBuf_EnableGraphicsBuffers(RunCfgPtr->AVBufPtr, 0);to 0 in in xddpma_video_example.c - Add
XAVBuf_SetInputLiveVideoFormat(AVBufPtr, RGB_8BPC);to xddpma_video_example.c - Add “m” library and
"C:/AMDDesignTools/2025.2/gnu/aarch64/nt/aarch64-none/aarch64-xilinx-elf/usr/include"library search path
Vivado fixes
- VTC -> Max Clocks Per Line = 8192
- VTC -> Enable Detection = Deselected
메타데이터
- post_id
- ccf5f4f1e656
- slug
- bare-metal-4k-streaming-on-kv260-the-2025-2-guide-pt-3-ccf5f4f1e656
- url
- https://medium.com/@velasco622/bare-metal-4k-streaming-on-kv260-the-2025-2-guide-pt-3-ccf5f4f1e656
- canonical_url
- https://medium.com/@velasco622/bare-metal-4k-streaming-on-kv260-the-2025-2-guide-pt-3-ccf5f4f1e656
- author_url
- https://medium.com/@velasco622
- status
- ok
- fetched_at
- 2026-07-10 13:01:02