How to Customize Ash Authentication Pages and Create a Experience That Makes Your Users Stay
How to Customize Ash Authentication Pages and Create a Login Experience That Makes Your Users Stay
Ash Framework for Phoenix Developers

The final decision to use your application is often made on the login page. The customer experience on the authentication page can make or break the deal. That’s why your users will thank you for delivering a smooth, delightful experience on the very last page they see before actually using your application.
As an Elixir and Ash Framework developer, you want to maximize the benefits of the ecosystem and shorten your time to market. Ash Authentication is one of my must-use packages. It saves significant development time, comes with a ton of powerful features out of the box, and is surprisingly easy to customize.
Today, I’ll show you in 3 simple steps how to customize Ash Authentication in a Phoenix application, so you can give your users an experience that makes them want to return to your app again and again.
All you need is:
- Define the authentication form as a reusable LiveComponent.
- Create an authentication LiveView to host the form.
- Override the authentication routes to use your custom LiveView.
You can combine the first two steps if you want, but I recommend keeping them separate for easier maintenance.
Also, notice that we won’t touch the authentication business logic at all it’s already beautifully handled by the Ash Authentication package.
Let’s get started!
Step 1: Create a Customer Authentication Live Component
We need a form to display the username, password, links, and buttons on the authentication page. In another words we want to create this form on the right side of the page.
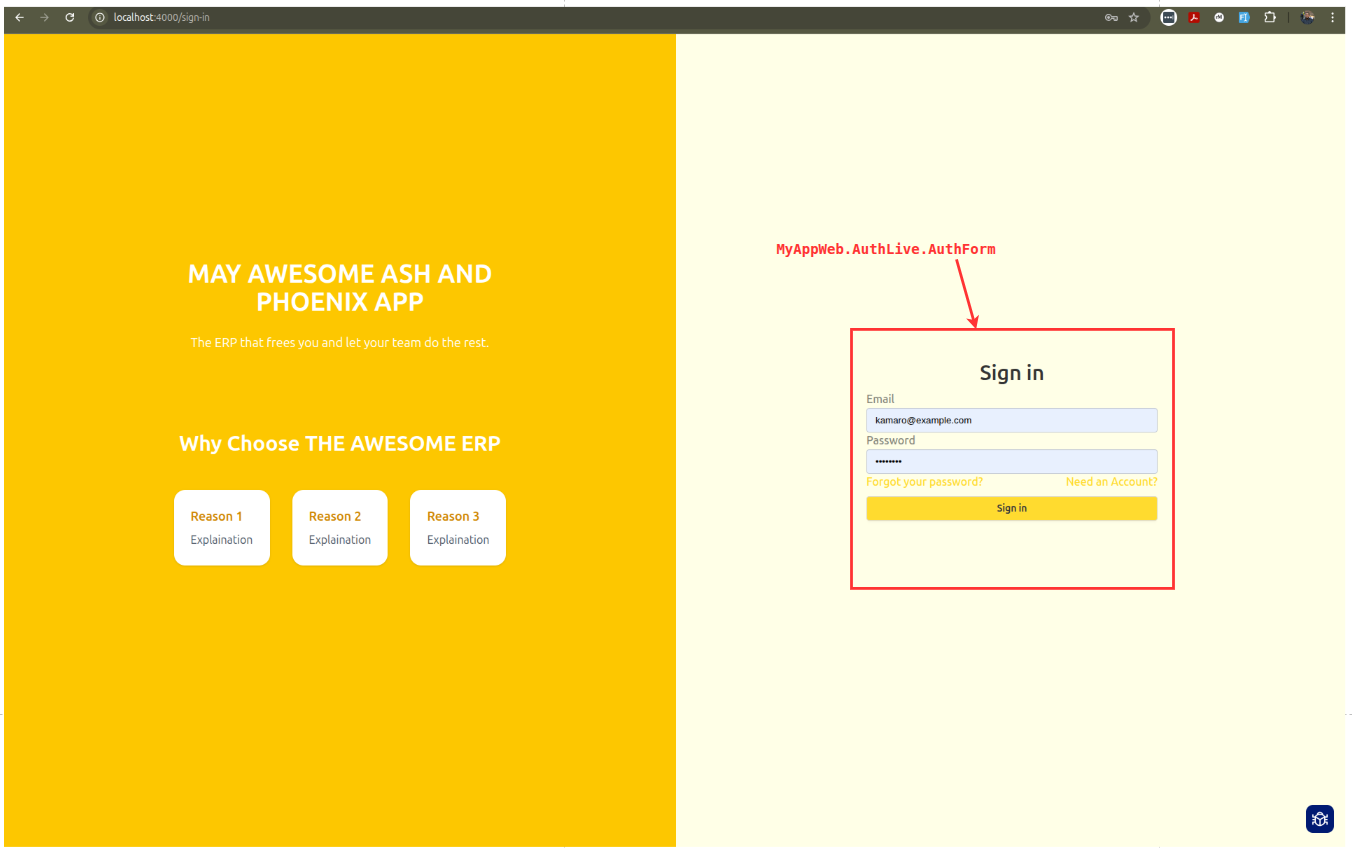
Create lib/my_app_web/live/auth_live/auth_form.ex and add the following codes.
NB: Replace
MyAppWebwith your application name
defmodule MyAppWeb.AuthLive.AuthForm do
  use MyAppWeb, :live_component

  use PhoenixHTMLHelpers

  @impl Phoenix.LiveComponent
  def update(assigns, socket) do
    socket
    |> assign(assigns)
    |> assign(errors: [])
    |> assign(trigger_action: false)
    |> ok()
  end

  @impl Phoenix.LiveComponent
  def handle_event("validate", %{"user" => params}, socket) do
    form = AshPhoenix.Form.validate(socket.assigns.form, params, errors: false)

    socket
    |> assign(form: form)
    |> assign(:errors, AshPhoenix.Form.errors(form))
    |> noreply()
  end

  @impl Phoenix.LiveComponent
  def handle_event("submit", %{"user" => params}, socket) do
    form = AshPhoenix.Form.validate(socket.assigns.form, params)

    socket
    |> assign(:form, form)
    |> assign(:errors, AshPhoenix.Form.errors(form))
    |> assign(:trigger_action, form.valid?)
    |> noreply()
  end
end
Next, alongside the liveview, create the HTML HEEX template to host the UI for the component.
Create lib/my_app_web/live/auth_live/auth_form.html.heex and add the followign codes
<div>
  <ul :if={@form.errors} class="text-error">
    <li :for={{k, v} <- @errors}>{humanize("#{k} #{v}")}</li>
  </ul>
  <.form
    :let={f}
    for={@form}
    phx-change="validate"
    phx-submit="submit"
    phx-trigger-action={@trigger_action}
    phx-target={@myself}
    action={@action}
    method="POST"
  >
    <.input field={f[:email]} label={gettext("Email")} />
    <.input
      :if={@form_action not in [:reset]}
      field={f[:password]}
      type="password"
      label={gettext("Password")}
    />
    <.input
      :if={@is_register?}
      field={f[:password_confirmation]}
      type="password"
      label={gettext("Password")}
    />

    <%!-- Login Account --%>

    <div
      :if={@form_action == :sign_in}
      class="flex flex-row justify-between content-between font-medium mb-2"
    >
      <.link
        navigate={~p"/reset"}
        class="flex-none text-primary px-2 first:pl-0 last:pr-0"
      >
        {gettext("Forgot your password?")}
      </.link>

      <.link
        navigate={~p"/register"}
        class="flex-none text-primary px-2 first:pl-0 last:pr-0"
      >
        {gettext("Need an Account?")}
      </.link>
    </div>

    <div
      :if={@form_action == :register}
      class="flex flex-row justify-between content-between font-medium mb-2"
    >
      <.link
        navigate={~p"/reset"}
        class="flex-none text-primary px-2 first:pl-0 last:pr-0"
      >
        {gettext("Forgot your password?")}
      </.link>

      <.link
        navigate={~p"/sign-in"}
        class="flex-none text-primary px-2 first:pl-0 last:pr-0"
      >
        {gettext("Already have an account?")}
      </.link>
    </div>

    <div
      :if={@form_action == :reset}
      class="flex flex-row justify-between content-between font-medium mb-2"
    >
      <.link
        navigate={~p"/register"}
        class="flex-none text-primary px-2 first:pl-0 last:pr-0"
      >
        {gettext("Need an Account?")}
      </.link>

      <.link
        navigate={~p"/sign-in"}
        class="flex-none text-primary px-2 first:pl-0 last:pr-0"
      >
        {gettext("Already have an account?")}
      </.link>
    </div>

    <.button class="btn bg-primary w-full">{@cta}</.button>
  </.form>
</div>
As you might have noticed it, the above template can be modified as you like. It is a live component like any other.
Next, we need to create the overall page that will house the form. It is our marketing page on the authentication form.
Step 2: Create Customized Liveview Page
Create lib/my_app_web/live/auth_live/index.ex
defmodule MyAppWeb.AuthLive.Index do
  use MyAppWeb, :live_view

  @impl Phoenix.LiveView
  def mount(params, _, socket) do
    socket
    |> apply_action(socket.assigns.live_action, params)
    |> ok()
  end

  @impl Phoenix.LiveView
  def handle_params(params, _url, socket) do
    dbg(params)

    socket
    |> apply_action(socket.assigns.live_action, params)
    |> noreply()
  end

  defp apply_action(socket, :register, _params) do
    form = AshPhoenix.Form.for_create(
              MyApp.Accounts.User,
              :register_with_password,
              as: "user"
            )

    socket
    |> assign(:cta, "Sign up")
    |> assign(:form_action, :register)
    |> assign(:form_id, "sign-up-form")
    |> assign(:alternative_path, ~p"/sign-in")
    |> assign(:alternative, "Have an account?")
    |> assign(:action, ~p"/auth/user/password/register")
    |> assign(:form, form)
  end

  defp apply_action(socket, :sign_in, _params) do
    form =
          AshPhoenix.Form.for_action(
              MyApp.Accounts.User,
              :sign_in_with_password,
              as: "user"
            )

    socket
    |> assign(:form_action, :sign_in)
    |> assign(:form_id, "sign-in-form")
    |> assign(:cta, "Sign in")
    |> assign(:alternative_path, ~p"/register")
    |> assign(:alternative, "Need an account?")
    |> assign(:action, ~p"/auth/user/password/sign_in")
    |> assign(:form, form)
  end

  defp apply_action(socket, :reset, _params) do
    form =
          AshPhoenix.Form.for_action(
              MyApp.Accounts.User,
              :request_password_reset_token,
              as: "user"
          )

    socket
    |> assign(:form_action, :reset)
    |> assign(:cta, "Send Password Reset Link")
    |> assign(:form_id, "reset-password-form")
    |> assign(:alternative_path, ~p"/register")
    |> assign(:alternative, "Need an account?")
    |> assign(:action, ~p"/auth/user/password/reset_request")
    |> assign(:form, form)
  end
end
The above liveview has a simple logic around it:
- When it is loaded it determines what the user wants between
sign_in,register, andreset. - It applies the correct action and builds the form necessary for that actions in the
apply_action/3function. - Then it changes the
assignsincluding where the form should be submitted(action)
To see this in action, we need to add its html.heex to render the form component and update the routes to see this in action.
Let’s create the lib/my_appweb/live/auth_live/index.html.heex .
I have added comments to explain what’s going on.
<Layouts.flash_group flash={@flash} />
<div class="auth-page min-h-screen flex">

<!-- LEFT BANNER -->
  <div class="hidden lg:flex flex-col lg:w-1/2 bg-yellow-400 text-white items-center justify-center p-12">
    <div class="max-w-md text-center">
      <h2 class="text-4xl font-bold mb-6 uppercase">
        Zippiker
      </h2>
      <p class="text-lg mb-6">
        The ERP that frees you and let your team do the rest.
      </p>

      <div class="mt-8">
        <%!-- <img src="/images/login-banner.svg" alt="Banner" class="w-full"> --%>
      </div>
    </div>

    <section class="py-20 ">
      <div class="max-w-7xl mx-auto px-6">
        <h3 class="text-3xl font-bold text-center mb-12">Why Choose Zippiker</h3>
        <div class="grid md:grid-cols-3 gap-8 ">
          <div class="bg-white p-6 rounded-2xl shadow">
            <h4 class="text-lg font-semibold mb-2 text-yellow-600 ">Reason 1</h4>
            <p class="text-gray-600">
              Explaination
            </p>
          </div>
          <div class="bg-white p-6 rounded-2xl shadow">
            <h4 class="text-lg font-semibold mb-2 text-yellow-600 ">Reason 2</h4>
            <p class="text-gray-600">
              Explaination
            </p>
          </div>
          <div class="bg-white p-6 rounded-2xl shadow">
            <h4 class="text-lg font-semibold mb-2 text-yellow-600 ">Reason 3</h4>
            <p class="text-gray-600">
              Explaination
            </p>
          </div>
        </div>
      </div>
    </section>
  </div>

<!-- RIGHT SIDE (FORM) -->
  <div class="w-full lg:w-1/2 flex items-center justify-center">
    <div class="w-full max-w-md px-4  mx-auto">
      <h1 class="text-3xl font-semibold mb-2 text-center">{@cta}</h1>

      <!-- RENDER THE LIVE COMPONENT WE SAW IN STEP 1 -->
      <.live_component
        module={ZippikerWeb.AuthLive.AuthForm}
        id={@form_id}
        form={@form}
        is_register?={@live_action == :register}
        action={@action}
        cta={@cta}
        form_action={@form_action}
        alternative={@alternative}
        alternative_path={@alternative_path}
      />
    </div>
  </div>
</div>
We are done with the first 2 steps. To render this page, we need to update the routes and tell phoenix to load the authentication pages from the AuthLive.Index
Step 3: Override the routes to render the custom auth pages
Update your lib/my_app_web/router.ex, comment out default routes for sign in, register, and reset.
  scope "/", MyAppWeb do
    pipe_through :browser

    get "/", PageController, :home

    # =================================================================
    # ADD BELOW CUSTOM AUTH PAGES TO RENDER OUR CUSTOM ASH AUTH PAGE
    # =================================================================
    live "/register", AuthLive.Index, :register
    live "/sign-in", AuthLive.Index, :sign_in
    live "/reset", AuthLive.Index, :reset

    # ==============================================================
    # COMMENTED OUT SO THAT WE CAN USE CUSTOM ONES ABOVE TO RENDER
    # ==============================================================
    # Remove these if you'd like to use your own authentication views
    # sign_in_route auth_routes_prefix: "/auth",
    #               on_mount: [{ZippikerWeb.LiveUserAuth, :live_no_user}],
    #               overrides: [
    #                 ZippikerWeb.AuthOverrides,
    #                 AshAuthentication.Phoenix.Overrides.DaisyUI
    #               ]
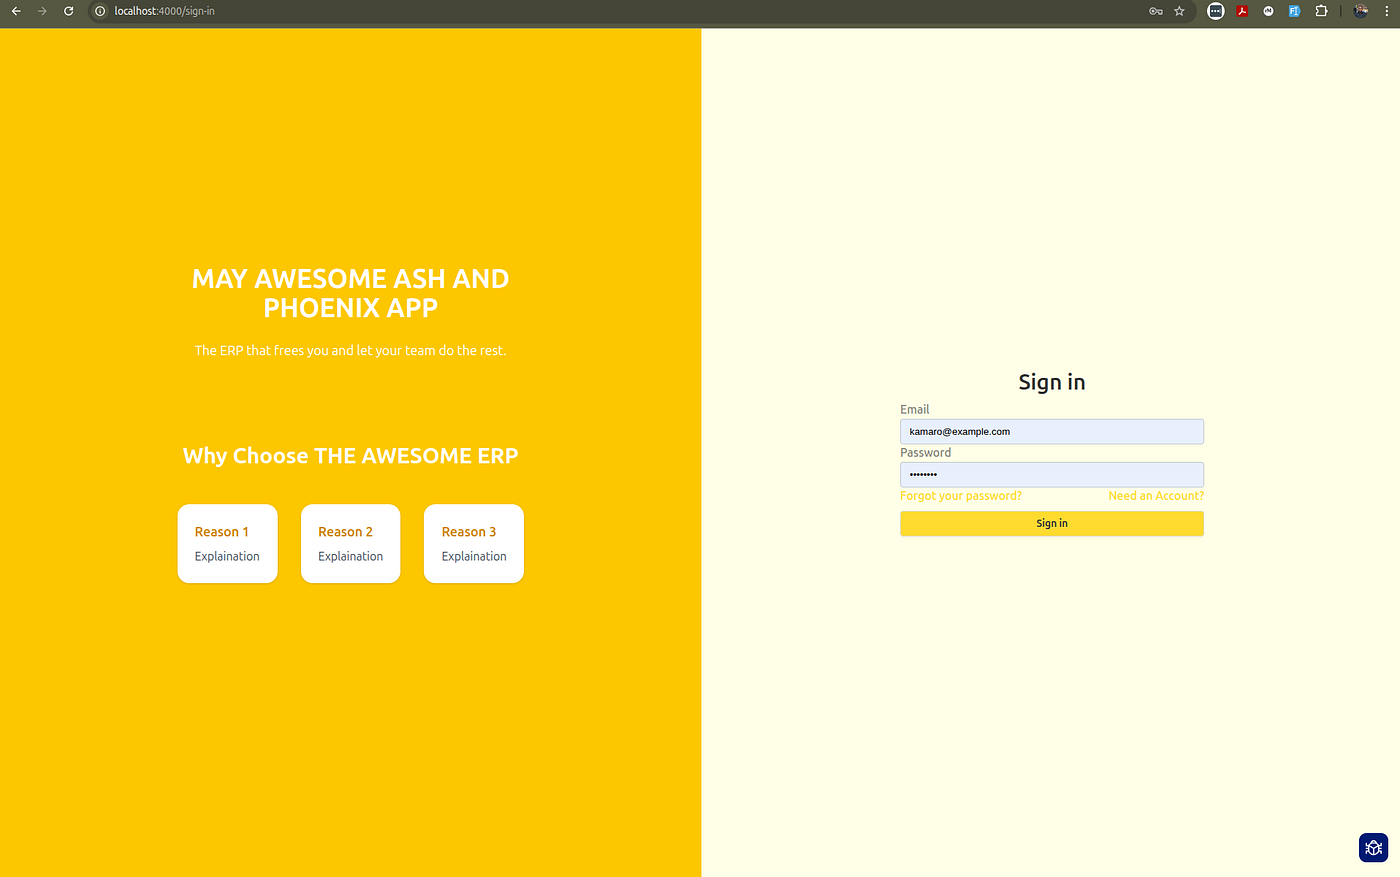
Now you have a authentication pages with new look and feel. Start your phoenix server and go to [https://localhost:4000/sign-in](https://localhost:4000/sign-in) you should see the following page
Want to go even deeper with Ash + Phoenix?
If you enjoyed this tutorial and want to master building production-grade applications with Ash Framework and Phoenix LiveView, I wrote a book for you:
**→ Get “Ash Framework for Phoenix Developers ” on Leanpub**
It covers everything from project setup to advanced patterns, custom authentication, authorization, and real-world architecture, saving you months of trial and error.
Let me know in the comments: What part of Ash Authentication are you struggling with most? Or what would you like me to cover in the next article?
메타데이터
- post_id
- ccfbb4dae3e8
- slug
- how-to-customize-ash-authentication-pages-and-create-a-experience-that-makes-your-users-stay-ccfbb4dae3e8
- url
- https://medium.com/@lambert.kamaro/how-to-customize-ash-authentication-pages-and-create-a-experience-that-makes-your-users-stay-ccfbb4dae3e8
- canonical_url
- https://medium.com/@lambert.kamaro/how-to-customize-ash-authentication-pages-and-create-a-experience-that-makes-your-users-stay-ccfbb4dae3e8
- author_url
- https://medium.com/@lambert.kamaro
- status
- ok
- fetched_at
- 2026-07-21 10:43:05