Getting Started with Makefile for a Simple C++23 Project
So you’ve been writing C++ code and typing long compile commands like this:
Getting Started with Makefile for a Simple C++23 Project

So you’ve been writing C++ code and typing long compile commands like this:
g++ -std=c++23 main.cpp utils.cpp -o appIt works fine… until your project gets more than a few files — then suddenly it feels messy. That’s where Makefile comes in.
Before We Start — You’ll Need a Compiler
Before using make, you need to have a C++ compiler installed — usually GCC or G++.
If you’re not sure, open a terminal (or command prompt) and type:
g++ --versionIf it shows something like g++ (GCC) 13.2.0, you’re good to go!
If not, here’s how to get it:
Windows
You can install:
- MSYS2 → recommended, includes
makeandg++-> https://www.msys2.org/. - Or **MinGW-w64** if you prefer something lighter.
After installing, make sure to add mingw64/bin (or similar) to your system PATH.
Linux / macOS
Most systems already have GCC. If not, install it with:
sudo apt install build-essential # Ubuntu/Debianor
brew install gcc # macOS with HomebrewOur Simple Project
Let’s organize it a bit more neatly, like this:
project/
 ├─ src/
 │   ├─ main.cpp
 │   └─ math.cpp
 ├─ include/
 │   └─ math.hpp
 └─ Makefile
src/main.cpp
//#include <print>
#include <iostream>
#include "math.hpp"

int main()
{
    //std::print("Sum: {}\n", add(5, 3));
    //std::print("Diff: {}\n", sub(5, 3));

    std::cout << "Sum: " << add(5, 3) << '\n';
    std::cout << "Diff: " << sub(5, 3) << '\n';
}
Note:
std::print()doesn't work on MinGW v15.2.0 or earlier. You can usestd::cout()instead if you get errors.
src/math.cpp
#include "math.hpp"

int add(int a, int b) { return a + b; }
int sub(int a, int b) { return a - b; }
include/math.hpp
#pragma once
int add(int a, int b);
int sub(int a, int b);
The Makefile
Now let’s write the Makefile in the project root:
# Compiler and flags
CC = g++
CFLAGS = -std=c++23 -Wall -Iinclude

# Source files and target output
SRCS = src/main.cpp src/math.cpp
TARGET = app

# Default target (build)
all: $(TARGET)

# Build rule
$(TARGET): $(SRCS)
 $(CC) $(CFLAGS) $(SRCS) -o $(TARGET) $(LDFLAGS)

# Run rule
run: $(TARGET)
 ./$(TARGET)

# Clean rule
clean:
 del $(TARGET)
How to Build and Run
Open a terminal in your project folder and type:
Type:
makeIf everything works, you’ll see your program compile into app.
Then run it:
make runOutput:
Sum: 8
Diff: 2
And when you want to clean up:
make cleanWhat’s Going On
Let’s break this Makefile down:
CCsets the compiler (in this caseg++)CFLAGSdefines the compiler optionsSRCSlists your source filesTARGETnames your output filemake all(or justmake) builds your projectmake runexecutes itmake cleandeletes the compiled file
It’s simple, readable, and a perfect foundation for beginners. Once you get used to this pattern, you can gradually add more rules — like separate folders for objects, or automatic dependency building.
Alright, time for the fun stuff!
We’re done with a very simple project setup, so maybe we can try a more interesting project, like drawing or rendering graphics on the screen.
So far, I think using raylib is the easiest way to do graphical things in C++, except for using the native OS API itself (for setup the project).
With this makefile setup, we can use any code editor like Visual Studio Code or even Notepad++.
To make this things more “scratch”, using Notepad++ is maybe a good idea. If using Notepad++, we can use a CMD for compile and run the app. Or we can use a plugin like NppExec:

Using raylib is actually very simple when it comes to linking. You just need to download it, tell your compiler where it is, and you’re done.
Download it:
https://github.com/raysan5/raylib/releases/tag/5.5

Then put it here:
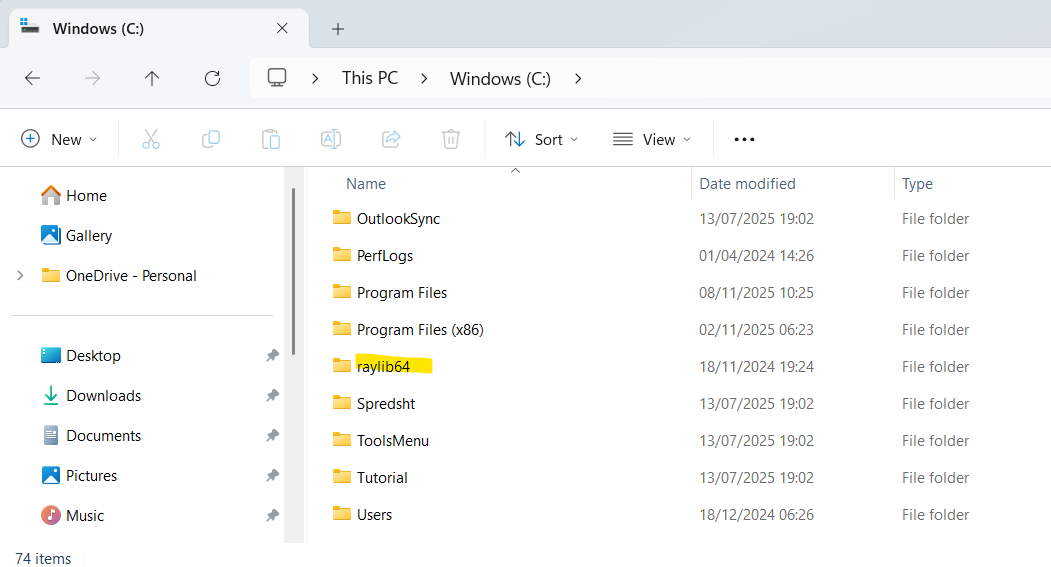
Link raylib like this:
# Compiler flags
CFLAGS = -Wall -Wextra -std=c++23 -I"C:/raylib64/include"

# Linker flags
LDFLAGS = -L"C:/raylib64/lib" -lraylib -lopengl32 -lgdi32 -lwinmm
Here’s the final version of the Makefile:
# Compiler
CC = g++

# Compiler flags
CFLAGS = -Wall -Wextra -std=c++23 -I"C:/raylib64/include"

# Linker flags
LDFLAGS = -L"C:/raylib64/lib" -lraylib -lopengl32 -lgdi32 -lwinmm

# Executable name
TARGET = main.exe

# Source files
SRCS = src/main.cpp

# Default to debug mode
DEBUG = true

ifeq ($(DEBUG), true)
 CFLAGS += -g -DDEBUG
else
 CFLAGS += -O2
endif

# Default target (build)
all: $(TARGET)

# Build rule
$(TARGET): $(SRCS)
 $(CC) $(CFLAGS) $(SRCS) -o $(TARGET) $(LDFLAGS)

# Run rule
run: $(TARGET)
 ./$(TARGET)

# Clean rule
clean:
 del $(TARGET)
Note: The debug section is optional. It adds a simple way to switch between debug and release.
Simply compile and run the program like this:

Thats it!
The full source code is available on my **GitHub account**, where you can explore, modify, and experiment.
For more tutorials and code examples, you can follow my GitHub account to keep learning, building your own projects, and supporting me!
메타데이터
- post_id
- cda0dcbe91a5
- slug
- getting-started-with-makefile-for-a-simple-c-23-project-cda0dcbe91a5
- url
- https://medium.com/@noryx/getting-started-with-makefile-for-a-simple-c-23-project-cda0dcbe91a5
- canonical_url
- https://medium.com/@noryx/getting-started-with-makefile-for-a-simple-c-23-project-cda0dcbe91a5
- author_url
- https://medium.com/@noryx
- status
- ok
- fetched_at
- 2026-07-15 13:48:23





