How to Make Payments Using Apple Pay
This article walks through how to implement Apple Pay transactions using Apple’s PassKit framework. We're focusing specifically on how to…
How to Make Payments Using Apple Pay
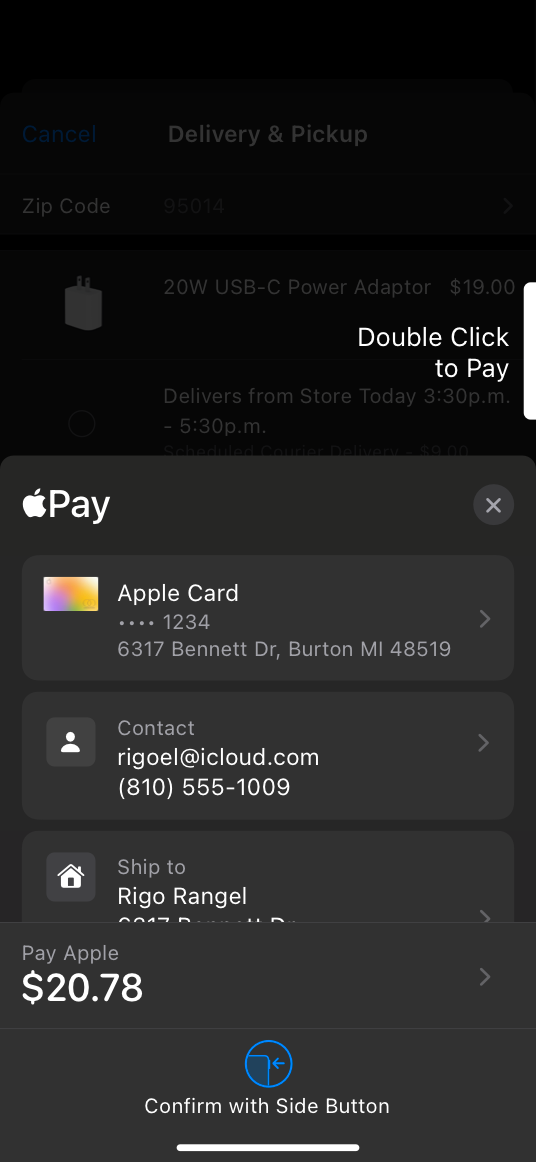
Apple Pay
This article walks through how to implement Apple Pay transactions using Apple’s PassKit framework. We're focusing specifically on how to use PKPaymentAuthorizationController, not on setting up merchant IDs or certificates..
Apple Pay payments are made using Apple’s PassKit framework and specifically through an object called PKPaymentAuthorizationController.
Note: we could also use PKPaymentAuthorizationViewController to achieve Apple Pay transactions but at the cost of depending on UIKit.
The PKPaymentAuthorizationController class performs the same role as the PKPaymentAuthorizationViewController class, but it does not depend on the UIKit framework. This means that the authorization controller can be used in places where a view controller cannot (for example, in watchOS apps or in SiriKit extensions).
Below is a Swift class that encapsulates everything you need to launch an Apple Pay flow using PassKit.
import Foundation
import PassKit

final class ApplePayService: NSObject {
    /// Internal state of `ApplePayService`
    private enum State {
        /// Transaction authorized.
        case authorized(PKPaymentAuthorizationResult)
        /// Nothing is going on.
        case idle
        /// Apple Pay sheet has been displayed.
        case started
    }

    /// Apple Pay transaction failure reason.
    enum AuthorizationError: Error {
        /// Apple Pay transaction failed to start.
        case failedToStart
        /// Apple Pay authorization failed.
        case authorizationFailed([any Error])
        /// User cancelled the payment.
        case cancelled
    }

    /// Apple Pay transaction request.
    struct AuthorizationRequest: Equatable {
        struct Item: Equatable {
            let amount: Int
            let label: String
        }

        /// Represents the label that will be displayed next to the request's total. In common cases, the value should be your application's name.
        let title: String
        /// The transaction's total.
        let total: Int
        /// Th transaction items.
        let items: [Item]
    }

    /// An object that presents a sheet that prompts the user to authorize a payment request.
    private var paymentAuthorizationController: PKPaymentAuthorizationController?
    /// A closure that will be invoked once Apple has validated our transaction. This closure should validate the Apple Pay transaction's data.
    private var authorizationValidationHandler: ((Data) async throws -> Void)?
    private var state = State.idle
    private var continuation: CheckedContinuation<Void, any Error>?

    /// Starts Apple Pay transaction.
    /// - Parameters:
    ///   - merchantId: A valid registered merchant identifier.
    ///   - request: The request containing the payment detail.
    ///   - authorizationValidationHandler: A call back that the system calls after the payment request is authorized in order submit the payment information to your payment processor to authorize the transaction.
    func authorize(
        merchantId: String,
        request: ApplePayAuthorizationRequest,
        authorizationValidationHandler: sending @escaping (Data) async throws -> Void
    ) async throws {
        let request = try self.createPKPaymentRequest(
            merchantId: merchantId,
            request: request
        )
        self.paymentAuthorizationController = PKPaymentAuthorizationController(paymentRequest: request)
        self.paymentAuthorizationController?.delegate = self
        self.authorizationValidationHandler = authorizationValidationHandler
        // `PKPaymentAuthorizationController.present` might fail due to servral reasons:
        // - Merchant ID not properly configured in Apple Developer.
        // - Missing Apple Pay capability in app's entitlements.
        // - Incorrect merchant identifier format.
        // - Invalid Payment Request.
        // - ...
        // Note that even when `PKPaymentAuthorizationController.present` the PKPaymentAuthorizationControllerDelegate.paymentAuthorizationControllerDidFinish(:)` will still be called.
        guard await self.paymentAuthorizationController?.present() == true else {
            self.cleanup()
            throw ApplePayAuthorizationError.failedToStart
        }

        try await withCheckedThrowingContinuation { continuation in
            self.continuation = continuation
        }
    }
}

private extension ApplePayService {
    /// Creates a `PKPaymentRequest` from  an`AuthorizationRequest`
    /// - Parameters:
    ///   - request: AuthorizationRequest
    /// - Returns:PKPaymentRequest
    /// - note: refer to this [link](https://developer.apple.com/documentation/passkit_apple_pay_and_wallet/pkpaymentrequest/1619231-paymentsummaryitems#1943252) to learn more info about the rules to follow when constructing `PKPaymentRequest`items.
    private func createPKPaymentRequest(
        merchantId: String,
        request: ApplePayAuthorizationRequest
    ) throws(ApplePayAuthorizationError) -> PKPaymentRequest {
        // total must be >= 0
        guard request.total >= 0 else {
            throw .invalidRequest("ApplePayAuthorizationRequest.total must be greater than or equal to zero. Got value: \(request.total)")
        }

        let pkPaymentRequest = PKPaymentRequest()
        pkPaymentRequest.merchantIdentifier = merchantId
        // `merchantCapabilities`: a bit field of the payment-processing protocols and card types that you support.
        pkPaymentRequest.merchantCapabilities = [.threeDSecure, .credit, .debit]
        pkPaymentRequest.countryCode = "FR"
        pkPaymentRequest.currencyCode = "EUR"
        // `supportedNetworks`: this property constrains the payment methods that the user can select to fund the payment.
        pkPaymentRequest.supportedNetworks = [.visa, .masterCard]
        pkPaymentRequest.paymentSummaryItems = request
            .items
            .map { .init(label: $0.label, amount: NSDecimalNumber(value: $0.amount).dividing(by: 100)) }
        // Apple Pay uses the last item in the paymentSummaryItems array as the grand total for the purchase shown in the example in paymentSummaryItems. The PKPaymentAuthorizationController class displays this item differently than the rest of the summary items. As a result, there are additional requirements placed on both its amount and its label.
        // - Set the grand total amount to the sum of all the other items in the array. This amount must be greater than or equal to zero.
        // - Set the grand total label to the name of your company. This label represents the person or company receiving payment.
        let total = NSDecimalNumber(value: request.total).dividing(by: 100)
        pkPaymentRequest.paymentSummaryItems.append(.init(label: request.title, amount: total))
        return pkPaymentRequest
    }

    private func cleanup() {
        self.continuation = nil
        self.paymentAuthorizationController?.dismiss()
        self.authorizationValidationHandler = nil
        self.state = .idle
    }
}

// MARK: ApplePayService: PKPaymentAuthorizationControllerDelegate

extension ApplePayService: PKPaymentAuthorizationControllerDelegate {
    func paymentAuthorizationControllerDidFinish(
        _: PKPaymentAuthorizationController
    ) {
        assert(self.state != .idle)
        guard let continuation = self.continuation, !continuation.isCancelled, self.state != .idle else { return }

        switch self.state {
        case let .authorized(authorizationResult):
            switch authorizationResult.status {
            case .success:
                // The Apple Pay transaction finished with success.
                self.continuation?.resume()
            default:
                // The Apple Pay transaction failed.
                self.continuation?.resume(throwing: ApplePayAuthorizationError.authorizationFailed(authorizationResult.errors))
            }
            self.cleanup()
        case .idle:
            // This case should never happen.
            break
        case .started:
            // In this case, the user has dismissed the Apple Pay sheet before starting the payment transaction. This case is considered as a user cancellation.
            self.continuation?.resume(throwing: ApplePayAuthorizationError.cancelled)
            self.cleanup()
        }
    }

    func paymentAuthorizationController(
        _: PKPaymentAuthorizationController,
        didAuthorizePayment payment: PKPayment
    ) async -> PKPaymentAuthorizationResult {
        assert(self.state == .started)
        // At this stage Apple has validated the payment request. `authorizationValidationHandler` is called to submit the payment information to the payment processor.
        do {
            try await self.authorizationValidationHandler?(payment.token.paymentData)
            // Mark state as .authorized(.success)
            self.state = .authorized(.init(status: .success))
            // Tell the system that the transaction has been approved.
            return .init(status: .success)
        } catch {
            // Mark state as .authorized(.failure)
            self.state = .authorized(.init(status: .failure, errors: [error]))
            // Tell the system that the transaction has been disapproved.
            return .init(status: .failure, errors: [error])
        }
    }
}
We’ll go over:
- How to build the payment request
- How to launch the Apple Pay sheet
- How to handle the result (success/failure/cancel)
- How to validate the payment token
Step 1: Building the Payment Request
    /// Creates a `PKPaymentRequest` from  an`AuthorizationRequest`
    /// - Parameters:
    ///   - request: AuthorizationRequest
    /// - Returns:PKPaymentRequest
    /// - note: refer to this [link](https://developer.apple.com/documentation/passkit_apple_pay_and_wallet/pkpaymentrequest/1619231-paymentsummaryitems#1943252) to learn more info about the rules to follow when constructing `PKPaymentRequest`items.
    private func createPKPaymentRequest(
        merchantId: String,
        request: ApplePayAuthorizationRequest
    ) throws(ApplePayAuthorizationError) -> PKPaymentRequest {
        // Total must be >= 0. Otherwise we throw an error.
        assert(request.total >= 0, "ApplePayAuthorizationRequest.total must be greater than or equal to zero. Got value: \(request.total)")

        let pkPaymentRequest = PKPaymentRequest()
        pkPaymentRequest.merchantIdentifier = merchantId
        // `merchantCapabilities`: a bit field of the payment-processing protocols and card types that you support.
        pkPaymentRequest.merchantCapabilities = [.threeDSecure, .credit, .debit]
        // The merchant’s two-letter ISO 3166 country code.
        pkPaymentRequest.countryCode = "FR"
        // The three-letter ISO 4217 currency code that determines the currency the payment request uses.
        pkPaymentRequest.currencyCode = "EUR"
        // `supportedNetworks`: this property constrains the payment methods that the user can select to fund the payment.
        pkPaymentRequest.supportedNetworks = [.visa, .masterCard]
        pkPaymentRequest.paymentSummaryItems = request
            .items
            .map { .init(label: $0.label, amount: NSDecimalNumber(value: $0.amount).dividing(by: 100)) }
        // Apple Pay uses the last item in the paymentSummaryItems array as the grand total for the purchase shown in the example in paymentSummaryItems. The PKPaymentAuthorizationController class displays this item differently than the rest of the summary items. As a result, there are additional requirements placed on both its amount and its label.
        // - Set the grand total amount to the sum of all the other items in the array. This amount must be greater than or equal to zero.
        // - Set the grand total label to the name of your company. This label represents the person or company receiving payment.
        let total = NSDecimalNumber(value: request.total).dividing(by: 100)
        pkPaymentRequest.paymentSummaryItems.append(.init(label: request.title, amount: total))
        return pkPaymentRequest
    }
This method turns an AuthorizationRequest into a valid PKPaymentRequest.
Important Notes:
- The total must be greater than or equal to zero.
- The final item in the
paymentSummaryItemslist represents the grand total and must use your company name or app name as the label
Step 2: Starting the Apple Pay Sheet
    /// Starts Apple Pay transaction.
    /// - Parameters:
    ///   - merchantId: A valid registered merchant identifier.
    ///   - request: The request containing the payment detail.
    ///   - authorizationValidationHandler: A closure that the will be called after the payment request is authorized in order submit the payment information to your payment processor to authorize the transaction.
    func authorize(
        merchantId: String,
        request: ApplePayAuthorizationRequest,
        authorizationValidationHandler: sending @escaping (Data) async throws -> Void
    ) async throws {
        assert(self.state == .idle)
        // 1.
        // Create a valid PKPaymentRequest object.
        // Create a PKPaymentAuthorizationController with the PKPaymentRequest object.
        // Delegate must be set so we can be notified about the Apple Pay transaction's state.
        let request = try self.createPKPaymentRequest(
            merchantId: merchantId,
            request: request
        )
        self.paymentAuthorizationController = PKPaymentAuthorizationController(paymentRequest: request)
        self.paymentAuthorizationController?.delegate = self
        self.authorizationValidationHandler = authorizationValidationHandler
        // 2.
        // `PKPaymentAuthorizationController.present` might fail due to servral reasons:
        // - Merchant ID not properly configured in Apple Developer.
        // - Missing Apple Pay capability in app's entitlements.
        // - Incorrect merchant identifier format.
        // - Invalid Payment Request.
        // - ...
        guard await self.paymentAuthorizationController?.present() == true else {
            self.cleanup()
            throw ApplePayAuthorizationError.failedToStart
        }
        self.state = .started
        try await withCheckedThrowingContinuation { continuation in
            self.continuation = continuation
        }
    }
Steps inside authorize():
- Builds the
PKPaymentRequest. - Initializes the
PKPaymentAuthorizationController. - Presents the Apple Pay sheet.
- Suspends using
withCheckedThrowingContinuationuntil the payment finishes.
This is the method you should call when you’re ready to launch Apple Pay.
You can use other async models too — this uses Swift Concurrency, but Combine or closures would work as well.
Step 3: Handling Apple Pay Results
When payment is authorized:
    func paymentAuthorizationController(
        _: PKPaymentAuthorizationController,
        didAuthorizePayment payment: PKPayment
    ) async -> PKPaymentAuthorizationResult {
        assert(self.state == .started)
        // At this stage Apple has validated the payment request. `authorizationValidationHandler` is called to submit the payment information to the payment processor.
        do {
            try await self.authorizationValidationHandler?(payment.token.paymentData)
            // Mark state as .authorized(.success)
            self.state = .authorized(.init(status: .success))
            // Tell the system that the transaction has been approved.
            return .init(status: .success)
        } catch {
            // Mark state as .authorized(.failure)
            self.state = .authorized(.init(status: .failure, errors: [error]))
            // Tell the system that the transaction failed.
            return .init(status: .failure, errors: [error])
        }
    }
Apple has validated the request at this point. The system gives you the chance to forward the payment data to your backend and validate it using the authorizationValidationHandler. If validation succeeds, return .success; if not, return .failure.
When payment is completed or canceled:
    func paymentAuthorizationControllerDidFinish(
        _: PKPaymentAuthorizationController
    ) {
        assert(self.state != .idle)
        guard let continuation = self.continuation, !continuation.isCancelled, self.state != .idle else { return }

        switch self.state {
        case let .authorized(authorizationResult):
            switch authorizationResult.status {
            case .success:
                // The Apple Pay transaction finished with success.
                self.continuation?.resume()
            default:
                // The Apple Pay transaction failed.
                self.continuation?.resume(throwing: ApplePayAuthorizationError.authorizationFailed(authorizationResult.errors))
            }
            self.cleanup()
        case .idle:
            // This case should never happen.
            break
        case .started:
            // In this case, the user decided to dismiss the Apple Pay sheet before starting the payment transaction. This case is considered as a user cancellation.
            self.continuation?.resume(throwing: ApplePayAuthorizationError.cancelled)
            self.cleanup()
        }
    }
This method is called when the Apple Pay transaction is finished.
When the user authorizes a payment request, this method is called after the user is shown the status from the paymentAuthorizationController:didAuthorizePayment function.
When the user cancels without authorizing the payment request, only paymentAuthorizationControllerDidFinish: is called.
Make sure to dismiss the PKPaymentAuthorizationController by calling the cleanup method.
Example
final class ApplePayRequestValidationService {
    func validate(data: Data) async throws {
        // ...
    }
}

func payWithApplePay() async throws {
    let total = 1111 // The amount in cents.
    let request = ApplePayAuthorizationRequest(
        title: "MyAppName",
        total: total,
        items: [.init(amount: 1000, label: "Shirt"), .init(amount: 111, label: "Fees")]
    )
    let service = ApplePayService()
    try await service.authorize(merchantId: "merchantID", request: request) { data in
        let applePayRequestValidationService = ApplePayRequestValidationService()
        try await applePayRequestValidationService.validate(data: data)
    }
}
Remember:
- Build your
PKPaymentRequestcarefully — follow Apple’s guidelines for items and totals. - Validate payments responsibly — either client-side or via your backend.
- Handle errors and user cancellations gracefully — they’re a natural part of the payment flow.
This article focused on the core logic of making a payment, not on setup. If you haven’t yet configured your merchant ID, certificates, or entitlements, that’s your next step before testing.
Now that you’ve seen how to build and trigger Apple Pay in Swift, you’re ready to plug this into your app’s real-world purchase flows — from subscriptions to physical goods.
Any feedback would be appreciated as always. Thanks.
메타데이터
- post_id
- cf12562308d4
- slug
- how-to-make-payments-using-apple-pay-cf12562308d4
- url
- https://medium.com/@rokridi/how-to-make-payments-using-apple-pay-cf12562308d4
- canonical_url
- https://medium.com/@rokridi/how-to-make-payments-using-apple-pay-cf12562308d4
- author_url
- https://medium.com/@rokridi
- status
- ok
- fetched_at
- 2026-08-12 20:06:02