System Data Is Eating My Mac Storage: What It Really Is (and How to Clean It Safely)
“System Data” is the most unhelpful label macOS has ever shipped.
System Data Is Eating My Mac Storage: What It Really Is (and How to Clean It Safely)
“System Data” is the most unhelpful label macOS has ever shipped.
It’s basically the junk drawer of your storage: caches, logs, local snapshots, backups, and a bunch of “it depends.” So when it suddenly jumps to 80GB, you’re not crazy for feeling stuck.
Here’s the good news: you usually don’t need to delete random stuff in ~/Library like you’re defusing a bomb. There’s a safer path. A boring one. The kind that works.
I’ll show you exactly what I do when System Data starts ballooning — what’s low-risk, what’s risky, and where people accidentally hurt themselves.
First: confirm it’s not just a weird storage calculation
Before you touch anything:
- Restart once. Yeah, I know. But macOS storage reporting can lag behind reality.
- Check your free space. Apple menu → System Settings → General → Storage.
- Give it 5 minutes. On some machines, the “System Data” bar recalculates after a short wait.
If it’s still huge, keep going.
What “System Data” usually contains (in plain English)
System Data is not one thing. It’s a pile.
The big chunks I see most often:
- Local snapshots (APFS / Time Machine). They can grow quietly and then… surprise.
- App caches and logs (browsers are repeat offenders).
- iPhone/iPad backups stored locally.
- Developer/build artifacts (Xcode DerivedData, simulators, Homebrew caches, Docker… you know the vibe).
- Mail/Messages attachments and other “I didn’t realize it saved locally” stuff.
The trick is to stop guessing and start locating.
The safe-first cleanup order (this matters)
If you do this backwards, you waste time. Or worse, you delete something important and don’t notice until Monday morning.
My order:
- Clear low-risk caches (browser/app caches you can regenerate)
- Remove obvious leftovers (DMGs, old installers, downloads)
- Find large files and folders that are explainable
- Deal with backups/snapshots only if they’re clearly the culprit
- Only then, consider deeper system-level cleanup
Let’s walk it.
Step 1: clear caches (low risk, usually real wins)
This is the “I need space today” step.
Browser cache (not cookies)
If your browser cache is huge, clearing it is usually painless. You might lose some “instant load” speed for a day. That’s it.
On my Mac, I prefer using a tool that shows the real paths it’s touching and lets me choose what to remove. No scary “we found 999 problems” nonsense.
CleanDiskGo’s Junk view is basically that: categories on the left, actual folders/paths on the right.
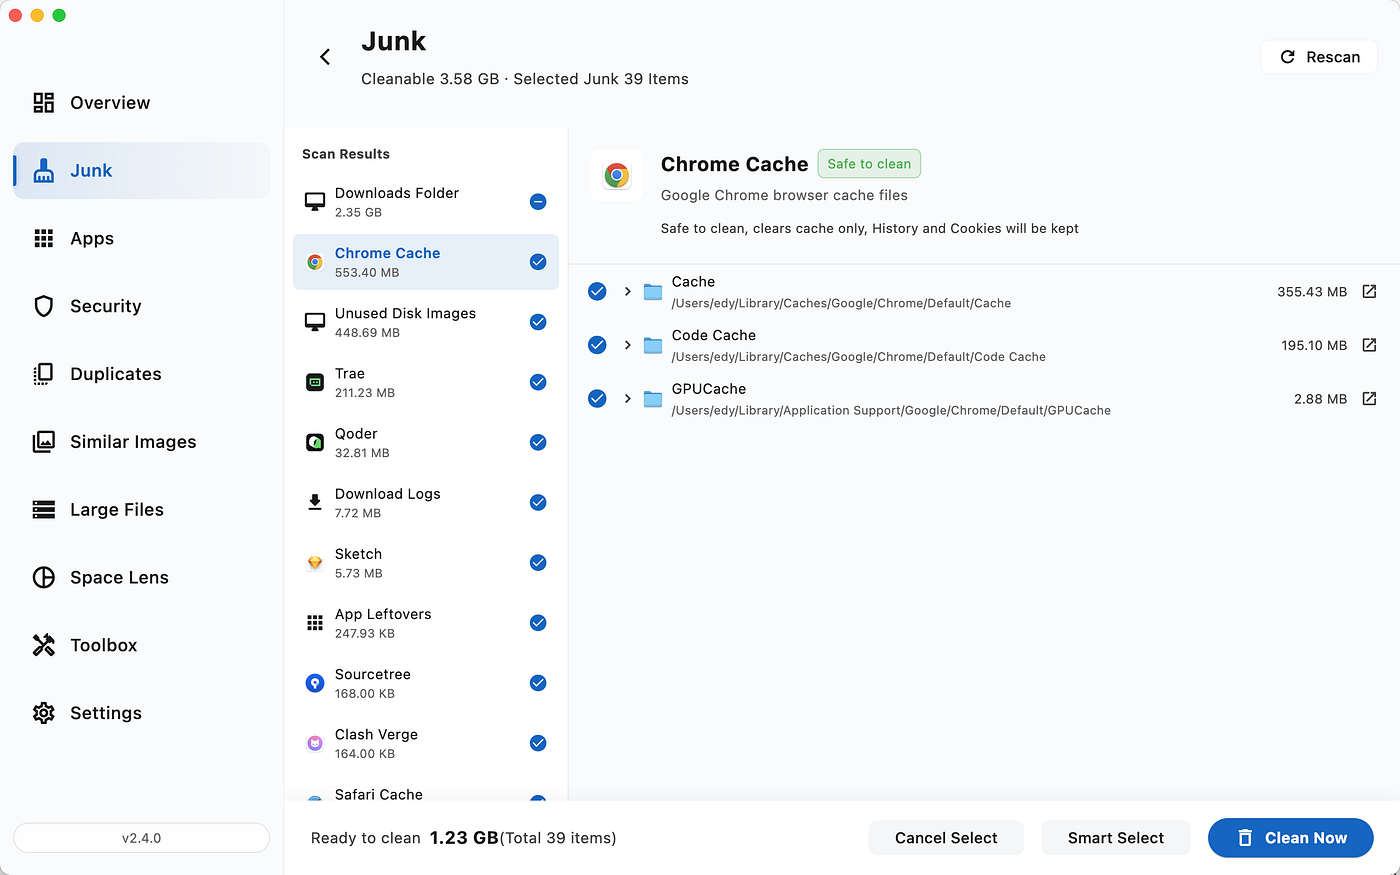
My rule:
- If it says “Cache”, I’m calm.
- If it says “Preferences” or “Application Support”, I slow down.
Step 2: clean the stuff you forgot existed (Downloads, DMGs, installers)
This is where easy gigabytes hide.
Look for:
- Old
.dmgfiles .zipand exports you already moved elsewhere- Duplicate installers (same app, different versions)
- “Temporary” folders that have been temporary since last year
If you want to do it manually, Finder can help:
- In Finder, press
Command + F - Filter by File Size → “is greater than” → start with
500 MB - Sort and delete only what you can explain
That last part is the whole game: if you can’t explain what it is, don’t delete it yet.
Step 3: find the actual space hog (stop staring at the Storage bar)
The Storage bar tells you that you have a problem. It doesn’t tell you where.
This is where a treemap view is worth its weight in SSD: you spot the “why is that folder 12GB?” moment in two seconds.
CleanDiskGo’s Space Lens does exactly that for me.

What I do with this view:
- Click the biggest blocks first
- Drill down until I hit a folder I recognize
- Decide whether it’s safe to remove, archive, or ignore
If you’re seeing things like video exports, old installers, build artifacts, or duplicated project folders… congrats. That’s cleanable space.
If you’re seeing mysterious system directories you don’t recognize… slow down. Don’t go full “delete and pray”.
Step 4: check for local snapshots (the sneaky one)
Local snapshots are a common reason “System Data” goes wild, especially if:
- you use Time Machine
- your backup drive isn’t always connected
- you’ve had low disk space recently
You can check snapshots via Terminal:
tmutil listlocalsnapshots /
If you see a long list, that might be your missing space.
Two important notes:
- macOS may delete snapshots automatically when it needs space (so sometimes they look scary but resolve themselves).
- deleting snapshots is more “system-level” than clearing caches (so I don’t start here unless the evidence points to it).
If you decide to remove a specific snapshot:
sudo tmutil deletelocalsnapshots 2026–04–30–123456
Use the exact timestamp you see in the list.
If you’re not comfortable with this, don’t force it. You can still reclaim a lot of space from the earlier steps without touching snapshots.
Step 5: old iPhone/iPad backups (big, boring, real)
Local iOS device backups can be massive and easy to forget.
You can manage them here:
- Connect your iPhone
- Open Finder
- Select your device
- Click “Manage Backups…”
Delete backups you don’t need.
My personal rule: keep one recent backup if you’re the cautious type, delete the rest.
Step 6: developer clutter (if you’re a dev, you already know)
If you code, System Data can quietly become “Build Artifact Data”.
Common culprits:
- Xcode DerivedData
- iOS Simulators
- Homebrew caches / old versions
- Docker images and volumes
I’m not going to pretend there’s one universal command that’s safe for everyone. There isn’t.
But the workflow is the same:
- locate what’s big
- confirm it’s regeneratable
- delete it deliberately
Large files view helps here too:

What I avoid doing (because I like my future self)
This is the “don’t be a hero” section.
- I don’t bulk-delete random folders under
~/Librarybecause a Reddit comment said so - I don’t run “cleaning scripts” I don’t understand
- I don’t delete Preferences for apps I still use (I’m not rebuilding configs for fun)
- I don’t chase the Storage bar to make it look pretty
The goal is usable space. Not a perfect chart.
A simple monthly routine that keeps System Data from exploding again
Once a month:
- Clear browser caches
- Clean Downloads and old installers
- Scan for large files/folders and archive what you’re done with
That’s it.
If you want it to take five minutes instead of half an hour, use a tool that’s transparent about what it’s touching. I personally stick with CleanDiskGo because it shows real paths, lets me choose, and doesn’t rush me into clicking “Clean” like it’s a game show buzzer.
If your Mac cleaner makes you feel anxious, close it. You’re not the problem.
메타데이터
- post_id
- d26f87f60804
- slug
- system-data-is-eating-my-mac-storage-what-it-really-is-and-how-to-clean-it-safely-d26f87f60804
- url
- https://medium.com/@zhouweidev/system-data-is-eating-my-mac-storage-what-it-really-is-and-how-to-clean-it-safely-d26f87f60804
- canonical_url
- https://medium.com/@zhouweidev/system-data-is-eating-my-mac-storage-what-it-really-is-and-how-to-clean-it-safely-d26f87f60804
- author_url
- https://medium.com/@zhouweidev
- status
- ok
- fetched_at
- 2026-06-09 15:37:30