Building an IPv6-Only Kubernetes Cluster with kubeadm
Most Kubernetes tutorials assume dual-stack networking or traditional IPv4 infrastructure. But what happens when your Kubernetes node…
Building an IPv6-Only Kubernetes Cluster with kubeadm
Most Kubernetes tutorials assume dual-stack networking or traditional IPv4 infrastructure. But what happens when your Kubernetes node itself is IPv6-only?
I recently built a single-node Kubernetes cluster using kubeadm, containerd, and Calico in a fully IPv6-only environment. The goal was not just to make Kubernetes work, but to deeply understand every networking layer involved — from Pod CIDRs to NAT64, DNS64, IPv6 routing, and how IPv4 traffic can still interact with an IPv6-only Kubernetes setup.
This article walks through the complete setup process, the networking concepts involved, the issues encountered during setup, and how traffic flows inside the cluster.
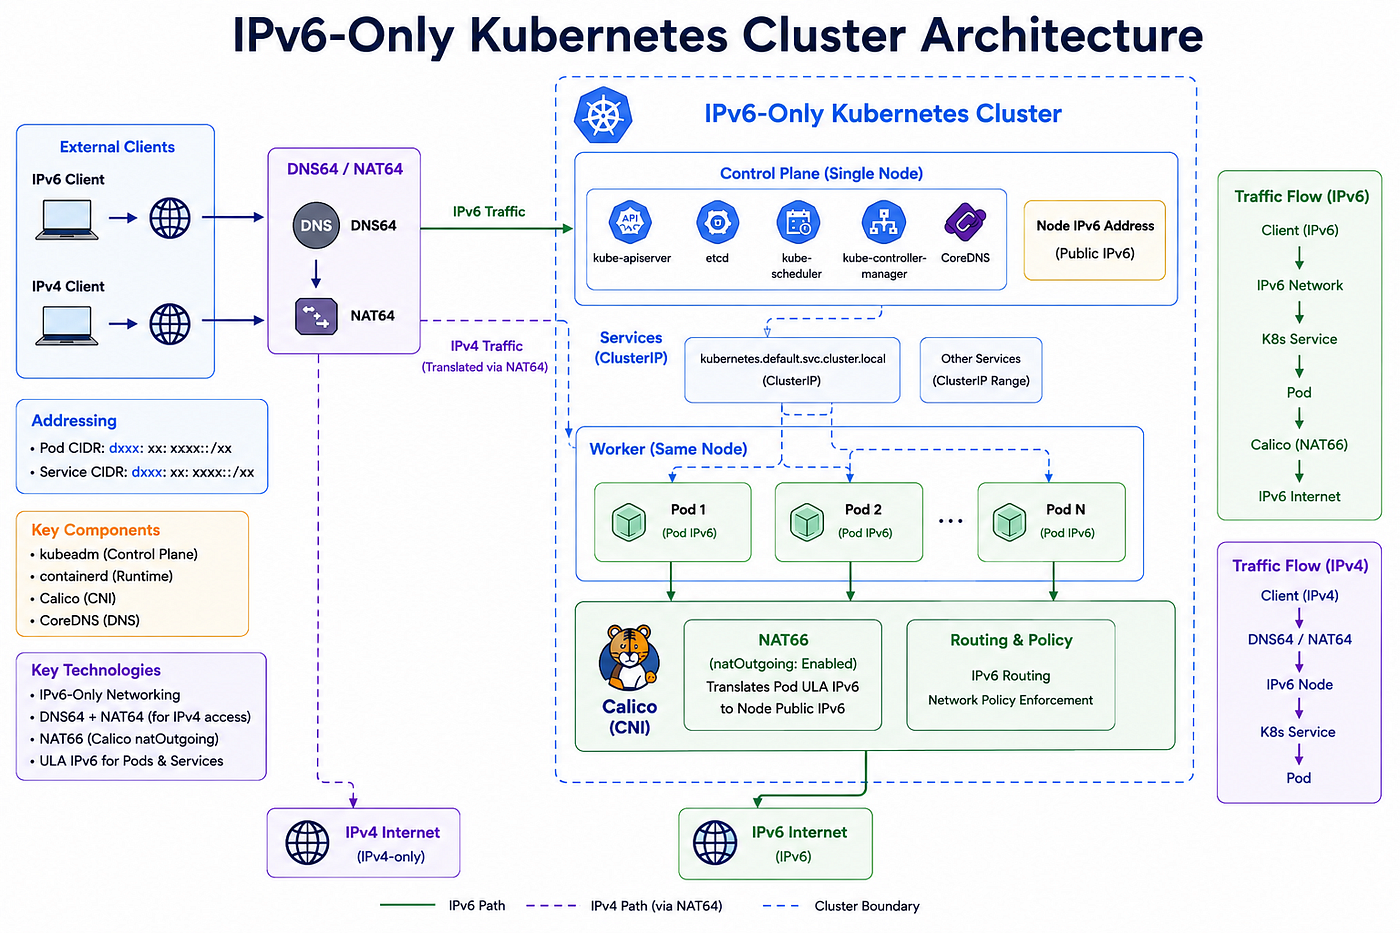
Kubernetes IPV6 Architecture
Why IPv6-Only Kubernetes?
IPv6 adoption is steadily increasing, and modern infrastructure increasingly supports IPv6-first deployments.
Running Kubernetes in an IPv6-only environment helps understand:
- Kubernetes networking internals
- IPv6 routing
- NAT64 and DNS64
- Pod and Service networking
- Real-world infrastructure behavior
This setup was built mainly for learning and experimentation, but many of the concepts apply directly to production-grade infrastructure.
Understanding the Biggest Challenge
The biggest thing to understand is this:
An IPv6-only machine cannot directly communicate with IPv4-only services.
That becomes a problem because many internet services still operate primarily over IPv4.
Examples include:
- GitHub
- Some package repositories
- Some APIs
To solve this problem, IPv6-only environments commonly use:
- NAT64
- DNS64
What is NAT64?
NAT64 allows IPv6 systems to communicate with IPv4 systems.
It translates:
- IPv6 requests → IPv4
- IPv4 responses → IPv6
Without NAT64, an IPv6-only host cannot reach IPv4-only destinations.
What is DNS64?
DNS64 works together with NAT64.
Suppose a domain only has an IPv4 A record:
example.com -> 192.0.2.10DNS64 synthesizes a fake IPv6 AAAA record:
64:ff9b::192.0.2.10The IPv6-only host connects to that synthesized IPv6 address, and NAT64 performs the translation behind the scenes.
Step 1 — Verifying IPv6 Connectivity
Before installing Kubernetes, outbound IPv6 connectivity must be verified.
curl -6 -v https://registry-1.docker.io/v2/
ping6 google.com
This confirms:
- IPv6 routing works
- Docker image pulls work
- NAT64/DNS64 functionality exists
This step is extremely important because Kubernetes depends heavily on pulling container images.
Step 2 — Preparing the Operating System
Kubernetes requires several kernel-level networking features.
Disable Swap
swapoff -a
sed -i '/ swap / s/^/#/' /etc/fstab
Kubernetes expects predictable memory management and does not work reliably with swap enabled.
Load Required Kernel Modules
cat <<EOF | tee /etc/modules-load.d/k8s.conf
overlay
br_netfilter
EOF
modprobe overlay
modprobe br_netfilterWhy these modules matter
overlay
Used by container runtimes for layered container filesystems.
br_netfilter
Allows iptables/ip6tables to inspect bridged container traffic.
Without this, Kubernetes networking breaks.
Configure sysctl Parameters
cat <<EOF | tee /etc/sysctl.d/k8s.conf
net.bridge.bridge-nf-call-ip6tables = 1
net.bridge.bridge-nf-call-iptables = 1
net.ipv4.ip_forward = 1
net.ipv6.conf.all.forwarding = 1
EOF
sysctl --systemThe most important setting in an IPv6 cluster is:
net.ipv6.conf.all.forwarding = 1Without IPv6 forwarding, Pods cannot route traffic correctly.
Step 3 — Installing containerd
Kubernetes does not run containers directly.
The flow looks like this:
kubelet → containerd → runc → containersInstall containerd:
apt install -y containerdmkdir -p /etc/containerdcontainerd config default | tee /etc/containerd/config.tomlConfigure systemd Cgroup Driver
sed -i 's/SystemdCgroup = false/SystemdCgroup = true/' \
/etc/containerd/config.toml
Restart containerd:
systemctl restart containerd
systemctl enable containerd
This step is important because kubelet and containerd must use the same cgroup driver.
Step 4 — Installing Kubernetes Components
apt install -y kubelet kubeadm kubectlapt-mark hold kubelet kubeadm kubectlapt-mark hold prevents automatic upgrades that may break version compatibility.
Step 5 — Configuring kubelet for IPv6
In IPv6 environments, kubelet should explicitly use the node’s IPv6 address.
cat <<EOF | tee /etc/default/kubelet
KUBELET_EXTRA_ARGS=--node-ip=2001:db8::10
EOF
Restart kubelet:
systemctl daemon-reexec
systemctl restart kubelet
Step 6 — kubeadm init and the IPv6 CIDR Problem
The first kubeadm attempt failed because of an IPv6 CIDR sizing issue.
Initial configuration:
--pod-network-cidr=f100:1:1::/112Error:
networking.podSubnet: Invalid value:
the size of pod subnet with mask 112
is smaller than the size of node subnet with mask 64
Why This Happens
In IPv6 Kubernetes networking:
- Each node receives a
/64 - Therefore the overall Pod CIDR must be larger than
/64
That means:
/112is too small/56works correctly
This is one of the most confusing IPv6 Kubernetes concepts.
Correct kubeadm init Command
kubeadm init \
--apiserver-advertise-address=2001:db8::10 \
--pod-network-cidr=f100:1:1::/56 \
--service-cidr=f100:1:1::/112
Understanding the CIDRs
Pod CIDR
f100:1:1::/56Used for Pod IP allocation.
Pods receive addresses from this range.
Example:
f100:1:1:9a:3bd6:64c8:4f36:f6c6Service CIDR
f100:1:1::/112Used for virtual Service IPs.
Example:
kubernetes.default.svc.cluster.local
→ f100:1:1::0
Step 7 — Installing Calico with IPv6 Support
Flannel is not ideal for IPv6-only Kubernetes.
Calico provides much better IPv6 support.
Install the operator:
kubectl create -f \
https://raw.githubusercontent.com/projectcalico/calico/v3.28.0/manifests/tigera-operator.yaml
Custom IPv6 Calico Configuration
apiVersion: operator.tigera.io/v1
kind: Installation
metadata:
  name: default
spec:
calicoNetwork:
ipPools:
- name: default-ipv6-ippool
blockSize: 122
cidr: f100:1:1::/56
encapsulation: None
natOutgoing: Enabled
nodeSelector: all()Understanding natOutgoing: Enabled
This enables NAT66.
Pods use private IPv6 ULA addresses:
f100:...These addresses are not publicly routable.
Calico translates Pod traffic to the node’s public IPv6 address.
This allows Pods to access the internet.
Step 8 — Making the Node Schedulable
Single-node clusters initially prevent workloads from running on the control plane.
Remove the taint:
kubectl taint nodes k8s-ipv6-node \
node-role.kubernetes.io/control-plane:NoSchedule-
Now the same node acts as:
- Control plane
- Worker node
Step 9 — Verifying Networking
Deploy a test Pod:
kubectl run test-nginx --image=nginx --port=80Check the Pod IP:
kubectl get pod test-nginx -o wideThe Pod should receive an IPv6 address from the Pod CIDR range.
Testing Internet Connectivity from Pods
kubectl exec -it test-nginx -- \
curl -6 -I https://www.google.com
This confirms:
- NAT66 works
- Outbound IPv6 routing works
Testing Kubernetes DNS
kubectl exec -it test-nginx -- \
getent hosts kubernetes.default
Expected result:
f100:1:1::0This confirms:
- CoreDNS works
- Internal service discovery works
- Kubernetes DNS resolution works
Deploying PostgreSQL Stateful Workload
After networking validation, PostgreSQL was deployed using:
- StatefulSet
- Headless Service
- NodePort Service
Problem: No StorageClass
A fresh kubeadm cluster does not include dynamic storage provisioning.
PVCs remained stuck in:
PendingSolution: local-path-provisioner
Install local-path-provisioner:
kubectl apply -f \
https://raw.githubusercontent.com/rancher/local-path-provisioner/v0.0.30/deploy/local-path-storage.yaml
Then set it as default:
kubectl patch storageclass local-path \
-p '{"metadata":{"annotations":{"storageclass.kubernetes.io/is-default-class":"true"}}}'
PVCs immediately bound successfully.
Exposing PostgreSQL Externally
PostgreSQL was exposed using NodePort:
type: NodePort
nodePort: 304
This made the database reachable publicly through the node’s IPv6 address.
Important Security Lesson
This setup intentionally exposed PostgreSQL publicly for testing purposes.
That is dangerous in production.
Risks include:
- Brute-force attacks
- Internet scanning
- Credential compromise
Safer alternatives include:
- Kubernetes Secrets
- Restricted firewall rules
- VPN access
- Bastion hosts
- Internal-only Services
How IPv4 Traffic Reaches an IPv6 Kubernetes Cluster
One of the most interesting parts of this setup is understanding how IPv4 traffic can still interact with workloads running inside an IPv6-only Kubernetes environment.
The flow looks like this:
IPv4 Client
     ↓
DNS64 / NAT64 Layer
     ↓
IPv6 Node
     ↓
NodePort / Service
     ↓
Pod
Internally:
Pod
 ↓
Calico CNI
 ↓
NAT66
 ↓
Public IPv6
 ↓
Internet
For IPv4-only destinations:
Pod
 ↓
IPv6 Node
 ↓
DNS64 synthesized AAAA
 ↓
NAT64 translation
 ↓
IPv4 Internet
This is what allows an IPv6-only Kubernetes cluster to still interact with the mostly IPv4 internet.
Key Lessons Learned
Kubernetes Networking Is Deep
Most complexity came from networking:
- Pod routing
- CIDRs
- DNS
- NAT
- Service discovery
IPv6 Changes Assumptions
Many tools still assume IPv4 exists.
IPv6-only clusters expose hidden infrastructure dependencies quickly.
Calico Works Very Well for IPv6
Calico handled:
- IPv6 Pod allocation
- NAT66
- Routing
- Service networking
- very reliably.
Final Thoughts
Building Kubernetes in an IPv6-only environment is one of the best ways to deeply understand:
- kubeadm
- Networking
- CNI behavior
- DNS
- routing
- Kubernetes architecture
It forces you to understand what usually stays hidden behind managed Kubernetes services.
As IPv6 adoption continues to grow, these concepts will become increasingly important for infrastructure and platform engineers.
🤝 Feedback & Suggestions
If you have any suggestions, improvements, or feedback regarding this implementation, feel free to reach out to me on LinkedIn. I’m always open to learning, improving, and discussing Kubernetes and DevOps concepts.
🔗 Let’s connect on LinkedIn:LinkedIn.
메타데이터
- post_id
- d2c8cf18e39b
- slug
- building-an-ipv6-only-kubernetes-cluster-with-kubeadm-d2c8cf18e39b
- url
- https://medium.com/@harshithkanumuri/building-an-ipv6-only-kubernetes-cluster-with-kubeadm-d2c8cf18e39b
- canonical_url
- https://medium.com/@harshithkanumuri/building-an-ipv6-only-kubernetes-cluster-with-kubeadm-d2c8cf18e39b
- author_url
- https://medium.com/@harshithkanumuri
- status
- ok
- fetched_at
- 2026-07-09 22:56:59