Install FreeRADIUS with MikroTik inUbuntu(mysql also)
Step 1: Install FreeRADIUS
Install FreeRADIUS with MikroTik inUbuntu(mysql also)

Free Radius With Mikrotik
Step 1: Install FreeRADIUS
sudo apt update
sudo apt upgrade -y
sudo apt install php libapache2-mod-php
sudo apt install freeradius freeradius-mysql -y
Step 2: Configure MySQL
- If mysql server not installed, then install mysql server first.
sudo apt install mysql-server
sudo systemctl start mysql
sudo systemctl enable mysql- After install Set up the MySQL Database
sudo mysql -u root -p- Once logged in, create a database and user
CREATE DATABASE radius;
CREATE USER 'radius'@'%' IDENTIFIED BY 'Public12345#';
GRANT ALL PRIVILEGES ON radius.* TO 'radius'@'%';
FLUSH PRIVILEGES;
EXIT;- Import the FreeRADIUS schema:
Now we will import tables to our database radius from free radius schema
sudo mysql -u root -p radius < /etc/freeradius/3.0/mods-config/sql/main/mysql/schema.sql- Open the
defaultandinner-tunnelvirtual server configuration files to add SQL
authorization:
sudo nano /etc/freeradius/3.0/sites-available/defaultFind the authorize { section and ensure the following line is uncommented:
sqlDo the same in the /etc/freeradius/3.0/sites-available/inner-tunnel file.
- Configure sql file:
edit the /etc/freeradius/3.0/mods-available/sql file:
sudo nano /etc/freeradius/3.0/mods-available/sqlChange dialect = "sqllite" to dialect = "mysql", add your database credentials:
driver = "rlm_sql_${dialect}"
server = "localhost"
port = 3306
login = "radius"
password = "Public12345#"
radius_db = "radius"
read_clients = yes
Enable the SQL module:
sudo ln -s /etc/freeradius/3.0/mods-available/sql /etc/freeradius/3.0/mods-enabled/Disable mysql TLS:
sudo nano /etc/freeradius/3.0/mods-available/sql
Comment these line by add #
mysql {
  # If any of the files below are set, TLS encryption is enabled
  #tls {
   #ca_file = "/etc/ssl/certs/my_ca.crt"
   #ca_path = "/etc/ssl/certs/"
   #certificate_file = "/etc/ssl/certs/private/client.crt"
   #private_key_file = "/etc/ssl/certs/private/client.key"
   #cipher = "DHE-RSA-AES256-SHA:AES128-SHA"

   #tls_required = yes
   #tls_check_cert = no
   #tls_check_cert_cn = no
  #}

  # If yes, (or auto and libmysqlclient reports warnings are
  # available), will retrieve and log additional warnings from
  # the server if an error has occured. Defaults to 'auto'
  warnings = auto
 }
Step 3: Start and Enable FreeRADIUS
Start the FreeRADIUS service and enable it to start on boot:
sudo systemctl start freeradius
sudo systemctl enable freeradius
Check if FreeRADIUS is running:
sudo systemctl status freeradiusStep 4: Install phpmyadmin (Optional)
Install phpmyadmin to work database in GUI mode
sudo apt install phpmyadminDuring the installation, you’ll be prompted to choose a web server. Select “apache2”.
Create a Symbolic Link:
sudo ln -s /usr/share/phpmyadmin /var/www/html/phpmyadminNow you can see phpmyadmin in browser http://yourip/phpmyadmin
And radius server database you will see tables
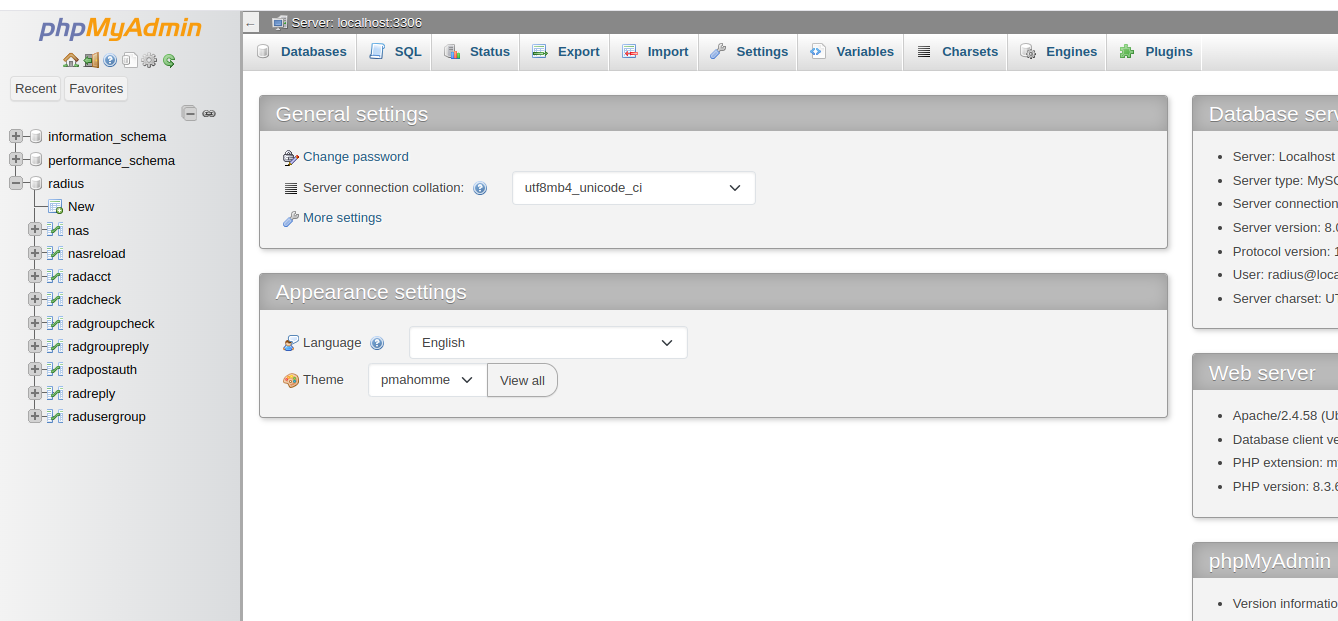
Tables of free radius server
Step 5: Insert mikrotik and user data in radius database
Now insert your Mikrotik in nas table. You can insert all mikrotik in this table
INSERT INTO nas (nasname, shortname, type, secret, description)
VALUES ('192.168.1.2', 'mikrotik1', 'Mikrotik', 'secret1', 'MikroTik Router 1');
In this case:
**nasname**: IP address of the MikroTik router.**shortname**: A human-readable name for the router.**type**: Device type (usually "other").**secret*: Shared secret used for RADIUS communication.(Note: In mikrotik we will add freeradius with this secret)***description**: Optional description of the router.
Now configure users in the MySQL database using the radcheck table. Here’s an example:
INSERT INTO radcheck (username, attribute, op, value)
VALUES ('user1', 'Cleartext-Password', ':=', 'password1');
This will allow the user **user1 with the password `password1`** to authenticate via RADIUS.
Step 6: Configure MikroTik Router for RADIUS Authentication
- Login to MikroTik:
Access the MikroTik router using Winbox or SSH.
2. Add a RADIUS Server:
- Go to RADIUS.
- Click Add New and enter the following:
- Service: Select the service you want (usually PPP for PPPoE authentication, or login for router login).
- Address: The IP address of your FreeRADIUS server (Ubuntu Server).
- Secret: Enter the same shared secret that you use in
nas insert tablewe use secret1 - Authentication Port: 1812 (default).
- Accept incoming
- Go to RADIUS.
- Open Incoming and check accept
- Enable Use Radius & Accounting under PPP>Secret > PPP Authentication & Accounting (if using PPP).
Additional Notes
- To troubleshoot, check the FreeRADIUS logs located in
/var/log/freeradius/radius.log. - For added security, consider setting up TLS for encrypted connections
- If we want to use free radius database in laravel project or other project then ensure that the MySQL server is set to accept connections from all interfaces. Open
/etc/mysql/my.cnfor/etc/my.cnf. And add
[mysqld]
bind-address = 0.0.0.0
메타데이터
- post_id
- d32c6402bbd6
- slug
- how-to-setup-free-radius-in-ubuntu-d32c6402bbd6
- url
- https://medium.com/@nafischonchol/how-to-setup-free-radius-in-ubuntu-d32c6402bbd6
- canonical_url
- https://medium.com/@nafischonchol/how-to-setup-free-radius-in-ubuntu-d32c6402bbd6
- author_url
- https://medium.com/@nafischonchol
- status
- ok
- fetched_at
- 2026-07-28 08:20:09


