Kubernetes Cluster Configuration and Nginx Web Application Deployment
Objective
Kubernetes Cluster Configuration and Nginx Web Application Deployment
Objective
To install and configure Kubernetes, deploy a containerized application (NGINX), and manage it using core components such as Pods, Deployments, and Services.
What is Kubernet?
Kubernetes is an open-source platform used to automatically deploy, manage, scale, and monitor containerized applications across multiple systems.
What is Kubernetes Used For?
Kubernetes is used to automatically manage, deploy, scale, and monitor containerized applications.
In simple terms:
- Docker → runs containers
- Kubernetes → controls many containers across systems
What it helps you do:
- Deploy applications easily
- Scale up/down automatically
- Restart failed containers (self-healing)
- Manage multiple containers in one system
Practical Task Performed
In this practical:
- Kubernetes was installed and configured
- System issues affecting Kubernetes were resolved
- A Kubernetes cluster was initialized
- Networking was configured using Flannel
- An Nginx application was deployed
- The application was exposed using a Kubernetes Service
Step 1: Disable Swap Memory
What is Swap?
Swap is a portion of disk space used as additional memory when physical RAM becomes full.
Kubernetes recommends disabling swap to ensure proper memory and resource management.
Command
sudo swapoff -aCommand Explanation
swapoff→ disables swap memorya→ disables all active swap partitions
Make it permanent (VERY IMPORTANT)
sudo sed -i '/ swap / s/^/#/' /etc/fstab
Explanation:
- Finds swap entry in system config
/etc/fstab - Comments it out
- Prevents swap from coming back after reboot
Purpose
Disables swap memory to allow Kubernetes services to function properly.
Step 2: Add Kubernetes Repository
The Kubernetes repository must be added because the required packages are not available in the default RHEL repositories. Adding the repository allows the package manager to locate and install Kubernetes components from an external source.
1. Create repo file
sudo vim /etc/yum.repos.d/kubernetes.repo2: Add this content
[kubernetes]
name=Kubernetes
baseurl=https://pkgs.k8s.io/core:/stable:/v1.29/rpm/
enabled=1
gpgcheck=1
gpgkey=https://pkgs.k8s.io/core:/stable:/v1.29/rpm/repodata/repomd.xml.key
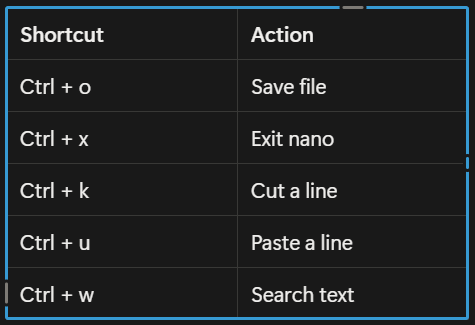
3: Save and exit
In vim:
ESC
:wq
Step 3: Install Kubernetes Tools
Command to install kubernetes tools
sudo dnf install -y kubelet kubeadm kubectl
Explanation:
sudo→ Runs command with administrative privilegesdnf install→ Installs packageskubelet→ Runs containers on each nodekubeadm→ Initializes Kubernetes clusterkubectl→ CLI tool to manage Kubernetes
Step 4: Start kubelet Service
sudo systemctl enable --now kubelet
Explanation:
systemctl→ Manages system servicesenable→ Starts service at boot-now→ Starts service immediatelykubelet→ Kubernetes node agent
Output:
Created symlink '/etc/systemd/system/multi-user.target.wants/kubelet.service' → '/usr/lib/systemd/system/kubelet.service'.Meaning:
- A symbolic link (shortcut) was created
- This ensures
kubeletstarts automatically when the system boots
Check kubelet status
sudo systemctl status kubelet
Explanation:
status→ Displays the current state of the service
Step 5: Configure Kubernetes Networking
Kubernetes networking configuration allows communication between Pods, Services, and cluster components.
This configuration enables Kubernetes to properly manage network traffic, packet forwarding, and communication between containerized applications running inside the cluster.
It also ensures that network plugins such as Flannel can function correctly within the Kubernetes environment.
Command
sudo modprobe br_netfilterCommand Explanation
modprobe→ loads kernel modulesbr_netfilter→ enables bridge network filtering
Verifying Kubernetes Network Module Configuration
After loading the br_netfilter module, the bridge networking files were verified to confirm that Kubernetes networking support was successfully enabled.
Verification Command
ls /proc/sys/net/bridge
Command Explanation
ls→ lists directory contents/proc/sys/net/bridge→ directory containing bridge networking parameters
Result
bridge-nf-call-arptables
bridge-nf-call-iptables
bridge-nf-call-ip6tables
Meaning
The presence of these files confirms that:
- the
br_netfiltermodule loaded successfully - Kubernetes networking support is active
- bridge traffic filtering is available for Pod communication
Reason
Kubernetes requires bridge network filtering to allow proper communication and traffic management between Pods and Services within the cluster.
Step 6: Configure Packet Forwarding
Command
echo "net.bridge.bridge-nf-call-iptables = 1" | sudotee -a /etc/sysctl.conf
Command Explanation
echo→ prints configurationnet.bridge.bridge-nf-call-iptables = 1→ enables packet filteringtee -a→ appends output to file
Enables Kubernetes networking rules for Pod communication.
Step 7: Reload System Configuration
After modifying Kubernetes networking settings, the system configuration must be reloaded so the new settings can take effect immediately.
This step applies the updated kernel and network parameters without requiring a system reboot.
Command
sudo sysctl -p
Command Explanation
sysctl→ manages kernel settings-p→ reload configuration file
Applies networking changes without rebooting.
Step 8: Pull Kubernetes Images
Before initializing the Kubernetes cluster, the required Kubernetes container images were downloaded to the system.
These images contain the core Kubernetes components needed to create and run the control plane services.
Command
sudo kubeadm config images pull
Command Explanation
sudo→ runs the command with administrator privilegeskubeadm→ Kubernetes cluster initialization toolconfig→ manages Kubernetes configuration settingsimages→ refers to Kubernetes container imagespull→ downloads the required images to the system
Ensures required system components are ready before cluster initialization.
Step 9: Kubernetes Cluster Initialization
To initialize a Kubernetes cluster using kubeadm and prepare the control plane for deploying and managing containerized applications.
sudo kubeadm initExplanation:
kubeadm→ Kubernetes setup toolinit→ initializes the Kubernetes control plane
This command is used to:
- Create the Kubernetes cluster
- Set up control plane components (API server, scheduler, controller manager)
- Prepare the system for running workloads
Modified Command (Used in This Lab)
sudo kubeadm init --pod-network-cidr=10.244.0.0/16 --ignore-preflight-errors=Mem
Explanation:
--pod-network-cidr=10.244.0.0/16→ assigns the Pod network range required by Flannel--ignore-preflight-errors=Mem→ tells Kubernetes to ignore the minimum memory requirement
This command performs the same function as the standard command but:
- Bypasses the RAM check
- Allows initialization on low-memory systems
Why Both Commands Were Used
1. Why the Standard Command is Important
The standard kubeadm init command represents the correct and recommended way to initialize a Kubernetes cluster under normal system conditions.
It ensures:
- All system requirements are met
- The cluster is stable and production-ready
2. Why the Modified Command Was Used
In this practical:
- The system had insufficient RAM (~1.6GB)
- Kubernetes required at least ~1.7GB
Because of this:
- The standard command failed
- The memory check blocked initialization
Solution:
- Use
-ignore-preflight-errors=Memto bypass the restriction
Summary
The Kubernetes cluster was initialized using the kubeadm init command. However, due to limited system memory in the lab environment, the command was executed with the --ignore-preflight-errors=Mem flag to bypass the minimum memory requirement. Both commands perform the same function, with the latter allowing the initialization process to proceed despite system constraints.
Step 10: Configure kubectl Access
Create directory
mkdir -p $HOME/.kubeExplanation:
mkdir→ Create directoryp→ Create parent directories if they don’t exist$HOME→ Current user’s home directory
Copy configuration file
sudo cp -i /etc/kubernetes/admin.conf $HOME/.kube/configExplanation:
cp→ Copy filei→ Prompt before overwriteadmin.conf→ Cluster admin configuration
Set permissions
sudo chown $(id -u):$(id -g) $HOME/.kube/configExplanation:
chown→ Change file ownership$(id -u)→ Current user ID$(id -g)→ Current group ID:→ Separates user and group
Step 11: Install Network Plugin
To deploy Flannel CNI plugin into Kubernetes
kubectl apply -f <https://raw.githubusercontent.com/coreos/flannel/master/Documentation/kube-flannel.yml>
Command Explanation:
kubectl→ Kubernetes CLIapply→ Creates or updates resources-f→ Specifies file or URL
Installs Flannel network for Pod communication.
Enables Pod-to-Pod networking inside the cluster.
Step 12: Verify Cluster Status
Command to display all nodes in the cluster.:
kubectl get nodes
Explanation:
get→ Retrieve resourcesnodes→ Machines in the cluster
This command verifies that the Kubernetes node is active and in a Ready state before deploying applications.
Step 13: Deploy Nginx Application
After successfully configuring the Kubernetes cluster, an application was needed to test and demonstrate how Kubernetes manages containerized workloads.
A Deployment is a Kubernetes object used to create, manage, and maintain Pods automatically.
A Deployment is like a manager for Pods.
- Pod → runs your application
- Deployment → controls and maintains Pods
What a Deployment does:
- Creates Pods
- Ensures the desired number of Pods are running
- Automatically restarts failed Pods
- Allows scaling (increase/decrease number of Pods)
- Supports updates and rollbacks
Command used:
kubectl create deployment nginx-deployment --image=nginx
Command Explanation
Creates a Deployment that runs Nginx containers.
Purpose of Deploying the Nginx Application
The Nginx application was deployed to demonstrate how Kubernetes manages and runs containerized applications within a cluster environment.
Nginx was selected because it is lightweight, widely used, and suitable for testing Kubernetes Deployments, Pods, and Services.
Step 14: Expose Nginx Application
Expose deployment means creating a Service for a Deployment so that it can be accessed over the network.
Without exposing, your app runs but cannot be accessed from outside.
Command
kubectl expose deployment nginx-deployment--port=80--type=NodePort
Command Explanation
expose deployment→ creates a Service-port=80→ exposes container port-type=NodePort→ allows external access
Purpose of Exposing the Nginx Application
The Nginx application was exposed to make the deployed web application accessible outside the Kubernetes cluster.
This demonstrates how Kubernetes Services provide external access and communication to containerized applications running inside Pods.
Why we use it
- To access the application in a browser
- To allow external communication
- To provide a stable IP/port (Pods change, Service stays constant)
Step 15: Deployment Verifications
Verification commands were used to confirm that the Kubernetes resources were created and functioning correctly.
1. Verify Deployments
Deployments were verified to ensure the application was successfully deployed.
kubectl get deployments
Explanation:
- Lists deployments
- Shows replicas and availability
2. Verify Pods
Pods were verified to confirm that the Nginx containers were running properly.
kubectl get pods
Explanation:
- Lists all Pods
- Shows status (Running, Pending, etc.)
3. Verify Services
Services were verified to ensure the application was successfully exposed and accessible within the cluster.
kubectl get services
Explanation:
- Lists services
- Shows how apps are exposed
Step 16: Accessing the Nginx Application in a Browser
After exposing the Deployment using a NodePort Service, the application can be accessed through the system IP address and assigned NodePort.
Check Service Port
Kubernetes automatically assigned a port from the NodePort range (usually 30000–32767)
Command
kubectl get services
Purpose
Displays the Service information including:
- Service name
- Cluster IP
- External port (NodePort)
Meaning
80→ container port30728→ external NodePort assigned by Kubernetes
The application can now be accessed through port 30728.
Get System IP Address
Command
ip a
Purpose
Displays the system network IP address.
Access Application in Browser
Format
http://SYSTEM-IP:NODEPORTExample
http://192.168.153.129:30728
Result
The default Nginx welcome page appears in the browser.
This confirms:
- Kubernetes networking is functioning
- The Service is accessible externally
- Communication between Kubernetes resources is working properly
Allow External Communication (Firewall Configuration)
Command
sudo firewall-cmd --permanent --add-port=30728/tcp
Explanation
firewall-cmd→ manages firewall settings-permanent→ saves rule permanently-add-port=30080/tcp→ allows NodePort traffic
Reload Firewall
Command
sudo firewall-cmd --reload
Purpose
Applies the new firewall configuration.
Purpose of Firewall Configuration
Allows external systems and browsers to communicate with the Kubernetes NodePort Service.
Key Concepts

Final Documentation Summary
Kubernetes was successfully installed and configured, and containerized applications were deployed and managed using Pods, Deployments, and Services, demonstrating effective container orchestration and cluster management.
메타데이터
- post_id
- d330c498990a
- slug
- kubernetes-cluster-configuration-and-nginx-web-application-deployment-d330c498990a
- url
- https://medium.com/@bamidelebabatundem/kubernetes-cluster-configuration-and-nginx-web-application-deployment-d330c498990a
- canonical_url
- https://medium.com/@bamidelebabatundem/kubernetes-cluster-configuration-and-nginx-web-application-deployment-d330c498990a
- author_url
- https://medium.com/@bamidelebabatundem
- status
- ok
- fetched_at
- 2026-06-21 07:44:09