From 90 Seconds to 1.4 Seconds: Running Apple’s FastVLM on CPU
How I built a full multimodal vision-language inference pipeline — entirely on CPU — from scratch.
From 90 Seconds to 1.4 Seconds: Running Apple’s FastVLM on CPU
How I built a full multimodal vision-language inference pipeline — entirely on CPU — from scratch.
By Ajay Kumar
The Goal
Apple released FastVLM, a compact but capable vision-language model. Like most modern VLMs, it was designed to run on GPUs. I wanted to see how fast I could get it running on a plain CPU — no GPU required — and actually make it usable in a real application.
The starting latency? Around 1 to 1.5 minutes per response.
Where I got it? 1.4 seconds to first token on a 6-core Intel CPU.
This post walks through exactly how I did it, broken into three parts:
- Part 1 — Model Conversion: turning the PyTorch checkpoint into ONNX + GGUF
- Part 2 — Serving: building a persistent server with FastAPI and Gradio
- Part 3 — Benchmarking: measuring accuracy and latency on real datasets
A Quick Look at FastVLM’s Architecture
Before diving into the code, it helps to understand what FastVLM is made of. Like most VLMs, it has two main components:
- Vision encoder — a FastViT-based MobileCLIP-L that processes the image into visual token embeddings
- Language model — Qwen2–0.5B, which takes those visual tokens alongside a text prompt and generates a response
The two are connected by a small MLP called the multimodal projector (mm_projector). Together they live in a single PyTorch checkpoint: llava-fastvithd_0.5b_stage3/model.safetensors.
To run this efficiently on CPU, you need to separate the two pieces and convert each to a format optimized for CPU inference:
- Vision encoder + projector → ONNX (fast, portable graph execution via ONNX Runtime)
- Language model → GGUF (quantized LLM serving via llama.cpp)

Part 1: Model Conversion Pipeline
Repo: fastvlm-cpu-inference
Step 1: Export the Vision Encoder to ONNX
The script vision_proj_to_onnx32.py loads the full multimodal checkpoint with the LLaVA model loader, extracts only vision_tower and mm_projector, wraps them in a thin nn.Module, and traces them to ONNX.
The wrapper is simple but there’s one important design decision buried in it — the output is cast back to float32, even if the model runs in fp16 internally:
class VisionEncoderWrapper(nn.Module):
    def __init__(self, vision_tower, mm_projector):
        super().__init__()
        self.vision_tower = vision_tower
        self.mm_projector  = mm_projector

    def forward(self, pixel_values: torch.Tensor):
        # pixel_values: (1, 3, H, W)  float32
        image_features = self.vision_tower(pixel_values)
        projected = self.mm_projector(image_features)
        return projected.float()   # always output float32
Returning float32 from the wrapper means the ONNX graph exports in a portable format. If you export raw fp16 output, many CPU ONNX Runtime versions will fail silently or produce garbage. The fp16 cast happens internally during the forward pass — you don't lose any model precision, you just make the output portable.
Then the export itself:
torch.onnx.export(
    encoder,
    (dummy_input,),
    "vision_projector_v1.onnx",
    export_params=True,
    opset_version=17,
    do_constant_folding=True,
    input_names=["pixel_values"],
    output_names=["image_embeddings"],
    dynamic_axes={
        "pixel_values":     {0: "batch_size", 2: "height", 3: "width"},
        "image_embeddings": {0: "batch_size", 1: "num_patches"},
    },
)
Dynamic axes on height, width, and num_patches are important — they let you swap between 512 and 1024 resolution inputs without re-exporting.
Output shapes:
- 512×512 input → embeddings
(1, 64, 896)— 64 visual tokens - 1024×1024 input → embeddings
(1, 256, 896)— 256 visual tokens
This produces two files: vision_projector_v1.onnx (the graph) and vision_projector_v1.onnx.data (the weights). To make it portable as a single file:
import onnx
model = onnx.load("vision_projector_v1.onnx")
onnx.save_model(model, "vision_projector_v1_standalone.onnx", save_as_external_data=False)
Step 2: FP16 → FP32 Cleanup (for the 1024 Variant)
For the 1024 resolution variant (vision_encoder_fp32.onnx), a second script convert_onnx_float32.py walks every node and initializer in the graph and converts any remaining fp16 tensors to fp32, then removes redundant Cast nodes. This makes the model run reliably across all ONNX Runtime versions without any FP16 compatibility issues.
This step is optional for the 512 standalone (which is already clean from the wrapper), but necessary for the 1024 export path.
Step 3: Extract the LLM-Only Weights
The language model lives inside the same big checkpoint as the vision components. exact_clean_Qwen2.py strips everything that isn't the Qwen2 LLM:
# What exact_clean_Qwen2.py does internally
state_dict = load_file("llava-fastvithd_0.5b_stage3/model.safetensors")

llm_only = {
    k: v for k, v in state_dict.items()
    if not k.startswith("model.vision_tower")
    and not k.startswith("model.mm_projector")
}
save_file(llm_only, "qwen2_llm_only/model.safetensors")
It also writes a clean config.json and copies the tokenizer files. The result is a fully HuggingFace-compatible Qwen2-0.5B folder — 24 transformer layers, hidden size 896, vocab of 151,936 tokens — that any standard tool can read.
Step 4: Convert to GGUF
With the clean HuggingFace checkpoint, convert it using convert_hf_to_gguf.py (from llama.cpp):
python convert_hf_to_gguf.py qwen2_llm_only \
    --outfile fastvlm_qwen2_f16.gguf \
    --outtype f16
Output: fastvlm_qwen2_f16.gguf — about 1.7 GB, full fp16 precision.
Step 5: Quantize to Q4_K_M
Q4_K_M compresses the model to roughly 4.9 bits per weight. Size drops from 1.7 GB to 463 MB, and CPU inference gets significantly faster because you’re loading and computing on far less data:
# Build the quantize tool first
cd llama.cpp/tools/quantize && cmake . && make

# Quantize
./llama.cpp/tools/quantize/llama-quantize \
    fastvlm_qwen2_f16.gguf \
    fastvlm_qwen2_q4km.gguf \
    Q4_K_M 8
Why Q4_K_M specifically? It uses a mixed quantization strategy where attention layers get slightly higher precision than FFN layers, which preserves output quality better than a uniform 4-bit scheme. On all four benchmarks I ran later, the quality loss versus fp16 was minimal.
Step 6: Build the Persistent C Inference Server
This is the most important engineering decision in the whole project. My first version launched the GGUF binary fresh for every HTTP request. That meant loading 463 MB of model weights from disk on every single call — and that is where the 1–1.5 minute latency came from. The model was spending almost all its time just loading, not actually running inference.
The fix: fastvlm_infer_v3.c, a persistent server built directly on the llama.cpp C API.
Here’s what the main loop does:
// Main request loop
while (1) {
    // Read: embeddings file path
    if (!fgets(embd_path, sizeof(embd_path), stdin)) break;
    embd_path[strcspn(embd_path, "\n")] = 0;

    // Read: user prompt
    if (!fgets(user_prompt, sizeof(user_prompt), stdin)) break;
    user_prompt[strcspn(user_prompt, "\n")] = 0;
    run_inference(ctx, vocab, embd_path, user_prompt, seq_id);
    // Cycle through sequence slots 0-3 for KV cache reuse
    seq_id = (seq_id + 1) % 4;
}
The model loads once at startup and stays resident. Every subsequent request just does the forward passes.
Inside run_inference, the prefill happens in three separate batches — this is the key to correctly feeding visual tokens to the LLM:
// Batch 1: system + user prefix tokens
{
    struct llama_batch b = llama_batch_init(n_prefix, 0, 1);
    // ... fill token IDs and positions ...
    llama_decode(ctx, b);
}

// Batch 2: image embeddings (raw float vectors, not token IDs)
{
    struct llama_batch b = llama_batch_init(n_img, n_embd, 1);
    for (int i = 0; i < n_img; i++) {
        memcpy(b.embd + i * n_embd,
               img_embd + i * n_embd,
               n_embd * sizeof(float));
        b.pos[i]       = cur_pos++;
        b.seq_id[i][0] = seq_id;
        b.logits[i]    = 0;
    }
    llama_decode(ctx, b);
}
// Batch 3: prompt suffix ("\nWhat is this?\n<|im_end|>\n<|im_start|>assistant\n")
{
    struct llama_batch b = llama_batch_init(n_suffix, 0, 1);
    // Mark only the last suffix token for logit output
    b.logits[n_suffix - 1] = 1;
    llama_decode(ctx, b);
}
The image embeddings go in as raw float vectors (not token IDs) using llama.cpp’s embedding batch mode. After all three batches are decoded, the KV cache holds the full context and generation begins token by token.
After each request, the KV cache slot is freed so it can be reused:
llama_memory_seq_rm(llama_get_memory(ctx), seq_id, -1, -1);The context is initialized with n_seq_max = 4, so up to 4 sequence slots can coexist — useful if you want to extend this to handle concurrent requests in the future.
Compile the server:
gcc fastvlm_infer_v3.c \
    -o fastvlm_server \
    -I./llama.cpp/include \
    -I./llama.cpp/ggml/include \
    -L/path/to/llama.cpp/build/src \
    -lllama -lggml -lggml-base \
    -lstdc++ -lm \
    -Wl,-rpath,"/path/to/llama.cpp/build/src"
The Two Resolution Variants
One key decision is whether to use the 512×512 or 1024×1024 vision encoder. The numbers:
Component 1024 Resolution 512 Resolution Visual tokens 256 64 ONNX inference 4,000–5,000 ms 1,290–1,430 ms LLM first token 300–500 ms 300–500 ms Total TTFT ~5,500–9,600 ms ~1,450–1,640 ms
The 512 version produces 4× fewer visual tokens, so the LLM’s prefill phase is dramatically shorter. This is why 512 is 3–5× faster — the bottleneck shifts from vision encoding to LLM prefill, and 64 tokens is a much lighter prefill than 256.

Part 2: Serving with FastAPI + Gradio
Repo: fastvlm-cpu-serve-gradio-fastapi
The Architecture
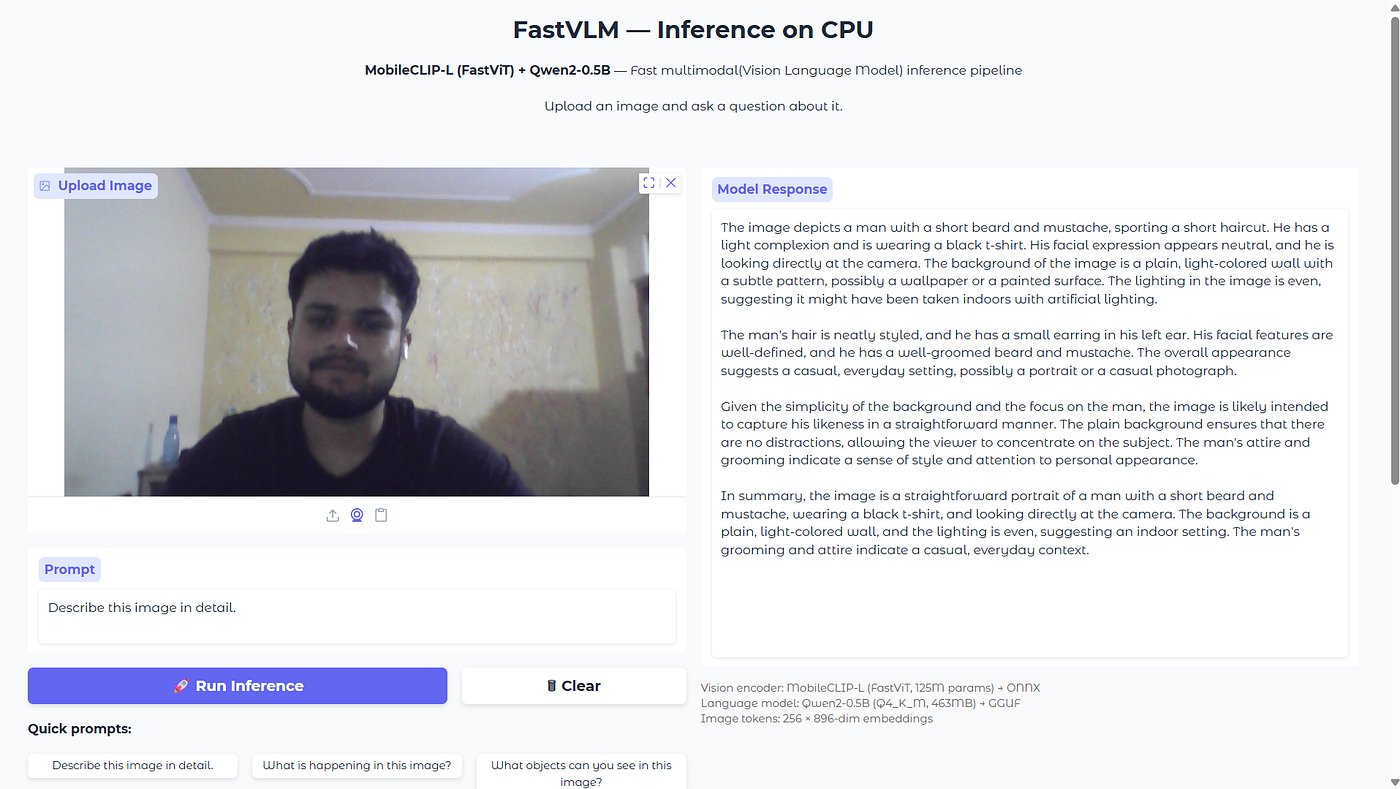
User → Gradio UI → FastAPI (stream_api.py) → fastvlm_server (C binary via stdin/stdout)
                        ↓
                   ONNX Runtime (vision encoder, loaded once)
stream_api.py handles the full pipeline. On startup, it loads the ONNX session and launches fastvlm_server as a persistent async subprocess:
@app.on_event("startup")
async def load_models():
    global ort_session
    ort_session = ort.InferenceSession(
        ONNX_PATH,
        providers=["CPUExecutionProvider"]
    )
    await start_llm_server()

async def start_llm_server():
    global llm_process
    llm_process = await asyncio.create_subprocess_exec(
        SERVER_BIN, GGUF_PATH,
        stdin=asyncio.subprocess.PIPE,
        stdout=asyncio.subprocess.PIPE,
        stderr=asyncio.subprocess.PIPE,
    )
    # Wait until the C server prints "READY"
    while True:
        line = await llm_process.stderr.readline()
        if "READY" in line.decode():
            break
Both the ONNX session and the LLM process stay alive for the lifetime of the server. No reloading.
Getting Image Preprocessing Exactly Right
This tripped me up early. The model was trained with a very specific preprocessing pipeline — any deviation hurts output quality noticeably.
The correct pipeline used in stream_api.py:
def expand_2_square(image: Image.Image):
    w, h = image.size
    if w == h:
        return image
    size = max(w, h)
    result = Image.new("RGB", (size, size), (0, 0, 0))
    result.paste(image, ((size - w) // 2, (size - h) // 2))
    return result

def preprocess_image(image: Image.Image) -> np.ndarray:
    image = image.convert("RGB")
    image = expand_2_square(image)       # pad to square with black borders
    TARGET_SIZE = 512                    # 512 or 1024 depending on variant
    w, h  = image.size
    scale = 1024 / min(w, h)
    image = image.resize(
        (round(w * scale), round(h * scale)),
        Image.Resampling.BILINEAR
    )
    w, h = image.size
    left = (w - TARGET_SIZE) // 2
    top  = (h - TARGET_SIZE) // 2
    image = image.crop((left, top, left + TARGET_SIZE, top + TARGET_SIZE))
    arr = np.array(image, dtype=np.float32) / 255.0
    return arr.transpose(2, 0, 1)[np.newaxis]   # (1, 3, H, W)
The expand2square step is critical. Without it, non-square images get distorted when resized, which confuses the vision encoder. I used trace_clip_processor.py and debug_exact_preprocess.py to compare tensor statistics between my implementation and the original CLIPImageProcessor pixel by pixel before trusting the output.
The Streaming Pipeline
The /predict endpoint runs the full pipeline and streams output back to the client as tokens arrive:
@app.post("/predict")
async def predict(image: UploadFile = File(...), prompt: str = Form(...)):
    img = Image.open(BytesIO(await image.read())).convert("RGB")

    # 1. Run ONNX vision encoder
    embeddings = encode_image(img)          # shape: (64, 896) or (256, 896)
    # 2. Save embeddings to temp .bin file
    # Format: [int32 n_tokens][int32 n_embd][float32 × n_tokens × n_embd]
    embd_path = save_embeddings(embeddings)
    # 3. Stream LLM response
    return StreamingResponse(
        run_llm_stream(embd_path, prompt, t0),
        media_type="text/plain"
    )
The streaming function sends the request to the C server and forwards tokens as they arrive:
async def run_llm_stream(embed_path, prompt, request_start):
    async with llm_lock:   # one request at a time (server is single-threaded)
        llm_process.stdin.write((embed_path + "\n").encode())
        llm_process.stdin.write((prompt + "\n").encode())
        await llm_process.stdin.drain()

        buffer = ""
        while True:
            chunk = await llm_process.stdout.read(16)
            text  = chunk.decode("utf-8", errors="ignore")
            buffer += text
            if "---END---" in buffer:
                before, _ = buffer.split("---END---", 1)
                if before:
                    yield before
                break
            # Yield text that definitely isn't part of the sentinel
            safe = buffer[:-12]
            if safe:
                yield safe
                buffer = buffer[-12:]
The 12-character tail buffer is a practical detail — ---END---\n is 10 characters, so keeping 12 in reserve ensures the sentinel is never accidentally split across yield boundaries.
Three Gradio Interfaces
The repo includes three Gradio UIs that progressively add capabilities.
gradio_app.py — Basic Image + Text
Upload an image, type a question, get a streaming response. The inference call uses async HTTP streaming so tokens appear in the UI as they’re generated:
async def run_inference(image, prompt):
    async with httpx.AsyncClient(timeout=300) as client:
        async with client.stream("POST", f"{API_URL}/predict",
                                 files={"image": ...},
                                 data={"prompt": prompt}) as response:
            async for chunk in response.aiter_text(chunk_size=16):
                if chunk:
                    partial_text += chunk
                    yield partial_text   # each yield updates the Gradio textbox
gradio_app_voice.py — Voice In, Voice Out
Adds bidirectional voice. The user can speak their prompt instead of typing, and the response is spoken back via TTS.
- STT:
faster-whisper(tiny model, int8, CPU) — fast and accurate enough for short prompts - TTS:
edge-ttswith theen-US-ChristopherNeuralvoice
# Transcribe audio prompt
def transcribe_audio(audio_path):
    segments, _ = whisper_model.transcribe(audio_path)
    return " ".join(segment.text for segment in segments)

# Convert response to speech
async def text_to_speech_edge(text):
    communicate = edge_tts.Communicate(text, "en-US-ChristopherNeural")
    await communicate.save("response_voice.mp3")
    return "response_voice.mp3"
# Combined handler
async def process_voice_and_predict(image, audio_path):
    prompt = handle_audio_transcription(audio_path, fallback_prompt="Describe this image.")
    last_text = ""
    async for text_out in run_inference(image, prompt):
        last_text = text_out
        yield last_text, gr.skip()          # stream text as it comes in
    audio_file = await text_to_speech_edge(last_text)
    yield last_text, audio_file             # final yield adds the audio
gradio_3i1_new.py — 3-in-1 with Live Camera
The most complete interface, with four tabs:
- Image Upload — standard static image Q&A
- FastVLM Live Camera — webcam snapshot mode with TTFT shown on screen after each capture
- Voice + Camera — speak your prompt while pointing the webcam
- Continuous generation — webcam streams frames every 4 seconds with automatic inference
The live camera tab shows latency metrics inline after each capture:
async def on_capture(frame, busy, selected_prompt):
    yield _status_html("processing"), True, "⏳ Analysing frame…"

    t_start = time.time()
        ttft_ms, final_text = 0.0, ""
        async for partial in run_inference(frame, selected_prompt):
            if partial and not final_text:
                ttft_ms = (time.time() - t_start) * 1000
            final_text = partial
        total_ms = (time.time() - t_start) * 1000
        yield _status_html("done", ttft=ttft_ms, total=total_ms), False, final_text
Deployment on Hugging Face Spaces
Both variants are live and public:
- 512 resolution (faster): https://musk12-fastvlm-cpu-inference-demo.hf.space
- 1024 resolution (higher quality): https://musk12-fastvlm-fast-inference-on-cpu.hf.space
Each Space bundles the compiled fastvlm_server binary, the GGUF, the ONNX file, and the required shared libraries (libllama.so, libggml.so, libggml-cpu.so, libggml-base.so) — everything needed to run without any build steps on the target machine.

Part 3: Benchmarks
Repo: fastvlm-cpu-benchmarks
After building the system, I ran it against four standard VQA and OCR benchmarks to measure accuracy, not just latency.
POPE — Hallucination Detection (512×512)
POPE tests whether the model hallucinates objects that aren’t in an image. It asks binary yes/no questions like “Is there a chair in this image?” The model’s job is to not make things up.
Metric Value Accuracy 80.39% Precision 93.31% Recall 65.46% F1 Score 76.94%
High precision, moderate recall. The model tends to say “no” when uncertain rather than hallucinate — that’s the safer and more correct behavior for this benchmark. For a 0.5B quantized model running at 512 resolution on CPU, 80% is solid.
GQA — Visual Reasoning (512×512)
GQA tests compositional visual reasoning with questions like “What color is the object to the left of the chair?” — things that require understanding spatial relationships and object attributes together.
Metric Value Accuracy 60.12% Precision 59.74% Recall 71.11% F1 Score 64.93%
60% accuracy on GQA is reasonable for a 0.5B model. Models 10× larger typically score in the 63–65% range, so the gap is small.
TextVQA — Reading Text in Images (1024×1024)
TextVQA measures whether the model can read and reason about text embedded in images: street signs, product labels, book covers, receipts. This is where the 1024 resolution variant earns its place — fine text details are simply lost at 512.
Metric Value VQA Accuracy 72.21% Exact Match Rate 77.44%
72% on TextVQA is genuinely strong for a 0.5B model. The original full-precision FastVLM paper results are in this range, which confirms that Q4_K_M quantization is not hurting text reading quality meaningfully.

OCRBench v2 — Heavy OCR (1024×1024)
OCRBench v2 is harder than TextVQA — it includes degraded scans, handwriting, stylized fonts, and low-resolution documents.
Metric Value OCR Accuracy 45.57%
45% on OCRBench v2 is expected for this model size and architecture. The model handles clean, printed text well (TextVQA confirms this) but struggles with degraded inputs. For a 0.5B parameter model doing OCR on CPU, this is a reasonable baseline.

Latency Benchmark — LLAVA-Wild (512×512)
Running on a 6-core Intel CPU across 100+ real prompts from the LLAVA-Wild dataset:
Metric Value Average TTFT 1,382 ms Min TTFT 1,204 ms Max TTFT 2,278 ms Avg total pipeline latency 5,975 ms
TTFT is what users actually feel — under 1.5 seconds average is responsive enough for interactive use. Total latency varies with output length (the model keeps generating until it hits a stop token or the 512-token limit).
"metadata": {
        "target_resolution": "512x512",
        "total_samples_evaluated": 60,
        "summary_stats": {
            "avg_ttft_ms": 1382.53,
            "min_ttft_ms": 1204.12,
            "max_ttft_ms": 2278.28,
            "avg_total_pipeline_ms": 5975.24,
            "std_dev_ttft_ms": 171.63
        }
Resolution Trade-off Summary
Use Case Recommended Variant General image Q&A, object recognition 512×512 Reading text, receipts, documents, OCR 1024×1024 Voice-first or hands-free apps 512×512 Latency-sensitive applications 512×512 Detailed visual reasoning 1024×1024
Key Lessons Learned
1. The bottleneck was model loading, not inference. The single biggest optimization was switching from per-request binary execution to a persistent C server. This cut latency from ~90 seconds to under 5 seconds. Every other optimization — quantization, ONNX, smaller resolution — was incremental on top of that. If you take one thing from this post, it’s that architecture matters more than hyperparameters.
2. FP16 → FP32 matters more than you’d expect. The ONNX Runtime on CPU has inconsistent FP16 support across platforms and versions. Exporting with an explicit float32 output from the wrapper and running convert_onnx_float32.py as a cleanup step made the difference between a model that worked everywhere and one that randomly broke on different machines.
3. Preprocessing has to match the training pipeline exactly. VLMs are sensitive to input normalization. expand2square + BILINEAR resize + center crop + /255.0 normalization — in that exact order — is what the model expects. I caught subtle differences by saving correct_pixels.npy from the reference CLIPImageProcessor and comparing it against my implementation tensor by tensor.
4. 512 vs 1024 is a real quality trade-off, not just speed. At 512 resolution the model genuinely cannot read fine text. At 1024 it can. TextVQA (72%) versus trying the same task at 512 makes this obvious. If you’re building something OCR-adjacent, 512 will frustrate users. For general scene understanding or object recognition, 512 is the right choice.
5. Q4_K_M is the quantization sweet spot. 1.7 GB → 463 MB with minimal accuracy loss across all four benchmarks. The mixed-precision approach in K_M (higher precision for attention, lower for FFN) is genuinely effective. Going further to Q3 or Q2 would save another 100–150 MB but hurt TextVQA and POPE noticeably.
Models on Hugging Face
All converted model files are publicly available. You can download them and skip the conversion pipeline entirely:
| Model                                  | Description                                 | Link |

| **fastvlm-qwen2-bf16**                 | LLM-only HF checkpoint (BF16 safetensors)   | musk12/fastvlm-qwen2-bf16 |
| **apple-fastvlm-qwen2-q4-gguf**        | Quantized LLM for llama.cpp (Q4_K_M, 463MB) | musk12/apple-fastvlm-qwen2-q4-gguf |
| **apple-fastvlm-vision-encoder-1024**  | Vision encoder ONNX (1024×1024)             | musk12/apple-fastvlm-vision-encoder-1024 |
| **apple-fastvlm-vision-projector-512** | Vision projector ONNX (512×512, standalone) | musk12/apple-fastvlm-vision-projector-512 |
Wrapping Up
Getting FastVLM running on CPU went from a curiosity to a complete production stack: ONNX + GGUF conversion, persistent C inference server, FastAPI backend with streaming, Gradio frontends with voice and live camera, and benchmark validation across four standard datasets.
The core insight is that efficient CPU serving of VLMs is entirely feasible. The naive approach — reloading the model on every request — makes it look impossible. Fix that one architectural issue and everything else falls into place.
If you want to try it yourself, the live demos are on Hugging Face Spaces and all three repos are fully open source. The converted models are on HuggingFace if you want to skip straight to inference.
GitHub Repos:
- fastvlm-cpu-inference — model conversion pipeline
- fastvlm-cpu-serve-gradio-fastapi — deployment with Gradio + FastAPI
- fastvlm-cpu-benchmarks — benchmark evaluation scripts
Live Demos:
- 512 resolution: https://musk12-fastvlm-cpu-inference-demo.hf.space
- 1024 resolution: https://musk12-fastvlm-fast-inference-on-cpu.hf.space
HuggingFace Models:
GitHub: @ajstyle007 | HuggingFace: @musk12
메타데이터
- post_id
- d4b9c0ae4396
- slug
- from-90-seconds-to-1-4-seconds-running-apples-fastvlm-on-cpu-d4b9c0ae4396
- url
- https://medium.com/@kumarajaypaonta/from-90-seconds-to-1-4-seconds-running-apples-fastvlm-on-cpu-d4b9c0ae4396
- canonical_url
- https://medium.com/@kumarajaypaonta/from-90-seconds-to-1-4-seconds-running-apples-fastvlm-on-cpu-d4b9c0ae4396
- author_url
- https://medium.com/@kumarajaypaonta
- status
- ok
- fetched_at
- 2026-07-14 14:14:34