How to Set Up a Self-Ordering Kiosk: Step-by-Step Guide
Setting up a self-ordering kiosk in your restaurant involves choosing compatible kiosk hardware and software, digitising your menu…
How to Set Up a Self-Ordering Kiosk: Step-by-Step Guide
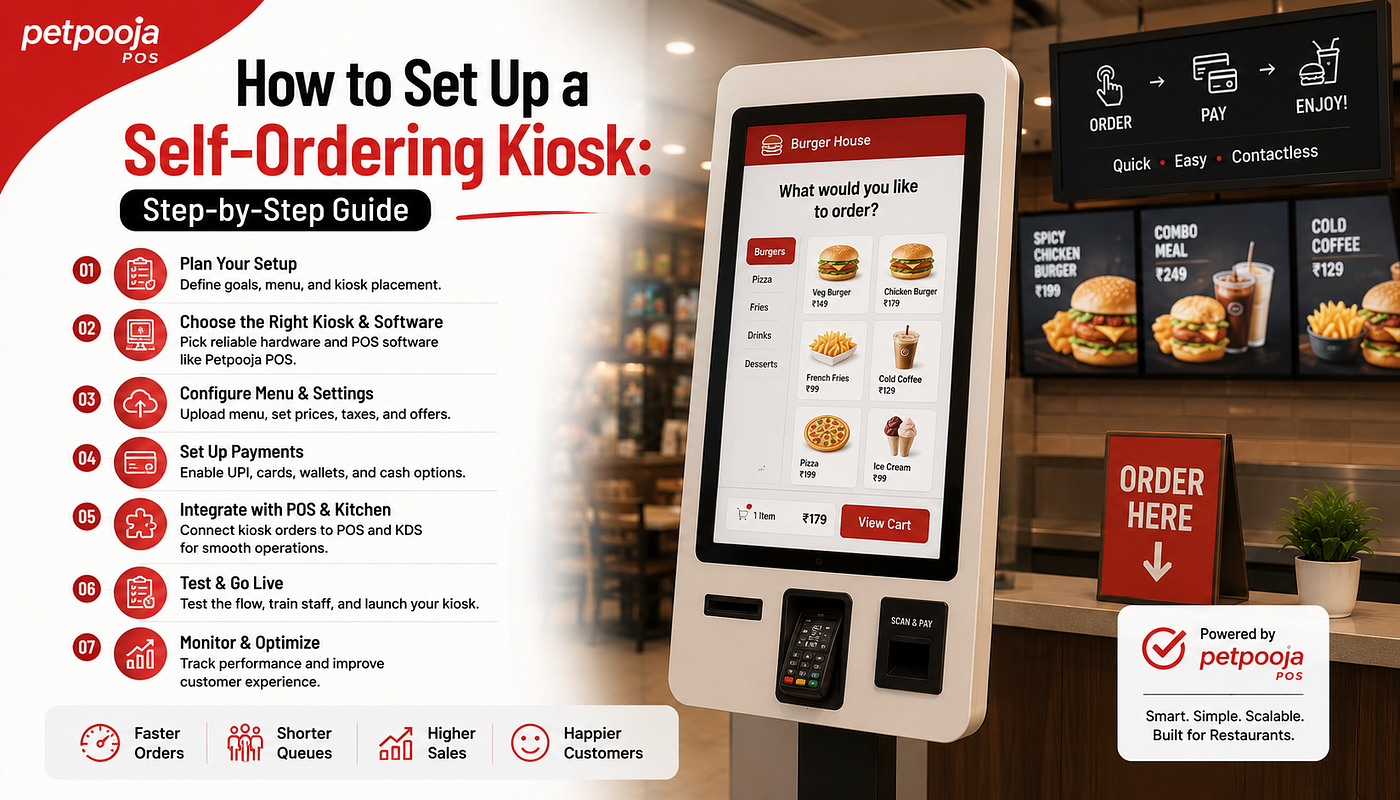
Setting up a self-ordering kiosk in your restaurant involves choosing compatible kiosk hardware and software, digitising your menu, configuring order customisation and payments, connecting the kiosk with your POS and kitchen workflow, and testing the complete ordering process before launch.
When set up correctly, a kiosk can give customers another way to place orders while reducing pressure on the billing counter during busy hours.
Self-ordering kiosks are especially useful for quick-service restaurants (QSRs), food courts, cafés, and other high-volume outlets. However, simply installing a touchscreen is not enough. The kiosk must fit smoothly into your existing restaurant operations.
Here is a step-by-step guide to setting up a self-ordering kiosk in your restaurant.
What Is a Self-Ordering Kiosk?
A self-ordering kiosk is a digital touchscreen system that allows customers to browse a restaurant’s menu and place orders without giving the order directly to a cashier.
Depending on the setup, customers may be able to:
- Browse menu categories
- View item images and prices
- Select variants
- Customise dishes
- Add extras or toppings
- Choose combos
- Review their order
- Select dine-in or takeaway
- Complete payment
Once confirmed, the order is sent to the restaurant’s order management or POS system and then forwarded to the kitchen based on the restaurant’s setup.
Step 1: Understand Why Your Restaurant Needs a Kiosk
Before investing in a self-ordering kiosk, identify the problem you want it to solve. Common reasons include:
- Long queues during peak hours
- Slow order-taking
- High customer footfall
- Complex menu customisation
- Pressure on billing staff
- Need for additional ordering points
For example, if your QSR regularly has long queues between 7 pm and 10 pm, adding kiosks could help distribute customers across more ordering points.
However, a small café with limited footfall may not need the same setup. start with the operational problem, then decide whether a kiosk is the right solution.
Step 2: Choose the Right Kiosk Hardware
A self-ordering kiosk requires reliable hardware designed for frequent customer use. Depending on your requirements, the setup may include:
- Touchscreen display
- Kiosk stand or enclosure
- Receipt printer
- Payment terminal
- QR code scanner
- Network connectivity
- Backup power solution
The screen should be easy to use and positioned at a comfortable height.
Hardware durability is also important. Unlike a staff-operated POS terminal, a customer-facing kiosk may be used hundreds of times every day.
Choose hardware that can handle your expected order volume and restaurant environment.
Step 3: Select Self-Ordering Kiosk Software
The software controls the customer ordering experience. Look for software that supports:
- Digital menu management
- Menu categories
- Product variants
- Add-ons and modifiers
- Combos
- Dine-in and takeaway options
- Taxes and charges
- Offers and discounts
- Multiple payment methods
- POS integration
Ease of use should be a priority.
Customers should be able to understand how to place an order without requiring constant staff assistance.
Before choosing software, request a product demonstration and test the complete customer journey.
Step 4: Connect the Kiosk with Your POS
A kiosk should ideally work as part of your broader restaurant technology setup.
When the kiosk and POS are properly integrated, an order placed by a customer can enter the restaurant’s order workflow without staff manually entering it again. This can help reduce:
- Duplicate data entry
- Order-entry mistakes
- Delays between ordering and preparation
The integration requirements will depend on the kiosk and POS solutions you use.
Before purchasing, confirm that your kiosk software is compatible with your existing restaurant POS or that the provider offers the required integration.
Step 5: Create a Kiosk-Friendly Digital Menu
A menu designed for a cashier may not work equally well on a self-ordering screen. Customers need to navigate the menu themselves.
Organise items into clear categories such as:
- Burgers
- Pizzas
- Main meals
- Snacks
- Beverages
- Desserts
Use simple item names and clear descriptions.
Where appropriate, include high-quality food images that accurately represent the dishes.
Avoid overcrowding each screen with too many options. Customers should be able to find what they want quickly.
Step 6: Set Up Variants and Customisation
Customisation is common in QSRs. For example, a customer ordering a burger may need to choose:
- Regular or large
- Veg or non-veg
- Extra cheese
- Additional toppings
- Meal upgrade
Set these options clearly in the kiosk.
You should also define which customisations are optional and which are mandatory. a well-designed customisation flow reduces confusion and helps ensure that the kitchen receives complete order information.
Step 7: Configure Upselling Carefully
One advantage of digital ordering is the ability to present relevant add-ons consistently.
For example, after a customer selects a burger, the kiosk could ask: “Would you like to add fries or a beverage?”
Similarly, customers could be offered:
- Larger portions
- Extra toppings
- Desserts
- Side dishes
- Combo upgrades
However, avoid showing too many prompts.
Aggressive upselling can slow down ordering and frustrate customers. Suggestions should be relevant and easy to skip.
Step 8: Set Up Payment Options
Depending on your kiosk configuration, customers may pay directly at the kiosk or complete payment through another process.
Possible payment options can include:
- UPI
- Debit cards
- Credit cards
- Digital wallets
- Other supported digital payment methods
Some restaurants may also allow customers to place an order at the kiosk and pay at the counter.
Before launch, test every supported payment method carefully. The customer should receive clear confirmation when payment is successful or unsuccessful.
Step 9: Connect Orders to the Kitchen
Placing an order quickly is only useful if the kitchen receives it correctly. Depending on your restaurant setup, kiosk orders may be sent to:
- Kitchen printers
- Kitchen Order Tickets (KOTs)
- Kitchen Display Systems (KDS)
The kitchen team should be able to clearly identify:
- Order number
- Items ordered
- Quantity
- Customisations
- Special instructions
- Order type
Make sure your team understands how kiosk orders appear in the kitchen workflow before going live.
Step 10: Decide How Customers Will Collect Orders
You also need a clear process for order fulfilment. Customers should know when and where to collect their food.
You may use:
- Printed order numbers
- Digital order numbers
- Pickup displays
- Staff announcements
- Designated collection counters
For busy QSRs, separating the ordering area from the collection area can help prevent crowding. Clear signage is essential.
Step 11: Test the Complete Customer Journey
Never launch a kiosk immediately after installation. Test the entire process from the customer’s perspective.
A test order should cover:
- Browsing the menu
- Selecting an item
- Adding customisations
- Applying an offer, if available
- Making payment
- Sending the order to the POS
- Receiving the order in the kitchen
- Preparing the order
- Completing customer pickup
Also test unusual situations.
What happens if an item becomes unavailable? What happens if a payment fails? What happens if the internet connection is interrupted?
Testing these scenarios before launch can prevent problems during actual service.
Step 12: Train Your Restaurant Staff
A self-ordering kiosk reduces some manual work, but employees still need training. Staff should know:
- How the kiosk works
- How to assist customers
- How to handle failed payments
- How to update menu availability
- How to respond to technical problems
- How kiosk orders appear in the POS and kitchen
During the first few weeks, consider assigning a staff member to assist customers who are unfamiliar with self-ordering.
Common Self-Ordering Kiosk Setup Mistakes
Restaurants sometimes invest in kiosk technology without preparing the surrounding operations. Common mistakes include:
- Creating a complicated digital menu
- Offering too many customisation options
- Poor kiosk placement
- Not integrating orders with the POS
- Failing to test payment scenarios
- Ignoring kitchen capacity
- Not training staff
- Having no clear pickup process
One particularly important mistake is focusing only on ordering speed.
If kiosks allow customers to order faster but the kitchen cannot prepare those orders efficiently, the result may simply be a longer wait after ordering.
Your front-end and back-end operations must work together.
Where Should You Place a Self-Ordering Kiosk?
Kiosk placement can affect how often customers use it. The kiosk should be:
- Easy to see when customers enter
- Accessible without blocking walkways
- Positioned before the pickup area
- Located where queues can form safely
- Close enough for staff to provide assistance
Avoid placing kiosks where customers using them create congestion near the entrance or billing counter.
For larger restaurants, multiple kiosks can be distributed across the ordering area.
How Petpooja Can Support Self-Ordering Operations
A self-ordering kiosk works best when it is connected with the restaurant’s broader order management workflow.
Petpooja POS helps restaurants manage billing, orders, inventory, and business reports. Restaurants exploring self-ordering technology should ensure their chosen kiosk setup can work efficiently with their POS and kitchen processes.
An integrated workflow can help move orders from the customer-facing ordering system to the kitchen with less manual intervention, supporting smoother operations during busy periods.
Restaurants should confirm specific kiosk compatibility, integration requirements, hardware, and available features with their technology provider before implementation.
Final Thoughts
Setting up a self-ordering kiosk involves much more than installing a touchscreen. Restaurants need to think about hardware, software, menu design, POS integration, payments, kitchen operations, order collection, and staff training.
For high-volume QSRs and busy restaurants, kiosks can create additional ordering points and reduce pressure on traditional billing counters.
However, the technology delivers the most value when the entire order journey from menu selection to food collection is designed efficiently.
Start by identifying the operational problem you want to solve. Then choose a kiosk system that fits your existing restaurant workflow and test every step before launching it to customers. A well-planned kiosk should make ordering easier for customers without creating additional complexity for your staff.
메타데이터
- post_id
- d9d2bd5bb28a
- slug
- how-to-set-up-a-self-ordering-kiosk-step-by-step-guide-d9d2bd5bb28a
- url
- https://medium.com/@vidhi.petpooja13/how-to-set-up-a-self-ordering-kiosk-step-by-step-guide-d9d2bd5bb28a
- canonical_url
- https://medium.com/@vidhi.petpooja13/how-to-set-up-a-self-ordering-kiosk-step-by-step-guide-d9d2bd5bb28a
- author_url
- https://medium.com/@vidhi.petpooja13
- status
- ok
- fetched_at
- 2026-07-23 11:18:28