Jetpack Compose | Navigation in Compose | Nested Navigation
Learn about Nested, Multi-Module, and Dialog Navigation— in Jetpack Compose

Jetpack Compose Series — Episode II — Compose Navigation
Type-Safe Navigation in Jetpack Compose
In this article, we’ll setup Type-Safe navigation, Arguments, Nested-Graphs and Bottom-Navigation.
Let’s start by including dependencies for navigation-compose.
// libs.versions.toml

navigation = "2.8.9"
kotlinxSerializationJson = "1.8.0"
kotlinSerializationPlugin = "1.9.22"

[libraries]
navigation-compose = { module = "androidx.navigation:navigation-compose", version.ref = "navigation" }
kotlinx-serialization-json = { module = "org.jetbrains.kotlinx:kotlinx-serialization-json", version.ref = "kotlinxSerializationJson" }

[plugins]
kotlin-serialization = { id = "org.jetbrains.kotlin.plugin.serialization", version.ref = "kotlinSerializationPlugin" }

// App Level build.gradle

plugins {
    alias(libs.plugins.kotlin.serialization)
}

dependencies {
       implementation(libs.navigation.compose)
       implementation(libs.kotlinx.serialization.json)
}

// Note: If you are not using version catlogs, Use direct implementation.
The Navigation component has significantly simplified our lives by introducing Nav-Controllers, Nav-Graphs, and Nav-Host.
NavHost
NavHost is a composable designed to hold our layouts. It holds layouts in stack. As we navigate through composable, the content within the NavHost changes. Each screen in the navigation has its route:
To use type-safe routes in Compose, define
@Serializableobjects or classes for our routes:
Object → for routes without arguments
Class/Data class → for routes with arguments
Add the Kotlin Serialization plugin to your project to enable
@Serializable.
@Serializable data object LoginRoute
@Serializable data object HomeRoute

@Composable
fun RootNavHost(){
  val navController = rememberNavController()
  NavHost(navController = navController, startDestination = LoginRoute) {
      // ...
      composable<LoginRoute>{
            LoginScreen()
      }
  }
}
NavController
NavController manages the stack & back stack of composable, representing the screens in our app and their respective states. It’s a dynamic entity that we can initialize as follows:
val navController = rememberNavController()
...
navController.navigate(HomeRoute)
Let’s create two screens: LoginScreen and HomeScreen to navigate from login screen to home screen where NavHost is serving as a container.

Figure: How Navigation Container & Screens
The NavController is in-charge of navigation, it specify whether to add or remove components.
Navigating with NavController
Now, we have to use our NavController to navigate between these screens. Mainly, there are two ways to use NavController in Navigation.
- We can pass the NavController in the composable functions
@Composable
fun LoginScreen(navController: NavController) {

    Button(onClick = {
                navController.navigate(HomeRoute)
            }) {
       Text("Navigate to Home Screen")
    }
}
2. Adding functions like () -> Unit as parameters for navigation. [Recommended Way]
 RootNavHost(
        navController = navController,
        startDestination = LoginRoute
    ) {
      composable<LoginRoute> {
          LoginScreen {
              // Navigation logic from LoginScreen route to HomeScreen route
              // Using lambda, if last parameter is Higher Order Function
              navController.navigate(HomeRoute)
          }
      }
      composable<HomeRoute> {
      // Navigation logic from HomeScreen route to LoginScreen route
          HomeScreen(navigateToLogin = navController.navigate(LoginRoute)

      }
    }

// And add the parameter in Composable screen like

@Composable
fun LoginScreen(navigateToHome: () -> Unit) {
    // ... LoginScreen content

    // Triggering navigation from LoginScreen
    Button(onClick = { navigateToHome() }) {
        Text("Login")
    }
}

@Composable
fun HomeScreen(navigateToLogin: () -> Unit) {
    // ... HomeScreen content

    // Example of Triggering navigation from HomeScreen
    Button(onClick = { navigateToLogin() }) {
        Text("Logout")
    }
}
Now we can easily navigate to any screen with the help of a navigation controller. Our simple Navigation completes here.
We will manage to remove and add/skip multiple back stack screens later in this article.
Bottom Navigation in Jetpack Compose
Let’s configure the bottom navigation. Our goal is to navigate from LoginScreen to BottomNavigationScreen.
Figure: Initial Main Activity
Initially, our start destination was **LoginRoute** when navigating from LoginScreen to HomeScreen, right? Now, with bottom navigation, we want the first bottom item (HomeScreen) to be selected by default.
So we end up with two start destinations. How can we handle this? 🤯 This is where Navigation Graphs comes.
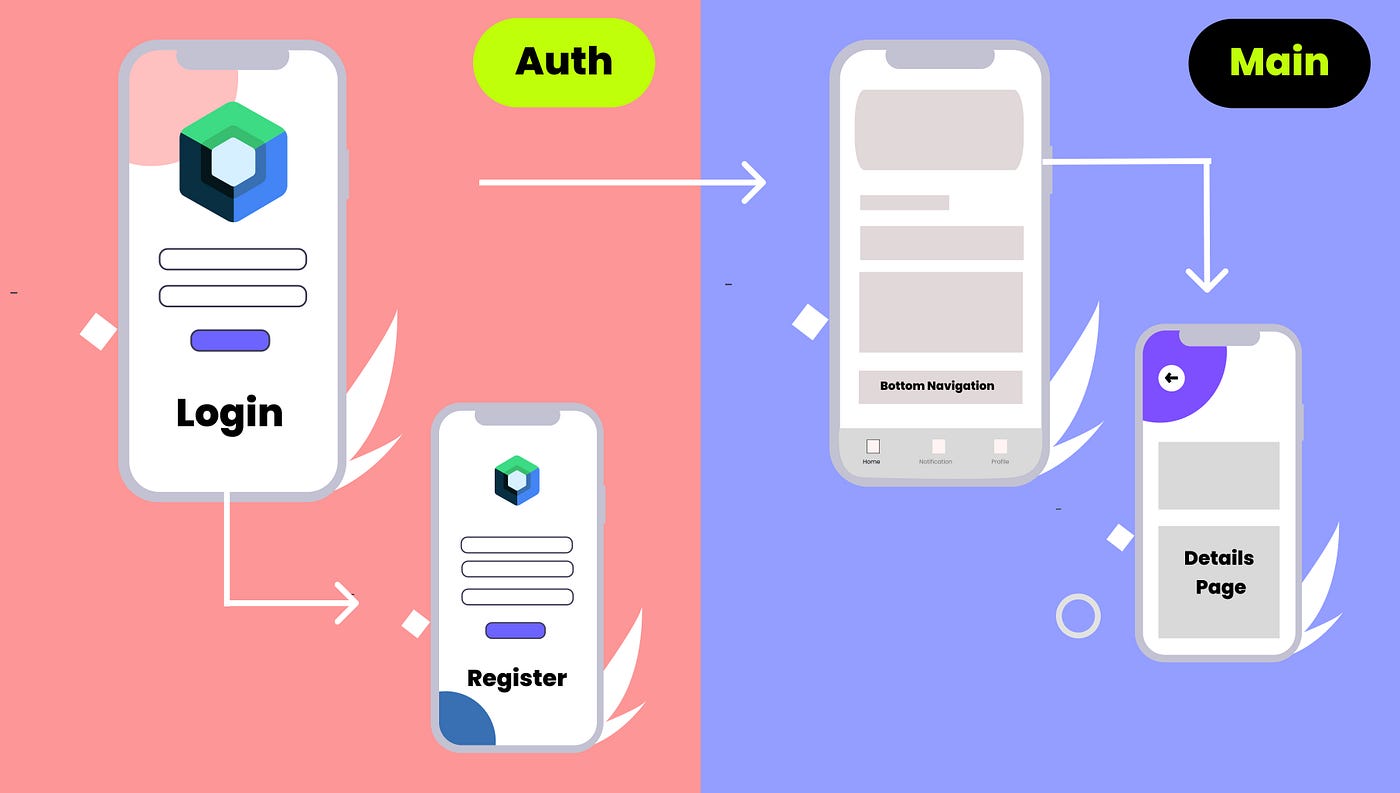
Figure 1: Final Bottom Navigation Screen
Navigation Graph
The navigation graph helps to maintain the relationship between the screens within the NavHost. Basically, we need multiple graphs to handle multiple “start destinations”, the term “Nested Navigation Graph”.
Nested Navigation Graph
Let’s try to understand nested navigation using bottom navigation. Our first graph will manage screen for authentication routes and second graph will manage bottom navigation and other subsequent screens.
Add a new class specially for managing bottom navigation items where we can add selectedIcon, unselectedIcon, title and destination (route).
@Serializable
sealed class BottomNavItem<T>(
    val destination: T,
    val titleRes: Int,
    @Contextual val selectedIcon: ImageVector,
    @Contextual val unselectedIcon: ImageVector
) {
    @Serializable
    data object Home : BottomNavItem<HomeRoute>(
        HomeRoute,
        R.string.home,
        AppIcons.HomeFilled,
        AppIcons.HomeOutlined
    )

    @Serializable
    data object Explore : BottomNavItem<ExploreRoute>(
        ExploreRoute,
        R.string.explore,
        AppIcons.ExploredFilled,
        AppIcons.ExploredOutlined
    )

    @Serializable
    data object Interest : BottomNavItem<InterestRoute>(
        InterestRoute,
        R.string.interest,
        AppIcons.InterestFilled,
        AppIcons.InterestOutlined
    )

    @Serializable
    data object Notification : BottomNavItem<NotificationRoute>(
        NotificationRoute,
        R.string.notification,
        AppIcons.NotificationFilled,
        AppIcons.NotificationOutlined
    )

    @Serializable
    data object Profile : BottomNavItem<ProfileRoute>(
        ProfileRoute,
        R.string.profile,
        AppIcons.ProfileFilled,
        AppIcons.ProfileOutlined
    )
}

val bottomNavItemsList = listOf(
    BottomNavItem.Home,
    BottomNavItem.Explore,
    BottomNavItem.Interest,
    BottomNavItem.Notification,
    BottomNavItem.Profile
)
To keep things simple, Let’s use two groups of nested graphs. Although we can use multiple Nested Graphs.
The Auth Group
This group will include Login and Register screen, where authentication is not required. “AuthGraphRoot” is the root destination for this group.
@Serializable data object AuthGraphRoot
@Serializable data object LoginRoute
@Serializable data object RegisterRoute

fun NavGraphBuilder.authNavGraph(
    navController: NavHostController
) {
    navigation<AuthGraphRoot>(
        startDestination = LoginRoute,
    ) {
        composable<LoginRoute> {
            LoginScreen(
                navigateToHome = {
                    navController.navigate(MainGraphRoute) {
                        popUpTo(AuthGraphRoot) {
                            inclusive = true
                        }
                    }
                },
                navigateToSignUp = {
                    navController.navigate(RegisterRoute)
                },
            )
        }

        composable<RegisterRoute> {
            SignUpScreen(onNavigateBack = {
                navController.navigateUp()
            })
        }
    }
}
The Main Group
This group will include Bottom Navigation Destinations and other subsequent nested screens. “MainGraphRoute” is root destination here.
@Serializable data object MainGraphRoute
@Serializable data object HomeRoute

@Serializable data object NotificationRoute

@Serializable data object ProfileRoute

@Serializable data object ExploreRoute

@Serializable data object InterestRoute

@Serializable data object SettingsRoute

@Serializable data class ProductDetailRoute(val productId: String)
@Serializable data class RecipeDetailRoute(val recipeId: String)

fun NavGraphBuilder.mainNavGraph(
    navController: NavHostController
) {

    navigation<MainGraphRoute>(
        startDestination = HomeRoute,
    ) {
        composable<HomeRoute> {
            HomeScreen(
                onProductClick = {
                    val route = ProductDetailRoute(productId = it)
                    navController.navigate(route)
                }
            )
        }

        composable<NotificationRoute> {
            NotificationScreen {
                val route = RecipeDetailRoute(recipeId = it)
                navController.navigate(route)
            }
        }

        composable<ProductDetailRoute> {
            ProfileScreen(navigateToLogin = {
                navController.navigate(AuthGraphRoot) {
                    popUpTo(MainGraphRoute) {
                        inclusive = true
                    }
                }
            })
        }

        composable<ExploreRoute> {
            ExploreScreen {
            }
        }

        composable<InterestRoute> {
            InterestScreen {
            }
        }

        composable<ProductDetailRoute> { backStackEntry ->
            val productDetail = backStackEntry.toRoute<ProductDetailRoute>()
            ProductDetailScreen(
                productId = productDetail.productId
            ) {
                navController.navigateUp()
            }
        }

        composable<ProfileRoute> {
            ProfileScreen(navigateToLogin = {
                navController.navigate(AuthGraphRoot) {
                    popUpTo(MainGraphRoute) {
                        inclusive = true
                    }
                }
            })
        }

        dialog<SettingsRoute>(
            dialogProperties = DialogProperties(usePlatformDefaultWidth = false)
        ) {
            SettingScreen {
                navController.navigateUp()
            }
        }

        dialog<RecipeDetailRoute>(
            dialogProperties = DialogProperties(usePlatformDefaultWidth = false)
        ) { backStackEntry ->
            val recipeDetail = backStackEntry.toRoute<RecipeDetailRoute>()
            RecipeDetailScreen(recipeId = recipeDetail.recipeId) {
                navController.navigateUp()
            }
        }
    }
}
And, Let’s create BottomBar component to handle the bottom navigation logic.
@Composable
fun BottomBar(
    navController: NavHostController,
) {
    val navBackStackEntry by navController.currentBackStackEntryAsState()
    val currentDestination = navBackStackEntry?.destination
    val navDestinationScreens = remember {
        bottomNavItemsList
    }

    NavigationBar {

        navDestinationScreens.forEach { screen ->

            val isSelected = currentDestination?.hierarchy?.any { it.route == screen.destination::class.qualifiedName } == true

            NavigationBarItem(
                selected = isSelected,
                label = {
                    Text(
                        text = when (screen.destination) {
                            HomeRoute -> stringResource(R.string.home)
                            ExploreRoute -> stringResource(R.string.explore)
                            InterestRoute -> stringResource(R.string.interest)
                            NotificationRoute -> stringResource(R.string.notification)
                            ProfileRoute -> stringResource(R.string.profile)
                            else -> ""
                        },
                        style = MaterialTheme.typography.labelSmall
                    )
                },
                icon = {
                    Icon(
                        imageVector = when (screen.destination) {
                            HomeRoute -> if (isSelected) AppIcons.HomeFilled else AppIcons.HomeOutlined
                            ExploreRoute -> if (isSelected) AppIcons.ExploredFilled else AppIcons.ExploredOutlined
                            InterestRoute -> if (isSelected) AppIcons.InterestFilled else AppIcons.InterestOutlined
                            NotificationRoute -> if (isSelected) AppIcons.NotificationFilled else AppIcons.NotificationOutlined
                            ProfileRoute -> if (isSelected) AppIcons.ProfileFilled else AppIcons.ProfileOutlined
                            else -> AppIcons.HomeOutlined
                        },
                        contentDescription = null
                    )
                },
                onClick = {
                    navController.navigate(screen.destination) {
                        popUpTo(navController.graph.findStartDestination().id) {
                            saveState = true
                        }
                        launchSingleTop = true
                        restoreState = true
                    }
                }
            )
        }
    }
}
Now, let’s include BottomBar and other graphs in our RootNavHost which acts as container of our application.
@OptIn(ExperimentalMaterial3Api::class, ExperimentalSharedTransitionApi::class)
@Composable
fun RootNavHost(isAuthenticated: Boolean) {
    SharedTransitionLayout {
        // toolbar title
        val topAppbarTitle = remember { mutableStateOf("") }
        val topAppBarState = rememberTopAppBarState()

        //toolbar behavior
        val barScrollBehavior = TopAppBarDefaults.enterAlwaysScrollBehavior(state = topAppBarState)
        // snackbar
        val snackbarHostState = remember { SnackbarHostState() }
        // show and hide bottom bar and toolbar
        val showBottomBarState = rememberSaveable { (mutableStateOf(true)) }
        val showTopBarState = rememberSaveable { (mutableStateOf(true)) }

        val coroutineScope = rememberCoroutineScope()

        val rootNavHostController = rememberNavController()
        val rootNavBackStackEntry by rootNavHostController.currentBackStackEntryAsState()

        ObserveAsEvents(
            flow = SnackbarManager.events,
            snackbarHostState
        ) { event ->
            coroutineScope.launch {
                snackbarHostState.currentSnackbarData?.dismiss()
                val result = snackbarHostState.showSnackbar(
                    message = event.message,
                    actionLabel = event.action?.name,
                    duration = SnackbarDuration.Short
                )

                if (result == SnackbarResult.ActionPerformed) {
                    event.action?.action?.invoke()
                }
            }
        }

        // Control TopBar and BottomBar
        when (rootNavBackStackEntry?.destination?.route) {
            HomeRoute::class.qualifiedName-> {
                showBottomBarState.value = true
                showTopBarState.value = true
                topAppbarTitle.value = stringResource(R.string.home)
            }

            NotificationRoute::class.qualifiedName -> {
                showBottomBarState.value = true
                showTopBarState.value = true
                topAppbarTitle.value = stringResource(R.string.notification)
            }
            ExploreRoute::class.qualifiedName -> {
                showBottomBarState.value = true
                showTopBarState.value = true
                topAppbarTitle.value = stringResource(R.string.explore)
            }
            InterestRoute::class.qualifiedName -> {
                showBottomBarState.value = true
                showTopBarState.value = true
                topAppbarTitle.value = stringResource(R.string.interest)
            }
            ProfileRoute::class.qualifiedName -> {
                showBottomBarState.value = true
                showTopBarState.value = true
                topAppbarTitle.value = stringResource(R.string.profile)
            }
            ProductDetailRoute::class.qualifiedName,
            RecipeDetailRoute::class.qualifiedName -> {
                showBottomBarState.value = false
                showTopBarState.value = false
            }
            else -> {
                showBottomBarState.value = false
                showTopBarState.value = false
            }
        }

        // Container

        Scaffold(
            modifier = Modifier
                .fillMaxSize()
                .nestedScroll(barScrollBehavior.nestedScrollConnection),
            snackbarHost = {
                SnackbarHost(hostState = snackbarHostState)
            },
            topBar = {
                if (showTopBarState.value) {
                    AppTopBar(topAppbarTitle.value,
                        barScrollBehavior,
                        onActionCameraClick = {
                            rootNavHostController.navigate(SettingsRoute)
                        }
                    )
                } else {
                    Box {

                    }
                }
            },
            bottomBar = {
                if (showBottomBarState.value) {
                    BottomBar(navController = rootNavHostController)
                }
            }) { paddingValues ->
            Box(
                modifier = Modifier
                    .padding(paddingValues)
            ) {

                // Navigation Host

                NavHost(
                    navController = rootNavHostController,
                    startDestination = if (isAuthenticated) MainGraphRoute else AuthGraphRoot,
                    enterTransition = {
                        EnterTransition.None
                    },
                    exitTransition = {
                        ExitTransition.None
                    }
                ) {

                    authNavGraph(
                        rootNavHostController
                    )
                    mainNavGraph(
                        rootNavHostController
                    )
                }
            }
        }
    }
}
And, Finally we can load RootNavHost to our MainActivity.
@AndroidEntryPoint
class MainActivity : AppCompatActivity() {

    private val TAG: String = AppLog.tagFor(this.javaClass)
    private val mainViewModel: MainViewModel by viewModels()
    private var isAuthenticated = false

    override fun onCreate(savedInstanceState: Bundle?) {
        super.onCreate(savedInstanceState)
        installSplashScreen()
        isAuthenticated = mainViewModel.isUserAuthenticated()
        setContent {
            FireflyComposeTheme {
                 RootNavHost(isAuthenticated)
            }
        }
    }
}
Multiple BackStack in Compose
Each bottom navigation host its own NavHost remembering their respective nested route. See code Of Multiple-BackStack. The implementation of nested navigation to save each stack of bottom navigation nested screen is available at GitHub gist.
As of this article, There were still some bugs in Multiple Backstack while using nav arguments. So i suggest to look in Google Issue Tracker before using it.
Thank you for reading! Next, we’ll dive into login validation, network requests for values, and storing them locally using Room, Retrofit, and Kotlin Flow.
Until then, Keep Composing. All Jetpack Compose Series Episodes will be available in this story list.
And You can also buy me coffee to support me 🙌
[embed]Jetpack Compose Series Start your Compose adventure today!!iamnaran.medium.com
[embed]GitHub - iamnaran/firefly-compose A Jetpack Compose App Android. github.com
Find more articles at www.kt.academy
메타데이터
- post_id
- db00b0a0ef75
- slug
- mastery-navigation-in-jetpack-compose-db00b0a0ef75
- url
- https://medium.com/kotlin-academy/mastery-navigation-in-jetpack-compose-db00b0a0ef75
- canonical_url
- https://medium.com/kotlin-academy/mastery-navigation-in-jetpack-compose-db00b0a0ef75
- author_url
- https://medium.com/@iamnaran
- status
- ok
- fetched_at
- 2026-08-02 05:07:27





