How to Set Up Enhanced Conversion Tracking for Forms Using Google Tag Manager
If you’re a marketer managing Google Ads, you’ve probably received a hundred emails or seen a dozen blog posts about setting up Enhanced…
How to Set Up Enhanced Conversion Tracking for Forms Using Google Tag Manager
If you’re a marketer managing Google Ads, you’ve probably received a hundred emails or seen a dozen blog posts about setting up Enhanced Conversion Tracking. And let’s be honest — it’s often more complicated than it needs to be.
I’ve been there. After trying method after method (and hitting a few walls), I finally found a process that works almost every time — whether it’s a WordPress form (Contact Form 7, Gravity Forms), HubSpot form, Shopify form… you name it.
This guide cuts through the noise and shows you exactly how to set up Enhanced Conversion Tracking using Google Tag Manager. If you want a no-fluff, step-by-step process that actually works, you’re in the right place.
Let’s jump in.
Who this is for:
- You already have conversion tracking setup through Google Tag Manager
- You have not (yet) setup enhanced conversion tracking
What You’ll Need:
- Google Ads Account: To create or retrieve your Conversion ID and Conversion Label.
- Google Tag Manager Account: To implement the enhanced conversion setup.
- Chrome DevTools: For inspecting form fields and identifying selectors.
Step-by-Step Guide to Setting Up Enhanced Conversion Tracking
Step 1: Create or Retrieve the Google Ads Conversion ID and Label
You’ll need these two values to set up your Google Ads conversion tag.
Instructions:
- Log in to your Google Ads account.
- Navigate to Tools & Settings > Conversions.
- Create a new conversion action or use an existing one for your form submissions.
- Copy the Conversion ID and Conversion Label and save them for later.
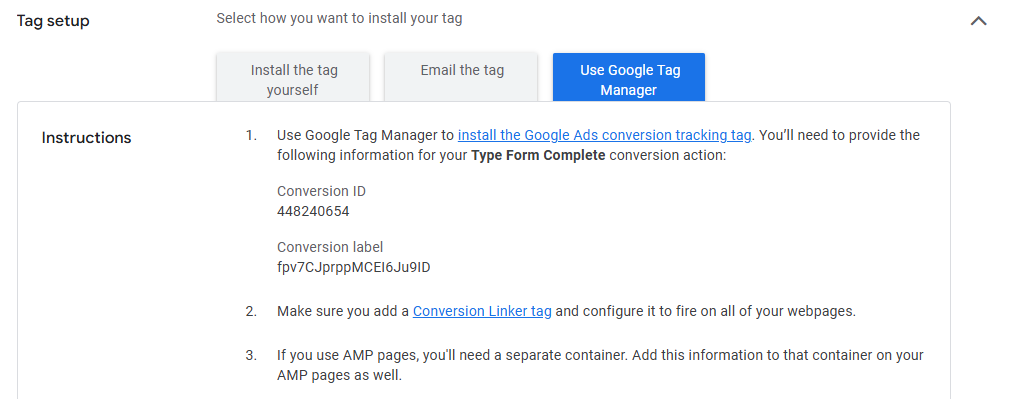
- Under Conversion Settings > Find the Enhanced conversion section and click Turn on enhanced conversions > Under method select Google Tag Manager > Save
Step 2: Inspect the Form Fields (Email and Phone)
Next, you’ll identify the CSS selectors for the email and phone input fields in your form.
Instructions:
- Go to the web page containing the form.
- Right-click the email input field and select Inspect.
- In Chrome DevTools, right-click the highlighted code and choose Copy > Copy Selector.
- Repeat the process for the phone input field.
- Save both selectors for use in Google Tag Manager.

Right click in form fields > Copy selector from both email and phone fields
Step 3: Create Custom JavaScript Variables in Google Tag Manager
Now, we’ll create variables to extract the email and phone values from the form.
Instructions:
- Log in to your Google Tag Manager account.
- Go to Variables > New > Variable Configuration.
- Choose Custom JavaScript as the variable type.
- Name the variable Email Field Selector and paste the following code, replacing the selector with your own then save it.
function() {
  return document.querySelector("#ContactForm-email").value;
}
In the above example, you should replace #ContactForm-email with what you copied in Step 2 from the email field.
- Repeat the steps above for the Phone Field Variable with the appropriate selector:
function() {
  return document.querySelector("#ContactForm-phone").value;
}
*In the above example, you should replace *#ContactForm-phone* with what you copied in Step 2 from the phone field.***
-
After saving your email and phone custom javascript variables > Create a new User-defined variable > select User-Provided Data
-
Click Manual configuration > in the email field add your email variable > in the phone field, add your phone variable > Name it something like Email and phone > Save

Add your new variables to the user-provided data user-defined variable
Step 4: Create a ‘Google Ads User-provided Data Event’ Tag
Now, we’ll create the Google Ads User-provided Data Event tag and connect it to the custom variables we just created.
Instructions:
- In Google Tag Manager, go to Tags > New > Tag Configuration
- Select ‘Google Ads User-provided Data Event’ as the tag type.
- Enter the Conversion ID from Step 1.
- Add your new “email and phone” user data variables:
- Click Save.

Create Google Ads user provided data event from your new variables
At this stage you've done the minimum and should now be sending emails and phone numbers back to Google for Enhanced conversion tracking.
However, if you are working with a website with a variety of different forms, they might have different email and phone variables to map!
You will need to repeat these steps for each form. Then map those variables to the related conversion actions.
This next step is to map variables at the form level.
Step 4.2: Map All Of Your Forms To Related Google Ads Conversion Tags
This next step is to map variables at the form level. For each form on the website, repeat Step 2 and Step 3 above to get all of your variables mapped out (I normally add these into notepad for easy copy pasting later):
note: Don't use google docs or sheets for pasting code — It might reformat it incorrectly, use a text editor or something like W3 Schools code editor
- Form name
- email field variable
- phone field variable
So for example:

Once you've got all your forms email and phone variables documented — Jump back to Step 3 and repeat the process for each form to setup each form. Be sute to name it {form name} — User provided data.
Now for the easy part:
- Open up your existing Google Ads conversion tag for the first form ie: Contact us
- Scroll down to “include user provided data from your website
- Click the dropdown and select your new user provided data variable created ie: Contact us — User provided data
- Save
- Repeat across all your forms
WAHOO — You’re done! HOPE THIS HELPS!
If you found this guide helpful, share it with other marketers or leave a comment with your thoughts!
메타데이터
- post_id
- db5c4b5f878d
- slug
- how-to-set-up-enhanced-conversion-tracking-for-forms-using-google-tag-manager-db5c4b5f878d
- url
- https://medium.com/@dillonjones/how-to-set-up-enhanced-conversion-tracking-for-forms-using-google-tag-manager-db5c4b5f878d
- canonical_url
- https://medium.com/@dillonjones/how-to-set-up-enhanced-conversion-tracking-for-forms-using-google-tag-manager-db5c4b5f878d
- author_url
- https://medium.com/@dillonjones
- status
- ok
- fetched_at
- 2026-07-18 06:23:57