Deploying Reliable NFS: High Availability Setup Using Pacemaker, Corosync, and DRBD
How to Build a Highly Available NFS Server with Pacemaker, Corosync, and DRBD on Linux
Deploying Reliable NFS: High Availability Setup Using Pacemaker, Corosync, and DRBD
In today’s fast-paced digital environment, ensuring uninterrupted access to critical data is more important than ever. In this guide, “Deploying Reliable NFS: High Availability Setup Using Pacemaker, Corosync, and DRBD,” we walk you through building a robust, high availability NFS server on Linux. This tutorial is designed for IT professionals and system administrators looking to boost system resilience and minimize downtime. By leveraging Pacemaker for cluster resource management, Corosync for communication, and DRBD for data replication, you’ll gain the skills needed to deploy a reliable NFS solution that guarantees continuous file access and supports mission-critical applications.
This simple topology will be used for this article:
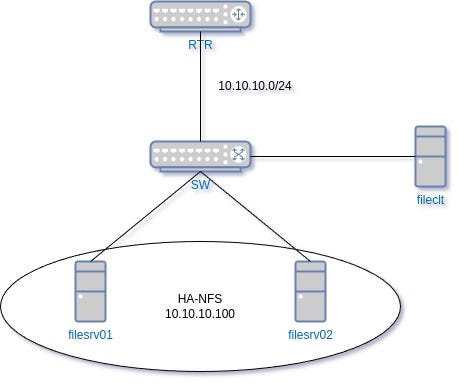
Deploying Reliable NFS: High Availability Setup Using Pacemaker, Corosync, and DRBD — Topology
Components and pre-requisites are:
- filesrv01 and filesrv02 (Debian 11.1 CLI) - These two servers will serve High Availability Cluster and run NFS Service
- IP Address: 10.10.10.10/24 and 10.10.10.20/24 respectively
- Virtual IP Address for the cluster: 10.10.10.100/24
- Basic configuration such as hostname and networking already configured
- Both servers have an additional disk that will be used for data store and replicated using DRBD (/dev/sdb)
- fileclt (Debian 11.1 CLI)
- We use this machine to simulate NFS client
- IP Address: 10.10.10.200/24
- Basic configuration such as hostname and networking already configured
Assuming that all components has been set up, we’ll move to the configuration steps. Note that every step will be executed using root user so we don’t need to add sudo at the beginning of command
A. Configure Data Store Disk Replication using DRBD (Both servers)
- Install
drbd-utils
apt install drbd-utils -y- Create a new DRBD resource configuration file
nano /etc/drbd.d/filesrv.resWe’ll configure a DRBD resource named filesrv, utilizing /dev/sdb on each server. The configuration will specify both server nodes, and the DRBD disk will be created as drbd0 (device minor number 0).
resource filesrv {
  volume 0 {
    device minor 0;
    disk /dev/sdb;
    meta-disk internal;
  }

  on filesrv01 {
    address 10.10.10.10:7780;
  }

  on filesrv02 {
    address 10.10.10.20:7780;
  }
}
Save the configuration file, and then exit the text editor.
- Enable and start
drbdservice
systemctl enable --now drbd.service- Configure one of the server to be a primary node for DRBD. In this article, we’ll use
filesrv01. We’ll also configure the DRBD disk withext4partition format
drbdadm create-md filesrv
drbdadm up filesrv
drbdadm primary filesrv --force
mkfs.ext4 /dev/drbd0- To verify, run this command on both servers. Make sure one server is primary and the other is secondary, and the replication is established
drbdadm status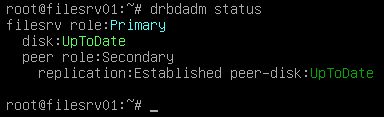
DRBD status on primary node
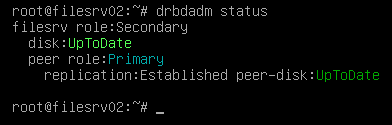
DRBD status on secondary node
B. Configure Pacemaker Cluster and HA-NFS Service
- On both servers, add hosts mapping record in
/etc/hostsbecause we’ll use the hostname instead of IP address in Pacemaker cluster
nano /etc/hostsFor this article, added records will be:
10.10.10.10 filesrv01
10.10.10.20 filesrv02
Save the file and exit the text editor
- Install all needed packages for Pacemaker clusters and NFS service on both servers
apt install pacemaker pcs resource-agents corosync crmsh nfs-kernel-server -y- Stop
pacemakerandcorosyncservice because we’ll create a new cluster instead of using default cluster. Then, enable and startpcsdservice. After that, set password forhaclusteruser as we’ll use this user for cluster creation authentication. Do this on both servers and use the same password forhaclusteruser on both servers
systemctl stop pacemaker corosync
systemctl enable --now pcsd
pcs cluster destroy
passwd hacluster
- Now, go to one of the server, and create a new cluster. In this article, we’ll create a cluster named
ha_filesrv. For authentication, use usernamehaclusterwith password that has been set before
pcs host auth filesrv01 filesrv02
pcs cluster setup ha_filesrv filesrv01 filesrv02
pcs cluster start --all
pcs cluster enable --all- Verify the cluster status. Run this on both servers to make sure that cluster already created for them
pcs cluster status
pcs status corosync- Disable STONITH, as we are not configuring device fencing in this tutorial. This allows the cluster to operate without requiring fencing devices
pcs property set stonith-enabled=false- Next, we’ll create the necessary cluster resources. First, define a resource to manage the previously created DRBD resource. This will be a Promotable resource, with one Master node and one Slave node. We’ll name this resource
filesrv_drbd. Note that Promotable resource will automatically create a Clone set with suffix-clonein the name
pcs resource create filesrv_drbd ocf:linbit:drbd drbd_resource=filesrv op monitor interval=30s role=Master op monitor interval=35s role=Slave promotable master-max=1 master-node-max=1 clone-max=2 clone-node-max=1 notify=true- After that, create a Virtual IP Address resource for the cluster. We’ll also insert this resource to a group called
filesrv_network_services. Note that--groupoption will create the group if not exists. We’ll name this resourcefilesrv_vip
pcs resource create filesrv_vip ocf:heartbeat:IPaddr2 ip=10.10.10.100 cidr_netmask=24 --group filesrv_network_services- At this point, we’ll pause resource creation. All resources in the filesrv_network_services group must run on the same node as the DRBD Master node. To ensure that future resources are not placed on a different node, we need to configure resource colocation
pcs constraint colocation add filesrv_network_services with Master filesrv_drbd-clone- We also need to configure resource ordering to ensure proper startup sequence. All resources in the filesrv_network_services group should start only after the DRBD node has been successfully promoted to Master
pcs constraint order promote filesrv_drbd-clone then start filesrv_network_services- Now, we can continue to create cluster resources. Next, create a Filesystem mount resource to mount DRBD device (
/dev/drbd0)to data directory. In this article, we’ll use/dataas data directory. We’ll name this resourcefilesrv_mount. This resource will also infilesrv_network_servicesgroup
# Create the directory if not exists on both servers
mkdir -p /data

# Create the Filesystem mount resource. Do this on one server
pcs resource create filesrv_mount ocf:heartbeat:Filesystem device=/dev/drbd0 directory=/data fstype=ext4 --group filesrv_network_services- Next, we’ll create a resource to manage the NFS daemon within the
filesrv_network_servicesgroup. The NFS info directory will be located at/data/nfsinfo, ensuring it is replicated across all nodes in the cluster. This resource will be namedfilesrv_nfs_daemon
pcs resource create filesrv_nfs_daemon ocf:heartbeat:nfsserver nfs_shared_infodir=/data/nfsinfo --group=filesrv_network_services- Finally, we’ll create a resource for the NFS share (exportfs). The
/data/sharedirectory will be shared, and this resource will be included in thefilesrv_network_servicesgroup. It will be namedfilesrv_nfs_share. We’ll restrict this share for10.10.10.0/24network only
# Check which node is elected as Master node for DRBD resource
crm status

# Go to that Master node, and create /data/share directory
mkdir -p /data/share

# Give full access permission as we'll create a read-write share
chmod 777 -R /data/share

# Create the exportfs resource to manage the NFS share. The FSID serves as a unique identifier for the exported filesystem. If this is the root exportfs (the base directory for export trees), set fsid=0
pcs resource create filesrv_nfs_share ocf:heartbeat:exportfs clientspec=10.10.10.0/255.255.255.255 directory=/data/share options=rw,sync,subtree_check fsid=1010 --group=filesrv_network_services- Verify that all resources are running and NFS share is created
# Run this on both nodes to make sure cluster resources is persistent across cluster nodes
crm status

# Run this on the node which exportfs resource is running
exportfs
Note: If You found some failed actions log in crm status, you can clean them up using this command on one node:
pcs resource cleanup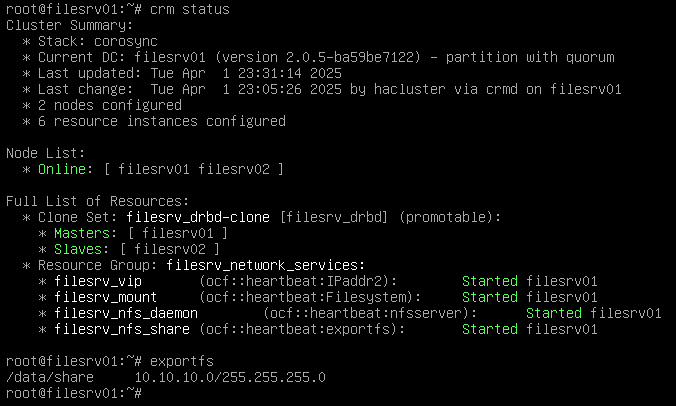
Cluster, resources, and NFS share status in DRBD master node
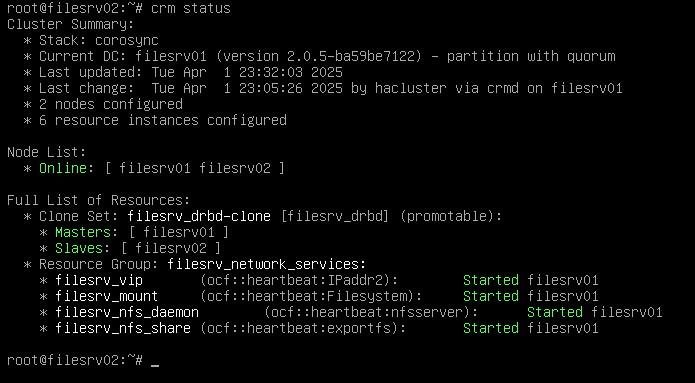
Cluster and resources status in DRBD slave node
C. NFS Client and Failover Testing
- We’ll test the NFS share in client side. Install
nfs-commonpackage infileclt
apt install nfs-common -y- Next, try to mount the NFS share on a directory and create a new file in it
mkdir /data
mount -t nfs 10.10.10.100:/data/share /data
echo "hello" > /data/hello.txt
Then, go to the server node where the NFS share is running, and verify that the file and it’s content are exist
ls /data/share
cat /data/share/hello.txt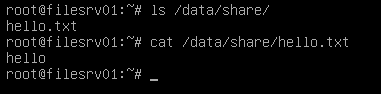
Client file and it’s content are exist in the NFS share directory
- To test failover, ban the current DRBD Master node from being promoted to Master for the DRBD resource. This will force the cluster to promote the Slave node to Master, verifying the failover mechanism
pcs resource ban filesrv_drbd-clone filesrv01 --masterWait for the failover initiated, and then issue this command:
crm statusVerify that the DRBD Master role has switched to another node. Due to resource colocation, all resources in the filesrv_network_services group should have moved along with it. This ensures that all services run on the same node as the DRBD Master, as intended. Also, verify that client files and it’s content are still exist in the new node
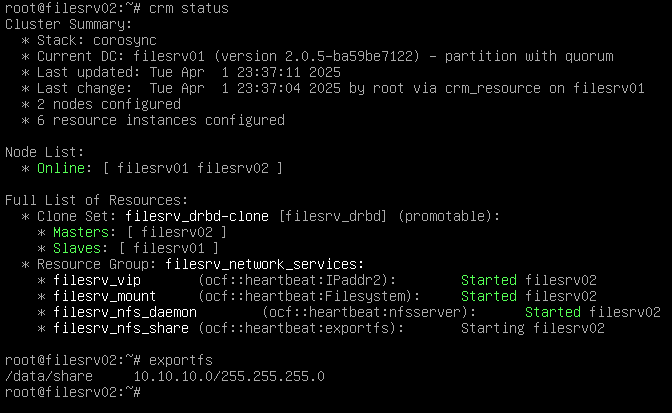
DRBD master, resources, and NFS share are moved to another node
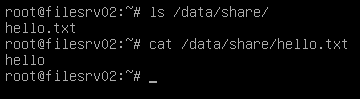
Client file and it’s content are exist in another node after failover
Note that the NFS mount connection on the client side remains intact, confirming that the high availability NFS service is functioning as expected. This ensures seamless failover without disrupting client access

NFS Mount and Connection in the Client Side is still Available
- To revert, clear the ban colocation on DRBD resource, ban the current node, and clear the ban colocation again. This ensures the DRBD Master role and all colocated resources return to the original node
pcs resource clear filesrv_drbd-clone
pcs resource ban filesrv_drbd-clone filesrv02 --master

# Aftar failover done, clear the ban colocation
pcs resource clear filesrv_drbd-clone
메타데이터
- post_id
- dba6be725d4b
- slug
- deploying-reliable-nfs-high-availability-setup-using-pacemaker-corosync-and-drbd-dba6be725d4b
- url
- https://medium.com/@kevintim/deploying-reliable-nfs-high-availability-setup-using-pacemaker-corosync-and-drbd-dba6be725d4b
- canonical_url
- https://medium.com/@kevintim/deploying-reliable-nfs-high-availability-setup-using-pacemaker-corosync-and-drbd-dba6be725d4b
- author_url
- https://medium.com/@kevintim
- status
- ok
- fetched_at
- 2026-06-26 03:39:16