Why I Stopped Writing Playwright Tests & Let Copilot Read the Jira Ticket and Create PR Instead?
How I Used MCP Servers to Turn Jira Tickets Into Reviewable Playwright PRs?
Let Copilot Read the Jira Ticket and Create PR Instead?
How I Used MCP Servers to Turn Jira Tickets Into Reviewable Playwright PRs?
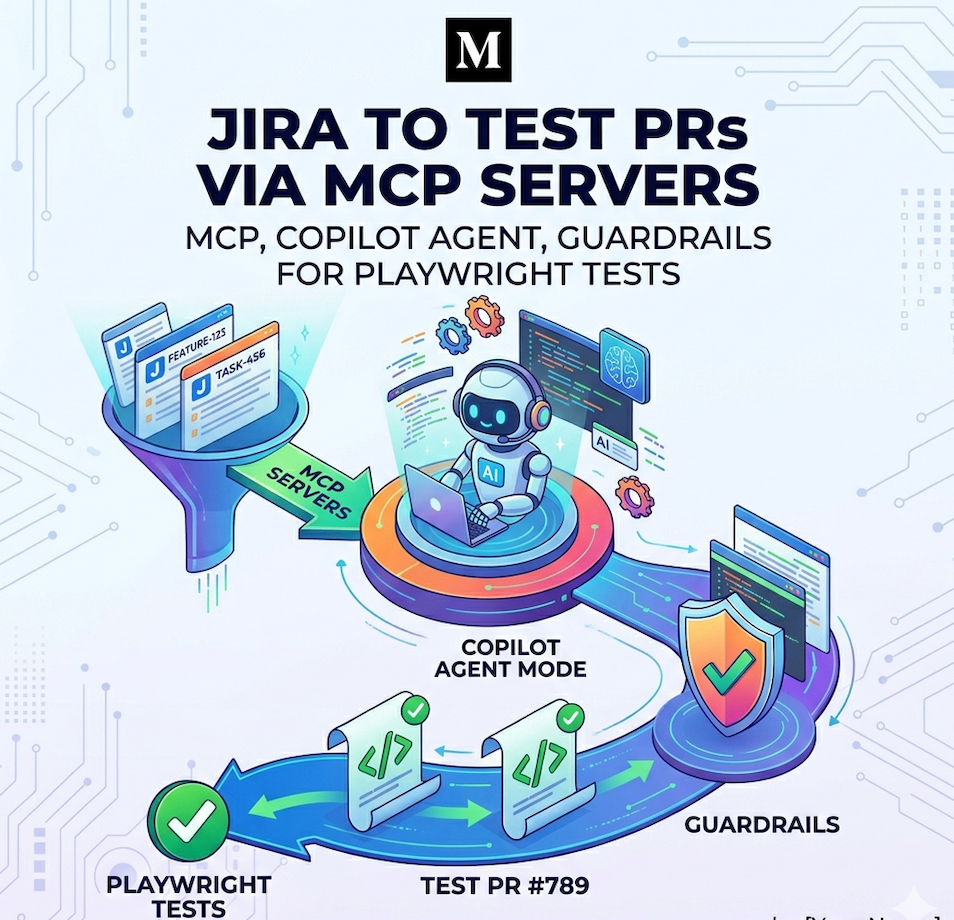
I’ve been experimenting with connecting Jira, Copilot in agent mode, and MCP servers to automate test creation in a way that still feels safe for a real engineering team.
Build something exciting today.
If you are behind the Medium paywall and can’t read this article, click here this publication is open to everyone.
The goal was not just to make AI write tests faster. The goal was to create a workflow where the agent can:
- Fetch Jira context directly
- Read repository and testing rules before generating anything
- Write only inside the approved test surface
- Open a pull request that fits the normal team review process
In other words, I wanted to move from -
“AI writes code” to “AI operates inside a contract.”
That distinction changes everything.
The idea
Most testing workflows still look like this:
- Open the Jira ticket
- Read the acceptance criteria
- Search the repo for existing test patterns
- Write the Playwright or TypeScript test manually
- Open a PR
- Ask for review
That works, but it is repetitive, context-heavy, and slow. A Jira ticket already contains most of the intent. The missing piece is translating that intent into code while respecting the repo’s rules and boundaries. So I tried a different model:
- Jira provides the context
- MCP provides the tool access
- Copilot agent mode provides the execution
- instruction files provide the constraints
- GitHub provides the review loop
The architecture in practice
At a high level, the workflow looks like this:
Jira ticket
  -> Atlassian MCP fetches issue context
  -> Copilot agent reads repo instructions
  -> Copilot agent reads testing rules
  -> Agent generates Playwright + TypeScript tests
  -> Agent stays inside test-only boundaries
  -> GitHub MCP creates the PR
  -> Human reviews and merges
What makes this usable is not the model alone. It is the combination of context plus constraints. Without context, the agent guesses. Without constraints, the agent overreaches. With both, it becomes genuinely useful.
1. Wiring the MCP layer
The first piece is the MCP server configuration in VS Code. This is what gives the agent access to systems like Jira, GitHub, and Playwright.
A simplified version of my setup looks like this:
{
  "servers": {
    "atlassian-rovo-mcp": {
      "url": "https://mcp.atlassian.com/v1/mcp",
      "env": {
        "ATLASSIAN_SITE_URL": "${env:ATLASSIAN_SITE_URL}",
        "ATLASSIAN_USER_EMAIL": "${env:ATLASSIAN_USER_EMAIL}",
        "ATLASSIAN_API_TOKEN": "${env:ATLASSIAN_API_TOKEN}"
      }
    },
    "github": {
      "type": "http",
      "url": "https://api.githubcopilot.com/mcp/"
    },
    "playwright": {
      "command": "npx",
      "args": ["@playwright/mcp@latest"]
    }
  }
}
This is where the workflow stops being theoretical. Now the agent can do real work across the delivery chain:
- Pull ticket context from Jira
- Inspect or generate tests with Playwright tooling
- Create and review PRs in GitHub
That removes a lot of copy-paste prompt engineering. The agent no longer depends on me manually summarizing a ticket or pasting fragments of repo context into chat.
2. Teaching the agent how the repository behaves
Tool access alone is not enough.
The next layer is the repository instruction model. In my case, the agent reads repo guidance from .github/copilot-instructions.md. Even a small set of explicit rules makes a major difference.
For example:
# GitHub Copilot Instructions

This file provides instructions for GitHub Copilot when generating code in this repository.

---

## General Codebase Rules

- Language: **TypeScript** with `strict: true` where supported by the existing file/configuration.
- Preferred style for new or substantially refactored code: use `const`, `ReadonlyArray<T>`, and spread operators where they fit. When editing existing `test/` code, follow the local file pattern if it already uses `let`, mutable builder state, or other non-functional style.
- Prefer specific types over `any`, but preserve existing `any` usage in legacy `test/` files unless the change is already refactoring that code safely.
- Match the existing import style of the file being edited. Do not rewrite established relative imports in `test/tests/` just to force absolute paths.
- File names use `kebab-case.ts`. Classes/Interfaces use `PascalCase`. Variables/functions use `camelCase` unless an existing file already follows a different established pattern.
- Never hardcode secrets. Use `.env` and `test/lib/config/`.

---

## Test Instructions

> These rules apply to all files under `test/` and `test/**/*.ts`.

### Overview

Tests in this project cover **regression testing** (functional checks) and **performance/load testing** (VU-based or iteration-based). All tests are TypeScript files compiled with the `test/tsconfig.json` config.

---

### How to Add a New Test File

1. Create `test/tests/<feature-name>.ts`.
2. Export a single named function matching the feature (e.g., `export const getMyFeature = ...`).
3. Add the export to `test/tests/index.ts`.
4. Call the function inside `test/my-test-1.ts` in the appropriate conditional block (`RUN_PERFORMANCE_TEST` guard).

---

### Key Rules for Tests

#### 1. Always use `test()` from `common/utils.ts` for named test cases

```ts
import { test } from '../common/utils.ts'

test(`[SG] - should return correct data`, testName => {

})
2. Use DtoBuilder for constructing request DTOs
const dto = new DtoBuilder()
    .setCountry('SG')
    .setCategory(['TRANSPORT'])
    .setOrderBy(OrderByField.NAME)
    .setOrder('ASC')
    .setLocale('en')
    .setRadius(2)
    .setLatitude(1.35)
    .setLongitude(103.9)
    .build()
3. Use executeAndParseRequest for all HTTP calls that return JSON
const response = executeAndParseRequest<SomeResponseType>({
    method: HttpMethods.GET, // or POST, PUT, etc.
    url,
    payload: JSON.stringify(dto), // only for POST/PUT/PATCH
    requestOptions,
    checkErrors: true, // set false to skip built-in status check
    testName,
})
4. Test name format
- Standard tests:
`[${country}] - should <description>` - Error/negative tests:
`[${country}] - ^should throw <Error> if <condition>`(prefix^for expected-error tests) - Performance tests:
`[PERF][${country}] GET /endpoint - description` - Schema tests:
`should return correct schema for GET /endpoint endpoint`
5. Performance-only tests go in tests/performance-tests.ts
Tests inside performance-tests.ts are only invoked when __ENV.RUN_PERFORMANCE_TEST === 'true'. Use exec.scenario.iterationInTest for modulo-based test rotation:
import exec from 'k6/execution'

const shouldRunOnEveryNthIteration = ({ nth }: { nth: number }): boolean => exec.scenario.iterationInTest % nth === 0
Adding a New Endpoint Test — Checklist
- [ ] Create
test/tests/get-<feature>.tswith a single exported function. - [ ] Define one
const testXxx = (requestUrl, requestOptions) => { ... }per behavior. - [ ] Use
DtoBuilderto compose request DTOs. - [ ] Gate all per-country test cases with
if (!targetCountry || config.country === targetCountry). - [ ] Use
executeAndParseRequest<ResponseType>()for JSON endpoints. - [ ] Use
validate(...).toXxx()assertions insidecheck(), combined with.every(Boolean). - [ ] Use the wrapped
checkfromcommon/wrapper.ts. - [ ] Import the response type from
modules/abc/index.ts. - [ ] Export the main function from
test/tests/index.ts. - [ ] Call it from
test/suite.tsinside the appropriate block. - [ ] Run
yarn test:regressionto validate.
This matters because it gives the agent a baseline coding contract before it starts generating tests. Instead of producing generic code, it has to produce code that matches the repo’s expectations.
That reduces cleanup. It also reduces review friction. The interesting part is that instruction files do not need to be huge to be effective. They just need to be specific enough to eliminate ambiguity.
3. Adding test-specific operating rules
The second guardrail layer is the agent operating contract in .github/instructions/playwright-api.instructions.md
This is where the workflow becomes safer and more reviewable, because the file defines how an agent is expected to work inside the repository.
A few examples from the real file:
---
applyTo: 'api-tests/*.ts,api-tests/**/*.ts'
excludeAgent: 'code-review'
---

# Playwright API Test Instructions & Best Practices

This document describes guidelines, standards, and architectural patterns to
follow when writing Playwright API integration tests. It is intended to ensure
consistency, maintainability, and quality across all API test suites.

---

## Overview of Playwright API Tests

This project uses Playwright Test API integration tests. These tests are API-first, not browser UI tests.

Key characteristics of this suite:

- Endpoint metadata lives in `api/endpoints.yml`
- Shared fixtures live in `api/fixtures/fixtures.ts`
- Response/body types live in `api/helpers/api-types.ts`
- Endpoint fixture contracts live in `api/helpers/types.ts`
- Specs live in `tests/*.spec.ts`
- `main.ts` controls which spec files are enabled for execution
- `playwright.config.ts` defines timeout, global setup, reporter, and `testMatch`

---

## Goals for Playwright API Test Code

All Playwright API tests should:

- Be deterministic and independent
- Follow the shared fixture-and-builder pattern
- Keep endpoint definitions centralized in YAML
- Validate both status codes and meaningful response fields
- Cover happy paths and important negative cases
- Use stable test data and environment-aware gating where needed
- Be easy to review, extend, and debug
- Avoid introducing browser/UI concerns into API-only tests

---
## Other Granular Details will go here
This is important because it shifts the role of the human.
I am no longer telling the agent every small implementation detail. I am defining the rules of engagement. That is a much better fit for test automation.
4. The most important rule: tests only, no accidental changes to src (dev code)
This was the biggest requirement in my experiment.
I wanted the agent to generate tests, not “helpfully” modify application logic. So the rule was simple:
- Generate Playwright and TypeScript tests only
- Keep changes inside the test area
- Do not modify
src/ - Do not refactor unrelated files
- Follow existing test patterns instead of inventing new abstractions
This is one of the main reasons I think AI agents can work well in QA workflows. Tests are a great target for constrained automation because the boundaries can be made very explicit.
When the blast radius is small, the risk is much easier to manage.
5. What the generated test code actually looks like
The repo already has Playwright-based API tests under api-tests/tests, with registration handled through api-tests/main.ts. That gives the agent a concrete pattern to follow.
A realistic generated test in this style looks like this:
import { test, expect } from '@api/fixtures/fixtures'
import { DetailItem } from '@api/helpers/api-types'
import { testdata } from '@utils/constants'

test.describe('Test Details', () => {
    test('[MY][P0-TC-01] should return 200 with valid schema for valid params', async ({ getDetails, executor }) => {
        const req = getDetails
            .builder()
            .withQuery({
                id: 1234,
                country: testdata.countries.my,
                locale: testdata.locales.en,
                mergeStations: true,
                stripCode: true,
            })
            .build()
        const response = await executor.raw(req)
        const data = response.data as DetailItem
        expect(response.status).toEqual(getDetails.successStatusCode)
        expect(data.id).toEqual(1234)
        expect(data.country).toEqual(testdata.countries.my)
        expect(typeof data.name).toEqual('string')
        expect(Array.isArray(data.routes)).toBe(true)
        expect(Array.isArray(data.relatedPoints)).toBe(true)
    })
})
That is where the instruction layering pays off.
The agent is not just generating a random Playwright example from the internet. It is following the repo’s fixture model, naming style, assertion pattern, and API helper structure.
That is the difference between “interesting demo” and “mergeable output.”
6. Keeping test registration explicit
One small but useful pattern in this repo is that enabled specs are declared centrally in api-tests/main.ts:
export const enabledTests: Array<string> = [
  'sample.spec.ts',
  'new-details.spec.ts'
]
I like this because it makes the workflow predictable.
If the agent adds a new spec, it can also update the registry in a controlled way. That makes it very obvious in review what was introduced into the suite.
Again, the theme here is explicitness. AI works better when the system is opinionated.
7. Why this changes the QA workflow
What I like most about this setup is that it changes the unit of work.
Before, the unit of work was “write the test.”
Now, the unit of work becomes:
- Define the intent
- Define the boundaries
- Define the rules
- Review the generated output
That is a higher-leverage role for QA and engineering teams. Instead of spending time writing repetitive scaffolding, you spend more time on:
- Clarity of acceptance criteria
- Edge-case identification
- Coverage quality
- Review quality
- Risk prioritization
That is where human judgment is most valuable anyway.
8. What GitHub MCP adds to the loop
The final step is making the output reviewable in the normal engineering process.
Once the agent finishes generating the tests, GitHub MCP can support the branch and pull request workflow. That means the artifact lands where teams already know how to evaluate it: in a PR, with a diff, comments, approvals, and history.
That is critical.
If AI-generated work never leaves the chat window, it is hard to trust and hard to operationalize.
If it lands in a normal PR with clear boundaries, reviewers can focus on the real question:
“Do these tests correctly encode the intended behavior?”
That is a much healthier workflow than asking people to trust raw model output blindly.

Final takeaway
The biggest lesson from this experiment is simple:
The real win is not that AI can write tests. The real win is that AI can write tests safely when you give it:
- Direct ticket context
- Tool access through MCP
- Repository instructions
- Testing-specific rules
- Strict file boundaries
- A standard PR-based review loop
That is the shift I find most interesting.
We are moving from “using AI to generate code” to “designing controlled execution environments where AI can contribute usefully.”
And for testing, that feels especially powerful.
Because test creation is repetitive enough to benefit from automation, but structured enough to be constrained.
That makes it a very good fit for agent-driven workflows.
Curious to hear:
how are you using AI agents in your testing or development workflows today? Are you using them mostly for code generation, test creation, PR review, or something else?
메타데이터
- post_id
- e1b9bbfa0222
- slug
- why-i-stopped-writing-playwright-tests-let-copilot-read-the-jira-ticket-and-create-pr-instead-e1b9bbfa0222
- url
- https://medium.com/syntest/why-i-stopped-writing-playwright-tests-let-copilot-read-the-jira-ticket-and-create-pr-instead-e1b9bbfa0222
- canonical_url
- https://medium.com/syntest/why-i-stopped-writing-playwright-tests-let-copilot-read-the-jira-ticket-and-create-pr-instead-e1b9bbfa0222
- author_url
- https://medium.com/@shivambharadwaj
- status
- ok
- fetched_at
- 2026-06-10 08:17:25





