Local RAG | Langflow, Milvus, & LM Studio
Learn how to use Langflow, Milvus, and LM Studio to process and chat with your documents — all on your local machine. 📑💻✨
Local RAG | Langflow, Milvus, & LM Studio

Milvus and LM Studio takin’ it easy in Langflow
Learn how to use Langflow, Milvus, and LM Studio to process and chat with your documents — all on your local machine. 📑💻✨
On the surface, Langflow is a drag-and-drop platform for building AI systems that’s built on top of LangChain. It can act as a no-code builder where the user can combine different components together in a flow, then immediately test their configuration in a playground. This means really, really quick and easy prototyping with built in UI support for seamless testing. ✨ It also has a lot of default components already in place with dedicated flow templates to show how these components can be used.
But even though Langflow can easily be used without creating any code, it can also be treated as a very-much-code platform for endless customization. 🎨 One of my favorite functionalities is the code button on top of each component which allows the user to view and modify the underlying code on-the-fly. You can see exactly what’s going on and customize your build to fit your specific needs. 🛠️ We’ll see how to do this by editing some of the default components for specific use cases.
We’re going to test out a flow template for a simple RAG system 📑💬 with which we can process and store many types of documents (40+ types of files can be uploaded — thanks in large part to Docling) with various PDFs and web pages discussing current and future medical AI as examples. 🩻
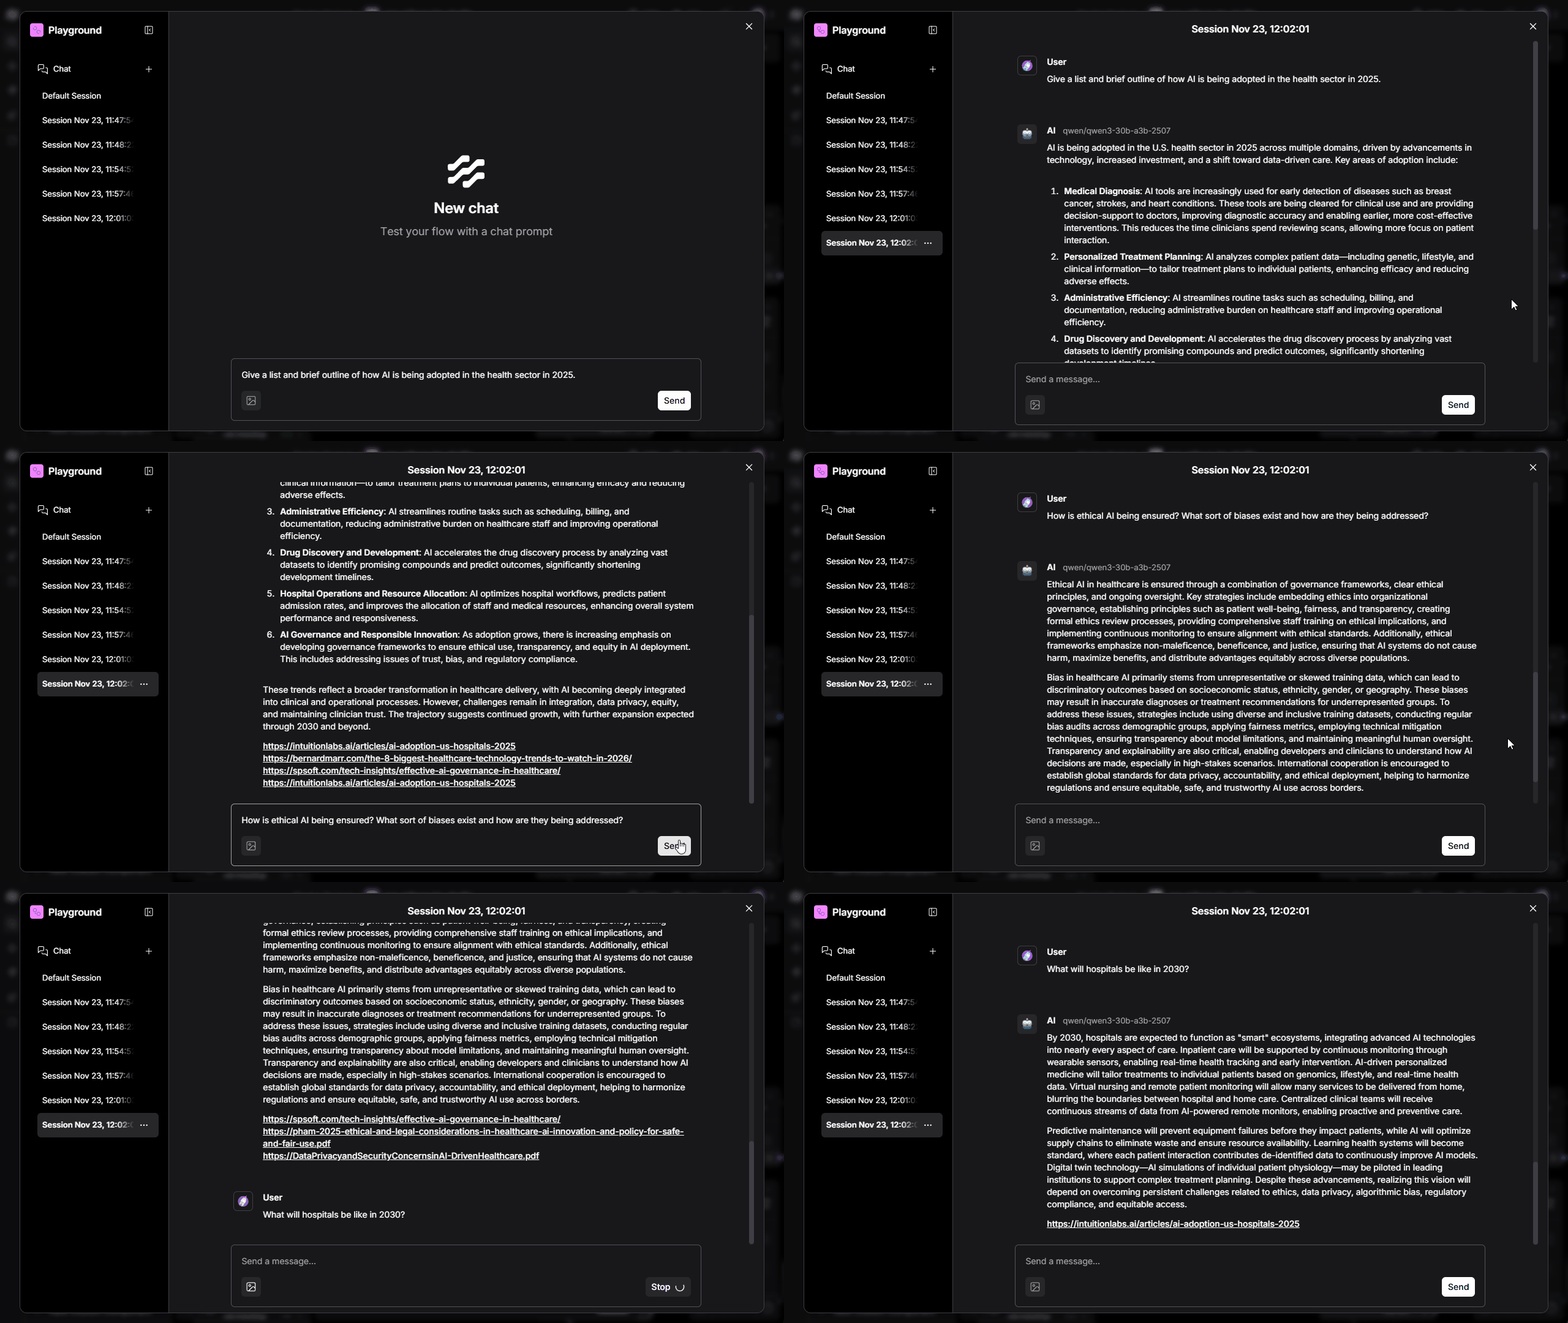
Using the Langflow template to chat about medical AI
For more tutorials on this particular subject, you can also check out Langflow’s RAG tutorial, Milvus’s Langflow tutorial, and my portfolio tutorial.
OK, enough talk — let’s get building! 🧰
🏁 Getting Started
To showcase Langflow’s capabilities, we’ll use a flow that I created for this very purpose. You can download it, then test that it works in Langflow’s playground by following these steps:
1.Install and run Docker:
We’ll use Docker to create a Milvus server (with etcd and MinIO servers for support). You can see the official Docker Compose release that we’ll use.
- Install and run LM Studio:
We’ll use LM Studio to host local embedding models for an extra representation for our documents and LLMs to chat with our documents.
- In LM Studio, download an LLM:
LM Studio should come packaged with a default embedding model which we’ll use in this example, so you only need to download an LLM. I used
qwen3–30b.
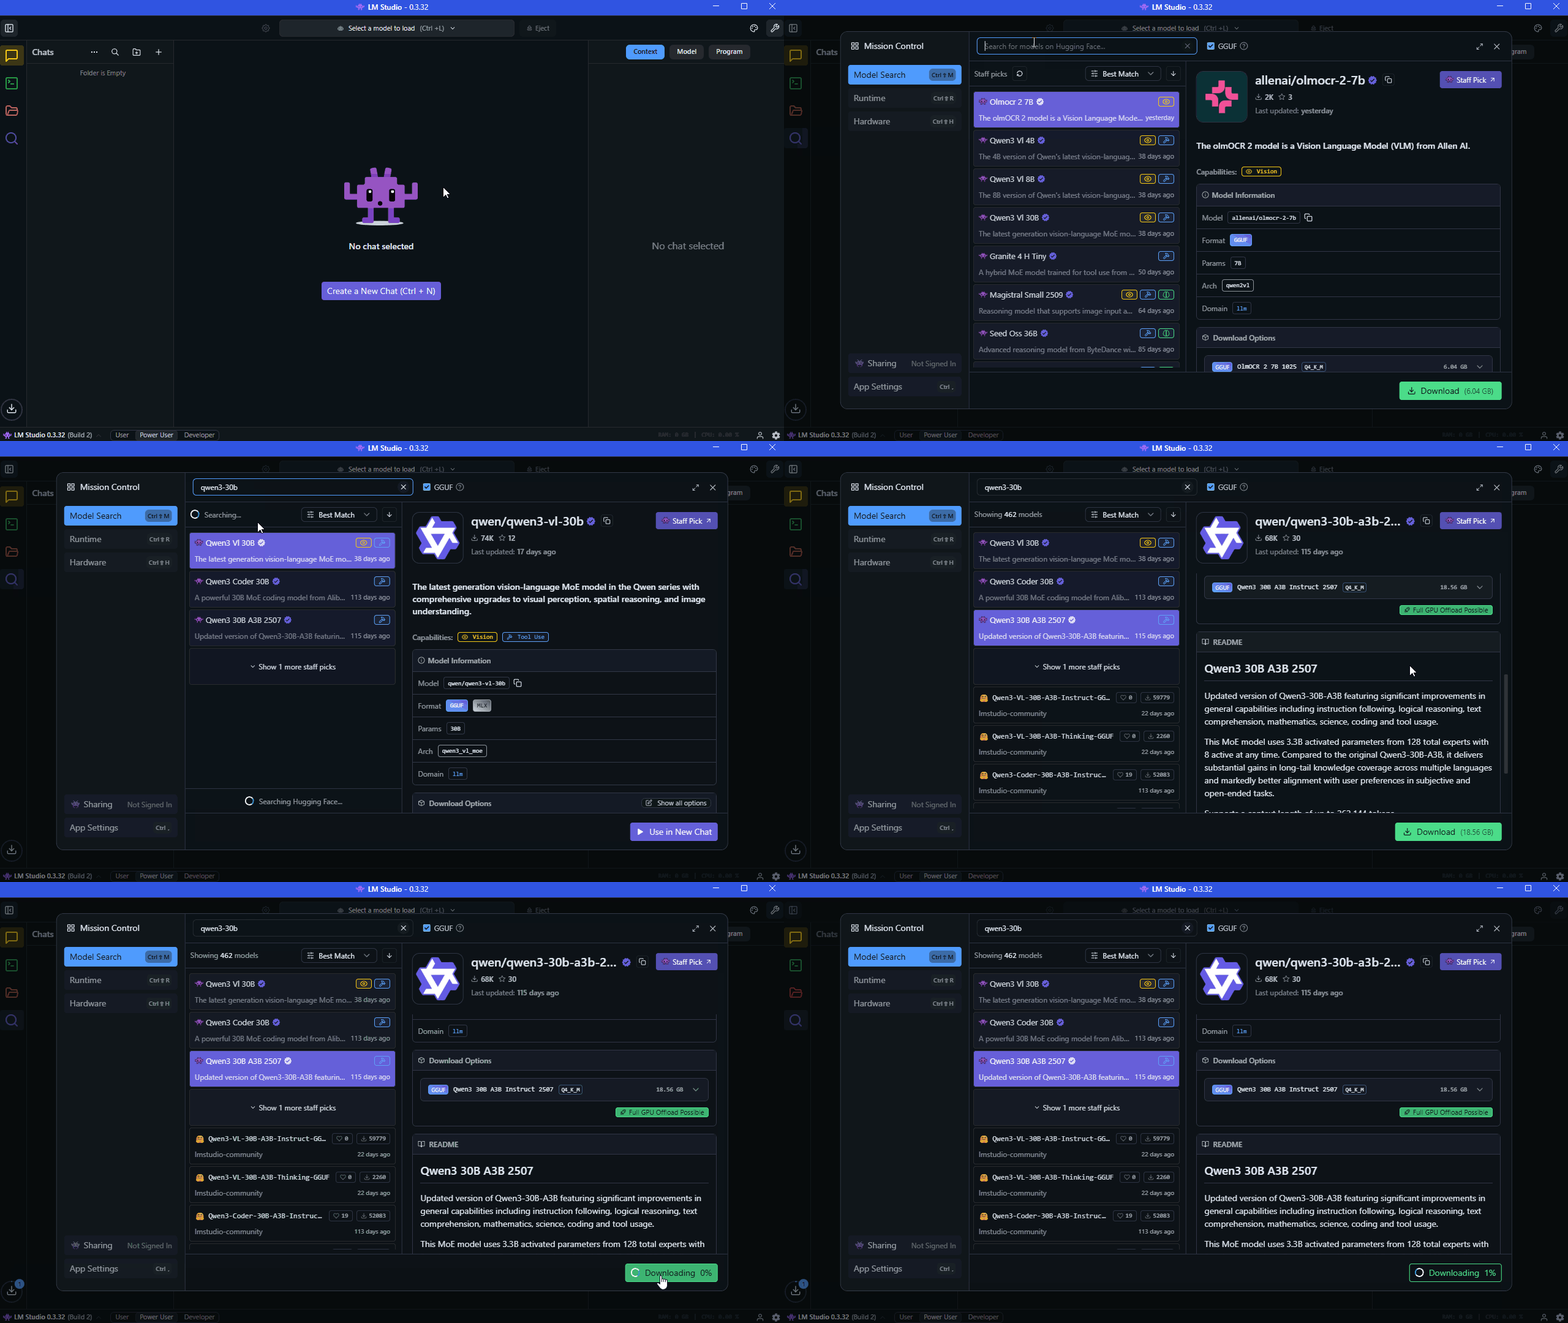
Downloading an LLM in LM Studio
- In the LM Studio
Developertab, start the server:
You can load the models that you want to test, but when you store your data and invoke the LLM in Langflow, the proper models should be loaded automatically.
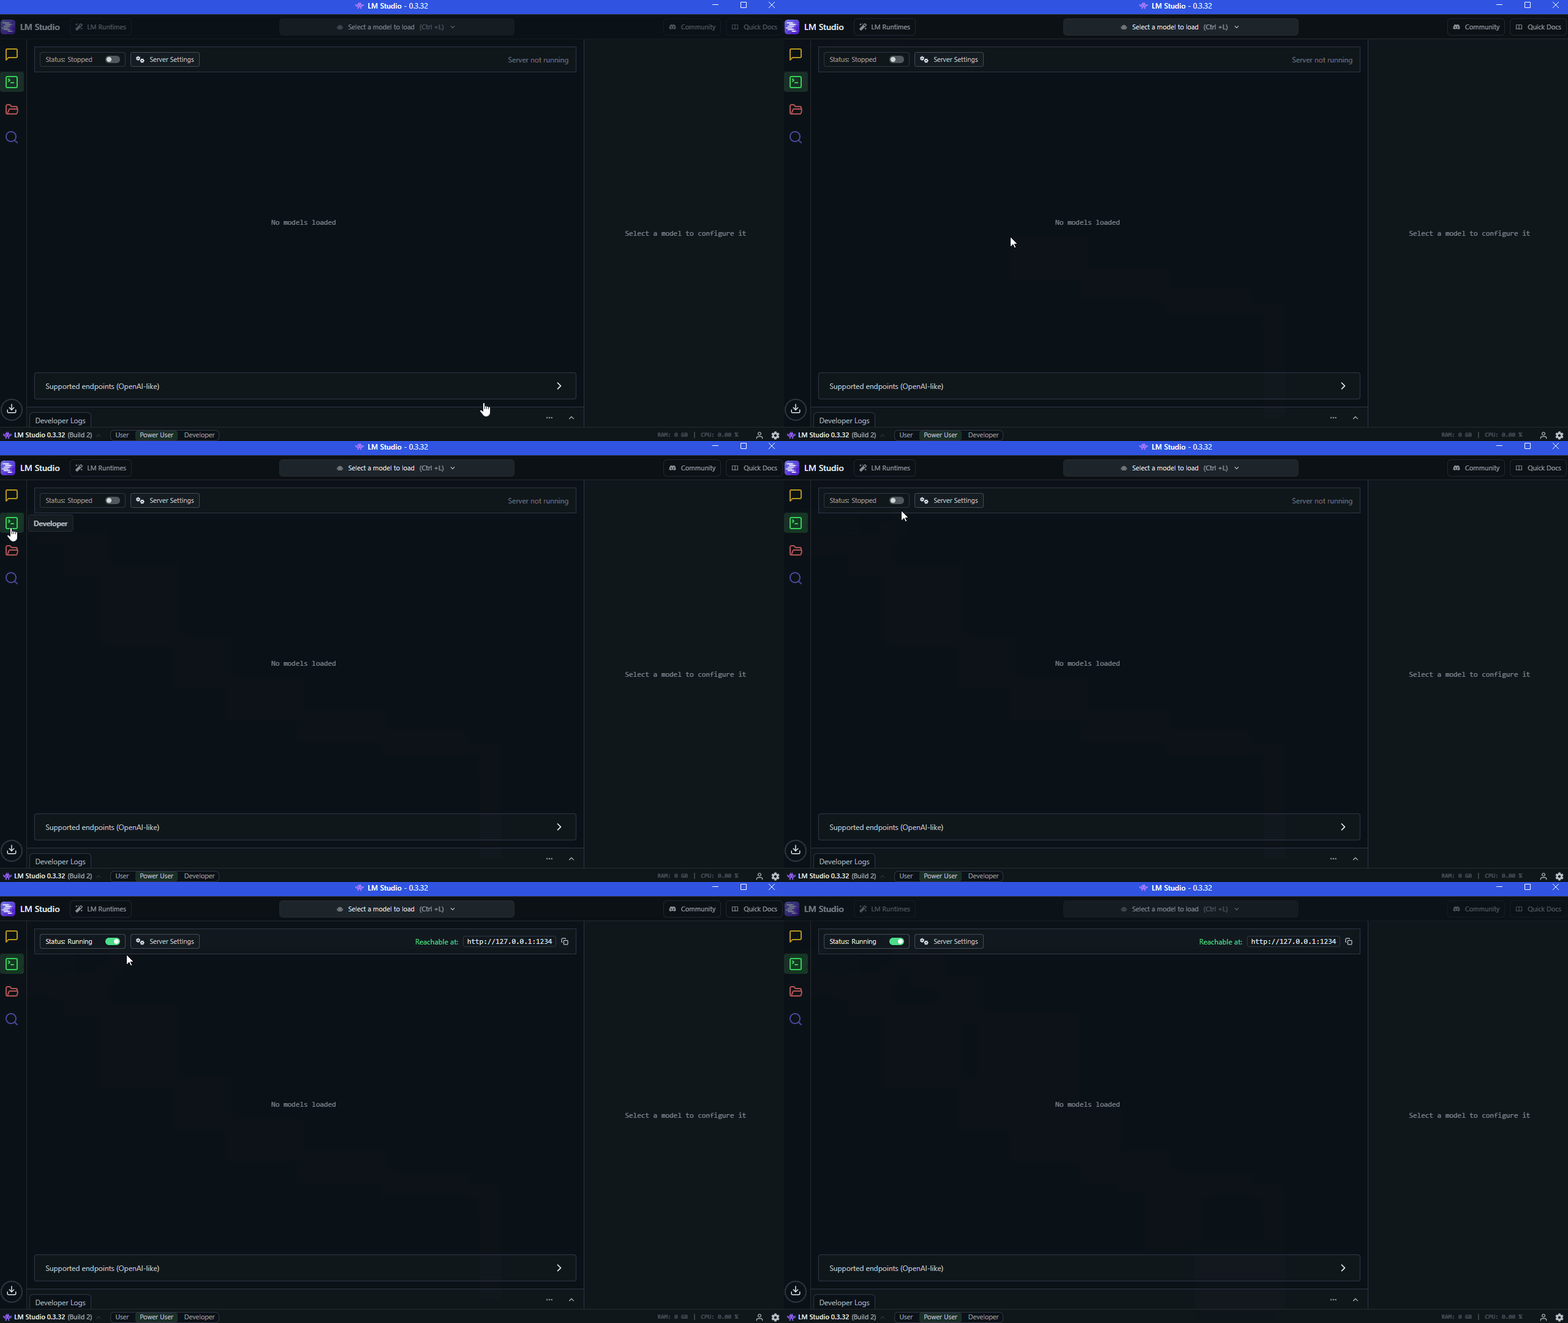
Starting a server in LM Studio
- Clone my repo and setup the Python environment:
We’re cloning this repo to use the included
rag-milvus-lm-studio.jsonin Langflow and themilvus.ymlfor building and running Milvus in Docker.
git clone https://github.com/anima-kit/langflows.git
cd langflows
uv venv venv
venv/Scripts/activate- Build and run Milvus:
You can check out additional instructions here. If you’re on Linux or Mac, you may be able to use
milvus-liteinstead. Checkout the installation instructions here.
docker compose -f docker-compose/milvus.yml up -d- Install Langflow:
You can do this many different ways, but I chose to
uvinstall.
uv pip install -U langflow- Run Langflow:
This will start the Langflow server on your local machine.
uv run langflow run-
Navigate to http://localhost:7860 in a web browser to start playing with Langflow.
-
Drag and drop
rag-milvus-lm-studio.jsononto the Langflow interface.
This should open the
flowwith all the necessary components. In the1stsection, you can upload PDFs, parse through PDFs and web pages, and store all the information in Milvus. In the2ndsection, you can chat with an LLM about the PDFs and web pages that you added.
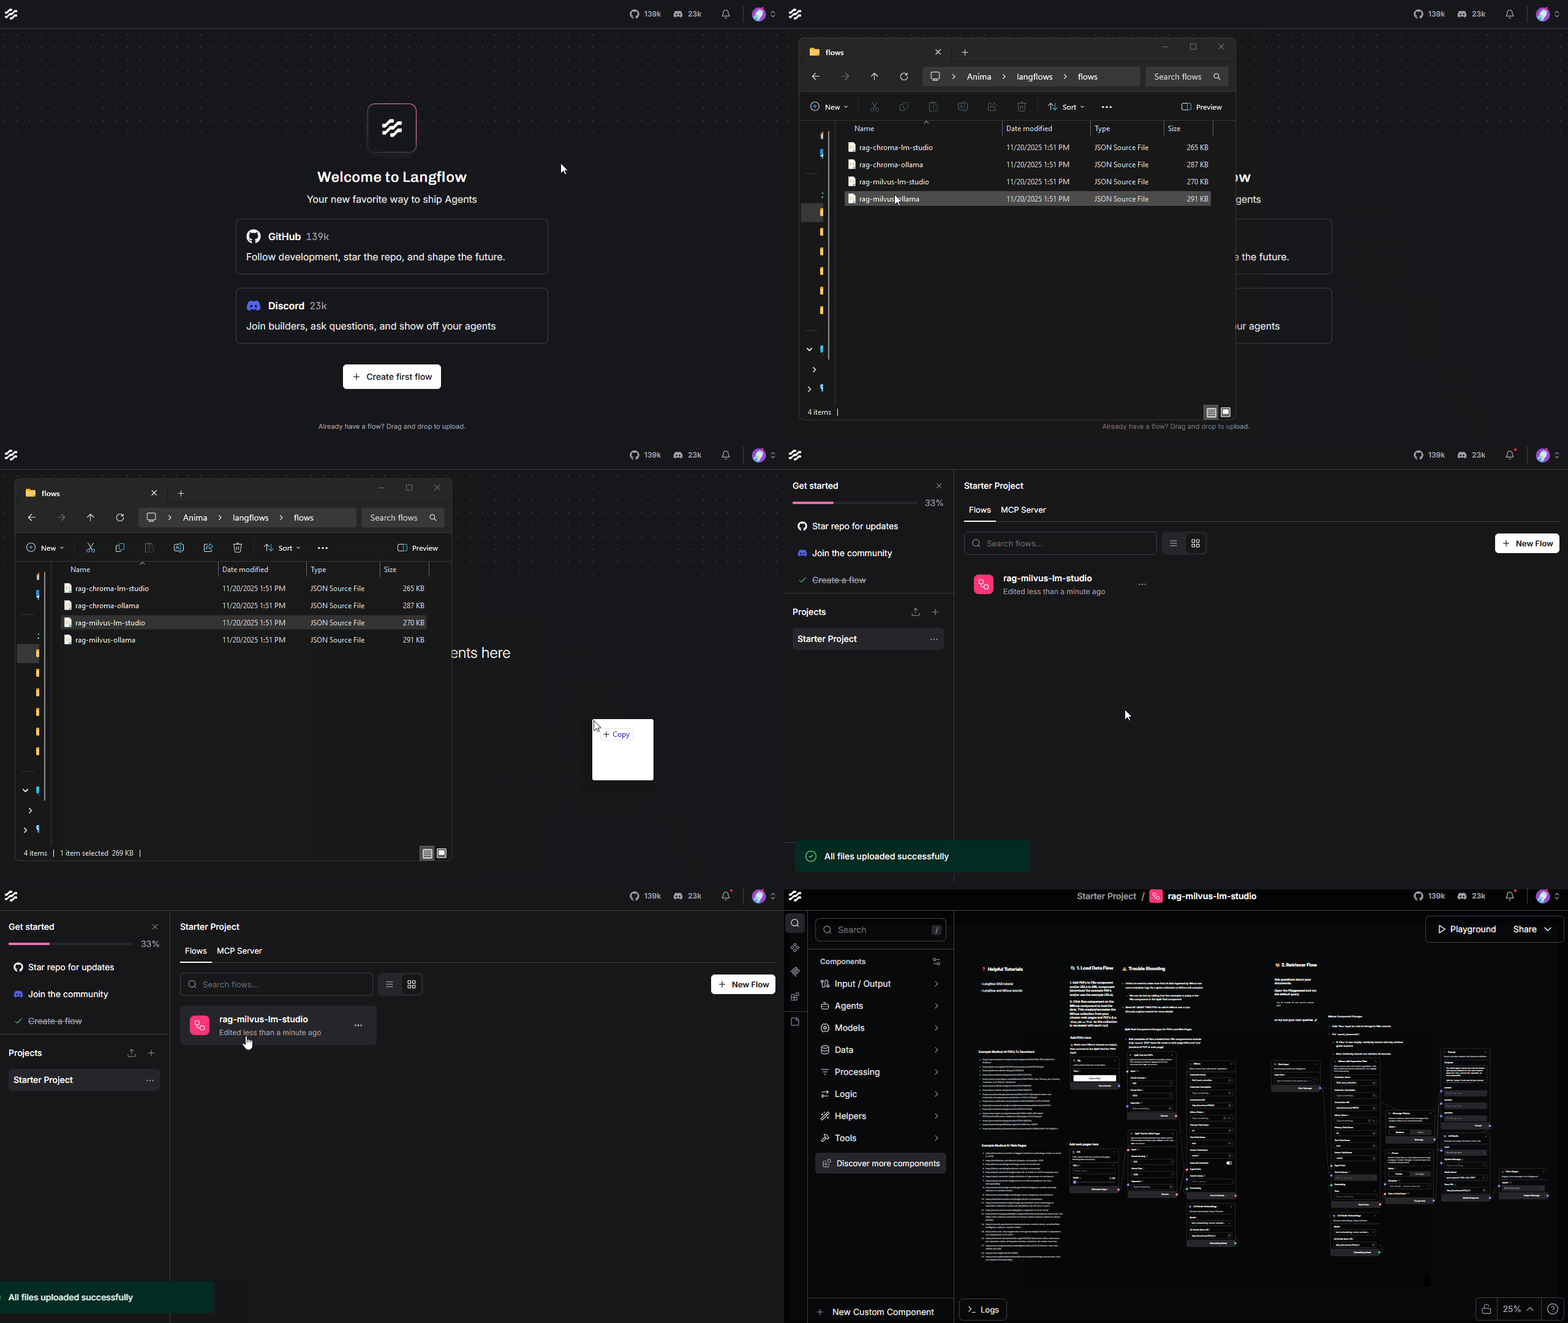
Adding a flow to Langflow
- Add some PDFs and web pages to Milvus:
These are the PDFs and web pages about which we’ll chat with an LLM. I added lots of medical AI examples for you to test.
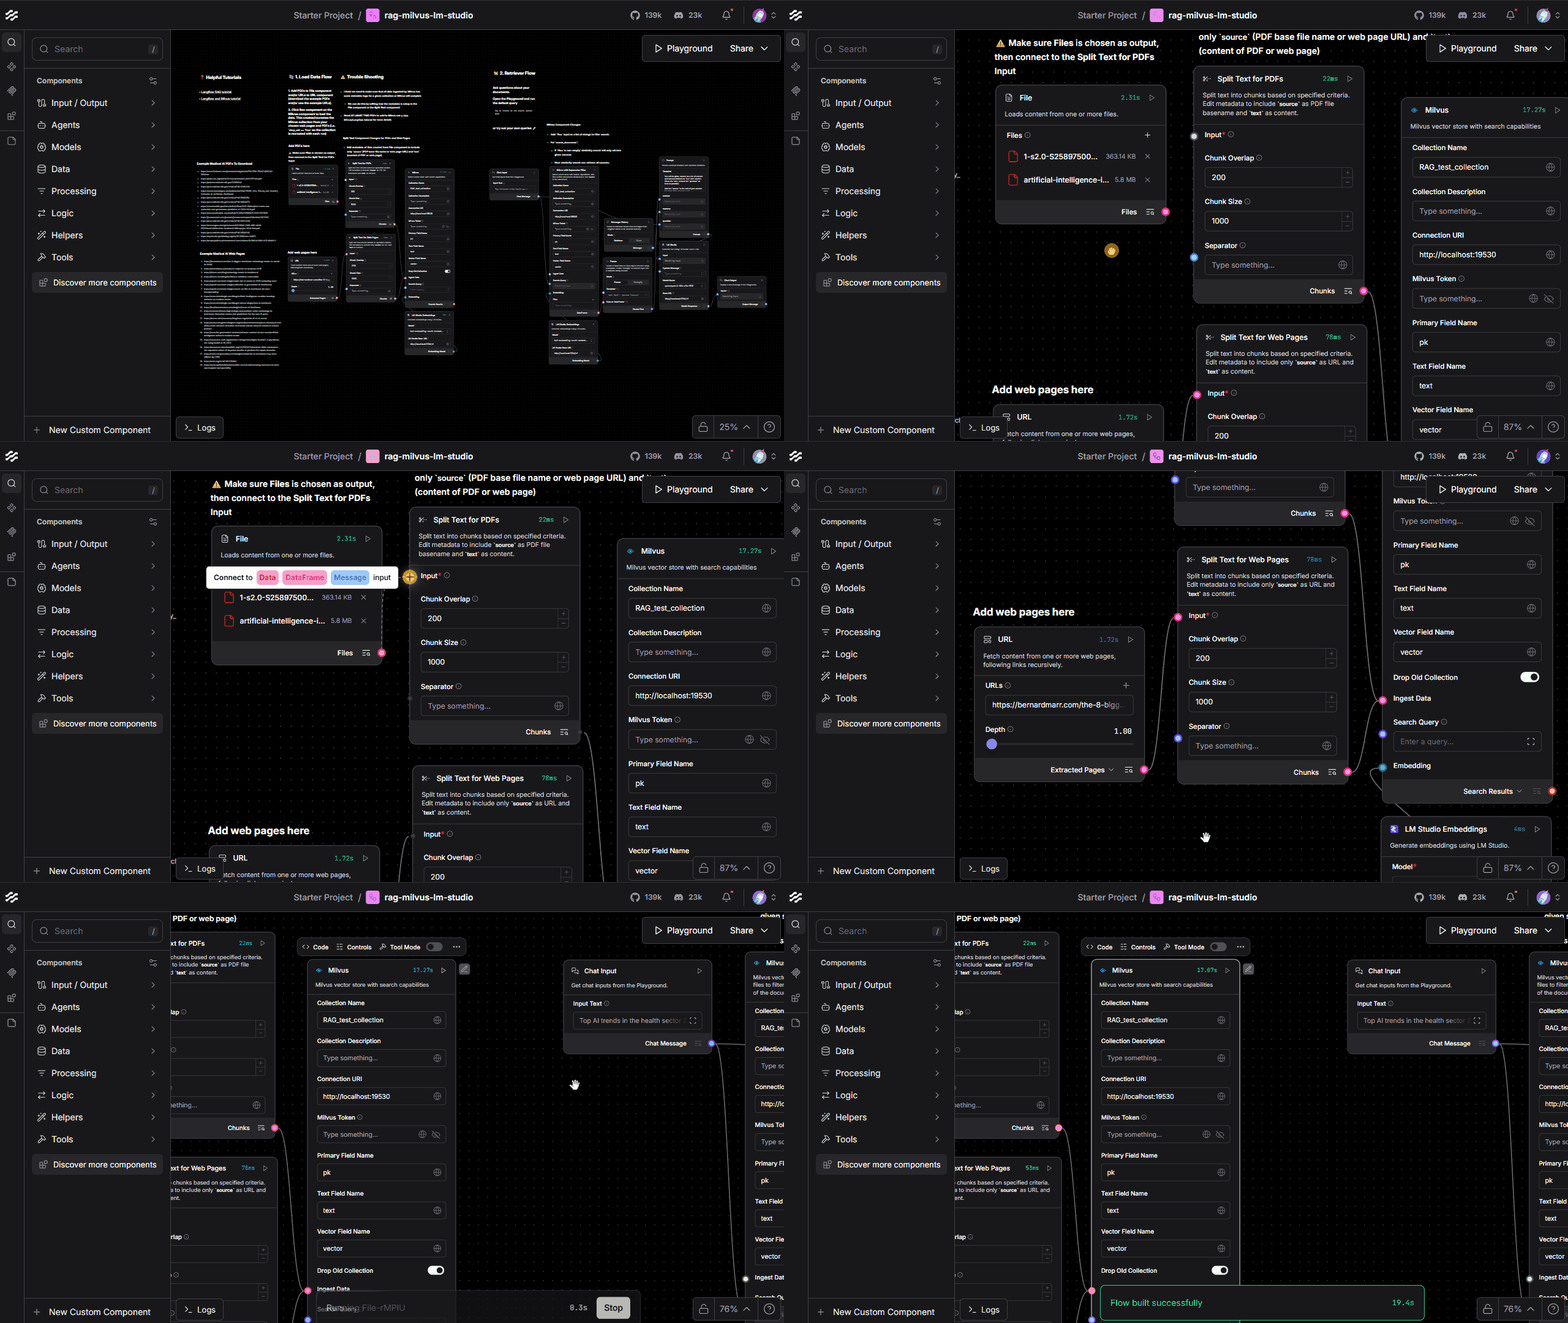
Adding documents to Milvus in Langflow
- Start the
Playgroundto chat.
Now you can test out chatting with an LLM about your documents.
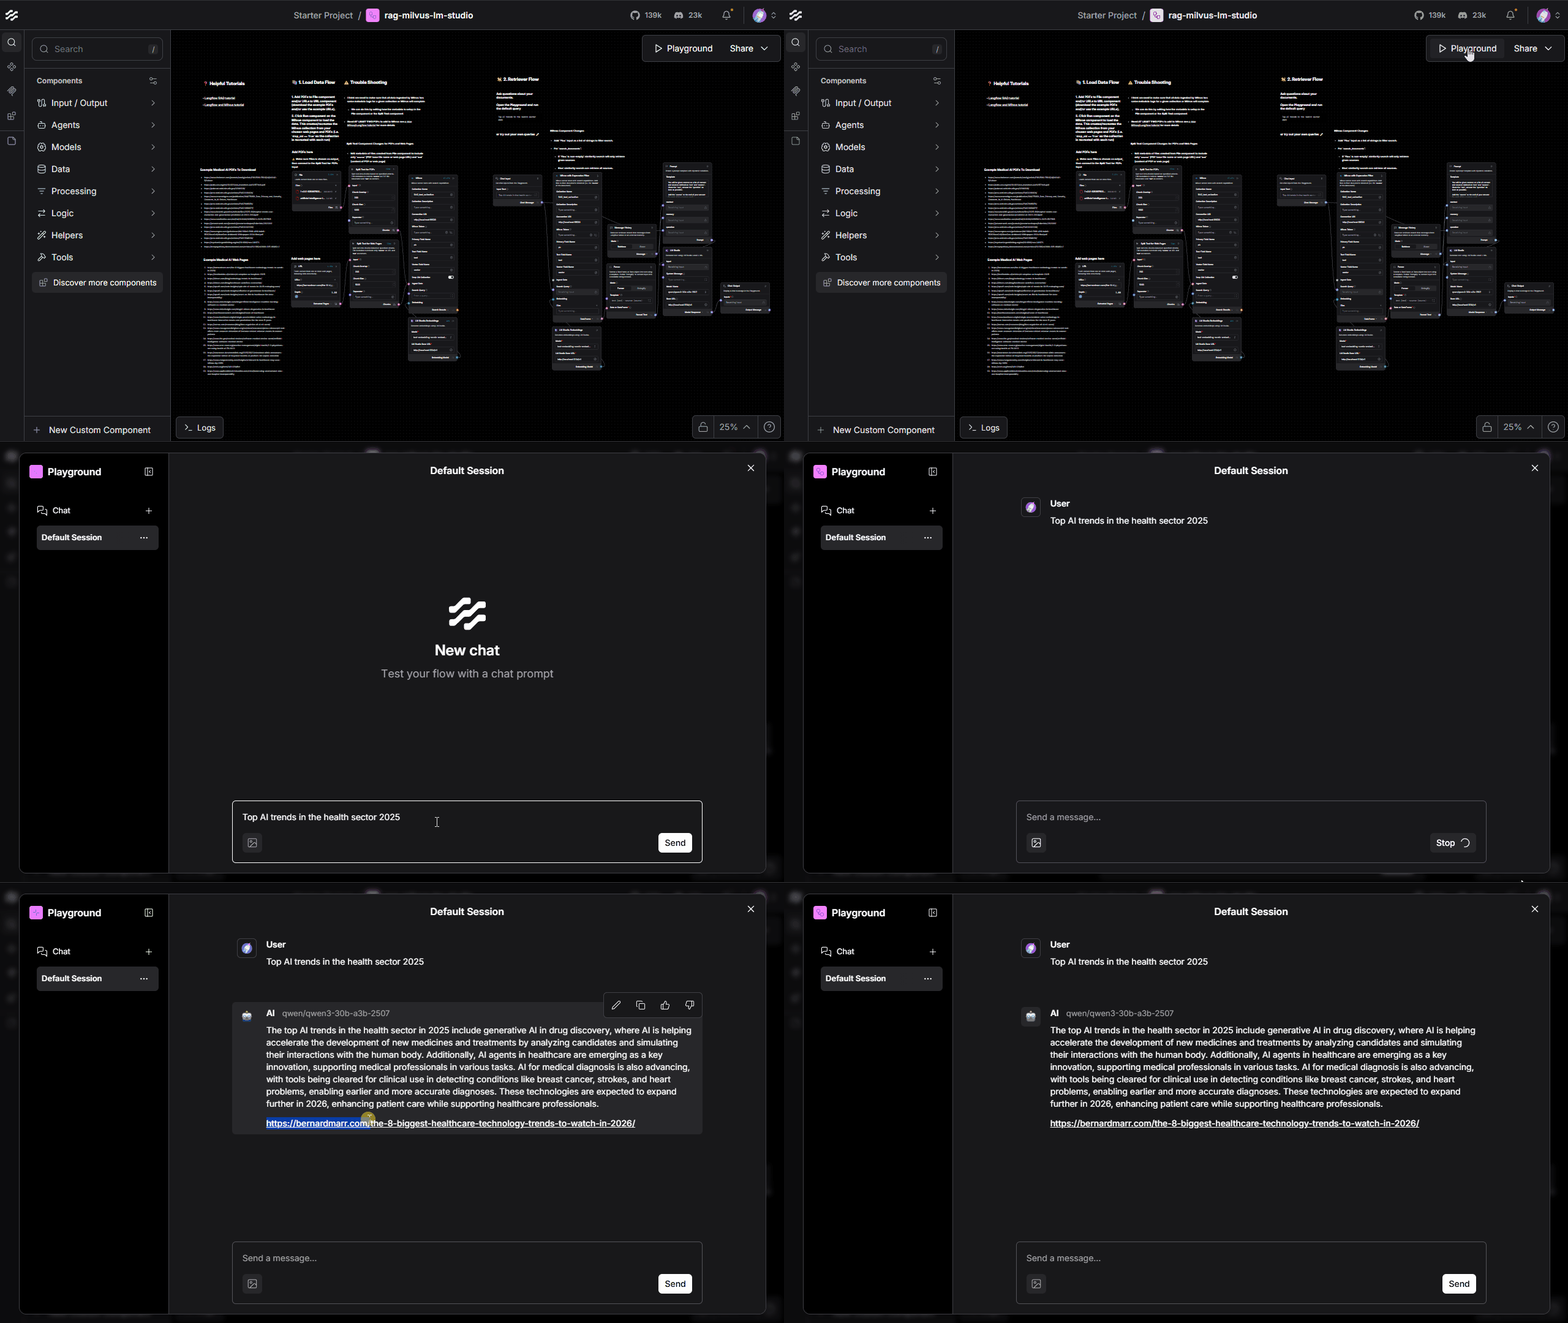
Using the default session in Langflow’s Playground
And that’s it! ✨ Now, you can add whichever documents or web pages you’d like and chat about them with an LLM, all on your local machine. 💻
📑 Example Use Cases
Now that we understand how to add flow templates and test them in Langflow’s playground, let’s see how we can further customize our flows. Of course, we can add or remove whichever built in components we’d like, but we can also modify the default components or create completely new components. Here, I’ll show how we can modify the default Split Text and Milvus components.
First, let’s inspect the outputs for the File component and the Split Text for PDFs component. You can do this by clicking Inspect Output at the bottom right hand corner.
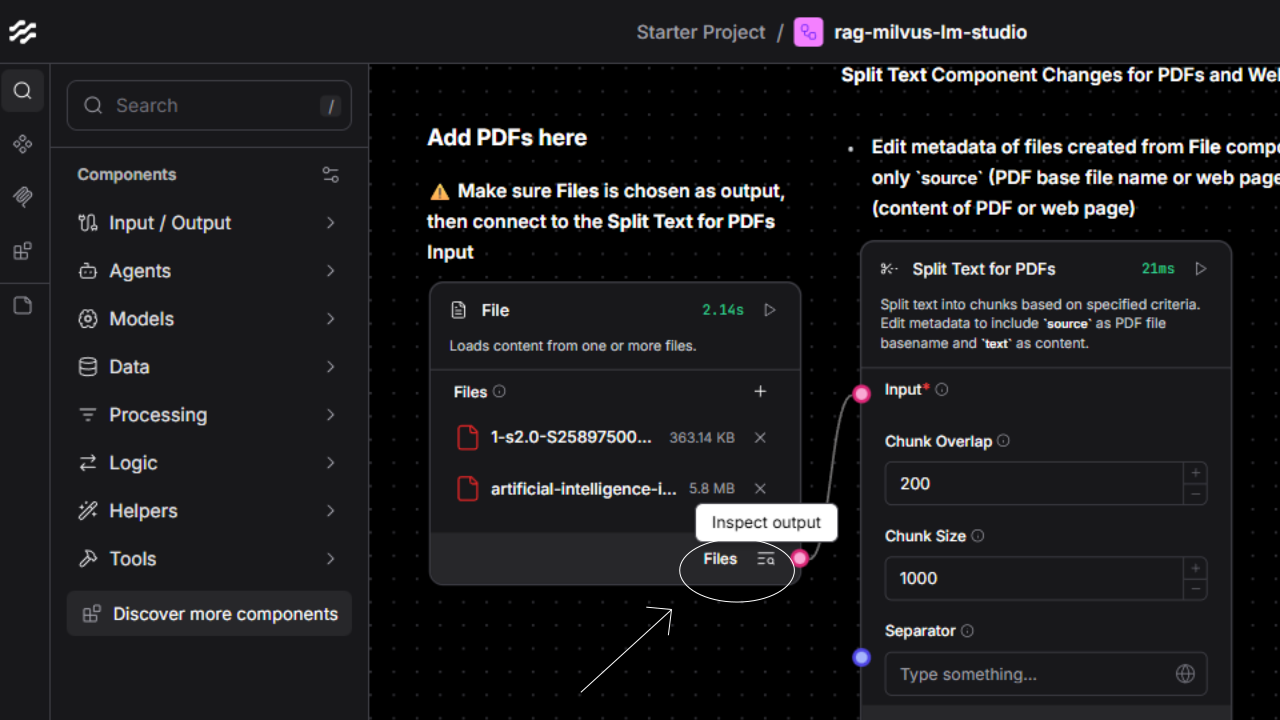
Inspect Output for the File component
Most documents that are fed into the File component are likely to be processed with Docling by default (the PDFs we add will be). This component then spits out the processed content along with a file_path tag. The content of web pages fed into the URL component are processed using LangChain’s RecursiveURLLoader.
When the data output from the File component passes through the Split Text component, the content from each data piece should be split up into smaller sections and new data pieces should be added with the same metadata.
However, notice that the output for the File and Split Text for PDFs have different metadata, with the File component including the file_path while the Split Text for PDFs component includes the source instead. This is because I edited Langflow’s default Split Text code.
You can checkout the edited code by clicking the Code button or by selecting the component, then pressing Space .
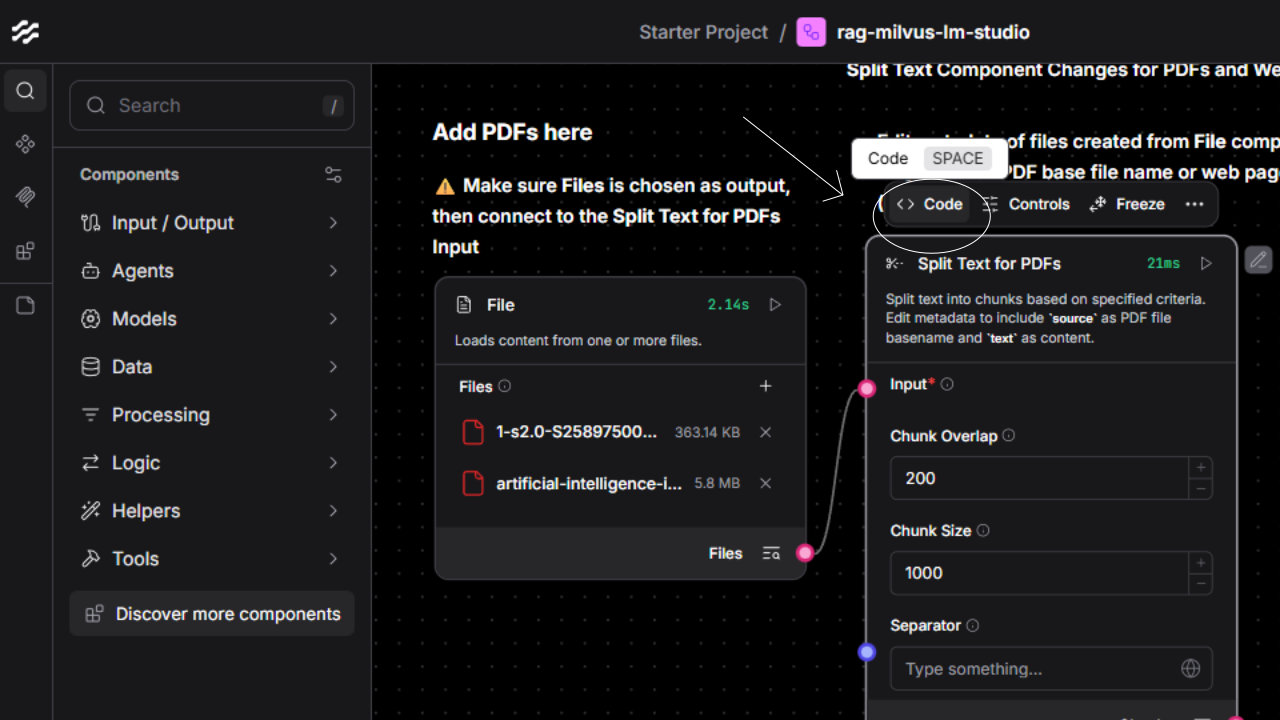
The Code button at the top of a Langflow component
Let’s take a closer look at what I edited for the Split Text for PDFs component:
def _docs_to_data(self, docs) -> list[Data]:
    for doc in docs:
        ### CHANGED: Lauren Street 2025/11/19
        ### Added metadata editing to include `source` as file path basename and `text` as content
        doc.metadata['source'] = basename(doc.metadata['file_path'])
        del doc.metadata['file_path']

    ### Original code
    return [Data(text=doc.page_content, data=doc.metadata) for doc in docs]
Originally, the code didn’t include lines 2–6. But, I wanted each of the documents that I added to have a source tag as the basename of the file added.
See how easy it is to edit a default component in order to get particular behaviors? ✨
Now, let’s look at one more example. The default Milvus component searches documents by using the similarity_search method of Langchain’s Milvus module. We can see this by checking out the code:
def build_vector_store(self):
    try:
        from langchain_milvus.vectorstores import Milvus as LangchainMilvus
    except ImportError as e:
        msg = "Could not import Milvus integration package. Please install it with `pip install langchain-milvus`."
        raise ImportError(msg) from e
    self.connection_args.update(uri=self.uri, token=self.password)
    milvus_store = LangchainMilvus(
        embedding_function=self.embedding,
        collection_name=self.collection_name,
        collection_description=self.collection_description,
        connection_args=self.connection_args,
        consistency_level=self.consistency_level,
        index_params=self.index_params,
        search_params=self.search_params,
        drop_old=self.drop_old,
        auto_id=True,
        primary_field=self.primary_field,
        text_field=self.text_field,
        vector_field=self.vector_field,
        timeout=self.timeout,
    )

    # Convert DataFrame to Data if needed using parent's method
    self.ingest_data = self._prepare_ingest_data()

    documents = []
    for _input in self.ingest_data or []:
        if isinstance(_input, Data):
            documents.append(_input.to_lc_document())
        else:
            documents.append(_input)

    if documents:
        milvus_store.add_documents(documents)

    return milvus_store
Langchain’s Milvus vectorstore has a lot potential customizations. For example, one thing we can do is add a filter to the search so that only certain documents are fetched. This is exactly what I did by editing the default Milvus component to create the Milvus with Expression Filter component. Let’s check the code out:
class MilvusVectorStoreComponent(LCVectorStoreComponent):
    """Milvus vector store with search capabilities."""

    ...

    inputs = [

        ...

        ### CHANGED: Lauren Street 2025/11/19
        ### Add list of strings input for particular sources to retrieve
        StrInput(
            name="files",
            display_name="Files",
            value="",
            is_list=True,
        ),
    ]

def search_documents(self) -> list[Data]:
    vector_store = self.build_vector_store()
    if self.search_query and isinstance(self.search_query, str) and self.search_query.strip():
        ### ORIGINAL:
        #docs = vector_store.similarity_search(
        #    query=self.search_query,
        #    k=self.number_of_results,
        #)

        ### CHANGED: Lauren Street 2025/11/19
        ### Do similarity search:
        ###     without expression if no sources added
        ###     with expression 'source == source_name_1' OR 'source == source_name_2' ... OR 'source == source_name_n'
        ###         for n added sources
        if self.files==['']:
            docs = vector_store.similarity_search(
                query=self.search_query,
                k=self.number_of_results,
            )
        else:
            expr_in = ' OR '.join(f'source=="{file}"' for file in self.files)
            docs = vector_store.similarity_search(
                query=self.search_query,
                k=self.number_of_results,
                expr=expr_in
            )

        data = docs_to_data(docs)
        self.status = data
        return data
    return []
Here, we’re adding a filter expression to the similarity_search method so that if the user includes any files as input, the search will be filtered to only fetch those files.
Let’s see if it works:
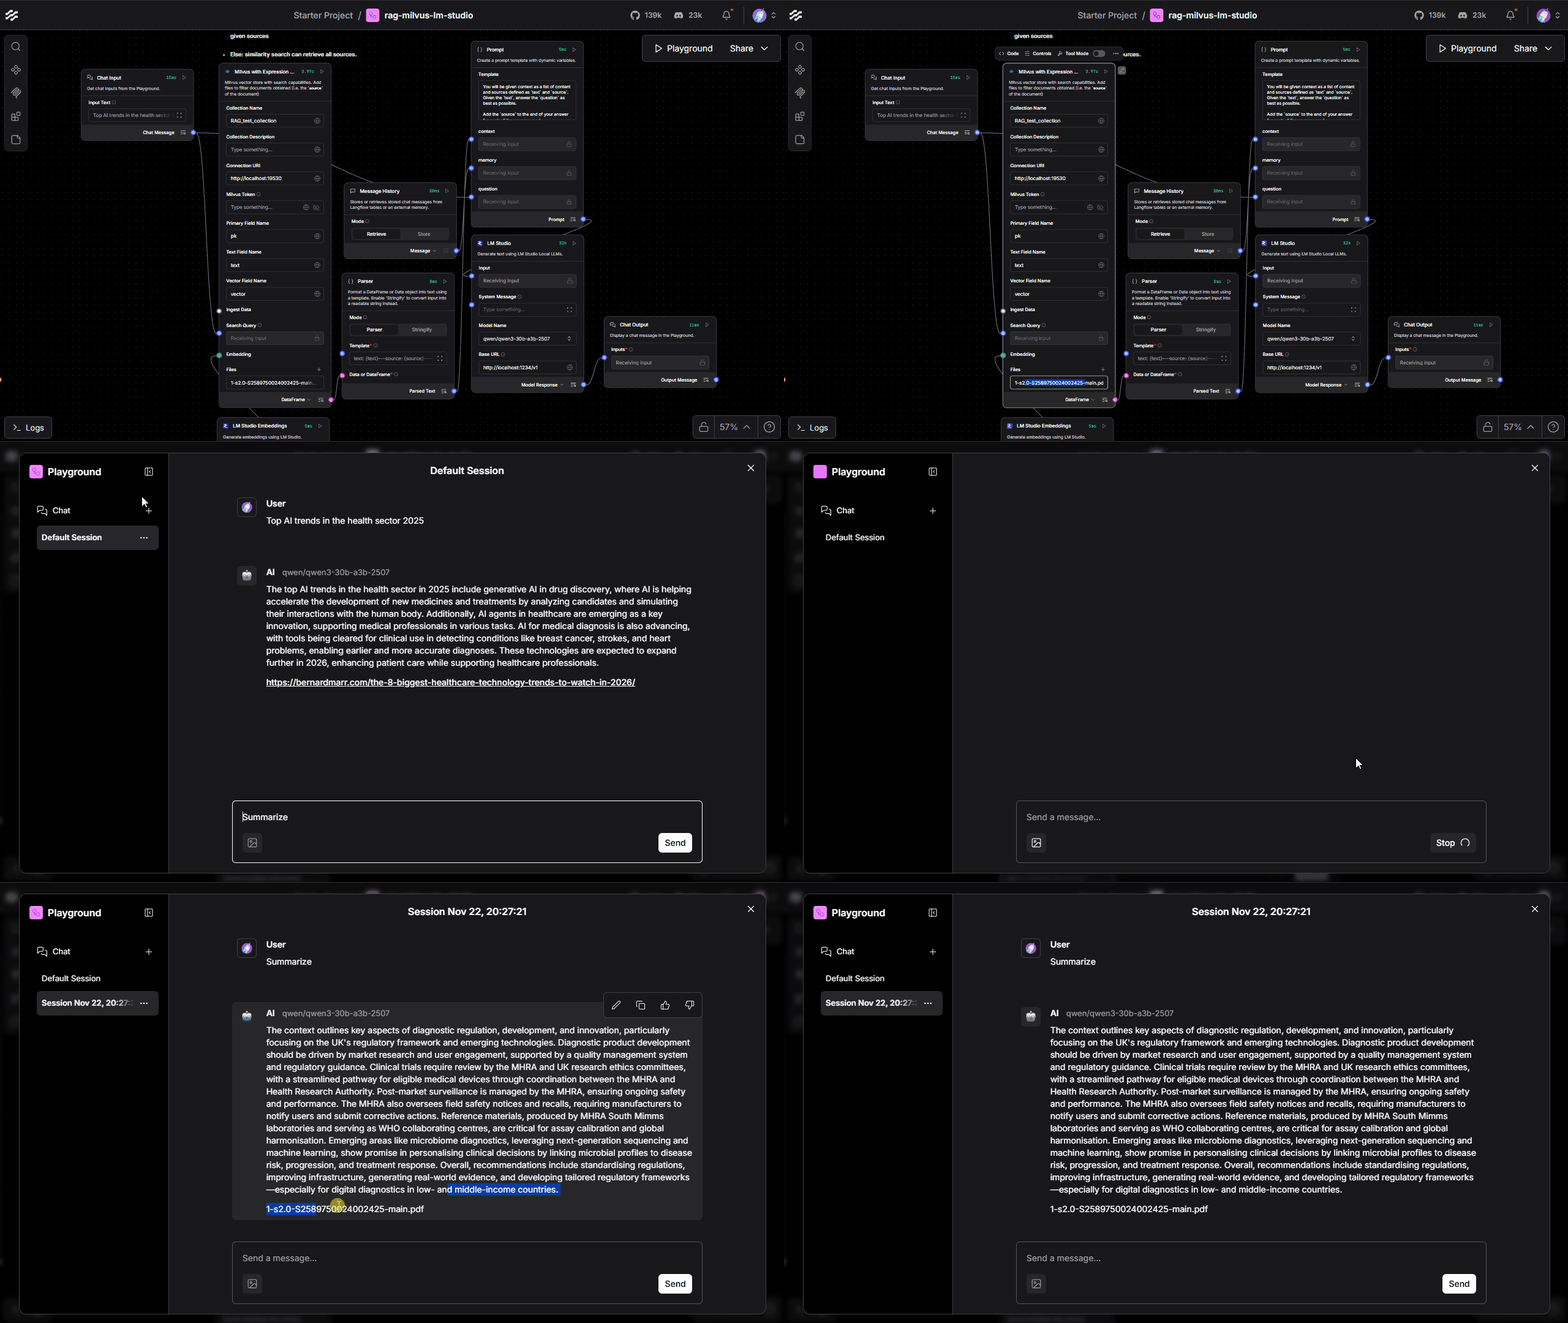
Using a custom filter expression for Milvus’s similarity search in Langflow
Great! Now, we can filter our searches to include whichever sources we want. We can select a few for focused research or select them all for getting a general understanding.
And now you might see why the little code button on top of each component is my favorite Langflow attribute. We can easily drag-and-drop the default components to create a system, then customize the components to better fit our needs. We can also create completely new components if the defaults aren’t enough to build off of.
And that’s it! ✨ I hope I showed you how easy it is to create and play with your own AI systems in Langflow. Happy building! 🤖
메타데이터
- post_id
- e22ca1e1dbcd
- slug
- local-rag-langflow-milvus-lm-studio-e22ca1e1dbcd
- url
- https://medium.com/@animakit/local-rag-langflow-milvus-lm-studio-e22ca1e1dbcd
- canonical_url
- https://medium.com/@animakit/local-rag-langflow-milvus-lm-studio-e22ca1e1dbcd
- author_url
- https://medium.com/@animakit
- status
- ok
- fetched_at
- 2026-07-16 18:50:24