Making Machine Learning Accessible: Building Interactive AI Demos with Gradio and Hugging Face BLIP
Build an AI image captioning app with Hugging Face BLIP and Gradio. Learn image understanding, caption generation, deployment, and…
Making Machine Learning Accessible: Building Interactive AI Demos with Gradio and Hugging Face BLIP
Build an AI image captioning app with Hugging Face BLIP and Gradio. Learn image understanding, caption generation, deployment, and real-world AI applications.

Introduction
Images, rich with untapped information, often come under the radar of search engines and data systems. Transforming this visual data into machine-readable language is no easy task, but it’s where image captioning AI is useful. Here’s how image captioning AI can make a difference:
- Improves accessibility: Helps visually impaired individuals understand visual content.
- Enhances SEO: Assists search engines in identifying the content of images.
- Facilitates content discovery: Enables efficient analysis and categorization of large image databases.
- Supports social media and advertising: Automates engaging description generation for visual content.
- Boosts security: Provides real-time descriptions of activities in video footage.
- Aids in education and research: Assists in understanding and interpreting visual materials.
- Offers multilingual support: Generates image captions in various languages for international audiences.
- Enables data organization: Helps manage and categorize large sets of visual data.
- Saves time: Automated captioning is more efficient than manual efforts.
- Increases user engagement: Detailed captions can make visual content more engaging and informative.
Learning objectives
At the end of this project, you will be able to:
- Implement an image captioning tool using the BLIP model from Hugging Face’s Transformers
- Use Gradio to provide a user-friendly interface for your image captioning application
- Adapt the tool for real-world business scenarios, demonstrating its practical applications
Setting up the environment and installing libraries
- Let’s set up the environment and dependencies for this project. Open up a new terminal and make sure you are in the
home/projectdirectory. - Open a new terminal:

Open a new terminal
Create a Python virtual environment and install Gradio using the following commands in the terminal:
pip3 install virtualenv
virtualenv my_env # create a virtual environment my_env
source my_env/bin/activate # activate my_env
Then, install the required libraries in the environment:
pip install langchain==0.1.11 gradio==5.23.2 transformers==4.38.2 bs4==0.0.2 requests==2.31.0 torch==2.2.1Have a cup of coffee, it will take 5 minutes.
      )  (
     (   ) )
      ) ( (
    _______)_
 .-'---------|
( C|/\/\/\/\/|
 '-./\/\/\/\/|
   '_________'
    '-------'
Now, your environment is ready to create Python files.

Generating image captions with the BLIP model
Introducing: Hugging Face, Transformers, and BLIP
- Hugging Face is an organization that focuses on natural language processing (NLP) and artificial intelligence (AI).
- The organization is widely known for its open-source library called “Transformers” which provides thousands of pre-trained models to the community.
- The library supports a wide range of NLP tasks, including translation, summarization, and text generation.
- Transformers have contributed significantly to the recent advancements in NLP, as it has made state-of-the-art models, such as BERT, GPT-2, and GPT-3, accessible to researchers and developers worldwide.The
- Transformers library includes a model that can be used to capture information from images.
- The BLIP, or Bootstrapping Language-Image Pre-training, model is a tool that helps computers understand and generate language based on images.
- It’s like teaching a computer to look at a picture and describe it, or answer questions about it.
Alright, now that you know what BLIP can do, let’s get started with implementing a simple image captioning AI app!
Step 1: Import your required tools from the transformers library
- You have already installed the package
transformersduring setting up the environment. - In the
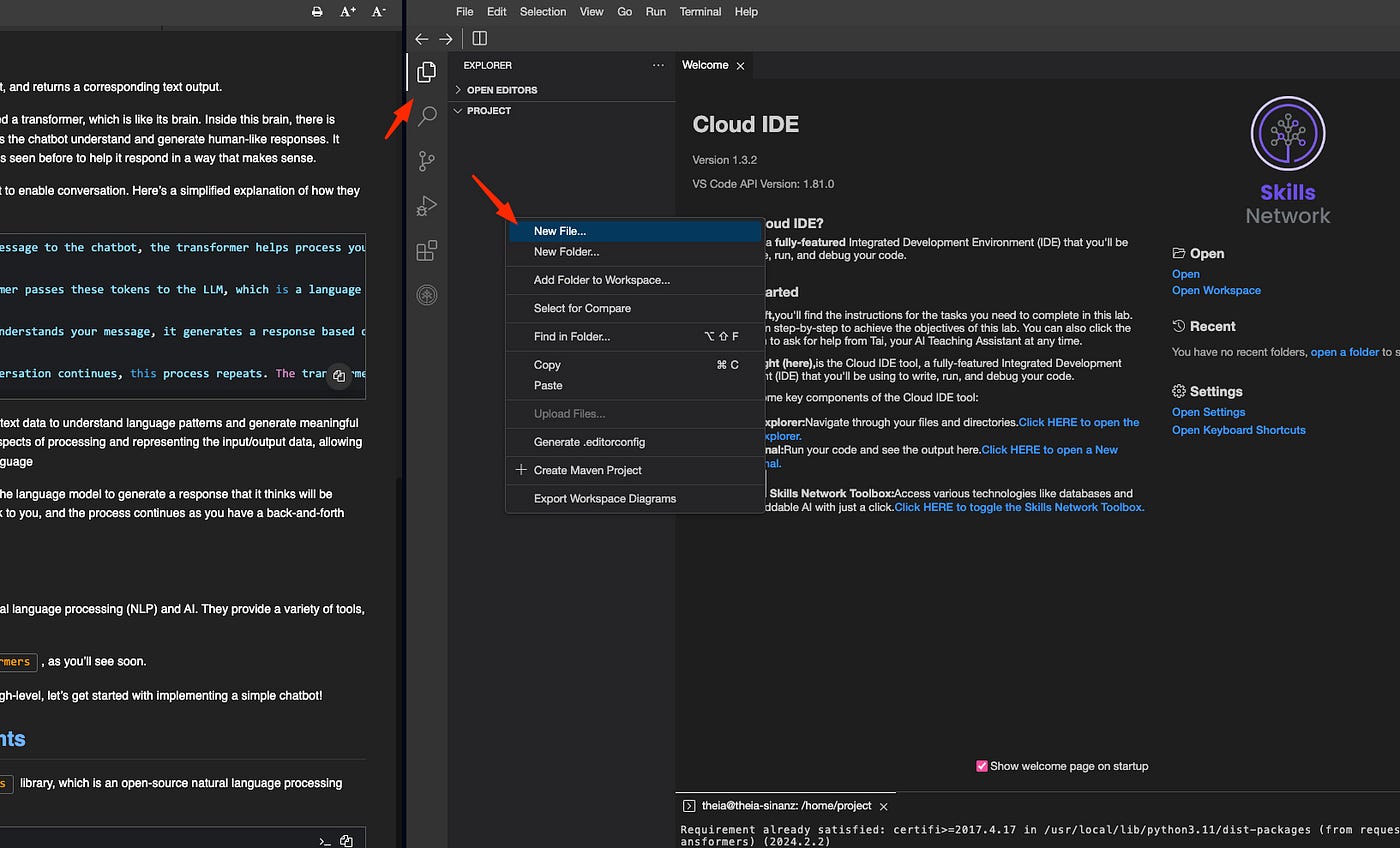
**projectdirectory, create a Python file, click on `File Explorer**, then right-click in the explorer area and selectNew File`. Name this new file**image_cap.py**. Copy the various code segments below and paste them into the Python file.
New file
You will be using **AutoProcessor and `BlipForConditionalGeneration** from thetransformers` library.
“AutoProcessor” and “BlipForConditionalGeneration” are components of the BLIP model, which is a vision-language model available in the Hugging Face Transformers library.
- AutoProcessor: This is a processor class that is used for preprocessing data for the BLIP model. It wraps a BLIP image processor and an OPT/T5 tokenizer into a single processor. This means it can handle both image and text data, preparing it for input into the BLIP model.
Note: A tokenizer is a tool in natural language processing that breaks down text into smaller, manageable units (tokens), such as words or phrases, enabling models to analyze and understand the text.
- BlipForConditionalGeneration: This is a model class that is used for conditional text generation, given an image and an optional text prompt. In other words, it can generate text based on an input image and an optional piece of text. This makes it useful for tasks like image captioning or visual question answering, where the model needs to generate text that describes an image or answer a question about an image.
import requests
from PIL import Image
from transformers import AutoProcessor, BlipForConditionalGeneration

# Load the pretrained processor and model
processor = AutoProcessor.from_pretrained("Salesforce/blip-image-captioning-base")
model = BlipForConditionalGeneration.from_pretrained("Salesforce/blip-image-captioning-base")
Step 2: Load and Preprocess an Image
After loading the processor and the model, you need to initialize the image to be captioned. The image data needs to be loaded and pre-processed to be ready for the model.
To load the image, right-click anywhere in the Explorer (on the left side of the code pane), and click Upload Files... (shown in the image below). You can upload any image from your local files and modify it img_path according to the name of the image.

In the next phase, you fetch an image, which will be captioned by your pre-trained model. This image can either be a local file or fetched from a URL. The Python Imaging Library, PIL, is used to open the image file and convert it into an RGB format which is suitable for the model.
# Load your image, DON'T FORGET TO WRITE YOUR IMAGE NAME
img_path = "YOUR IMAGE NAME.jpeg"
# convert it into an RGB format
image = Image.open(img_path).convert('RGB')
Next, the pre-processed image is passed through the processor to generate inputs in the required format. The return_tensors argument is set to “pt” to return PyTorch tensors.
# You do not need a question for image captioning
text = "the image of"
inputs = processor(images=image, text=text, return_tensors="pt")
You then pass these inputs into your model’s generate method. The argument **max_length=50** specifies that the model should generate a caption of up to 50 tokens in length.
The two asterisks () in Python are used in function calls to unpack dictionaries and pass items in the dictionary as keyword arguments to the function.
**inputsis unpacking the inputs dictionary and passing its items as arguments to the model.**
# Generate a caption for the image
outputs = model.generate(**inputs, max_length=50)
Finally, the generated output is a sequence of tokens. To transform these tokens into human-readable text, you use the decode method provided by the processor. The skip_special_tokens argument is set to True to ignore special tokens in the output text.
# Decode the generated tokens to text
caption = processor.decode(outputs[0], skip_special_tokens=True)
# Print the caption
print(caption)
Save your Python file and run it to see the result.
# image_cap.py

import requests
from PIL import Image
from transformers import AutoProcessor, BlipForConditionalGeneration

# Load the pretrained processor and model
processor = AutoProcessor.from_pretrained("Salesforce/blip-image-captioning-base")
model = BlipForConditionalGeneration.from_pretrained("Salesforce/blip-image-captioning-base")

# Load your image, DON'T FORGET TO WRITE YOUR IMAGE NAME
img_path = "myimage.png"
# convert it into an RGB format
image = Image.open(img_path).convert('RGB')

# You do not need a question for image captioning
text = "the image of"
inputs = processor(images=image, text=text, return_tensors="pt")

# Generate a caption for the image
outputs = model.generate(**inputs, max_length=50)

# Decode the generated tokens to text
caption = processor.decode(outputs[0], skip_special_tokens=True)
# Print the caption
print(caption)
Caption output
Image captioning app with Gradio
- Now that you understand the mechanism of image captioning, let’s create a proper application with an intuitive interface.
- You can utilize Gradio, a tool provided by Hugging Face, for this purpose. To begin, you will have a brief introduction to Gradio.
- Following that, as an exercise, you will be tasked with implementing the image captioning application using the Gradio interface.
Quickstart Gradio: Creating a simple demo
Let’s get familiar with Gradio by creating a simple app:
Still in the project directory, create a Python file, and name it hello.py.

Open hello.py, copy and paste the following Python code and save the file.
import gradio as gr

def greet(name):
    return "Hello " + name + "!"

demo = gr.Interface(fn=greet, inputs="text", outputs="text")

demo.launch(server_name="0.0.0.0", server_port= 7860)
The code creates a Gradio interface called demo using the gr.Interface class. It wraps the greet function with a simple text-to-text user interface that you could interact with.
The **gr.Interface** class is initialized with 3 required parameters:
- fn: the function to wrap a UI around
- inputs: which component(s) to use for the input (e.g., “text”, “image,” or “audio”)
- outputs: which component(s) to use for the output (e.g., “text”, “image” or “label”)
The last line demo.launch() launches a server to serve your demo.
Launching the demo app
Now go back to the terminal and make sure that the my_env virtual environment name is displayed at the beginning of the line.
Now run the following command to execute the Python script.
python3 hello.py

If you finish playing with the app and want to exit, press ctrl+c in the terminal and close the application tab.
You just had a first taste of the Gradio interface, it’s easy right? If you wish to learn a little bit more about customization in Gradio, you are invited to take the guided project called Bring your Machine Learning model to life with Gradio. You can find it under Courses & Projects on cognitiveclass.ai!
Exercise: Implement an image captioning app with Gradio
In this exercise, you will walk through the steps to create a web application that generates captions for images using the BLIP model and the Gradio library. Follow the steps below:
Step 1: Set up the environment
- Make sure you have the necessary libraries installed. Run
**pip install** **gradio transformers Pillow** to install Gradio, Transformers, and Pillow. - Import the required libraries:
Now, let’s create a new Python file and call it **image_captioning_app.py.**
import gradio as gr
import numpy as np
from PIL import Image
from transformers import AutoProcessor, BlipForConditionalGeneration
Step 2: Load the pretrained model
- Load the pretrained processor and model:
processor = # write your code here
model = # write your code here
Step 3: Define the image captioning function
- Define the
caption_imagefunction that takes an input image and returns a caption:
def caption_image(input_image: np.ndarray):
    # Convert numpy array to PIL Image and convert to RGB
   raw_image = Image.fromarray(input_image).convert('RGB')

    # Process the image
    input = processor(raw_image, return_tensors="pt")

    # Generate a caption for the image
    output = model.generate(**input, max_length=50)

    # Decode the generated tokens to text and store it into `caption`
    caption = processor.decode(outputs[0], skip_special_tokens=True)

    return caption
Step 4: Create the Gradio interface
- Use the
gr.Interfaceclass to create the web app interface:
iface = gr.Interface(
    fn=caption_image,
    inputs=gr.Image(),
    outputs="text",
    title="Image Captioning",
    description="This is a simple web app for generating captions for images using a trained model."
)
Step 5: Launch the Web App
- Start the web app by calling the
launch()method:
iface.launch()# image_captioning_app.py
import gradio as gr
import numpy as np
from PIL import Image
from transformers import AutoProcessor, BlipForConditionalGeneration
processor = AutoProcessor.from_pretrained("Salesforce/blip-image-captioning-base")
model = BlipForConditionalGeneration.from_pretrained("Salesforce/blip-image-captioning-base")
def caption_image(input_image: np.ndarray):
# Convert numpy array to PIL Image and convert to RGB
raw_image = Image.fromarray(input_image).convert('RGB')
# Process the image
input = processor(raw_image, return_tensors="pt")
# Generate a caption for the image
output = model.generate(**input, max_length=50)
# Decode the generated tokens to text and store it into `caption`
caption = processor.decode(outputs[0], skip_special_tokens=True)
return caption
iface = gr.Interface(
fn=caption_image,
inputs=gr.Image(),
outputs="text",
title="Image Captioning",
description="This is a simple web app for generating captions for images using a trained model."
)
iface.launch()Step 6: Run the application
- Save the complete code to a Python file, for example,
**image_captioning_app.py**. - Open a terminal or command prompt, navigate to the directory where the file is located, and run the command
python3 image_captioning_app.py(my_env) theia@theia-patelparth31:/home/project$ python3 image_captioning_app.py
/home/project/my_env/lib/python3.10/site-packages/huggingface_hub/file_download.py:949: FutureWarning: `resume_download` is deprecated and will be removed in version 1.0.0. Downloads always resume when possible. If you want to force a new download, use `force_download=True`.
warnings.warn(
* Running on local URL: http://127.0.0.1:7860
To create a public link, set `share=True` in `launch()`.You will have such output in the new windows:

- When the submit button is entered, then show the caption output

If you are running locally: Interact with the web App:
- The web app should start running and display a URL where you can access the interface.
- Open the provided URL in a web browser (in the terminal).
- You should see an interface with an image upload box.
Congratulations! You have created an image captioning web app using Gradio and the BLIP model. You can further customize the interface, modify the code, or experiment with different models and settings to enhance the application’s functionality.
Conclusion
Congratulations on completing this guided project! You have now mastered image captioning AI using Gradio.
메타데이터
- post_id
- e2b56fb642cf
- slug
- making-machine-learning-accessible-building-interactive-ai-demos-with-gradio-and-hugging-face-blip-e2b56fb642cf
- url
- https://medium.com/@codingsprints/making-machine-learning-accessible-building-interactive-ai-demos-with-gradio-and-hugging-face-blip-e2b56fb642cf
- canonical_url
- https://medium.com/@codingsprints/making-machine-learning-accessible-building-interactive-ai-demos-with-gradio-and-hugging-face-blip-e2b56fb642cf
- author_url
- https://medium.com/@codingsprints
- status
- ok
- fetched_at
- 2026-07-17 19:48:49