Build a Keyword Search Engine on Azure Blob Storage — Without Writing a Single Line of Code
Using Azure AI Search’s import wizard to index and query unstructured documents in minutes.
Build a Keyword Search Engine on Azure Blob Storage — Without Writing a Single Line of Code
Using Azure AI Search’s import wizard to index and query unstructured documents in minutes.
Azure — Developer — 5 min read — May 2026
If you’ve ever needed to search through hundreds of PDFs, Word documents, or text files stored in Azure Blob Storage, Azure AI Search is your answer. It can crawl your storage, extract content, and expose a powerful keyword search API — all through a point-and-click wizard. Here’s how to set it up end-to-end.
Prerequisites
You’ll need an Azure Blob Storage account with your documents already uploaded, and an Azure AI Search service provisioned. Both should be in the same Azure subscription — ideally the same region to avoid egress costs.
Step 1 — Grant the search service access to your storage
Before the indexer can read your blobs, the AI Search service needs permission to do so. Head to your storage account’s Access Control (IAM) blade and add a role assignment:
- Role: Storage Blob Data Reader
- Assign access to: Managed identity
- Select your AI Search service from the list
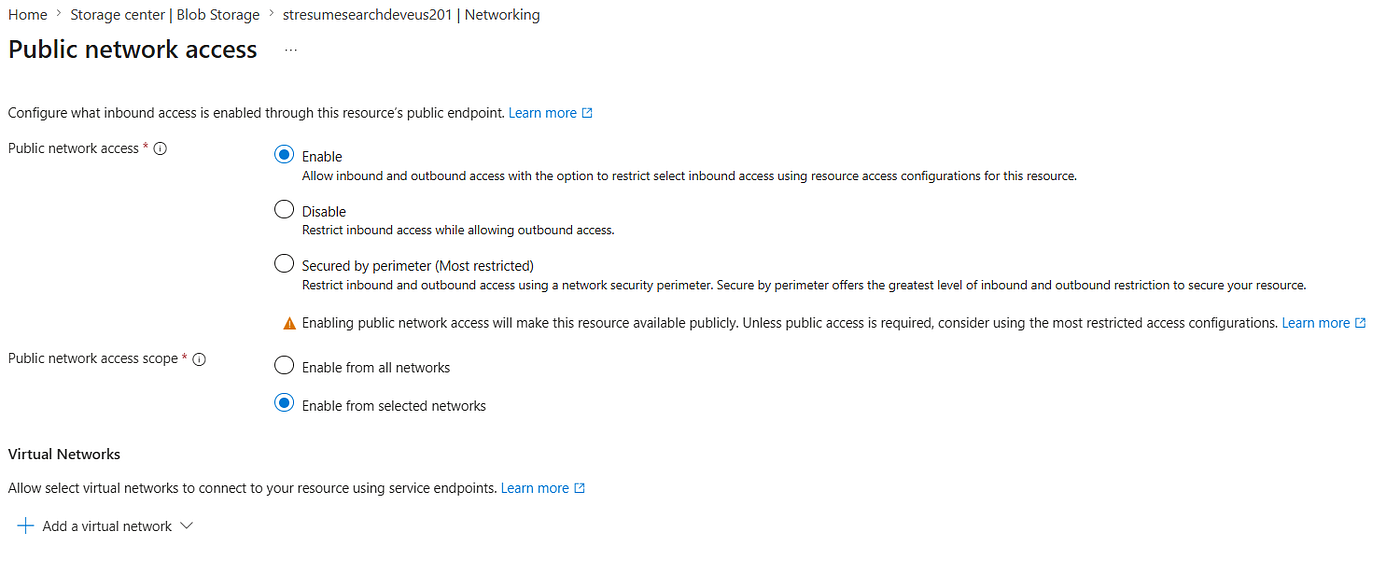
Restricted network? If your storage account is set to “Enable access only to selected networks,” you must also add a Resource Instance exception. Go to the storage account’s Networking blade → Resource instances section → set resource type to Microsoft.Search/searchServices and select your search service. Without this, the indexer will be blocked even with the role assignment in place.
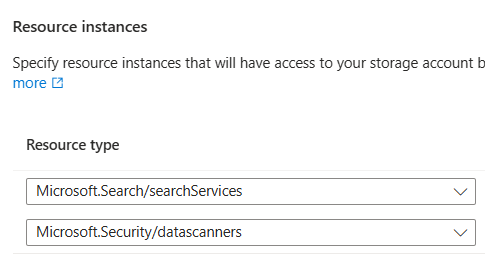
Add Search Service
Step 2 — Import data into Azure AI Search
Now switch to your Azure AI Search resource. From the Overview blade, click Import data at the top. This launches a guided wizard.
- Connect to your data
Choose Azure Blob Storage as the data source. Authenticate using your managed identity (recommended) or a connection string. Select the container and optionally specify a folder prefix to limit what gets indexed.
- Choose the keyword search scenario
On the “Add cognitive skills” step, select the Keyword search scenario. This skips AI enrichment (OCR, entity recognition, etc.) and sets up a straightforward full-text index — ideal for text-based documents where you just need fast keyword lookup.
- Customize the index fields
The wizard auto-detects fields from your blob metadata (file name, content type, last modified date, etc.). Review these and mark which fields should be searchable, filterable, or retrievable. The content field — the full text of your documents — should always be marked searchable.
- Configure the indexer schedule
Decide how often the indexer should run. Options range from once (manual trigger) to Hourly or Daily. Choose based on how frequently your blobs are updated — daily is a sensible default for most document stores.
- Submit and wait
Click Submit. Azure will create two resources: an Index (the searchable data store) and an Indexer (the crawler that populates it). Both appear under Search management in the left nav.
Step 3 — Verify the indexer ran successfully
Navigate to Search management → Indexers. You’ll see your newly created indexer with a status column. Wait for it to show Success — this means all documents have been extracted and indexed. If it shows a warning or error, click into it to see which documents failed and why (common causes: unsupported file types, permissions issues).
Good to know — The indexer’s execution history shows exactly how many documents were processed, skipped, or failed. A few skipped items are normal — zero-byte files or unsupported formats are silently ignored.
Step 4 — Run your first search
Go to Search management → Indexes and click your index. The Search explorer tab lets you test queries directly in the portal. Type any keyword and hit Search — results come back as JSON, showing the matching documents and their metadata fields.
For production use, you can query the index via the Search REST API or the Azure SDK with a simple HTTP GET or POST — no infrastructure to manage.
What you’ve built
With just a few clicks you now have a fully managed search pipeline: blobs flow into an index automatically on a schedule, and any application can query it over HTTPS. Azure AI Search handles tokenization, language analysis, and ranking behind the scenes.
From here you can extend the setup with semantic ranking, filters on metadata fields, or AI-powered enrichment (OCR for scanned PDFs, key phrase extraction, translation) — all additive to the same index.
메타데이터
- post_id
- e2d4432b0dad
- slug
- build-a-keyword-search-engine-on-azure-blob-storage-without-writing-a-single-line-of-code-e2d4432b0dad
- url
- https://medium.com/@dhanaangs10/build-a-keyword-search-engine-on-azure-blob-storage-without-writing-a-single-line-of-code-e2d4432b0dad
- canonical_url
- https://medium.com/@dhanaangs10/build-a-keyword-search-engine-on-azure-blob-storage-without-writing-a-single-line-of-code-e2d4432b0dad
- author_url
- https://medium.com/@dhanaangs10
- status
- ok
- fetched_at
- 2026-07-09 03:40:04