Cross-Tenant Virtual Network (VNet) Peering — Azure
Why is this needed?
Cross-Tenant Virtual Network (VNet) Peering — Azure
Why is this needed?
Whenever you want resources to communicate with each other, they should be able to reach one another. Azure provides several networking options to control and enable traffic between resources.
If you’re here, I’m assuming you’re already familiar with Virtual Network Peering. When both VNets are present in the same subscription (or even within the same tenant), peering them is fairly straightforward. The only important requirement is that their address spaces must not overlap, otherwise the peering cannot be established.
The same concept can also be applied when your VNets are present in different Microsoft Entra tenants (cross-tenant). Let’s see how we can configure that.
Prerequisites
Before you begin, make sure you:
- Have access to both Microsoft Entra tenants.
- Have subscription-level permissions on both subscriptions (such as Owner, Contributor, or Network Contributor/Network Access Administrator).
- Can switch between both directories from the Azure portal.
When you click on Switch Directory, you should be able to see both directories.
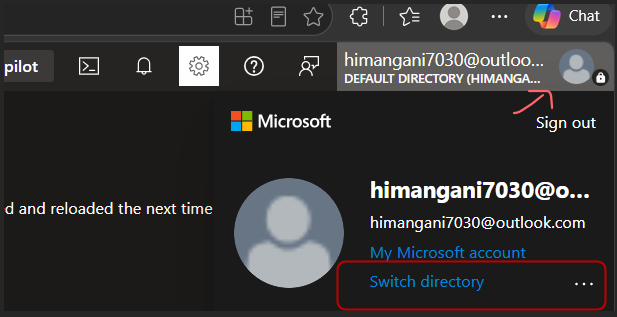
Snippet(Demo)

Scenario
For this article, I’m using the following setup:
- Source VNet → Tenant A → Subscription A
- Target VNet → Tenant B → Subscription B
Step 1: Create the peering from the Source VNet
Go to your Source VNet (Subscription A)
Left menu → Peerings → Add


This is the most important step. Click on “I know my resource ID.”

Now, go to your Target VNet (the VNet you want to peer with).
Navigate to: Properties → Copy the Resource ID Paste it into the Resource ID field, as shown below.

Once you paste the Resource ID, Azure will ask you to select the directory where the target VNet resides. Authenticate using an account that has access to that tenant and subscription.


At this point, you’ll still notice a yellow warning indicating that the peering isn’t established yet.
This is expected.
Azure has successfully identified the target VNet and allowed you to reference it, but the connection is not complete yet.
Unlike peering within the same subscription, cross-tenant VNet peering must be initiated from both sides. The target tenant also needs to authenticate and create its side of the peering.

Step 2: Create the peering from the Target VNet
Now repeat the same process, but this time from the Target VNet (Tenant B / Subscription B).

Copy the Resource ID of the Source VNet, paste it, and authenticate with the appropriate directory.

Once completed successfully, the peering status will show as Fully Synchronized.

Now go back to the Source VNet and refresh the page. It should also display Fully Synchronized.

And That is it!
Your cross-tenant VNet peering is now successfully established, and the resources in both VNets can communicate based on your configured Network Security Groups (NSGs), User Defined Routes (UDRs), and firewall rules.
If one of your VNets is connected to a Virtual Network Gateway, you can also configure gateway transit and use remote gateway options (where applicable) to allow gateway traffic to flow across the peering, depending on your network architecture.
메타데이터
- post_id
- e34ebab2122d
- slug
- cross-tenant-virtual-network-vnet-peering-azure-e34ebab2122d
- url
- https://medium.com/@himawrites/cross-tenant-virtual-network-vnet-peering-azure-e34ebab2122d
- canonical_url
- https://medium.com/@himawrites/cross-tenant-virtual-network-vnet-peering-azure-e34ebab2122d
- author_url
- https://medium.com/@himawrites
- status
- ok
- fetched_at
- 2026-07-19 13:52:23



