Analyzing Mobile Application HTTP/S Traffic Using Burp Suite and Frida
This article covers Burp proxy configuration, Burp CA certificate injection into Android System Trust Store, network proxy configuration on…
Analyzing Mobile Application HTTP/S Traffic Using Burp Suite and Frida
This article covers Burp proxy configuration, Burp CA certificate injection into Android System Trust Store, network proxy configuration on rooted Android device and SSL Pinning bypass using Objection toolkit for Frida.
The security research presented on this article was conducted on personal accounts and devices that I own. No TP-Link systems were compromised or enumerated while compiling this article.
Table of Contents
- Prerequisites
- Configure Burp Proxy to Intercept HTTP/S Traffic
- Configuring Proxy Listener
- Export Burp CA Certificates
- Preparing Burp Certificate for Android
- Loading Burp Certificate on Android Device
- Setting Up a Proxy on Android Phone
- Intercepting Traffic of a Mobile Application
- SSL Pinning
- Bypassing SSL Pinning
- Conclusion
- Resources
Prerequisites
Devices used for demonstration purposes:
- Android device, rooted via Magisk.
- Laptop with Arch Linux installed as a host OS.
On the host machine, a few packages need to be installed beforehand:
android-toolsBurp Suite(available via AUR on Arch Linux)uv(Python package and project manager, needed for Frida)
A few configurations need to be made (both on host and Android device):
- On Android device: USB debugging enabled in developer options:

- On host machine: connect Android phone via USB and verify that Android Debug Bridge (ADB) on host recognizes the device:

Configure Burp Proxy to Intercept HTTP/S Traffic
Configuring Burp Suite’s proxy enables “to intercept, view and modify all the HTTP/S requests and responses processed by the mobile app”, allowing to conduct penetration tests on such an application just like one would test a security situation of an ordinary website¹’².
One important aspect to mention is Burp’s Certificate Authority (CA). Citing documentation on Portswigger, “Burp generates its own TLS certificate for each host, signed by its own Certificate Authority (CA)”. Obtaining Burp’s certificate and injecting it into Android’s System Trust Store — located at /system/etc/security/cacerts — can aid with HTTPS traffic analysis since, by default, Android applications trust and use system certificates for initiating some of secure network connections. With Burp certificate injected into the System store, Burp proxy can intercept the HTTP/S traffic, read and modify the requests, essentially bypassing the layer of TLS. However, not all of the mobile application’s traffic is secured with the certificates available at the Android system store — some applications use their own subset of valid CA certificates. Such a method is called SSL pinning and is analyzed later on³’⁴.
Configuring Proxy Listener
Configure Burp proxy listener on host machine, so that network traffic of a mobile application could be intercepted.
- Open settings and select
Tools -> Proxy² - Under
Proxy listeners, click add²:
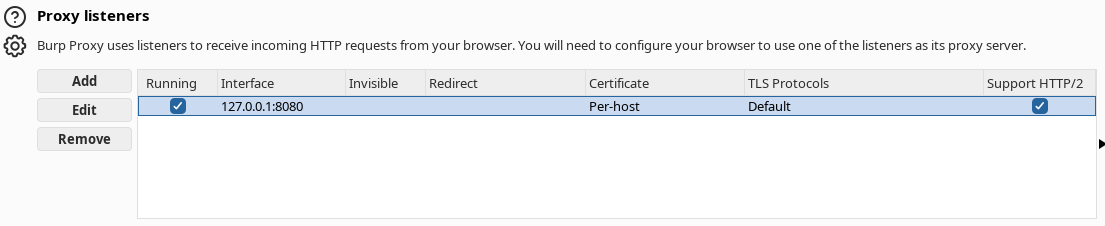
Setting up a new proxy listener
- For demonstration purposes, bind to port
1234and to all interfaces²:

- Click
OKto save changes².
Export Burp CA Certificates
When CA certificate from Burp Suite is loaded onto Android System Trust Store, Burp can “impersonate the target web server during the TLS handshake” with the targeted Android application and intercept HTTPS traffic in plain text².
The process of exporting Burp CA certificates is as follows²:
- Go to
Tools -> Proxyand selectImport/export CA certificate²:

Export Burp CA certificate
- In
Exportsection, selectCertificate in DER format²:

Export Burp CA certificate in DER format
- Save file as
cacert.der²:

Export Burp CA certificate as cacert.der
Preparing Burp Certificate for Android
Certificates in Android System Trust Store are stored in Privacy-Enhanced Mail (PEM) format and follows filename pattern of <certificate-hash>.0 ⁵.
- Converting Burp certificate into PEM format with
openssl:
openssl x509 -inform DER -in cacert.der -out cacert.pem- Rename certificate to follow the correct filename pattern:
#!/bin/sh

cert_name="cacert.pem";
cert_hash=$(openssl x509 -inform PEM -subject_hash_old -in ${cert_name} | head -1)
printf "%s => %s.0\n" "${cert_name}" "${cert_hash}"
cp "${cert_name}" "${cert_hash}.0"
This results in a certificate with name 9a5ba575.0.
Loading Burp Certificate on Android Device
Note: Android device needs to be rooted in order to successfully complete this step.
- Push certificate into Android phone:
adb push 9a5ba575.0 /sdcard/- Use a slightly modified script from
httptoolkitto inject Burp certificate into Android System’s certificate store⁶ (also found on a Github thread here⁷):
# Create a separate temp directory, to hold the current certificates
# Without this, when we add the mount we can't read the current certs anymore.
mkdir -p -m 700 /data/local/tmp/htk-ca-copy

# Copy out the existing certificates
cp /system/etc/security/cacerts/* /data/local/tmp/htk-ca-copy/

# Create the in-memory mount on top of the system certs folder
mount -t tmpfs tmpfs /system/etc/security/cacerts

# Copy the existing certs back into the tmpfs mount, so we keep trusting them
mv /data/local/tmp/htk-ca-copy/* /system/etc/security/cacerts/

# Copy our new cert in, so we trust that too
cp /sdcard/9a5ba575.0 /system/etc/security/cacerts/

# Update the perms & selinux context labels, so everything is as readable as before
chown root:root /system/etc/security/cacerts/*
chmod 644 /system/etc/security/cacerts/*
chcon u:object_r:system_file:s0 /system/etc/security/cacerts/*

# Delete the temp cert directory
rm -r /data/local/tmp/htk-ca-copy- Save the script as
cert.shand push to Android device,/sdcard/directory:
adb push cert.sh /sdcard/- Enter ADB shell as root and move the script to
/data/local/tmp/directory with a change of it’s ownership and permissions:
adb shell
su # Switch to root
mv /sdcard/cert.sh /data/local/tmp/ && cd /data/local/tmp/
chown root:root cert.sh # Change ownership to root
chmod 755 cert.sh #-rwxr-xr-x- Run
cert.shto inject Burp SSL certificate to Android System Trust Store:
adb shell
su # Switch to root
cd /data/local/tmp/
./cert.sh
Note: cert.sh needs to be re-run on each reboot of Android phone.
Setting Up a Proxy on Android Phone
With Burp Suite’s proxy listener set up and Burp CA certificates loaded onto Android, the phone needs to be configured to route all it’s network traffic through the Burp proxy. It can be done in the following way:
- Connect Android phone to Wi-Fi:

Select local Wi-Fi network
- Open Wi-Fi network details and select
Proxy -> Manual:

Select manual proxy configuration
- Enter hostname (IP address of a host machine with Burp proxy listener) and port number (in this demonstration — 1234):

Enter proxy settings (hostname and IP address)
- Save the manual proxy settings.
The proxy can also be set up using adb:
adb shell settings put global http_proxy <host-machine-ip>:1234Intercepting Traffic of a Mobile Application
For demonstration purposes, TP-Link Tapo application⁸ is installed and tested on a physical Android device that is rooted using Magisk.
Before going any further, allow Burp Suite to intercept HTTP/S traffic of the Android device’s proxy:

Allow Burp Suite to intercept network traffic of the Android device’s proxy
One important thing to note is that having Burp CA certificates injected into Android System Trust Store and Burp proxy configured works only on HTTP/S traffic that actually uses the certificates installed on Android system and for better security, certain applications use SSL pinning.
SSL Pinning
SSL pinning is a security technique that allows a subset of valid and trusted SSL/TLS certificates to be hard-coded into an application. The client later uses these certificates to verify the legitimacy of a remote server — if the server has a valid certificate, then it can be trusted for communication⁹.
For some of the requests, the Tapo application uses certifications loaded to the system certificate store. For example, logging into a Tapo account and navigating through the application shows it sending several HTTP requests to a number of endpoints on TP-Link’s cloud servers:

However, any requests that use TP-Link’s own hard-coded certificates would not show up here as Burp’s certificate is not a valid certificate for Tapo application. However, SSL pinning can be bypassed by using Frida.
Bypassing SSL Pinning
Tapo application uses standard okhttp3 HTTP client and the client’s CertificatePinner class for SSL pinning, which means that objection toolkit for Frida should be able to successfully bypass SSL Pinning⁹’¹⁰.
A sample workflow for SSL pinning bypass with Frida is presented below:
- Check CPU architecture of Android device:
adb shell getprop ro.product.cpu.abi # arm64-v8a for most Android devices- Download latest Frida server release for the appropriate architecture¹¹.
- Unpack downloaded Frida archive:
unxz frida-server-<version>-android-arm64.xz- Rename binary to
frida-server:
mv frida-server-<version>-android-arm64 frida-server- Make the binary executable:
chmod +x frida-server- Push Frida server onto the Android device:
adb push frida-server /data/local/tmp/- Update the binary’s permissions on Android device:
adb shell "chmod 755 /data/local/tmp/frida-server"- Start
frida-serverand background the process:
adb shell "su -c '/data/local/tmp/frida-server &'"- Check whether the relevant process is active:
adb shell "ps -A | grep frida-server"With Frida server up and running on Android device, a Frida client with objection toolkit have to be set up on a host machine:
- Create a separate directory for Frida client:
mkdir frida/ && cd frida/- Initialize new project with
uv:
uv init- Install
frida-toolsandobjection:
uv tool install frida-tools objection- Objection toolkit connects to a running Tapo application via Tapo’s process identifier (PID)⁸:
#!/bin/sh

pid=$(uv run frida-ps -U | grep -i Tapo | cut -d " " -f 1)
uv run objection -g "${pid}" explore- Lastly,
android sslpinning disablemethod allowsCertificatePinnerclass to be effectively bypassed⁹’¹².
With a successful bypass of SSL pinning, Burp should be able to intercept HTTPS requests that use TP-Link’s own hard-coded certificates, as well as HTTPS requests that use the certificates from Android System Trust Store.
Conclusion
This article is an attempt at presenting a clear and concise approach on setting up a security research environment that would enable efforts on mobile application security analysis. Covered topics include:
- Proxy setup on Android device.
- Mobile application’s HTTP/S traffic interception with Burp proxy.
- Burp Suite CA certificate injection into Android’s System Trust Store.
- Using Frida Objection toolkit to bypass SSL/TLS pinning.
Resources
- Mobile testing with Burp Suite, https://portswigger.net/burp/documentation/desktop/mobile
- Configuring an Android device to work with Burp Suite, https://portswigger.net/burp/documentation/desktop/mobile/config-android-device
- Installing Burp’s CA certificate, https://portswigger.net/burp/documentation/desktop/external-browser-config/certificate
- Network security configuration, https://developer.android.com/privacy-and-security/security-config
- Filenames in cacert directory, https://android.googlesource.com/platform/system/ca-certificates/+/refs/heads/master/README.cacerts
- New ways to inject system CA certificates in Android 14, https://httptoolkit.com/blog/android-14-install-system-ca-certificate/#how-to-install-system-ca-certificates-in-android-14
- Github thread on generating Burp certificates, https://gist.github.com/TobiasS1402/226f2923ae4cf08652d3fd74cdbb61ff
- TP-Link Tapo application, https://play.google.com/store/apps/details?id=com.tplink.iot
- Reverse engineering TP-Link Tapo’s REST API — part 1, https://dev.to/ad1s0n/reverse-engineering-tp-link-tapos-rest-api-part-1-4g6
- Objection — Runtime Mobile Exploration, https://github.com/sensepost/objection
- Frida release list (starting from latest), https://github.com/frida/frida/releases
- Bypassing Certificate Pinning with Frida and Objection: A Step-by-Step Guide, https://thexssrat.medium.com/bypassing-certificate-pinning-with-frida-and-objection-a-step-by-step-guide-def19bb2c880
메타데이터
- post_id
- e3e91c085e91
- slug
- analyzing-mobile-application-http-s-traffic-using-burp-suite-and-frida-e3e91c085e91
- url
- https://meetcyber.net/analyzing-mobile-application-http-s-traffic-using-burp-suite-and-frida-e3e91c085e91
- canonical_url
- https://meetcyber.net/analyzing-mobile-application-http-s-traffic-using-burp-suite-and-frida-e3e91c085e91
- author_url
- https://medium.com/@kostasereksonas
- status
- ok
- fetched_at
- 2026-07-13 06:23:13