Building a Login System with FastAPI, Google OAuth, and JWT
Watch it on YouTube: https://youtu.be/2mEwwyvoVgM?si=z_b3JH42wSHiJk50
Building a Login System with FastAPI, Google OAuth, and JWT
Watch it on YouTube: https://youtu.be/2mEwwyvoVgM?si=z_b3JH42wSHiJk50
Not a premium member, read here for free: https://sagarsangwan.vercel.app/blogs/building-a-login-system-with-fastapi-google-oauth-and-jwt
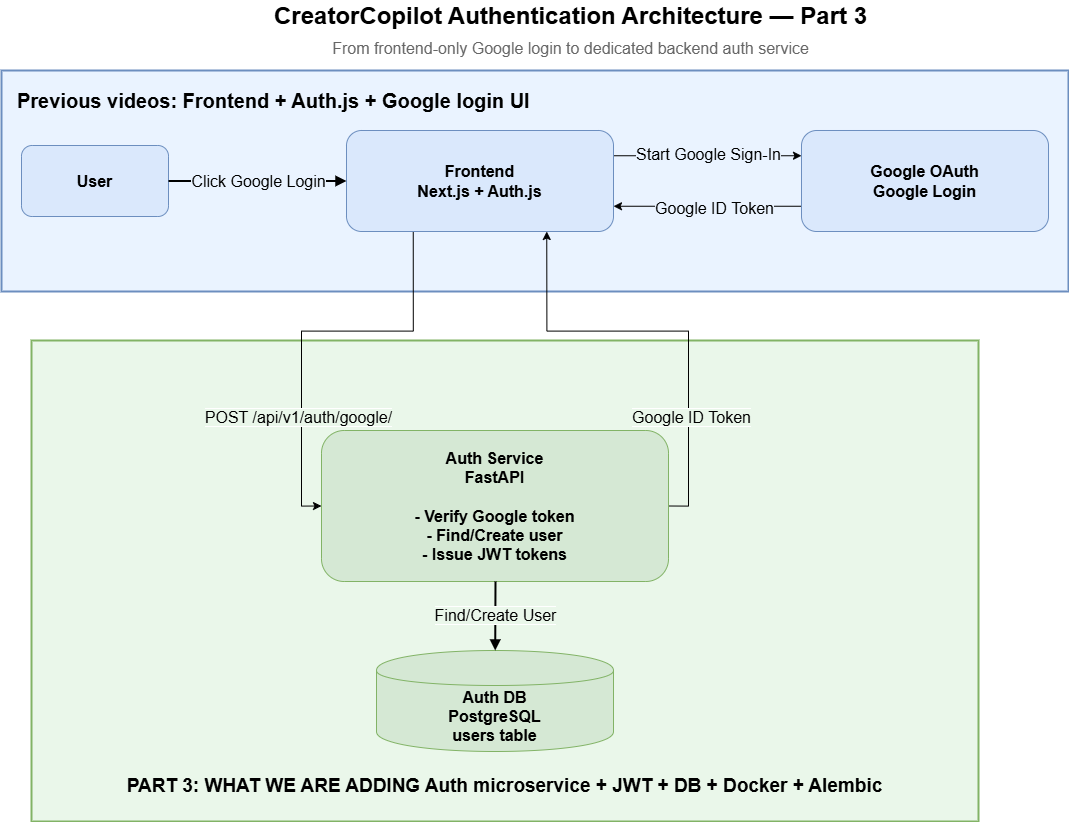
In this part of the CreatorCopilot series, we are building a dedicated authentication service using Python FastAPI.
In the previous part, the frontend Google login was already implemented using Next.js and Auth.js. Now, instead of keeping authentication logic tightly coupled with the frontend, we will move the backend authentication flow into a standalone Auth Microservice.
This service will handle:
- Google ID token verification
- User creation or lookup
- JWT access token generation
- JWT refresh token generation
- Refresh token endpoint
- Standalone local execution using Uvicorn
The goal is simple: build an auth service that can run independently before we connect it with Docker, PostgreSQL containers, or a gateway.
What We Are Building
Inside the services folder, we will create a new auth-service.
The final service will contain:
services/
└── auth-service/
    ├── app/
    │   ├── main.py
    │   ├── core/
    │   │   ├── config.py
    │   │   ├── database.py
    │   │   └── security.py
    │   ├── db/
    │   │   └── user_model.py
    │   ├── schemas/
    │   │   └── auth_schemas.py
    │   └── api/
    │       └── v1/
    │           └── routes.py
    ├── requirements.txt
    ├── .env.sample
    └── .gitignore
The service will expose two main endpoints:
POST /api/v1/auth/google/
POST /api/v1/auth/token/refresh/
Step 0: Starting Point
From the root of the project:
cd /Users/sagar/projects/creatorcopilot/code-creatorcopilot
ls
Expected folders:
frontend
gateway
infra
services
The frontend already has Google login working from the previous part. Now we are building the backend authentication service.
Step 1: Create the Basic FastAPI Auth Service
First, create the basic folder and main.py file:
mkdir-p services/auth-service/app
touch services/auth-service/app/__init__.py
touch services/auth-service/app/main.py
Now add the initial FastAPI app.
from fastapi import FastAPI
# Basic FastAPI app. We are starting with a simple health endpoint.
app=FastAPI(
title="Auth Microservice",
version="1.0.0",
description="Handles user authentication, Google OAuth, and JWT management.",
)
@app.get("/")
defindex():
# Simple health check endpoint
return {"message":"auth service is running"}
At this point, the service only has a root endpoint. This is intentional. When building a microservice, it is better to start with a small working service and then add features step by step.
Step 2: Add Requirements and Environment Files
Now create the dependency and environment files:
touch services/auth-service/requirements.txt
touch services/auth-service/.gitignore
touch services/auth-service/.env.sample
Add dependencies:
fastapi
uvicorn
gunicorn # Production readiness ke liye process manager style usage
python-jose[cryptography] # JWT encode/decode
httpx # HTTP client, OAuth related integrations me useful
SQLAlchemy # ORM
psycopg2-binary # PostgreSQL driver
requests
pydantic
dotenv
google-auth
google-auth[httpx]
alembic
Add .gitignore:
.env
.pyenv
.venv
__pycache__
Add .env.sample:
GOOGLE_CLIENT_ID={from_google_developer_console}
JWT_SECRET_KEY={same_that_we_use_in_gateway_for_now}
DB_USER={database_user}
DB_PASSWORD={database_password}
DB_HOST={database_host}
DB_PORT=5432
DB_NAME={database_name}
DATABASE_URL=postgresql://${DB_USER}:${DB_PASSWORD}@${DB_HOST}:${DB_PORT}/${DB_NAME}
The .env.sample file acts as a reference. Real secrets should go inside .env, which is ignored by Git.
The important variables are:
GOOGLE_CLIENT_ID
JWT_SECRET_KEY
DATABASE_URL
GOOGLE_CLIENT_ID is required for Google token verification.
JWT_SECRET_KEY is used for signing access and refresh tokens.
DATABASE_URL is used by SQLAlchemy and later by Alembic.
Step 3: Add the Config File
Now create the core config folder:
mkdir-p services/auth-service/app/core
touch services/auth-service/app/core/__init__.py
touch services/auth-service/app/core/config.py
Add the config code:
import os
from dotenv import load_dotenv
# Load .env values into runtime environment
load_dotenv()
classsettings:
# Shared secret used for signing and verifying HS256 JWT tokens
JWT_SECRET_KEY:str=os.getenv("JWT_SECRET_KEY")
# HS256 is simple for standalone service
# Later, RS256 can be used for gateway and microservice verification
JWT_ALGORITHM:str="HS256"
# Database connection URL used by SQLAlchemy and Alembic
DATABASE_URL:str=os.getenv("DATABASE_URL")
# Google OAuth client ID used for audience validation
GOOGLE_CLIENT_ID:str=os.getenv("GOOGLE_CLIENT_ID")
# Access token expiry time
ACCESS_TOKEN_EXPIRE_MINUTES:int=50
# Refresh token expiry time
REFRESH_TOKEN_EXPIRE_DAYS:int=7
settings=settings()
Here we are using HS256 for JWT signing.
HS256 is a symmetric algorithm, which means the same secret is used to sign and verify tokens. For a standalone service, this is simple and practical.
Later, when the gateway and multiple services need to verify tokens, RS256 would be a better choice because the auth service can sign tokens using a private key and other services can verify them using a public key.
Step 4: Add Database Connection
Create the database file:
touch services/auth-service/app/core/database.pyAdd the SQLAlchemy setup:
from sqlalchemy import create_engine
from sqlalchemy.orm import sessionmaker
from sqlalchemy.ext.declarative import declarative_base
from app.core.config import settings
# Create a reusable database engine
engine=create_engine(url=settings.DATABASE_URL,pool_pre_ping=True)
# Session factory used for creating database sessions per request
SessionLocal=sessionmaker(autocommit=False,autoflush=False,bind=engine)
# Base class used by SQLAlchemy models
Base=declarative_base()
defget_db():
"""
    FastAPI dependency for DB session.
    Why yield?
    - Before yield: session opens
    - After request completes: session closes in finally block
    """
db=SessionLocal()
try:
yielddb
finally:
db.close()
The get_db() function is a FastAPI dependency.
It creates a database session for each request and closes it after the request is completed. The yield is important because it allows cleanup logic to run after the request finishes.
Without closing sessions properly, a long-running backend can suffer from database connection leaks.
Step 5: Create the User Model
Now create the database model folder:
mkdir-p services/auth-service/app/db
touch services/auth-service/app/db/__init__.py
touch services/auth-service/app/db/user_model.py
Add the user model:
from sqlalchemy import Column,UUID,Boolean,String,DateTime
from sqlalchemy import func
from app.core.database importBase
import uuid
classDBUser(Base):
__tablename__="users"
# UUID primary key for unique user identity
id=Column(UUID(as_uuid=True),primary_key=True,index=True,default=uuid.uuid4)
# Basic profile fields
email=Column(String,unique=True,index=True)
first_name=Column(String,nullable=True)
last_name=Column(String,nullable=True)
image=Column(String,nullable=True)
# Account status related flags
is_active=Column(Boolean,default=True)
email_verified=Column(Boolean,default=False)
# Auto creation timestamp
created_at=Column(DateTime(timezone=True),server_default=func.now(),nullable=False)p
This model stores basic user information received from Google login.
The email field is unique because one email should map to one account. The image field stores the Google profile image. The email_verified field stores whether Google has verified the user’s email.
Step 6: Add Pydantic Schemas
Create the schemas folder:
mkdir-p services/auth-service/app/schemas
touch services/auth-service/app/schemas/__init__.py
touch services/auth-service/app/schemas/auth_schemas.py
Add the request and response schemas:
from pydantic import BaseModel,Field
classGoogleLoginRequest(BaseModel):
# Google ID token received from frontend
    token:str=Field(...,description="Google id token")
    # Optional Google access token
    access_token:str|None=Field(None,description="Google Access Token (optional)")
classUserResponse(BaseModel):
  id:str
  name:str
  email:str
  picture:str|None
  emailVerified:str
  classConfig:
  # Allows response models to read values from ORM/data objects
  from_attributes=True
classTokenResponse(BaseModel):
  user:UserResponse
  access:str
  refresh:str
classTokenRefreshRequest(BaseModel):
  refresh:str
classTokenRefreshResponse(BaseModel):
  access:str
Schemas define the API contract.
GoogleLoginRequest accepts the Google ID token from the frontend.
TokenResponse returns user data, access token, and refresh token.
TokenRefreshRequest accepts a refresh token and returns a new access token.
The from_attributes = True setting helps Pydantic read values from ORM-style objects.
Step 7: Add JWT and Google Token Verification
Create the security file:
touch services/auth-service/app/core/security.pyAdd the security logic:
from datetime import timedelta,timezone,datetime
# jose library is used for JWT operations
# jwt provides encode/decode functions
# JWTError handles token validation errors
fromjoseimportJWTError,jwt
fromapp.core.configimportsettings
# Official Google token verification utilities
fromgoogle.oauth2importid_token
fromgoogle.auth.transport.requestsimport (
RequestasGoogleAuthRequest,
)# Alias used to avoid naming conflict
# Reusable request object for Google certificate validation
google_request=GoogleAuthRequest()
defcreate_access_token(data:dict):
"""
    Creates a short-lived access token.
    """
to_encode=data.copy()
expire=datetime.now((timezone.utc))+timedelta(
minutes=settings.ACCESS_TOKEN_EXPIRE_MINUTES
    )
expire_timestamp=int(expire.timestamp())
# Current project uses custom `expire` key for access token expiry
to_encode.update({"expire":expire_timestamp,"type":"access"})
encoded_jwt=jwt.encode(
to_encode,settings.JWT_SECRET_KEY,algorithm=settings.JWT_ALGORITHM
    )
returnencoded_jwt
defcreate_refresh_token(data:dict):
"""
    Creates a long-lived refresh token.
    """
to_encode=data.copy()
expire=datetime.now(timezone.utc)+timedelta(
days=settings.REFRESH_TOKEN_EXPIRE_DAYS
    )
expire_timestamp=int(expire.timestamp())
# `exp` is the standard JWT expiry claim
to_encode.update({"exp":expire_timestamp,"type":"refresh"})
encoded_jwt=jwt.encode(
to_encode,
settings.JWT_SECRET_KEY,
algorithm=settings.JWT_ALGORITHM,
    )
returnencoded_jwt
defdecode_token(token:str):
"""
    Decodes a JWT token and returns None for invalid tokens.
    """
try:
payload=jwt.decode(
token=token,key=settings.JWT_SECRET_KEY,algorithms=settings.JWT_ALGORITHM
        )
returnpayload
exceptJWTError:
returnNone
defverify_refresh_token(refresh_token:str):
"""
    Verifies whether the refresh token is valid.
    """
payload=decode_token(refresh_token)
ifpayloadandpayload.get("type")=="refresh":
returnpayload
returnNone
defdecode_google_id_token_secure(id_token_str:str) ->dict:
"""
    Securely verifies Google ID token:
    signature, audience, expiry, and issuer.
    """
try:
id_info=id_token.verify_oauth2_token(
id_token_str,
google_request,
settings.GOOGLE_CLIENT_ID,
clock_skew_in_seconds=30,
        )
ifid_info["iss"]notin ["accounts.google.com","<https://accounts.google.com>"]:
raiseValueError("Wrong issuer.")
returnid_info
exceptValueErrorase:
raiseValueError(f"Google ID Token verification failed:{e}")
exceptExceptionase:
raiseValueError(f"Error during Google cert fetch:{e}")
This file handles four major responsibilities:
- Creating access tokens
- Creating refresh tokens
- Decoding JWT tokens
- Verifying Google ID tokens
The access token is short-lived. The refresh token is long-lived.
Each token also contains a type field. This is useful because the refresh endpoint should only accept refresh tokens, not access tokens.
For Google login, we use the official Google token verification utility. It validates the token signature, audience, expiry, and issuer.
Step 8: Add Auth Routes
Create the API route folder:
mkdir-p services/auth-service/app/api/v1
touch services/auth-service/app/api/__init__.py
touch services/auth-service/app/api/v1/__init__.py
touch services/auth-service/app/api/v1/routes.py
Add the auth routes:
from fastapi importAPIRouter,HTTPException,status,Depends
fromsqlalchemy.ormimportSession
import logging
fromapp.core.database import get_db
fromapp.core.security import (
decode_google_id_token_secure,
verify_refresh_token,
create_access_token,
create_refresh_token,
)
from app.db.user_model import DBUser
from app.schemas.auth_schemas import (
UserResponse,
TokenResponse,
GoogleLoginRequest,
TokenRefreshRequest,
TokenRefreshResponse,
)
router=APIRouter()
logger=logging.getLogger(__name__)
defget_or_create_user(
email:str,
first_name:str|None,
last_name:str|None,
image_url:str|None,
db:Session,
email_verified:str,) ->DBUser:
"""
    Looks up user by email. Creates a new user if not found.
    """
dbuser=db.query(DBUser).filter(DBUser.email==email).first()
ifdbuser:
returndbuser
else:
new_user=DBUser(
email=email,first_name=first_name,last_name=last_name,image=image_url
        )
db.add(new_user)
db.commit()
db.refresh(new_user)
returnnew_user
@router.post("/auth/google/",response_model=TokenResponse)
asyncdefgoogle_login(request:GoogleLoginRequest,db:Session=Depends(get_db)):
"""
    Verifies Google ID token, creates or fetches user, and returns access and refresh tokens.
    """
try:
google_payload=decode_google_id_token_secure(request.token)
email=google_payload.get("email")
first_name=google_payload.get("first_name")
last_name=google_payload.get("last_name")
picture=google_payload.get("picture")
full_name=google_payload.get("name")
email_verified=google_payload.get("email_verified")
ifnotemail:
raiseHTTPException(
status_code=status.HTTP_400_BAD_REQUEST,
detail="Invalid Google ID Token (missing email)",
            )
dbuser=get_or_create_user(
email=email,
first_name=first_name,
last_name=last_name,
image_url=picture,
db=db,
email_verified=email_verified,
        )
token_data= {"user_id":str(dbuser.id),"email":dbuser.email}
access_token=create_access_token(token_data)
refresh_token=create_refresh_token(token_data)
display_name=full_nameorf"{dbuser.first_name}{dbuser.last_name}"
user_response=UserResponse(
id=str(dbuser.id),
email=dbuser.email,
name=display_name,
picture=dbuser.image,
emailVerified=str(dbuser.email_verified),
        )
returnTokenResponse(
user=user_response,access=access_token,refresh=refresh_token
        )
exceptValueErrorase:
logger.error(f"Google ID Token Verification Error:{e}")
raiseHTTPException(
status_code=status.HTTP_401_UNAUTHORIZED,
detail=f"Authentication Failed:{e}",
        )
exceptExceptionase:
logger.error(f"internal Server Error During Google Login:{e} ")
raiseHTTPException(
status_code=status.HTTP_500_INTERNAL_SERVER_ERROR,
detail="An UnExpected Error Occur",
        )
@router.post("/auth/token/refresh/",response_model=TokenRefreshResponse)
asyncdeftoken_refresh(request:TokenRefreshRequest):
"""
    Returns a new access token if refresh token is valid.
    """
payload=verify_refresh_token(request.refresh)
ifnotpayload:
raiseHTTPException(
status_code=status.HTTP_401_UNAUTHORIZED,detail="Invalid Or Expired Token"
        )
token_data= {"user_id":payload["user_id"],"email":payload["email"]}
new_accessToken=create_access_token(token_data)
returnTokenRefreshResponse(access=new_accessToken)
The get_or_create_user() function checks whether a user already exists by email.
If the user exists, it returns that user.
If not, it creates a new user.
The Google login endpoint follows this flow:
Frontend sends Google ID token
        ↓
Backend verifies Google token
        ↓
Backend extracts user email and profile info
        ↓
Backend creates or fetches user
        ↓
Backend creates access and refresh tokens
        ↓
Backend returns user and tokens
The refresh token endpoint accepts a refresh token and returns a new access token if the token is valid.
Step 9: Update main.py
Now update main.py with router and CORS support.
from fastapi import FastAPI
from app.core.database import engine,Base
from app.db.user_model import DBUser
from app.api.v1 import routes
from fastapi.middleware.cors import CORSMiddleware
from contextlib import asynccontextmanager
@asynccontextmanager
asyncdeflifespan(app:FastAPI):
"""
    App lifecycle manager.
Why yield?
    - Before yield: startup logic runs
    - After yield: shutdown logic can run
    """
# Create tables on startup
Base.metadata.create_all(bind=engine)
yield
# Future shutdown cleanup can be added here
app=FastAPI(
title="Auth Microservice",
version="1.0.0",
description="Handles user authentication, Google OAuth, and JWT management.",
)
origins= [
"<http://localhost:3000>",
"<http://gateway:8000>",
]
app.include_router(routes.router,prefix="/api/v1")
app.add_middleware(
CORSMiddleware,
allow_origins=origins,
allow_credentials=True,
allow_methods=["*"],
allow_headers=["*"],
)
@app.get("/")
defindex():
return {"message":"auth service is running"}
This file now does three main things:
- Creates the FastAPI app
- Includes the auth routes with
/api/v1 - Adds CORS support for frontend and gateway origins
There is also a lifespan function defined for startup logic. In this exact version, the function is defined but not passed into the FastAPI() app instance. So if the table creation does not run automatically, that is the reason.
In a production setup, relying on migrations is better than relying on create_all. Alembic will be added in the next part.
Step 10: Run the Auth Service Standalone
Before Docker, run the service directly on the local machine.
Go to the auth service folder:
cd /Users/sagar/projects/creatorcopilot/code-creatorcopilot/services/auth-serviceCreate and activate a virtual environment:
python3-m venv .venv
source .venv/bin/activate
Install dependencies:
pip install--upgrade pip
pip install-r requirements.txt
Create the .env file:
cp .env.sample .envFor standalone mode, the .env should look like this:
GOOGLE_CLIENT_ID=your_google_client_id_from_google_cloud_console
JWT_SECRET_KEY=your_local_dev_secret_key
DB_USER=postgres
DB_PASSWORD=your_postgres_password
DB_HOST=localhost
DB_PORT=5432
DB_NAME=fastapi_auth_db
DATABASE_URL=postgresql://postgres:your_postgres_password@localhost:5432/fastapi_auth_db
For standalone execution, DB_HOST=localhost because the FastAPI service and PostgreSQL are running on the local machine.
In Docker mode, this will change. The database host will not be localhost; it will be the Docker Compose service name.
Local PostgreSQL Requirement
Before running the service, PostgreSQL should be running locally.
You need:
PostgreSQL running on localhost
Database name: fastapi_auth_db
User: postgres or your custom DB user
Password: your local PostgreSQL password
Port: 5432
Create the database if it does not exist:
createdb fastapi_auth_dbOr using psql:
psql-U postgresThen:
CREATE DATABASE fastapi_auth_db;If the database does not exist, SQLAlchemy will not be able to connect.
Run with Uvicorn
Start the service:
uvicorn app.main:app--reload--host127.0.0.1--port8001This command runs the app object from app/main.py.
-reloadis useful during development because the server restarts automatically when the code changes.
The auth service runs on port 8001, while the gateway can use port 8000.
Test the Root Endpoint
Run:
curl <http://127.0.0.1:8001/>Expected response:
{
  "message":"auth service is running"
}
If this response appears, the basic auth service is running successfully.
Test the Refresh Endpoint Structure
You can also test the refresh endpoint structure:
curl-X POST <http://127.0.0.1:8001/api/v1/auth/token/refresh/> \\
-H"Content-Type: application/json" \\
-d'{"refresh":"your_refresh_token_here"}'
This endpoint will only work with a valid refresh token.
If an invalid token is sent, the expected response is unauthorized. That is correct behavior.
Frontend Integration Flow
Since the frontend Google login is already working using Auth.js, the next integration step is to send the Google ID token from the frontend to the backend auth service.
The request will go to:
POST /api/v1/auth/google/Request body:
{
  "token":"google_id_token_here",
  "access_token":"optional_google_access_token_here"
}
Expected response:
{
  "user": {
    "id":"user-id",
    "name":"User Name",
    "email":"user@example.com",
    "picture":"profile-image-url",
    "emailVerified":"True"
  },
  "access":"backend_access_token",
  "refresh":"backend_refresh_token"
}
The frontend signs in with Google, receives the Google token, sends it to the auth service, and the auth service returns its own backend tokens.
🔥 Found this blog post helpful? 🔥
If you enjoyed this article and found it valuable, please show your support by clapping 👏 and subscribing to my blog for more in-depth insights on web development and Next.js!
Subscribe here: click me
🚀 Follow me on:
- 🌐 Website: sagarsangwan.dev
- 🐦 Twitter/X: @sagar sangwan
- 🔗 LinkedIn: Sagar Sangwan
- 📸 Instagram: @codingbysagar
- ▶️YouTube: @codingbysagar
Your encouragement helps me continue creating high-quality content that can assist you on your development journey. 🚀
메타데이터
- post_id
- e4187100bb83
- slug
- building-a-login-system-with-fastapi-google-oauth-and-jwt-e4187100bb83
- url
- https://blog.devgenius.io/building-a-login-system-with-fastapi-google-oauth-and-jwt-e4187100bb83
- canonical_url
- https://blog.devgenius.io/building-a-login-system-with-fastapi-google-oauth-and-jwt-e4187100bb83
- author_url
- https://medium.com/@sagarsangwan
- status
- ok
- fetched_at
- 2026-06-10 21:21:38