WC’26 — Australia’s Low Block Masterclass vs. Türkiye (2–0)
Australia’s 2–0 win over Türkiye was built on a clear defensive plan. They protected the middle of the pitch, stayed compact around their…
WC’26 — Australia’s Low Block Masterclass vs. Türkiye (2–0)
Australia’s 2–0 win over Türkiye was built on a clear defensive plan. They protected the middle of the pitch, stayed compact around their own box, and waited for moments to break forward. Türkiye had more of the ball and tried different ways to open the block, but Australia kept forcing them into wide areas and low-quality crossing situations. For soccer coaches, the main lesson is simple: a low block can be effective when the distances between players are tight, the roles are clear, and the team is ready to counter when the ball is won.
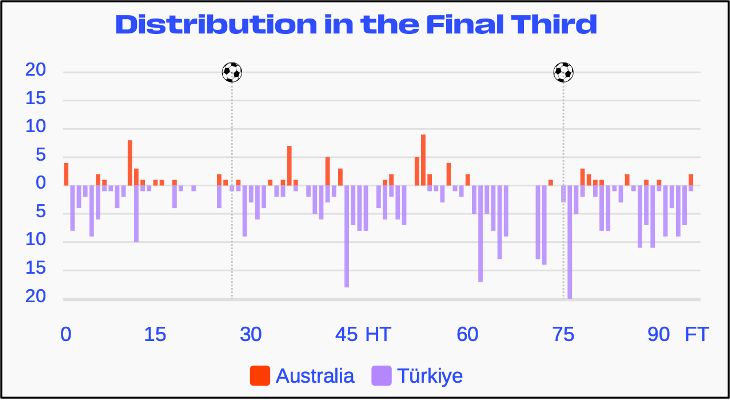
Figure 1: Türkiye Controlled the Attacking Tempo, but Failed to Convert (Source: FIFA).
1. The Australian Structural Blueprint
Australia’s main out-of-possession idea was to sit in a compact 5–4–1 low block. The back five protected the box, the midfield four screened the space in front, and the striker stayed as the first reference point for pressure (See Figure 2). The shape was not complicated, but it worked because the players kept their distances and understood when to shift. When Australia had a chance to move forward or adjust their defensive shape, the midfield line changed slightly:
- The two central midfielders stayed deeper and protected the central space.
- The wide midfielders tucked inside when needed, which made the shape look more like a 5–2–2–1.
This helped Australia close central passing lanes while still keeping enough numbers across the back line.
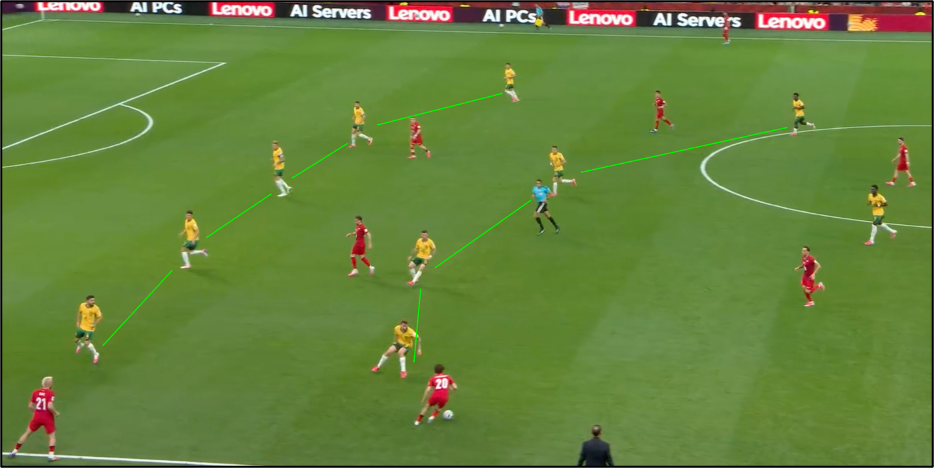
Figure 2: Australia’s structural flexibility, transitioning from a rigid 5–4–1 low block into a compact 5–2–2–1 shape as wide midfielders tuck inside to deny central progression.
2. Vertical Compactness vs. Lateral Overloads
Eliminating the Space Between the Lines
One of Australia’s biggest strengths was the short distance between their back line and midfield line (See Figure 3). They defended close to their own penalty area and did not leave much space for Türkiye to receive between the lines. Because Australia stayed goal-side of Türkiye’s midfielders, it was difficult for Türkiye to find a player who could turn and face goal in dangerous central areas.
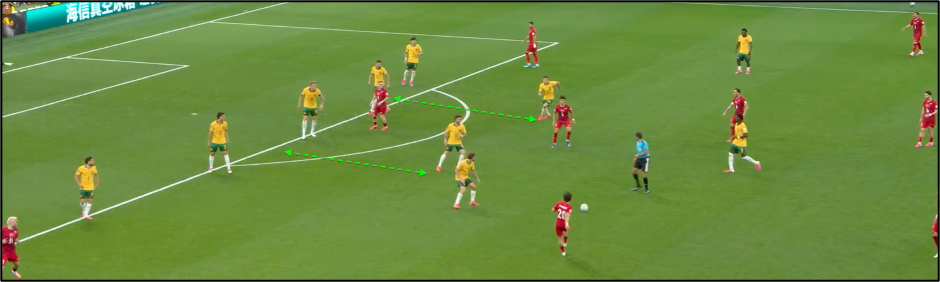
Figure 3: Australia’s elite vertical compactness at the edge of the box, showing the minimal distance between the backline and central midfielders, locking down the space between the lines.
Türkiye’s Left-to-Right Switches
Türkiye tried to move the ball quickly from one side to the other. The idea was to make Australia shift across the pitch and then attack before the block was fully set again. When Australia’s wide midfielder was late to recover, small shooting pockets appeared near the top of the box (See Figure 4). Arda Güler was the main player looking to use those moments, usually by stepping inside and shooting from distance.
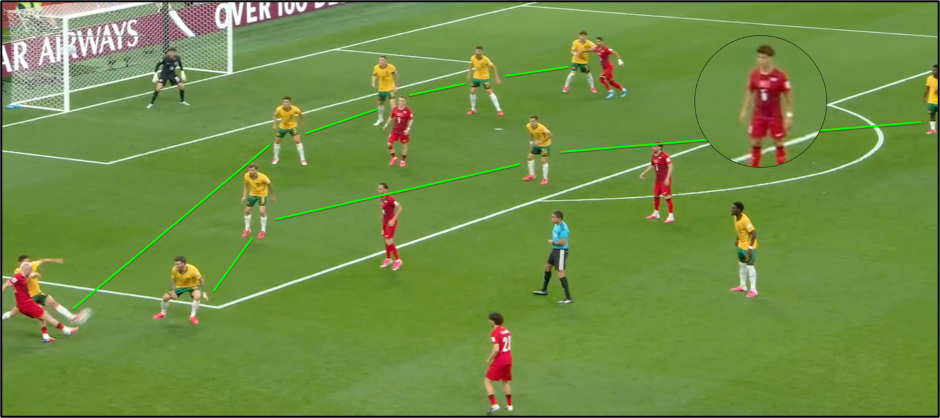
Figure 4: Türkiye’s rapid lateral ball movement unbalancing the block, exposing a temporary central shooting pocket for Arda Güler when Irankunda fails to shift in time but scores a few seconds later.
3. Funneling the Attack: Eliminating Deep Through Balls
Australia also protected the space behind their back line well. Their center-backs stayed close to Türkiye’s striker and were ready to follow runs when the striker tried to move across the line. This made it hard for Türkiye to play simple through balls into the striker’s path. Australia did not always need to win the ball straight away; often, just tracking the run was enough to remove the option (See Figure 5). As a result, Türkiye were often pushed into a predictable pattern:
- Central passes were blocked, so Türkiye had to play wide.
- Wide attacks led mostly to crosses rather than clear chances.
- Australia’s defenders were usually well-positioned to deal with those crosses.
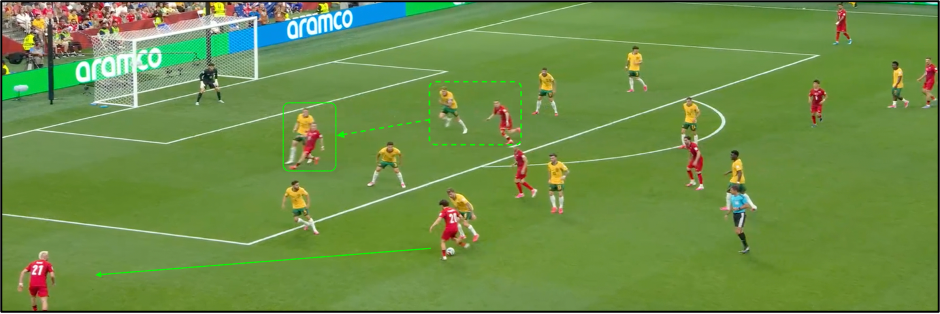
Figure 5: Türkiye’s striker attempt on receiving the ball behind the back five with a quick diagonal run was denied by immediate reaction from Australia’s CB.
This tactical frustration was clearly quantified by the team’s crossing statistics. Over the course of the match, Türkiye attempted 22 crosses, yet only one was successful, leaving the remaining 21 attempts to be intercepted or cleared by Australia’s well-organized defensive line (See Figure 6). This inability to penetrate the final third effectively is further illustrated by the concentration of these efforts, which were heavily forced into wide zones where Australia had established a defensive superiority, particularly in the channels leading into the penalty area.
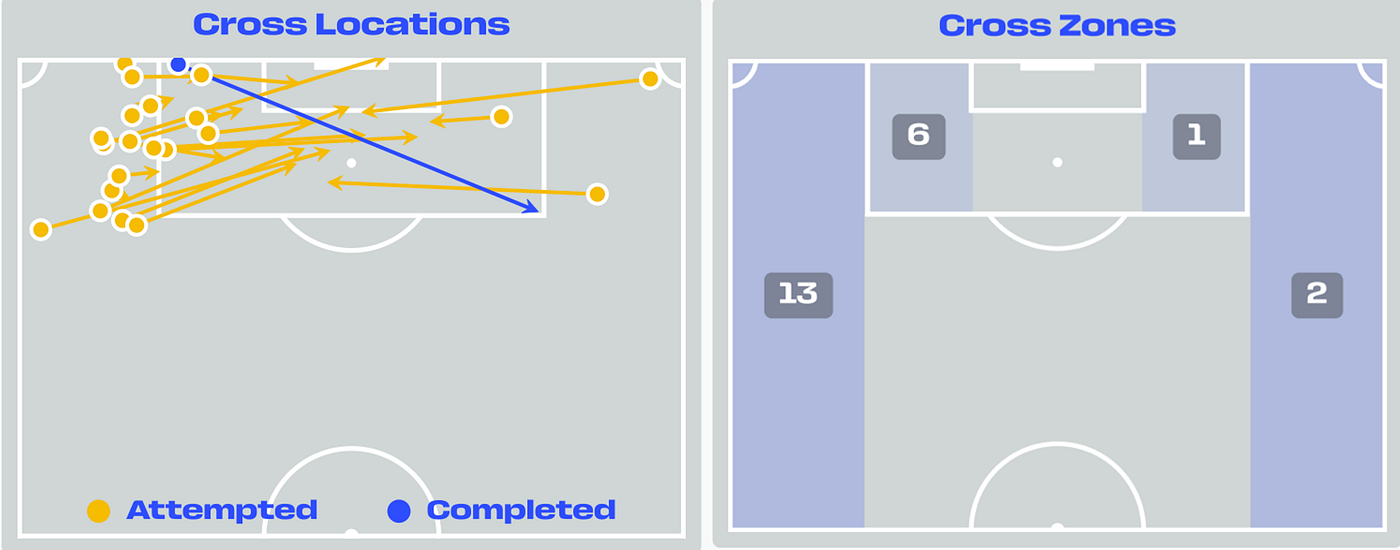
Figure 6: Cross analysis highlights the high volume of crosses attempted by Türkiye; despite 22 attempts, the positioning of the Australian defense resulted in only 1 successful completion (Source: FIFA).
4. Türkiye’s Strategic Adjustments & Final Desperation
Phase 1: Rapid Central Penetration
As the match went on, Türkiye tried to play faster through the middle. After moving the ball sideways, they looked for quick passes into the striker or attacking midfielders. Australia handled this by closing the space quickly (See Figure 7). The central midfielders stepped toward the ball carrier or passing lane, which slowed the attack and allowed the back line to stay organized.
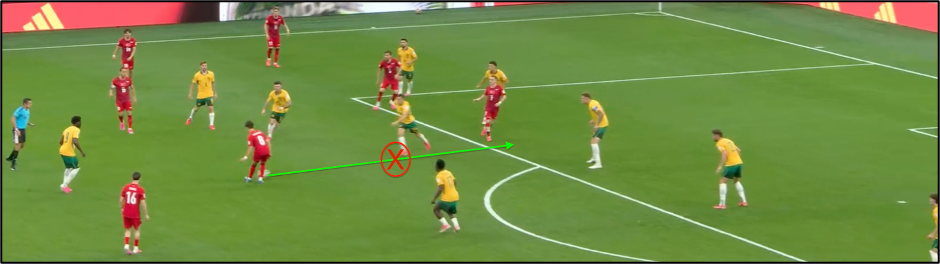
Figure 7: Türkiye’s attempt at rapid vertical penetration through the middle, immediately snuffed out by the rapid closing speed of Australia’s central defensive midfielders.
Phase 2: The Decoupling & Overlap Tactic (70' — 75')
After going behind, Türkiye tried to create more movement on the right side between the 70th and 75th minutes. The pattern was simple but useful (See Figure 8):
- The winger dribbled inside and played the ball into midfield.
- That inside movement pulled defenders with him and opened space outside.
- The right-back then ran into the wide space to receive and cross.
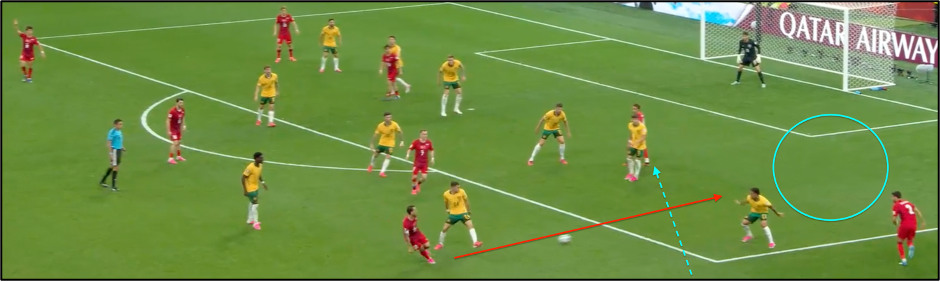
Figure 8: Türkiye’s attempt at rapid vertical penetration through the middle, immediately snuffed out by the rapid closing speed of Australia’s central defensive midfielders.
Türkiye used this idea three times in a short spell, with mixed results:
- Occasion 1: The right-back received the ball, dribbled forward and took a shot that was blocked by the goalkeeper.
- Occasion 2: The move ended with a central layoff and a long-range shot from Güler that was off target.
- Occasion 3: The midfielder played to the striker on the edge of the box, then he played to the penetrating winger on the same side and then received the ball back and took a shot that was blocked by the defenders.
Phase 3: Post-80th Minute Direct Aerial Assault
In the final ten minutes, Türkiye became more direct. Instead of trying to combine through midfield, they played longer balls into the box and looked for knockdowns. They won the first header on a couple of important occasions:
· The first sequence: A knockdown led to a shot on target, and Australia’s goalkeeper saved it (See Figure 9).
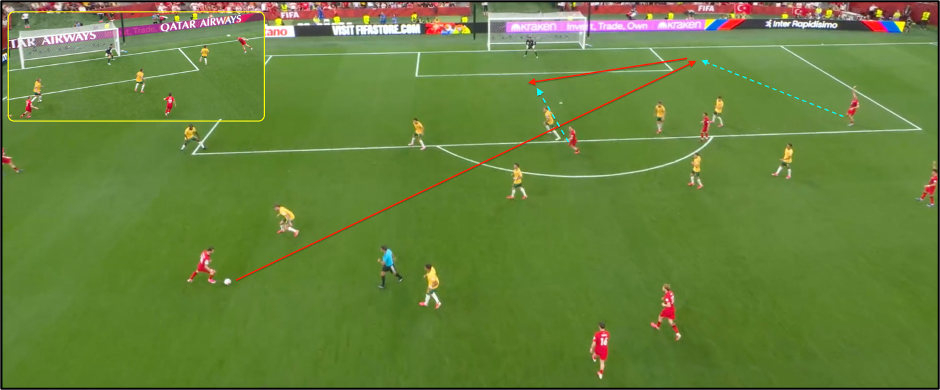
Figure 9: Türkiye’s late direct approach, winning a long-ball knockdown to unleash a dangerous third-man shot, denied by a crucial save from the Australian goalkeeper.
· The second sequence: Türkiye won the first contact again, but Australia recovered quickly and blocked the shot near goal (See Figure 10).
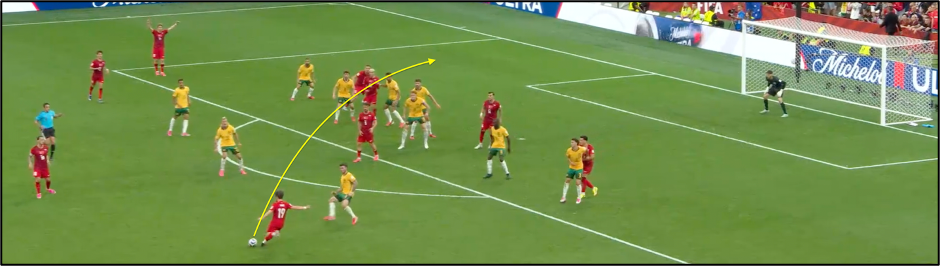
Figure 10: Türkiye’s second aerial knockdown inside the box, instantly swarmed and blocked by Australia’s deep defensive line right in front of goal.
5. Risk vs. Reward: How Australia Punished Türkiye (The Goals)
Australia did not only defend. They also chose moments to leave players higher up the pitch so they could counter when the ball was won.
Goal 1: The Irankunda Gamble (Counter-Attack)
Australia’s first goal came from this type of decision. Nestory Irankunda sometimes stayed higher instead of dropping all the way back into the low block (See Figure 4).
- The risk: This left more space on Australia’s side, especially if Türkiye switched play quickly.
- The reward: When Australia won the ball, Irankunda was already in a good starting position to attack Türkiye’s back line on the counter.
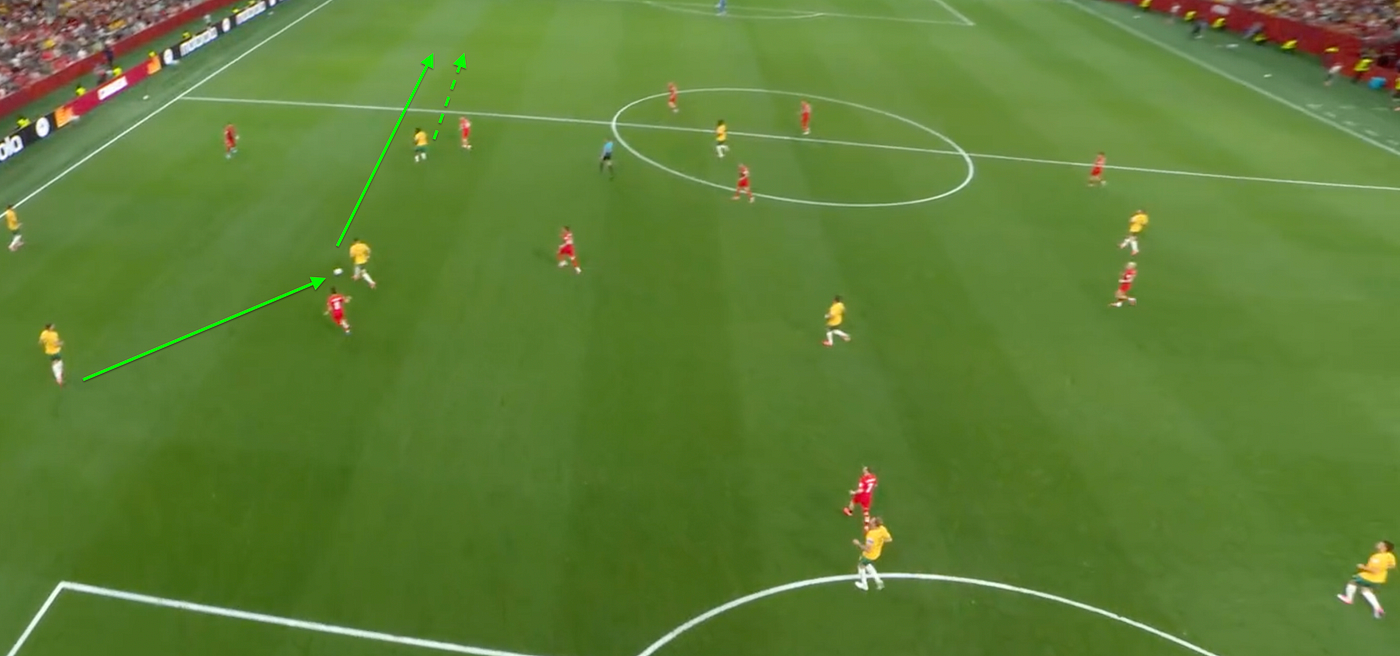
Figure 11: The transition from risk to reward. Utilizing the high positioning from Figure 4, Irankunda exploits Türkiye’s high defensive line on the counter-attack to open the scoring.
Goal 2: The Direct Goalkeeper Transition
The second goal came from a more direct action. Australia’s goalkeeper played long into midfield, and the team reacted well to the second ball. After the aerial duel, Australia picked up the loose ball quickly and found a midfielder free in front of Türkiye’s retreating back line. The finish made it 2–0 and showed the value of being ready for second balls after direct play.
Tactical Conclusion
Australia won because their defensive plan was clear and the players carried it out with good discipline. They stayed compact, protected the middle, tracked forward runs, and forced Türkiye into wide deliveries rather than central chances. They also understood when to take a small risk by leaving a counter-attacking player higher up the pitch. For soccer coaches, this match is a useful example of how a low block should work: keep the lines close, defend the most dangerous spaces first, and be ready to attack the moment possession is regained.
메타데이터
- post_id
- e4fd5cec77df
- slug
- wc26-australia-s-low-block-masterclass-vs-türkiye-2-0-e4fd5cec77df
- url
- https://medium.com/@amin.hass/wc26-australia-s-low-block-masterclass-vs-t%C3%BCrkiye-2-0-e4fd5cec77df
- canonical_url
- https://medium.com/@amin.hass/wc26-australia-s-low-block-masterclass-vs-t%C3%BCrkiye-2-0-e4fd5cec77df
- author_url
- https://medium.com/@amin.hass
- status
- ok
- fetched_at
- 2026-06-28 04:42:08